- Как запустить Chrome OS с флешки?
- 1. Загрузите последнюю версию Chromium OS
- 2. Распакуйте сжатый образ
- 3. Отформатируйте USB-накопитель
- 4. Запустите Etcher и установите образ
- 5. Перезагрузите компьютер и введите параметры загрузки
- 6. Загрузитесь в Chrome OS
- Включите ПК или ноутбук в Chrome OS
- How to Create a Bootable USB Thumb Drive of Chrome OS Flex on Linux
- Topic of Contents:
- Downloading Chrome OS Flex Installation Image
- Extracting Chrome OS Flex Installer Archive
- Finding the Device ID of the USB Thumb Drive to be Flashed to Chrome OS Flex
- Flashing Chrome OS Flex Installation Image to USB Thumb Drive
- Ejecting the USB Thumb Drive Safely
- Conclusion
- References:
- About the author
- Shahriar Shovon
- You Can Now Make Bootable ChromeOS Flex USB on Linux
- Joey Sneddon
Как запустить Chrome OS с флешки?
Вам не нужно покупать Chromebook, чтобы пользоваться функциями настольной операционной системы (ОС) Google. На самом деле все, что вам нужно, это рабочий компьютер и USB-накопитель.
Google официально не предлагает способ опробовать его, но разработчики придумали, как вам поэкспериментировать с ОС с открытым исходным кодом. Этот метод работает независимо от того, используете ли вы Windows, macOS или Linux. И нет, вы не будете перезаписывать вашу существующую ОС.
Мы создадим загрузочный USB-диск, загруженный с образом диска Chromium OS. Но вам нужно несколько вещей, прежде чем начать.
- Рабочий компьютер с портом USB
- USB-накопитель емкостью не менее 4 ГБ
- Скачать: 7-Zip для Windows (бесплатно) | Кека для macOS (бесплатно) | p7zip для Linux (бесплатно)
- Скачать: Etcher для Windows | macOS | Linux (бесплатно)
Примечание. USB-накопитель будет полностью отформатирован в процессе установки. Если у вас есть ценные данные на диске, пожалуйста, сохраните их в другом месте.
1. Загрузите последнюю версию Chromium OS
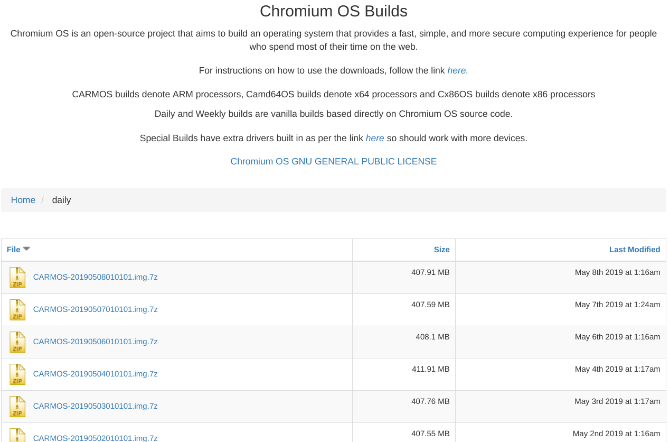
У Google нет официальной сборки Chromium OS, которую вы можете скачать. Лучший альтернативный источник — Arnold The Bat.
2. Распакуйте сжатый образ
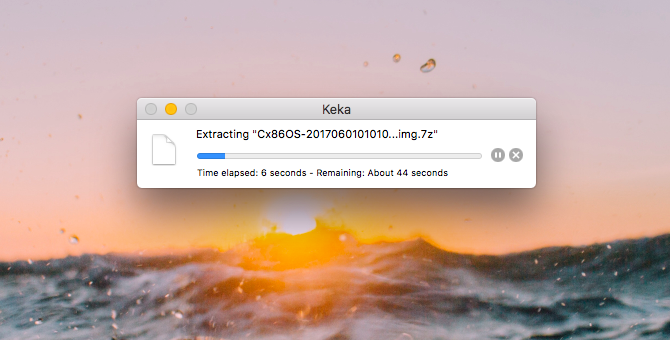
Теперь у вас есть 7-Zip файл на вашем жестком диске. Распакуйте этот файл с помощью одного из приложений, упомянутых выше.
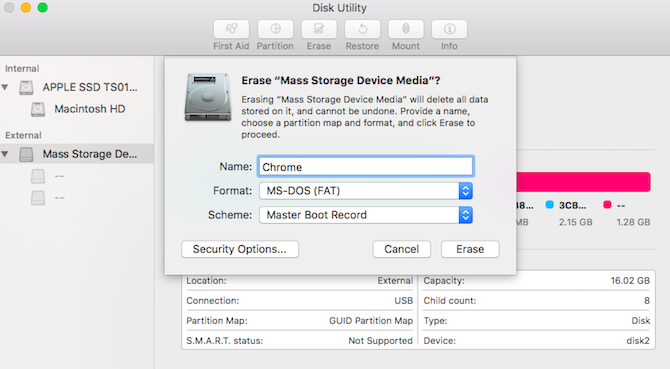
3. Отформатируйте USB-накопитель
Подключите USB-накопитель к порту и отформатируйте его как FAT32 . Процесс самый простой в Windows, но MacOS и Linux тоже не сложны.
Для пользователей MacOS встроенная Дисковая утилита может отформатировать ее как FAT32. Если вместо этого вы видите надпись «MS-DOS FAT», не волнуйтесь, это то же самое.
Если методы Windows или Mac сбивают вас с толку или ошеломляют, вы также можете использовать официальное приложение SD Card Formatter.
Скачать: SD Card Formatter для Windows | macOS (бесплатно)
Для пользователей Linux мы рекомендуем использовать GParted для быстрого форматирования.
Скачать: GParted для Linux (бесплатно)
Для дополнительного комфорта, когда вас попросят назвать новый диск, дайте ему имя «Chrome».
4. Запустите Etcher и установите образ
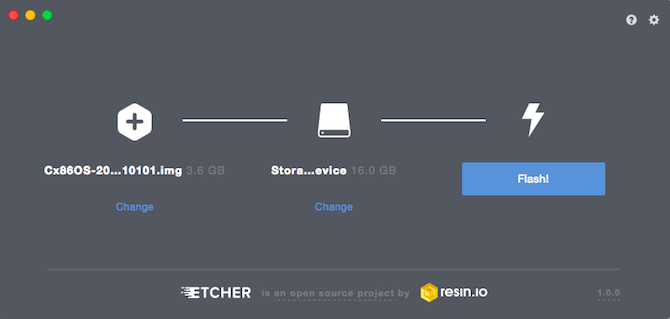
К настоящему времени у вас должен быть полностью отформатированный USB-накопитель с именем «Chrome», подключенный к одному порту компьютера (как показано на третьем шаге). У вас также будет распакованный файл образа последней версии Chromium OS (как показано в шагах 1 и 2). И на вашем компьютере установлен Etcher. Запустите Etcher.
- Нажмите «Выбрать изображение» и найдите, где находится файл образа Chromium OS. Добавьте это в Etcher.
- Нажмите «Выбрать диск» и выберите созданный вами USB-накопитель Chrome.
- Нажмите Flash, чтобы начать процесс установки образа и проверки правильности установки.
Etcher проверяет процесс записи, т.е. после создания образа на USB-накопителе он проверяет, все ли правильно. Убедитесь, что вы подождали, пока он говорит 100%. Когда Etcher завершит работу, это будет загрузочный USB-накопитель с ОС Chromium.
5. Перезагрузите компьютер и введите параметры загрузки
«Загрузка» — это процесс выбора ОС. Каждый компьютер позволяет выбрать, с какого диска будет загружаться ОС, будь то жесткий диск, USB-накопитель или даже DVD-дисковод. Вам нужно войти в режим выбора загрузчика и выбрать только что созданный USB-накопитель.
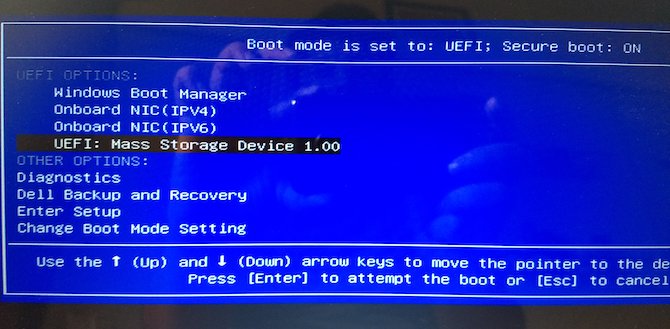
Для ПК с Windows или Linux: разные компьютеры имеют разные настройки BIOS. Обычно в меню Boot Options есть сочетание клавиш F5, F8 или F12.
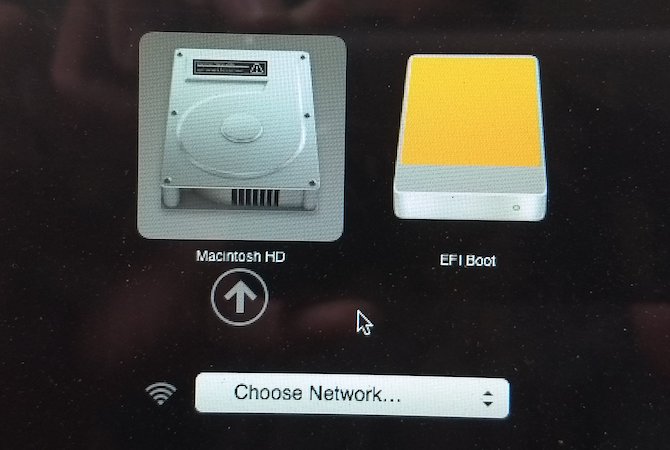
Для Mac: как только Mac выключится и перезагрузится, нажмите и удерживайте клавишу параметров. Вы будете делать это, пока экран черный, но ничего страшного. Держите его, пока не увидите меню загрузки, которое позволяет выбирать между жестким диском Macintosh или подключенным USB-накопителем (обычно обозначается как «EFI»).
6. Загрузитесь в Chrome OS
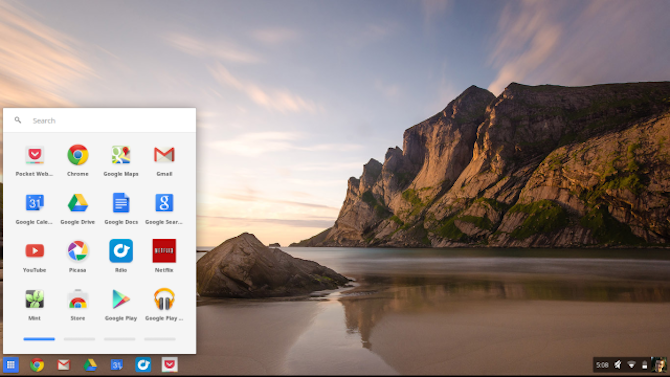
Выберите USB-накопитель в меню загрузки, нажмите Enter, и компьютер загрузится с накопителя. Теперь вы испытываете всю славу Chrome OS, не затрагивая ваш основной жесткий диск и ОС.
Вам придется настроить ОС Chrome при первом использовании, в идеале с существующей учетной записью Google. Не волнуйтесь, эта настройка только при первой загрузке. Всякий раз, когда вы запустите его в будущем, он сразу перейдет к экрану входа в систему.
Включите ПК или ноутбук в Chrome OS
Теперь, когда у вас есть Chrome OS, работающая на USB-накопителе, посмотрите на это. Вы будете удивлены, насколько это похоже на полноценные настольные операционные системы, такие как Windows, macOS и Linux. Вы даже можете установить несколько программ для Linux и Windows.
Насколько публикация полезна?
Нажмите на звезду, чтобы оценить!
Средняя оценка / 5. Количество оценок:
Оценок пока нет. Поставьте оценку первым.
How to Create a Bootable USB Thumb Drive of Chrome OS Flex on Linux
![]()
Chrome OS Flex is a version of Chrome OS which is developed for older desktops and laptops. Chrome OS Flex is a cloud-based modern operating system that runs well on older devices. It is also very responsive on older devices. It replaces the widely known CloudReady operating system from Neverware.
In this article, we will show you how to create a bootable USB thumb drive of Chrome OS Flex on Linux so that you can try and install Chrome OS Flex on your computer.
Topic of Contents:
Downloading Chrome OS Flex Installation Image
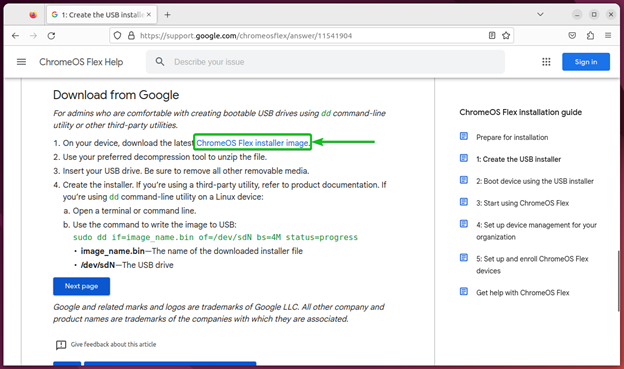
To download the Chrome OS Flex installer image, open a web browser app and visit the link https://support.google.com/chromeosflex/answer/11541904.
Once the page loads, scroll down to the “Download from Google” section and click on “ChromeOS Flex installer image” as marked in the following screenshot:
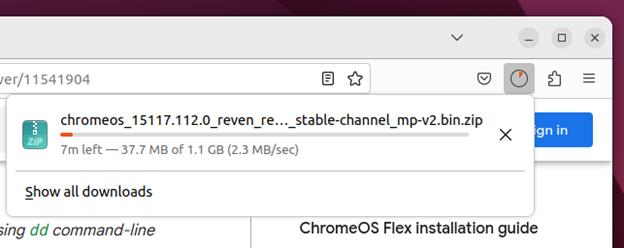
Your web browser should start downloading the Chrome OS Flex installer image archive. It takes a while to complete.
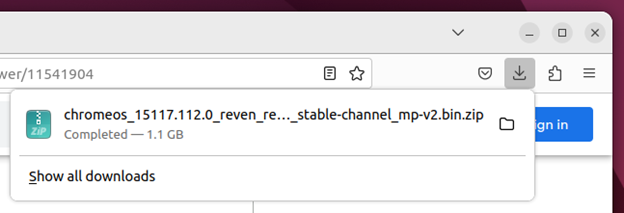
At this point, the Chrome OS Flex installer image archive should be downloaded.
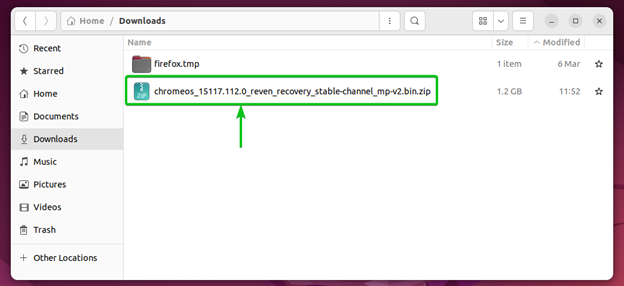
Once downloaded, the Chrome OS Flex installer image archive should be in the ~/Downloads directory of your computer. This directory is usually the default download location of Linux.
Extracting Chrome OS Flex Installer Archive
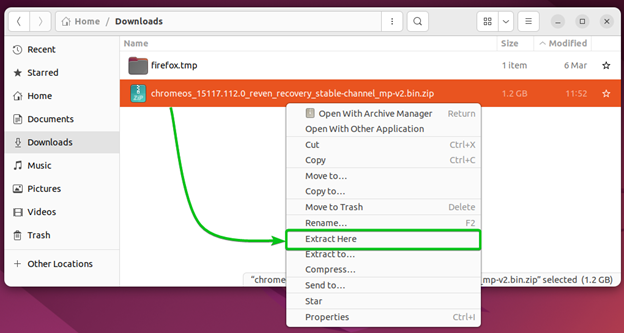
To extract the Chrome OS Flex installer archive, right-click (RMB) on it and click on “Extract Here”.
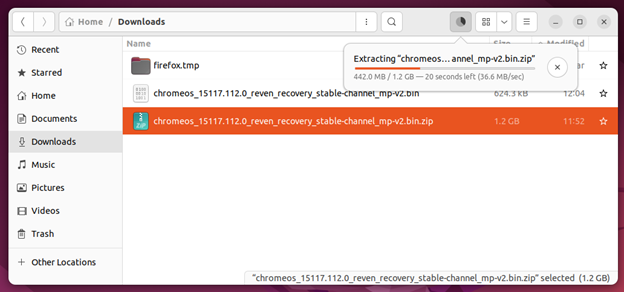
The Chrome OS Flex installer archive is being extracted. It takes a while to complete.
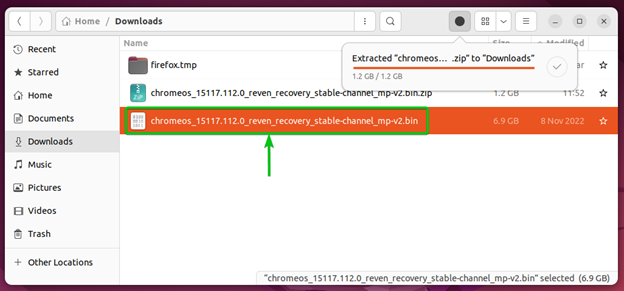
Once the Chrome OS Flex installer archive is extracted, you will find a new “.bin” file in the ~/Downloads directory as marked in the following screenshot. This is the file that you need to flash into your USB thumb drive to boot the Chrome OS Flex from it.
Finding the Device ID of the USB Thumb Drive to be Flashed to Chrome OS Flex
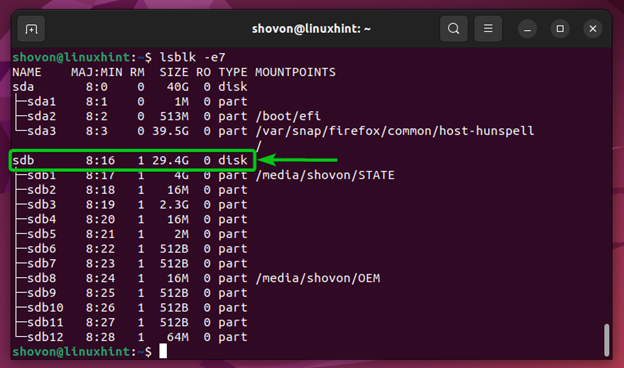
To find the device ID of the USB thumb drive that you want to flash with the Chrome OS Flex installer image, run the following command (from a Terminal app) once before inserting the USB thumb drive into your computer and once after inserting the USB thumb drive into your computer and compare the results:
In our case, the device ID of the USB thumb drive is “sdb”. Remember the device ID since you will need it later. Also, your device ID may not be “sdb”. It could be “sdc”, “sdd”, “sde”, or something else. Make sure to replace “sdb” with your device ID from now on.
Flashing Chrome OS Flex Installation Image to USB Thumb Drive
First, open a Terminal app and navigate to the ~/Downloads directory as follows:

The Chrome OS Flex installer image that you extracted should be in the ~/Downloads directory as marked in the following screenshot:

To flash the Chrome OS Flex installer image into your USB thumb drive, run the following command:
$ sudo dd if =chromeos_15117.112.0_reven_recovery_stable-channel_mp-v2.bin of = / dev / sdb bs =4M status =progress
NOTE: Make sure to replace /dev/sdb with the device ID of your USB thumb drive.

The Chrome OS Flex installer image is flashed into your USB thumb drive. It takes a while to complete.

At this point, the Chrome OS Flex installer image should be flashed into your USB thumb drive.

Ejecting the USB Thumb Drive Safely
Now that the Chrome OS Flex installer image is flashed into your USB thumb drive, you can run the following command to safely remove the USB thumb drive from your computer:
NOTE: Make sure to replace /dev/sdb with the device ID of your USB thumb drive.

Now, you can use the USB thumb drive to try and install Chrome OS Flex on your desktop/laptop computers.
Conclusion
We showed you how to download the Chrome OS Flex installer image on Linux. We also showed you how to flash the Chrome OS Flex installer image into a USB thumb drive so that you can use it to try and install Chrome OS Flex on your computer.
References:
About the author
Shahriar Shovon
Freelancer & Linux System Administrator. Also loves Web API development with Node.js and JavaScript. I was born in Bangladesh. I am currently studying Electronics and Communication Engineering at Khulna University of Engineering & Technology (KUET), one of the demanding public engineering universities of Bangladesh.
You Can Now Make Bootable ChromeOS Flex USB on Linux
As noted by our friends at Neowin, until recently Google only made it possible to create a bootable Chrome OS Flex USB using the Chromebook Recovery Utility, an app that only officially supports Windows, macOS, and ChromeOS.
Thankfully, this is no longer the case.
Google now provide a direct download of the ChromeOS Flex installer image. This image can be written/flashed/burned to a USB flash drive on Linux using a GUI app like Balena Etcher or, for those more comfortable at the command line, the trusty dd tool.
The image download comes as a ZIP. This needs to be unpacked to get the BIN file inside. The extracted BIN is around 6 GB in size so any USB you plan to flash it to must be >8 GB in size.
The process from there is simple.
- Download the ChromeOS Flex image from here
- Extract the ZIP download to get a BIN file
- Insert a USB of 8GB or greater in your computer
- Open Balenda Etcher
- Select the Chrome OS Flex BIN file
- Select your USB (double check)
- Hit write/flash
sudo dd if=flex.bin of=/dev/sdN bs=4M status=progressWhere flex.bin is the location of the downloaded installer file, and /dev/sdN is the USB drive identifier (you can find this out using the Disks Utility app, it’s often sdb – omit the number). The bs value improves the flash speed, while status keeps you informed as it writes.

Flashing Chrome OS Flex takes a bit of time, especially if you’re writing to an older (and slower) USB 2.0 drive. If running the dd command do be patient – it can look like the process has stalled or stopped at some points but it hasn’t, you just need to be patient.
Once done, use the USB to boot Chrome OS Flex on any PC or laptop with at least 4GB of RAM and a not-too-ancient CPU. The steps to boot from a USB vary by device, manufacturer, model, etc. See the Google Support page for pointers.

Once you’re booted into ChromeOS Flex you can try it as a live system as a guest before installing it.
Providing you are on a relatively modern device, ChromeOS Flex performs well. Due to the sheer variety of hardware out there the experience won’t be the same for everyone. Test it out thoroughly, check your webcam works, touchpad, wi-fi, bluetooth, etc before installing.
You can’t dual-boot Chrome OS Flex with any other operating system (including Linux). Also, if you choose to install ChromeOS Flex it will erase the ENTIRE primary SSD, eMMC, or HDD, etc — there’s no partition editor — backup important files before you continue.
Personally, I wasn’t willing to do go all-in with Flex, so I exited the guest session, shutdown my laptop, and removed the USB. I’m happy using “proper Linux”.
But ChromeOS Flex is a great way to repurpose unused laptops, turning them in to fairly a capable and safe “Chromebook” – ideal for less tech-inclined people in your life.
Home > How To > You Can Now Make Bootable ChromeOS Flex USB on Linux
Joey Sneddon
Joey Sneddon is a purveyor of puns and arbitrator of alliteration. Or at least, that’s what he says. When he’s not blogging about Ubuntu on omg! ubuntu! he’s collecting toys, feeding cats, and trying to master his Arch install…
- omg! linux! — covering the worlds of linux and open source
-
- About
- Privacy
- Commenting
- omg! ubuntu!