- Disk cloning
- Block-level cloning
- Using dd
- Using ddrescue
- File system cloning
- Using e2image
- Versatile cloning solutions
- See also
- Use dd to Clone a Disk
- dd command syntax
- Where
- Clone an entire disk
- Clone a partition from one disk to another
- About the author
- Karim Buzdar
- How to Clone a Partition or Hard drive in Linux
- How to Clone Linux Partition
- How to Clone Linux Hard Drive
- How to Backup MBR in Linux
Disk cloning
Disk cloning is the process of making an image of a partition or of an entire hard drive. This can be useful for copying the drive to other computers or for backup and recovery purposes.
- Moving to a drive with a smaller logical sector size (e.g. from 4096 bytes to 512 bytes) will require recreating the partition table since partition boundaries are specified in sector numbers.
- Moving to a drive with a larger logical sector size (e.g. from 512 bytes to 4096 bytes) may not be possible at all if a file system’s block size is less than target drive’s logical sector size or is not divisible by it.
Tip: Over time file systems get new features and the mkfs utilities change their defaults, but not all new features can be enabled without reformatting. So, when moving data to a new drive, instead of cloning the block devices or file systems, consider creating a new file system and only copy the files (and their attributes, ACLs, extended attributes, etc.) with e.g. rsync.
Block-level cloning
Using dd
Using ddrescue
If possible, data recovery from disks should be performed using their native interface: SATA or, for older drives, IDE. Results may vary while using USB adapters.
GNU ddrescue is a data recovery tool capable of ignoring read errors. ddrescue is not related to dd in any way except that both can be used for copying data from one device to another. The key difference is that ddrescue uses a sophisticated algorithm to copy data from failing drives causing them as little additional damage as possible. See the ddrescue manual for details.
To clone a faulty or dying drive, run ddrescue twice. For the first round, copy every block without read error and map the errors to rescue.map .
# ddrescue --force -n /dev/sdX /dev/sdY rescue.map
where X is the partition letter of the source and Y of the target block device.
For the second round, copy only the bad blocks and try 3 times to read from the source before giving up.
# ddrescue --force -d -r3 -n /dev/sdX /dev/sdY rescue.map
In some circumstances the disk controller or a USB adapter may lock, while attempting to read a particular sector. The -i option may be used to instruct ddrescue to start reading after that position.
Now you can check the file system for corruption and mount the new drive.
File system cloning
This article or section needs expansion.
Using e2image
e2image is a tool included in e2fsprogs for debugging purposes. It can be used to copy ext2, ext3, and ext4 partitions efficiently by only copying the used blocks. Note that this only works for ext2, ext3, and ext4 filesystems, and the unused blocks are not copied so this may not be a useful tool if one is hoping to recover deleted files.
To clone a partition from physical disk /dev/sda , partition 1, to physical disk /dev/sdb , partition 1 with e2image, run
# e2image -ra -p /dev/sda1 /dev/sdb1
Versatile cloning solutions
This article or section needs language, wiki syntax or style improvements. See Help:Style for reference.
Reason: This application list does not respect Template:App#Style and might be better as a table. (Discuss in Talk:Disk cloning)
These applications allow easy backup of entire filesystems and recovery in case of failure, usually in the form of a Live CD or USB drive. They contain complete system images from one or more specific points in time and are frequently used to record known good configurations. See Wikipedia:Comparison of disk cloning software for their comparison.
See also Synchronization and backup programs for other applications that can take full system snapshots, among other functionality.
- Clonezilla — A partition and disk imaging/cloning program which helps with system deployment, bare metal backup and recovery.
- Complete backup and recovery solution: able to image and restore entire drives including boot sector, bootloader, partition table. for different operating systems including Windows
- Supports BIOS and UEFI, MBR and GPT
- Supports most filesystems (ext2-3-4, reiserfs, reiser4, xfs, jfs, btrfs, f2fs, FAT12-16-32, NTFS, HFS+, UFS and others) and LVM2
- Free-space aware when using Partclone (default), Partimage (optional), ntfsclone (optional), otherwise falls back to dd for block-level copying (dm-crypt/LUKS containers, unsupported filesystems. )
- Supports multi-threaded compression with different formats (including zstd) and levels
- Supports encrypting the backup
- Multicasting server to restore to many machines at once
- Dedicated LiveCD available to boot from CD, USB drive or PXE server
- Included on the Arch Linux installation media.
- Deepin Clone — Tool by Deepin to backup and restore. It supports to clone, backup and restore disk or partition.
- FSArchiver — A safe and flexible file-system backup/deployment tool
- Support for basic and extended file attributes
- Support for basic file-system attributes (label, uuid, block-size) for all linux file-systems
- Support for multiple file-systems per archive
- Support for all major Linux filesystems (extfs, xfs, btrfs, reiserfs, etc) and FAT (in order to backup/restore EFI System Partitions)
- Experimental support for cloning ntfs filesystems
- Checksumming of everything which is written in the archive (headers, data blocks, whole files)
- Ability to restore an archive which is corrupt (it will just skip the current file)
- Multi-threaded lzo, lz4, gzip, bzip2, xz/lzma and zstd compression
- Support for splitting large archives into several files with a fixed maximum size
- Encryption of the archive using a password. Based on blowfish from libgcrypt
- Support for restoring to a bigger or smaller partition (as long as there is enough space to store the data)
- Support for exclusion patterns to filter what is archived/restored
- Works with directories (creating a compressed and checksummed tarball of sorts)
- Included on the Arch Linux installation media
- Mondo Rescue — A disaster recovery solution to create backup media that can be used to redeploy the damaged system.
- Image-based backups, supporting Linux/Windows.
- Compression rate is adjustable.
- Can backup live systems (without having to halt it).
- Can split image over many files.
- Supports booting to a Live CD to perform a full restore.
- Can backup/restore over NFS, from CDs, tape drives and other media.
- Can verify backups.
- Partclone — A tool that can be used to back up and restore a partition while considering only used blocks.
- Supports ext2, ext3, ext4, hfs+, reiserfs, reiser4, btrfs, vmfs3, vmfs5, xfs, jfs, ufs, ntfs, fat(12/16/32), exfat, f2fs, nilfs
- Supports pipe, stdin and stdout to script special features (compression, encryption. )
- Rescue mode tries to skip bad blocks and backup only good blocks, option to create GNU Ddrescue domain log file from source device
- ncurses interface available
- All backed-up blocks are checksummed with crc32
- Included on the Arch Linux installation media
- Partimage — An ncurses disk cloning utility for Linux/UNIX environments.
- Has a Live CD.
- Supports the most popular filesystems on Linux, Windows and Mac OS.
- Compression.
- Saving to multiple CDs or DVDs or across a network using Samba/NFS.
- Development stopped in favor of FSArchiver.
- Redo Backup and Recovery — A backup and disaster recovery application that runs from a bootable Linux CD image.
- Is capable of bare-metal backup and recovery of disk partitions.
- Uses xPUD and Partclone for the backend.
- System Tar & Restore — Backup and Restore your system using tar or Transfer it with rsync
- GUI and CLI interfaces
- Creates .tar.gz, .tar.bz2, .tar.xz or .tar archives
- Supports openssl / gpg encryption
- Uses rsync to transfer a running system
- Supports Grub2, Syslinux, EFISTUB/efibootmgr and Systemd/bootctl
See also
Use dd to Clone a Disk

The dd command in Linux is a powerful utility used to copy and convert a file. As in Linux, everything is considered as a file; even your hard disk drives. Hence, dd can also be used for cloning disks and partitions. The dd utility comes installed in almost all Linux distributions.
The dd utility in Linux can be used to:
- Clone a disk
- Clone a partition
- Backup and restore the entire hard disk or partition.
- Erase hard drive content
This post will describe how to use dd to clone a disk in Linux OS. The procedure demonstrated here has been tested on Linux Mint 20. For other Linux distributions, the same procedure can be used for disk cloning.
Note: Before running the dd command to clone the disk to the destination, remember that all the data on the destination will be lost, and you will not be informed about that. Therefore, make sure you specify the correct destination so that you may not lose your valuable data.
dd command syntax
The basic syntax of the dd command is as follows:
Where
- if: used for specifying an input file
- source-disk: It is the source disk from where files will be cloned
- of: used for specifying an output file
- destination-disk: It is the destination disk where you want to place the copied files
- option: Different options can be used with the dd command like for progress, speed of file transfer, the format of the file, etc.
Clone an entire disk
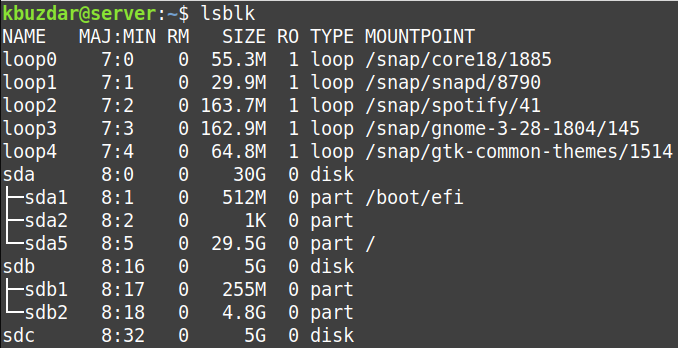
- First, execute the lsblk command to view all the available disks on your system.
Or you can also use the following command for viewing the disks:
We have three disks /dev/sda, /dev/sdb and /dev/sdc. The /dev/sdb has two partitions /dev/sdb1 and /dev/sdb2. We want to make the exact copy from /dev/sdb to /dev/sdc. Both disks /dev/sdb and /dev/sdc have the same size, 5GB. You can copy a smaller disk to a larger disk, but you cannot copy a larger disk to a smaller one.
This command tells dd to copy the source disk /dev/sdb to the destination disk /dev/sdc and shows the progress of the cloning process.
Once the cloning process has been completed, you will see a similar output.
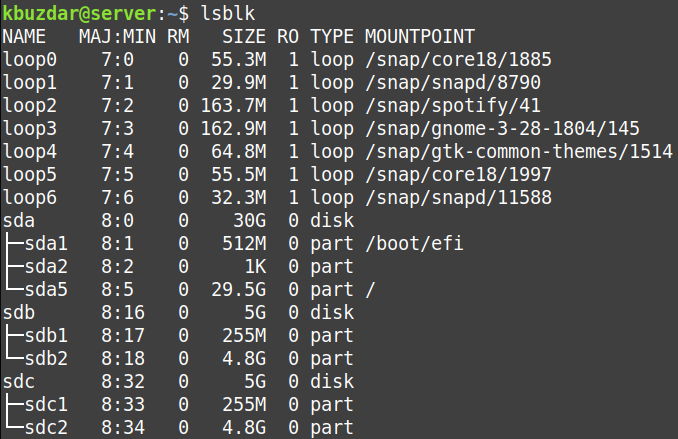
- Now, the cloning has been done. If you run the lsblk command again, you will see that the destination disk /dev/sdc has the same partitions as the source disk /dev/sdb.
Clone a partition from one disk to another
Using the same above described procedure, a partition can be cloned from one disk to another. However, instead of specifying the disk, you will need to specify the partition you want to clone.
For instance, to clone a partition /dev/sdb2 to /dev/sdc2, the command would be:
That is all there is to it! Using the simple procedure described above, you can easily clone a disk or partition in your Linux system.
About the author
Karim Buzdar
Karim Buzdar holds a degree in telecommunication engineering and holds several sysadmin certifications. As an IT engineer and technical author, he writes for various web sites. He blogs at LinuxWays.
How to Clone a Partition or Hard drive in Linux
There are many reasons why you may want to clone a Linux partition or even hard drive, most of which are related to creating backups of your data. There are multiple ways you can achieve this in Linux by using some external tools such as partimage or Clonezilla.
However in this tutorial we are going to review Linux disk cloning with tool called dd, which is most commonly used to convert or copy files and it comes pre-installed in most Linux distributions.
How to Clone Linux Partition
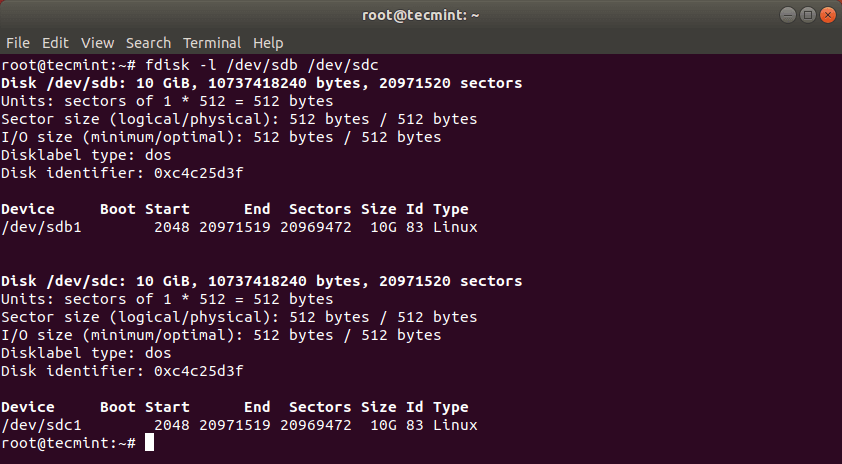
With dd command you can copy entire hard drive or just a Linux partition. Lets start with cloning one of our partitions. In my case I have the following drives: /dev/sdb, /dev/sdc.. I will clone /dev/sdb1/ to /dev/sdc1.
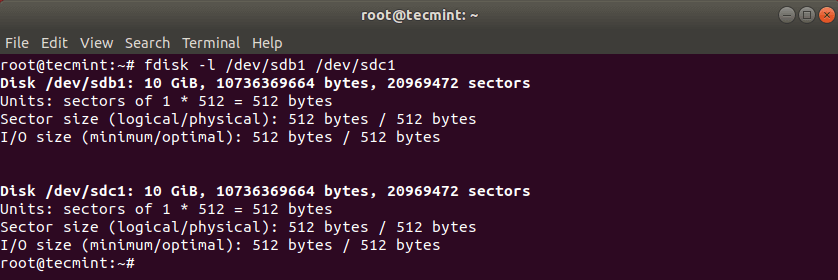
First list the these partitions using the fdisk command as shown.

Now clone a partition /dev/sdb1/ to /dev/sdc1 using the following dd command.
The above command tells dd to use /dev/sdb1 as input file and write it to output file /dev/sdc1.

After cloning Linux partition, you can then check both partitions with:

How to Clone Linux Hard Drive
Cloning a Linux hard drive is similar to cloning a partition. However, instead of specifying the partition, you just use the entire drive. Note that in this case it is recommended that the hard drive is same in size (or bigger) than the source drive.

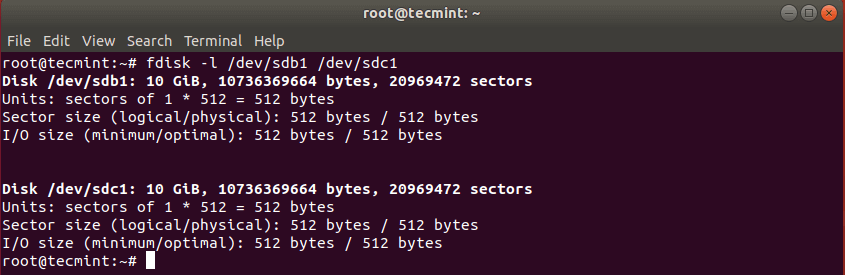
This should have copied the drive /dev/sdb with its partitions on the target hard drive /dev/sdc. You can verify the changes by listing both drives with fdisk command.

How to Backup MBR in Linux
dd command can also be used to backup your MBR, which is located at the first sector of the device, before the first partition. So if you want to create backup of your MBR, simply run:
# dd if=/dev/sda of=/backup/mbr.img bs=512 count=1.
The above command tells dd to copy /dev/sda to /backup/mbr.img with step of 512 bytes and the count option tells to copy only 1 block. In other words you tell dd to copy the first 512 bytes from /dev/sda to the file you have provided.

That’s all! dd command is a powerful Linux tool that should be used with caution when copying or cloning Linux partitions or drives.