An Easy Way To Encrypt And Decrypt Files From Commandline Using GnuPG In Linux
Today, we are going to see how to encrypt and decrypt files from command line in Linux using a free utility named GNU Privacy Guard (shortly GPG or GnuPG).
There are, of course, plethora of methods, and applications are available to encrypt and decrypt files in Linux. But, encrypting and decrypting files with GnuPG is the easiest method.
What is GnuPG?
GnuPG is an Open Source OpenPGP compatible encryption system. It is a commandline, sophisticated public key cryptosystem that provides digital encryption and signing services using the OpenPGP standard.
Using GnuPG, we can easily encrypt the important and confidential files and documents. It is packaged for several operating systems and also available as pre-compiled binaries.
GnuPG is available as two versions. They are GnuPG 1.x and GnuPG 2.x. GnuPG 2.x uses the modern algorithms and is recommended by security experts. You should use GnuPG 1.x only if your distribution does not support GnuPG 2.x.
Install GnuPG
GnuPG comes pre-installed by default in most Linux distributions. If it is not by any chance, you can install GnuPG using your distribution’s default package manager as shown below.
To install GnuPG in Alpine Linux, run:
On Arch Linux and its derivatives such as EndeavourOS and Manjaro Linux:
On Debian, Ubuntu, Linux Mint and Pop OS:
$ sudo apt-get install gnupg
On Fedora, RHEL, CentOS, AlmaLinux and Rocky Linux:
On older RHEL and its clones, use yum instead of dnf .
You can check the installed GPG version at any time using command:
Sample output:
gpg (GnuPG) 2.2.27 libgcrypt 1.8.8 Copyright (C) 2021 Free Software Foundation, Inc. License GNU GPL-3.0-or-later This is free software: you are free to change and redistribute it. There is NO WARRANTY, to the extent permitted by law. Home: /home/ostechnix/.gnupg Supported algorithms: Pubkey: RSA, ELG, DSA, ECDH, ECDSA, EDDSA Cipher: IDEA, 3DES, CAST5, BLOWFISH, AES, AES192, AES256, TWOFISH, CAMELLIA128, CAMELLIA192, CAMELLIA256 Hash: SHA1, RIPEMD160, SHA256, SHA384, SHA512, SHA224 Compression: Uncompressed, ZIP, ZLIB, BZIP2
Encrypt And Decrypt Files Using GnuPG
First, we will look at how to encrypt files.
Encrypt Files using GnuPG
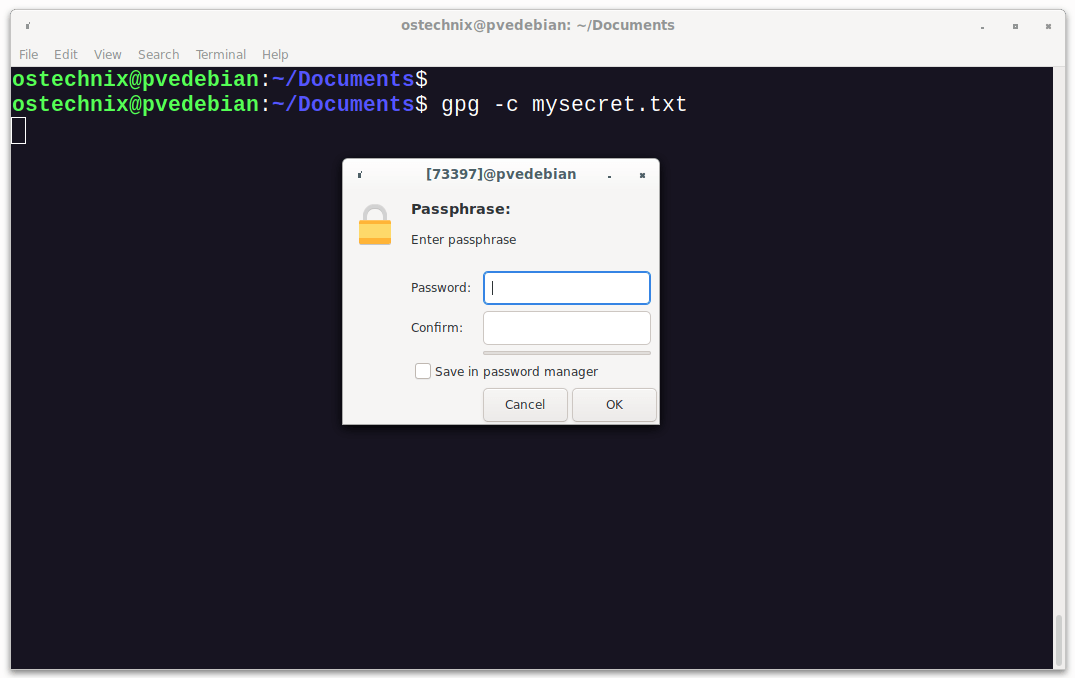
To encrypt a file using GnuPG, run:
Here, -c stands for conventional encryption, also known as symmetric encryption. Replace mysecret.txt file with your own filename in the above command.
You will be prompted to enter a passphrase to secure the file. Enter the strong passphrase twice and click OK to encrypt the file.
Heads Up: A good passphrase must be at least 8 characters long with number(s) and special character(s).
Let us verify it using ls command:
Sample output:
mysecret.txt mysecret.txt.gpg
As you see in the above output, the new encrypted file has the same name, but with the extension .gpg added. The original file is left intact.
As stated earlier, when we use -c flag, we encrypt the file with a symmetric cipher using a passphrase. The default symmetric cipher used is AES-128 . However, we can use different encryption method with the —cipher-algo option.
Once a file encrypted, You can’t view the contents of the encrypted file without the passphrase.
Even if you try to open it, you will only see some random numbers and symbols as shown below.
� 0k~ f����R���)�2Y�Vm:x��h�'|u7bd�m�lA��E'�=R����,��1������(tz�-�d��9����,��*�
By default, encrypted files are binary. Binary encrypted files are created with the suffix .gpg .
If you want to produce an ASCII text file instead, add the -a (armor) option:
The ASCII encrypted files have the suffix .asc (i.e filename.asc ).
Decrypt Files with GnuPG
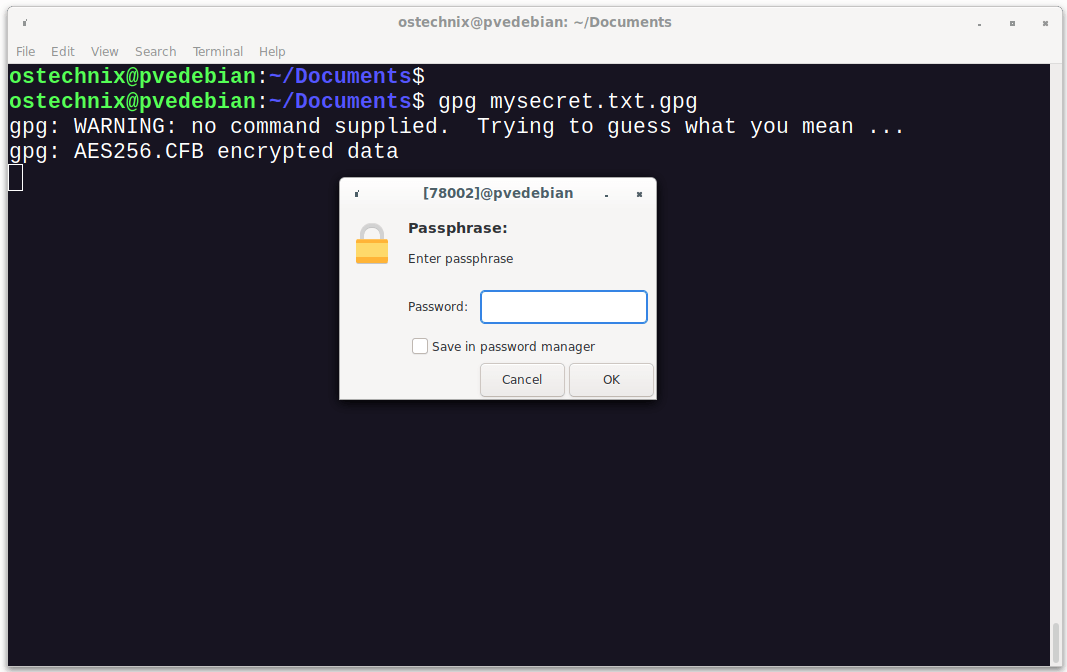
To decrypt a file using GnuPG, just run:
GnuPG automatically detects that the file is encrypted with a passphrase and asks for that passphrase. Just enter the correct passphrase, select Ok and hit Enter.
If the passphrase is correct, then it writes the decrypted data to a file with the same name but without the .gpg extension. Also, the encrypted file is left intact.
$ ls mysecret.txt mysecret.txt.gpg
That’s it, Now you can view the decrypted file’s content using any editor of your choice.
If you want the output file to be written to a different filename, use -o flag as shown below.
$ gpg -o secret.txt -d mysecret.txt.gpg
Here, -d stands for decryption and -o stands for output.
Please note that ASCII encrypted files (with the suffix .asc ) can be decrypted in the same way as binary encrypted files (with the suffix .gpg ).
To know more details about GnuPG, view its help section by running this command:
Conclusion
As you can see, encrypting and decrypting files using GnuPG is quite easy! You don’t need to be an expert or an experienced Linux admin to encrypt/decrypt files.
sk
Senthilkumar Palani (aka SK) is the Founder and Editor in chief of OSTechNix. He is a Linux/Unix enthusiast and FOSS supporter. He lives in Tamilnadu, India.
Encrypting Files and folder through terminal
I am new to part of encryption on Ubuntu . Is there any way to encrypt files and folder with password from terminal ? without using truecrypt or cryptkeeper etc.
3 Answers 3
You can encrypt and decrypt files with gpg
But gpg will not do entire directories. For entire directories you have several options, ecryptfs is popular.
# Install if ecryptfs-utils if needed sudo apt-get install ecryptfs-utils # Make an encrypted directory ecryptfs-setup-private That will make a directory «Private». Any data you put into the directory Private will automatically be encrypted when you log out and decrypted when you log in.
If you want a different behavior or a different directory .
mkdir ~/secret chmod 700 ~/secret sudo mount -t ecryptfs ~your_user/secret ~your_user/secret Put your data into ~/secrte
sudo umount ~your_user/secret sudo mount ./secret ./secret -o key=passphrase,ecryptfs_cipher=aes,ecryptfs_key_bytes=16,ecryptfs_passthrough=no,ecryptfs_enable_filename_crypto=yes Hint: make an alias for that second command.
ecryptfs will certainly encrypt files and folders, ensuring that the data that gets written to disk is always encrypted, and that applications which need access to the cleartext context can get that seamlessly.
However, to answer your question specifically, you can certainly encrypt a single file with a passphrase and gpg:
gpg -c /tmp/file > /tmp/file.gpg To encrypt a folder, you should use tar in conjunction with gpg:
tar zcvf - /tmp/directory | gpg -c > /tmp/directory.tar.gz.gpg For anybody else who read this quickly and was a little confused by the result.. on 14.04 gpg -c /tmp/file > /tmp/file.gpg does not return what I’d expect, instead writing an empty file. My usage is gpg -c /tmp/file which automatically adds the .gpg extension to the resulting file.
Installing: In order to install you must first add the universe repository
Then simply type into the terminal: encfs encrypted visible to create folders in the current directory named encrypted and visible and set up a password.
For example, if I’m in the default (home) directory (use pwd to see where you are), this will create folders /home/ijoseph/visible and /home/ijoseph/encrypted for me, since my username is ijoseph .
visible can be written and read, and stores its data encrypted in the encrypted folder.
To «hide» your data and leave only the encrypted version of the folder, type fusermount -u visible . You’ll want to do this before logging out or physically moving your laptop, usually, for protection. You’ll notice everything disappears from the visible folder when you type ls .
To re-mount (re-gain access to the visible folder for read/write), run encfs encrypted visible again.

