- How to Make Disk Images in Linux with DD Command
- Install LSSCSI Utility
- Check Disk Information
- Create a Clone Disk Image
- Restore the Drive from Clone Image
- Conclusion
- About the author
- Aqsa Yasin
- Editing Pictures on Linux Command Line with ImageMagick
- Resize an image on Linux command line
- Convert the file type
- Get Information about the particular image
- Flipping an image
- Color list
- Conversion of the colored image into Black and White
- Addition of a border to an image
- Negated image
- Conversion of an image into pdf
- Display
- Conclusion
How to Make Disk Images in Linux with DD Command
![]()
Whenever it comes to wiping, backing up, or restoring Linux files, you have few tools. Although there is one alternative that still works, regardless of the Linux distribution you’re using, and that is the DD command. Creating an image of a partition or cloning a complete hard disk drive are simply the acts of making a copy of the whole disk or partition, and it is very simple with the dd command. The DD command is good for cloning disks, backups, and restoration, among other things. In this guide, we will see how to make a disk image using the DD command. Make sure you have the Ubuntu Linux system installed.
DD circumvents this by making an identical replica of the whole hard drive or partitions. So if you recover this backup, your machine will be restored to its original state. You’ll regain access to your folders, games, browser history, and sometimes even device settings. We’ll want another drive with more capacity than the one we’re cloning to replicate your drive. There would most probably be a big hard drive for this purpose.
Install LSSCSI Utility
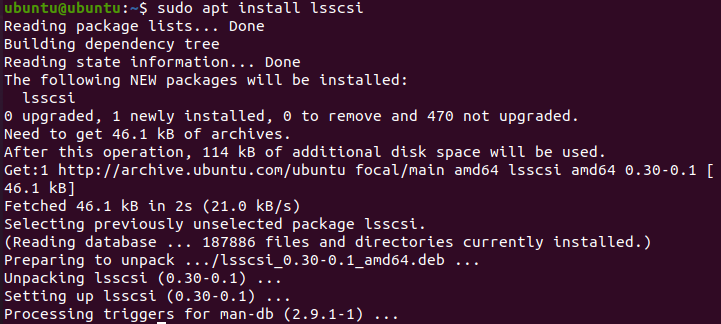
Open the command-line terminal of the Ubuntu 20.04 Linux system. Make sure to have the “lsscsi” utility installed on your system. If it is not installed, try to install it using the below “apt” command followed by the keyword “install” and “lsscsi”. It will take not more than 5 minutes to get installed, and you are good to go.
After installing the “lsscsi” utility, now it’s time to use it for listing all the storage devices of our Linux system. To list the storage drives and DVD’s execute the below command. You can see we have one disk drive and one cd/DVD device in our system.

Check Disk Information
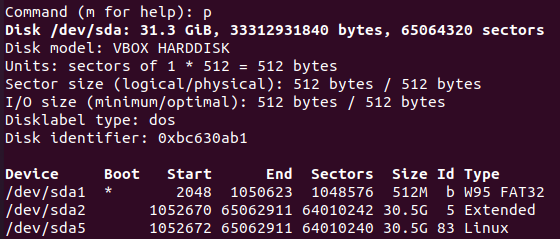
Firstly, we have to find out some information regarding the disk drive “/dev/sda”. And for this reason, we have to use the “fdisk” instruction in our command-shell with sudo privileges as below.

It will navigate to its command theme. Type “p” to check the information of disks as below. You can see it shows the total memory of the “/dev/sda” drive, its sectors, and bytes. It is showing the disk type as DOS. On the other hand, the last three lines of the snapshot show the partitions of the /dev/sda drive and their further information.
Create a Clone Disk Image
Now you have almost every piece of information regarding the “/dev/sda” drive. Press “q” to exit the commanding theme. Now, you are ready to make a disk image using the DD command. So, make yourself clear that the DD command always needs “sudo” privileges to execute. As we already know from the above image, the “/dev/sda” has three partitions, and we will make an image of one of them. So, we choose “sda1” for making its clone. You have to execute the below “DD” command followed by the “if” path and “of” path. The “if” path is of the input disk drive, which is meant to be cloned and the “of” path is for the output device disk, where it would be copied as an image. So, from this, you can understand that “sda1.img” is the cloned file for disk and sda1 is the actual drive. We have specified the bytes per second to be copied from one location to another. We assigned it a value of 1000. The command is as follows:
The output shows the number of records inputted and outputted from two locations, e.g., source and destination. It also shows the number of bytes with time seconds, copied into a destination in MB’s. This means that the clone has been effectively done.

Let’s check the destination image file to see if all the data from the source drive has been cloned into it properly or not. Use the below list command along with the path of an image file of the drive as:
The output shows the rights assigned to this image file, its size, and location. You can say that it has similar rights and size as the original disk drive have.

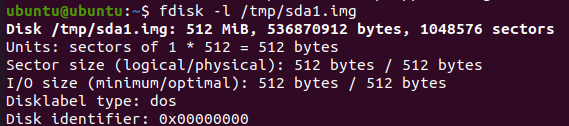
To see some more information regarding the disk image file, you have to try the below “fdisk” command followed by the flag “-l” as below.
The output shows the exact same information regarding this image file as we have seen for the original disk drive before creating this image file. It shows the size of the image drive, its total number of bytes, and total sectors.
Restore the Drive from Clone Image
Now, if you want to restore your original disk drive along with all the data it has, you have to use the DD command again to do so. While using the DD command, there is a little change in it. You have to swipe the input and output paths this time. This means you have to place the image disk file path into the “if” path, and in the “of” output path, you have to mention the location where you want to restore the image file data. Here is the command to restore the drive data from the image file:
The output shows the transfer of backup files into their actual destination. You can see the input and output number of total records and some further information regarding the numbers of bytes transferred, the total size of the disk image, and the time taken to transfer it.

Conclusion
Indeed, The method discussed before is the easiest and simplest way to clone a disk into an image file and restore the backup to get all the files and folders back.
About the author
Aqsa Yasin
I am a self-motivated information technology professional with a passion for writing. I am a technical writer and love to write for all Linux flavors and Windows.
Editing Pictures on Linux Command Line with ImageMagick

Every time we deal with images in a command line, we need to install or use any of the command line tools. Few of them include GraphicsMagick, Scrot, Feh, Exiv2 etc. These tools allow us to convert, also help us to resize, compare, animate, and view the images. Each tool has its own usage. In this tutorial, we will learn how to do the basic editing of pictures from Linux command line when needed. We will be using ImageMagick for this purpose which is most commonly used.
Resize an image on Linux command line
In order to resize an image in Linux terminal, you need to follow the following steps.
Step 1: First of all, open Terminal by clicking on Ubuntu launcher and search for Terminal.

Step 2: Now click on the Terminal and wait for the terminal to open.


Step 3: Once the terminal is opened, you will have a screen like this:

Next, once the terminal has been opened, we need to install ImageMagick to proceed further with the resizing, the command used to this purpose is “sudo apt-get install ImageMagick”.
![]()
Enter the required credentials to proceed further.
![]()
The installation will begin and your screen will be displayed as shown below.

In order to continue the installation further, type Y.

After the final installation, this is the display on the command line.
Now, we want to resize the image. It is currently located at the Desktop with a name index.png


We will move our current directory to the Desktop, where our image is located.
![]()
The image we want to resize is index.png so we write a command, with the original name of the image and then we will right the percentage to which we want the resize to happen and then, we will store it in a new file name with .png extension.
![]()
Here the new image that is resized by 60% is created named newindex.png


The two images show the different sizes of the same index.png which we have resized using the command.

Convert the file type
Since the above image file was in png and we want to convert into.jpg Now, we will enter the command to do so by using convert command and writing the type of file next to the type we want to convert to.
![]()


So, the file has now been converted into another type that is .jpg

Get Information about the particular image
If you want to obtain any sort of information about an image, run simply the command.
identify –ping imageName.jpg
![]()
All of the information about the image is revealed.
![]()
For further details, we simply type this command.
![]()
The outcome which we will be getting is.

Flipping an image
If we plan to flip an image in the command line of Linux, it is not a difficult thing to do rather, just write covert –flip imageName.jpg FlippedImageName.png. This will let us achieve the desired outcome.
![]()
The new image named Flipped-index on the Desktop can be seen.


This is the flipped image once we opened it. As you can see it is the image we desired to get. Our image has been flipped by 90 degrees as the following figure also shows the same.

This is how we can flip our images using the command line.
Color list
To know all colors used in an image, issue we use a simple command that will help us in knowing the colors that are involved in composing an image.
![]()
The output will be a display of a list of colors we have for our index image.

So, this is how we get the color list of any particular image we want.
Conversion of the colored image into Black and White
We can also convert a colored image into black and white by using the Linux Command Line. The command is
![]()
Addition of a border to an image
We can also add the border to any image we want to and it could be of any color as in our example we have added the red border. The command used for this is
![]()
The border-index is the border added image.


The image once opened, has a border to it which is red in color, the following figure shows the same.

Negated image
We can also negate any image whenever we want to by using the following command:
![]()
The negated-index is created on the Desktop.


The negated image is as follows:

Conversion of an image into pdf
Any image can be converted into pdf by using the command.
![]()
Where we just write convert imageName*.* FileName.pdf.
A new pdf will be created for that particular image as displayed on the Desktop of our system.


Thus the image has been saved in the pdf versions as shown below:

Display
At last, we will see the command if you want to edit an image on your own using GUI of ImageMagick, run the following command.
![]()
So, the GUI will eventually appear, allowing you to make changes.

Conclusion
In this tutorial, we have discussed many interesting ways to edit an image. The most common method used for editing is ImageMagick so in this tutorial, we have also used the same and done its installation first. Then we saw many applications and actions we can perform using ImageMagick. First, we did the resizing of an image, then we learned how to change the file type as per our need, after that we saw how to display the information of an image, then we saw how do we flip an image, then we saw the ways to see colors in an image. Then we saw a technique to convert an image that is colored into black and white, then we added a border (colored) to an image. Later we converted the image into a pdf file. At last, we saw how can we display the GUI so that we can use ImageMagick. These are the basic but necessary commands helpful for a Linux user to learn for editing an image in Linux.