- Linux command line openvpn
- How to Setup OpenVPN Command Line on Linux
- Access Server command line interface tools
- Authentication before using the CLI
- Overview
- Create a VPN connection from Linux Terminal
- Creating an L2TP VPN Connection in Linux
- Adding PPTP VPN Connection in Linux
- How to Set Up SSTP VPN Connection with Command Line on Linux?
- Configure OpenVPN Connection Using Linux Terminal
Linux command line openvpn
U.S. Dollar Euro British Pound Canadian Dollars Australian Dollars Indian Rupees China Yuan RMB More Info →
We stand with our friends and colleagues in Ukraine. To support Ukraine in their time of need visit this page.
How to Setup OpenVPN Command Line on Linux
This guide describes the command line setup of OpenVPN connection type on various most popular Linux distributions. OpenVPN is strongly recommended for Linux since the support of open source technologies (like OpenVPN) on Linux is much better than proprietary technologies such as PPTP. The guide uses Ubuntu 17 for demonstration purposes.
To set up OpenVPN on Linux, you will need:
- A secure FastVPN connection (Don’t have one? Sign up here!);
- An internet connection;
- Access to you FastVPN Account Panel.
Follow the steps below to configure OpenVPN on Linux devices via CLI :
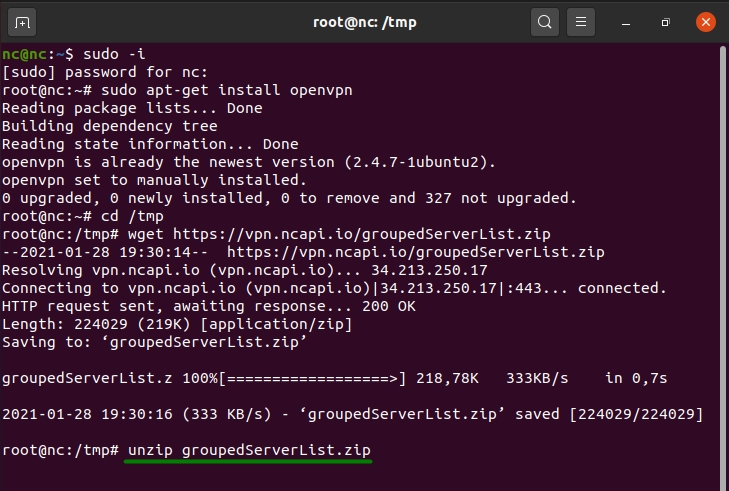
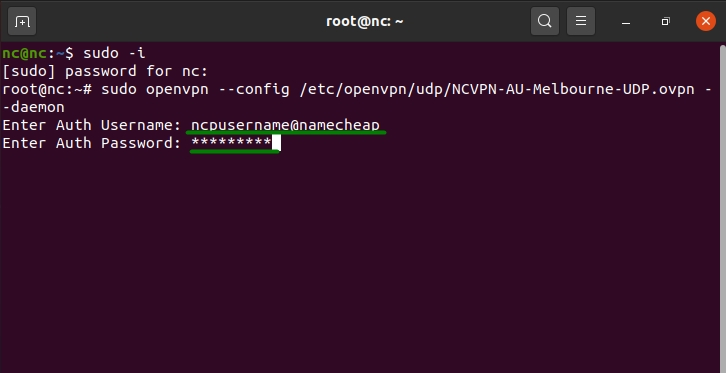
1. Login as a root user. If you are not a root user, run the following command and click the Enter key.
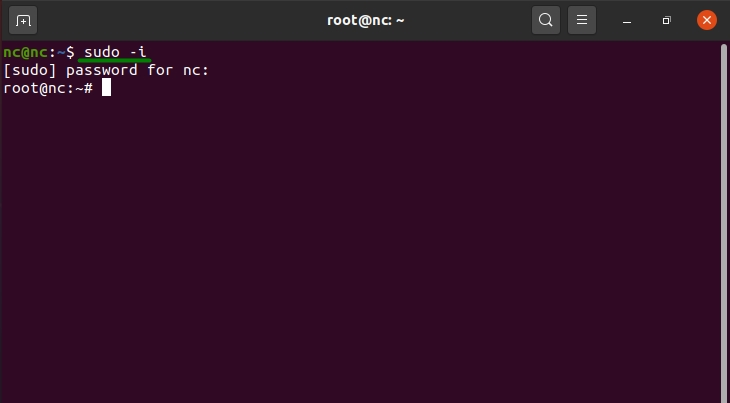
2. Type your root password and press Enter.
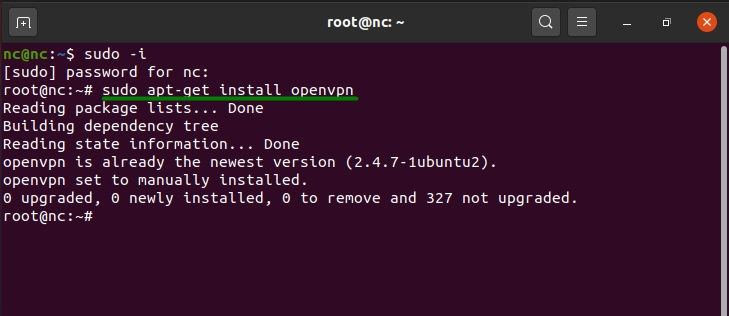
3. Now it is necessary to install the OpenVPN package on your Linux system. For this, type the command below and press Enter.
For Debian, Ubuntu, Mint:
sudo apt-get install openvpn
sudo yum install openvpn
sudo dnf install openvpn
sudo pacman -S openvpn
For openSUSE:
zypper install openvpn
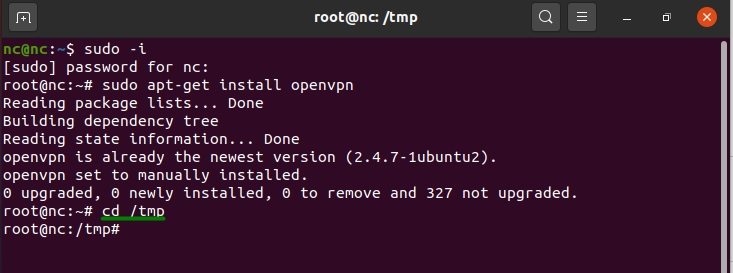
4. Enter the following command to change a directory for FastVPN config files:
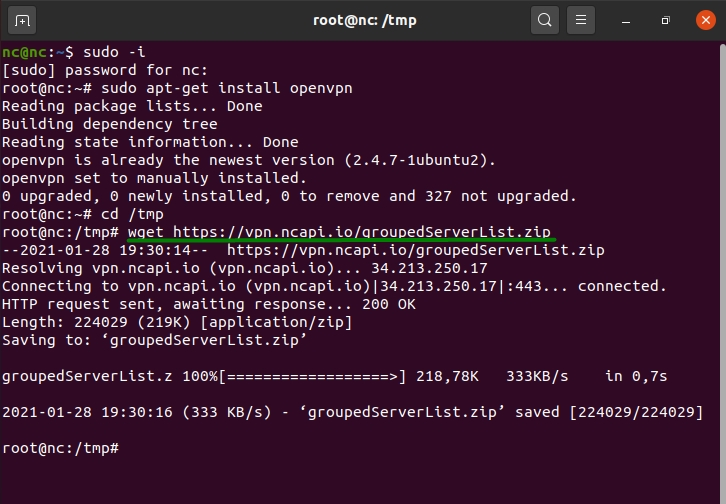
5. Run the command below to save the FastVPN OpenVPN configs zip file from our repository. Press the Enter key and proceed to the next step.
wget https://vpn.ncapi.io/groupedServerList.zip
6. Unzip the configs files into your Documents directory by using the following command and press Enter:
unzip groupedServerList.zip
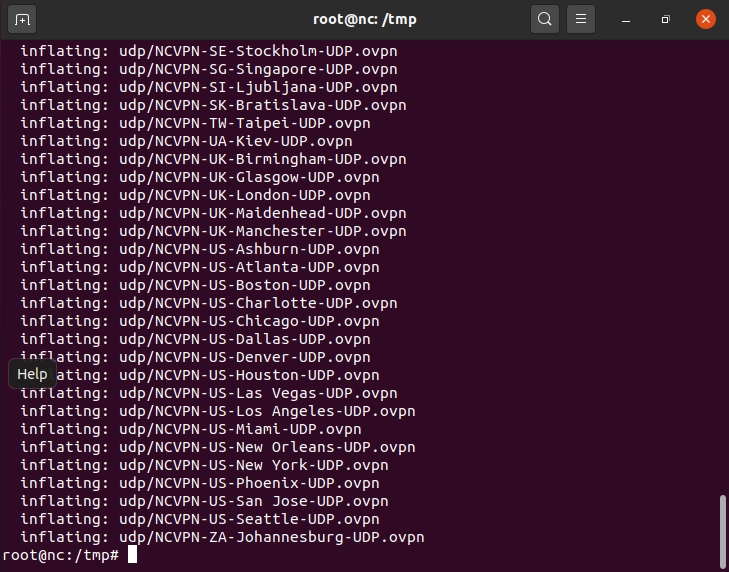
7. After all the required configuration files are unzipped, they will be shown in the terminal window:
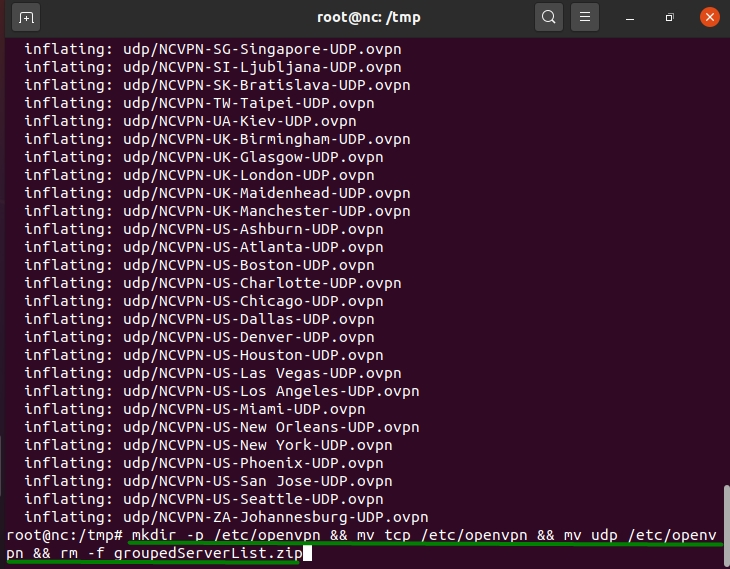
8. Use the command below to create an openvpn directory and move ovpn config files there:
mkdir -p /etc/openvpn && mv tcp /etc/openvpn && mv udp /etc/openvpn && rm -f groupedServerList.zip
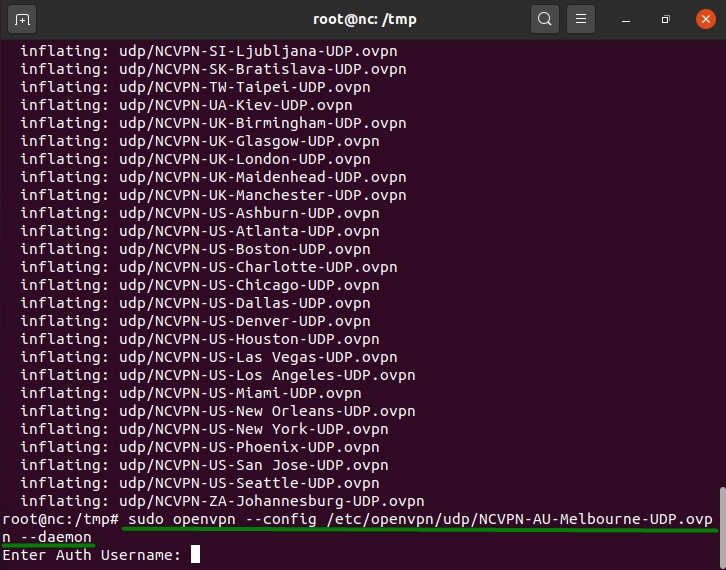
9. Depending on which protocol is preferable for you, you can connect to FVPN running the following commands:
sudo openvpn —config /etc/openvpn/tcp/NCVPN-AU-Melbourne-TCP.ovpn —daemon
NOTE: «NCVPN-AU-Melbourne-TCP.ovpn» and «NCVPN-AU-Melbourne-TCP.ovpn» can be changed to any preferred location from groupedServerList.zip
Congratulations! The setup of FastVPN connection has been completed.
11. To verify that your VPN connection is successful, wait for about a minute and enter the command below:
You will see your new public IP address:
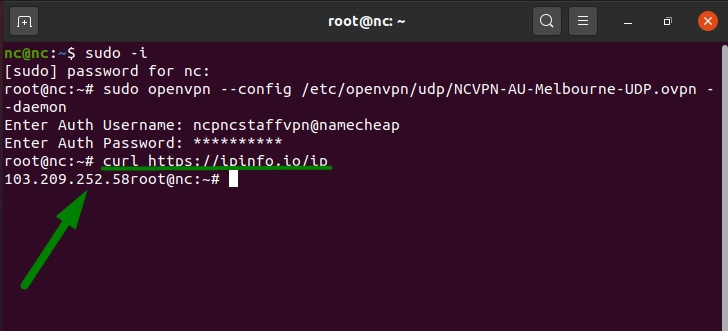
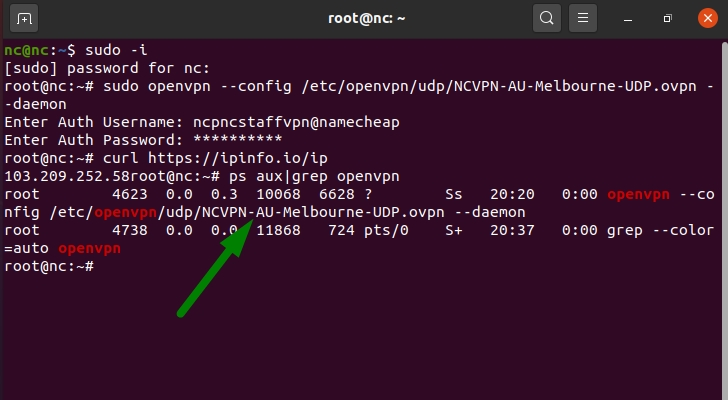
NOTE: You can check what VPN connection is currently running by entering: ps aux|grep openvpn
12. In order to change your VPN connection, you need to stop all active VPN connections first. For this, run the command:
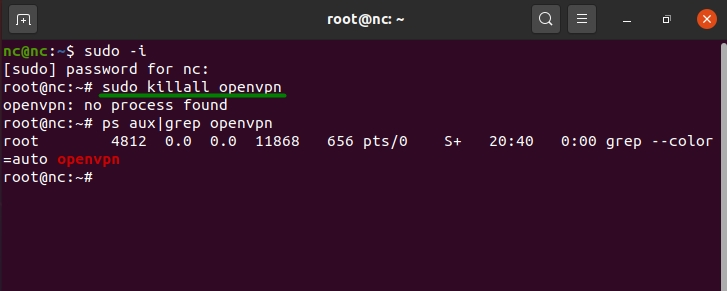
After that, please follow the Steps 9-10 to connect to any other preferred location.
13. To disconnect from VPN, use the following command:
Access Server command line interface tools
Pretty much every aspect of the configuration of the OpenVPN Access Server program can be configured through the command line interface. There are programs available in the directory /usr/local/openvpn_as/scripts/ that can be used to configure the Access Server from scratch, or to make adjustment to server settings, or to change properties set for users and groups. Certain tasks can only be done from the command line and are not implemented in the Graphical User Interface (GUI).
It is assumed that people that are going to use the CLI are familiar with at least some basics of Linux administration, namely the ability to log on to the server (console or SSH), to obtain root privileges, and to change directories in the Linux operating system.
Most of the command line parameters are executed as root user in the /usr/local/openvpn_as/scripts/ directory.
We recommend you use copy and paste to execute the commands where possible as manually typing it may result in a slight difference, and the command prompt is not a forgiving environment.
Authentication before using the CLI
Much of the functionality for managing users and user permissions, as well as server configuration and other tasks, is contained in the sacli program. This program requires that you have root privileges. Therefore all commands used in the documentation here assume that you are on the console of the server or logged on via an SSH session to the server, and that you have either the ability to run commands with «sudo» or that you are logged on as «root» user.
Overview
Create a VPN connection from Linux Terminal
In this article, we’ll look at how to create a VPN connection from the Linux terminal console and connect to a remote VPN server from the command line. Consider how to create L2TP, PPTP, OpenVPN, and SSTP VPN connections on Linux.
Creating an L2TP VPN Connection in Linux
You can use NetworkManager to create L2TP VPN connections from the Linux console.
To install NetworkManager with L2TP support, run the command:
# yum -y install NetworkManager-l2tp$ sudo add-apt-repository ppa:nm-l2tp/network-manager-l2tp $ sudo apt-get install network-manager-l2tp
To create a new L2TP VPN connection, use the command:
$ nmcli connection add connection.id [VPNConnectionName] con-name [VPNConnectionName] type VPN vpn-type l2tp ifname -- connection.autoconnect no ipv4.method auto vpn.data "gateway = [ipv4], ipsec-enabled = yes, ipsec-psk = 0s"$(base64 - [VPNConnectionName]
- [ipv4] — IP address or FQDN of L2TP/IPSEC VPN server
- [PSK] —Pre-Shared Key (PSK)
- [user] — VPN username
- [user-password] — user password
The settings for a new VPN connection are saved to the /etc/NetworkManager/system-connections/ file.
List all connections in NetworkManager:
Show information about the created VPN connection:
$ nmcli c show id [VPNConnectionName]
To connect to the L2TP VPN server from the command line:
$ nmcli c up [VPNConnectionName]
Error: Connection activation failed: Could not find source connection.
In this case, check the following:
- journactl logs;
- the default gateway is set for the physical interface (for example, ens33 );
- the br0 interface may be enabled on the server, but is not used. Try to remove it.
To disconnect from a VPN server, run:
$ nmcli c down [VPNConnectionName]
Adding PPTP VPN Connection in Linux
To install a PPTP VPN client on Ubuntu/Debian:
$ sudo apt install pptp-linux
$ sudo nano /etc/ppp/peers/PPTP
Add the following content:
pty "pptp YOUR_VPN_SERVER --nolaunchpppd --debug" name VPNUsername password VPNPassword remotename PPTP require-mppe-128 require-mschap-v2 refuse-eap refuse-pap refuse-chap refuse-mschap noauth debug persist maxfail 0 defaultroute replacedefaultroute usepeerdns
Save the file by pressing CTLR+X, Y -> Enter.
Change file permissions:
$ chmod 600 /etc/ppp/peers/PPTP
To connect to a PPTP VPN server, run the command:
How to Set Up SSTP VPN Connection with Command Line on Linux?
You can set up an SSTP connection to a VPN server on Linux. On Ubuntu, you can use the sstp package for nmcli.
$ sudo add-apt-repository ppa:eivnaes/network-manager-sstp $ sudo apt update $ sudo apt install network-manager-sstp sstp-client
The following command is used to connect to the SSTP VPN server:
$ sudo sstpc --cert-warn --save-server-route --user --password usepeerdns require-mschap-v2 noauth noipdefault nobsdcomp nodeflate
You can save VPN server connection settings to a text file:
$ sudo nano /etc/ppp/peers/sstptest
remotename sstptest linkname sstptest ipparam sstptest pty "sstpc --ipparam sstptest --nolaunchpppd sstpvpn.contoso.com" name user1 plugin sstp-pppd-plugin.so sstp-sock /var/run/sstpc/sstpc-sstp-test usepeerdns require-mppe require-mschap-v2 refuse-eap refuse-pap refuse-chap refuse-mschap nobsdcomp nodeflate
Add the username and password for authentication on the VPN server to /etc/ppp/chap-secrets file:
# Secrets for authentication using CHAP # client server secret IP addresses user1 * xxxxxx *
Now you can connect to the SSTP VPN server using the configured connection:
To send all traffic through the VPN connection, you need to add a route:
(usually, this is ppp0 device)
Or only traffic to specific networks/hosts:
$ sudo route add -net 192.168.2.0/24 dev ppp0
Configure OpenVPN Connection Using Linux Terminal
Install the OpenVPN package on Linux:
Debian, Ubuntu, Linux Mint, Kali Linux:
$ sudo apt-get update && apt-get upgrade $ sudo apt-get install openvpn
# yum install epel-release –y. # yum install openvpn –y
You will need the *.ovpn configuration file to connect to an OpenVPN server. In order to connect to VPN using the client.ovpn file:
$ sudo openvpn --config /etc/openvpn/client.ovpn --daemon
Check that the VPN connection is established:
To end the OpenVPN connection, press CTRL+C (if the client is running without the --daemon parameter) or run the command:
In order for an OpenVPN connection to be automatically established when Linux starts, you need to create a separate systemd unit:
$ sudo vi /lib/systemd/system/OpenVPNClientCorp.service
[Unit]
Description=Hide.me OpenVPN Client Corp
After=multi-user.target
[Service]
Type=idle
ExecStart=/usr/sbin/openvpn --config /etc/openvpn/client.ovpn
[Install]
WantedBy=multi-user.target
Change the file permissions:
$ sudo chmod 644 /lib/systemd/system/OpenVPNClientCorp.service
Add the new unit via systemctl:
$ sudo systemctl daemon-reload $ sudo systemctl enable OpenVPNClientCorp.service
I can’t fix the error Error: Connection activation failed: Could not find source connection. can you help me?