- How to Create/Add Users in Linux
- useradd Command Syntax
- useradd Command Options
- Creating New Users in Linux
- Adding a User in Linux
- Adding a User in Linux and Creating Home Directory
- Adding a User with a Specific Home Directory
- Adding a User without Home Directory
- Adding a User with Specific User ID
- Adding a User with Specific Group ID
- Adding a User to Multiple Groups
- Adding a User with a Specific Login Shell
- Adding a User with a Specific Comment
- Adding a User with Account Expiry Date
- Adding a User with a Deactivation Period
- Adding a System User
- The adduser Command
- Add Multiple Users
How to Create/Add Users in Linux
Linux is a multiuser environment, and user provisioning is an essential responsibility in system management. System administrators add, delete, and manage users and groups on the system.
The useradd command provides various options, resulting in a comprehensive way to automate identity and access management.
This article shows how to create and add users in Linux.
- Access to the terminal to run the commands.
- Access to a user with sudo permissions or root.
- A text editor, such as nano or Vim.
- Basic Linux commands (grab our Linux commands cheat sheet).
useradd Command Syntax
The basic syntax for the useradd command is:
Running the command creates a new user account or updates an existing user according to the values in:
- /etc/default/useradd — The default values for the useradd command.
- /etc/login.defs — Configuration control values for the login package.
- The provided with the command, which update or override the predefined configuration.
The default values vary between different systems.
The rules limit the username to:
- Length between 1 and 32 characters.
- The username begins with a lowercase letter or an underscore.
- The username can contain any combination of upper and lowercase letters, numbers, dashes, and underscores.
- The username can end in a dollar sign ( $ ).
The regular expression for checking the username validity is:
Note: Debian follows a different set of rules for usernames. However, the provided rules are a good starting point for all systems to help avoid problems.
In addition, the command also creates a group for the new user. Adding a new user requires sudo permissions to modify the files for storing user and group information.
useradd Command Options
The useradd command comes with various options. Common options are in the table below:
| Option | Description |
|---|---|
| -b —base-dir | Sets a default base directory for the system. |
| -c —comment | Sets a short description of the user, such as the full name or role. |
| -d —home-dir | The user’s login directory. |
| -D —defaults | Displays the default values or changes them when combined with other options. |
| -e —expiredate | The date when the user account expires. |
| -f —inactive | Sets the time in days the account becomes inactive after a password expiry. |
| -g —gid | Establishes the user’s initial login group. |
| -G —groups | Adds user to additional groups. |
| -k —skel | Copies files and directories into the user’s home directory. |
| -m —create-home | Creates a home directory for a user if it does not exist. |
| -M —no-create-home | Does not create a home directory (overrides system settings). |
| -o —non-unique | Combines with -u to allow duplicate UIDs. |
| -p —password | Sets the user’s password (not recommended). |
| -r —system | Adds a system account. |
| -s —shell | Defines the user’s login shell. |
| -u —uid | Unique numerical value ID. |
| -U —user-group | Creates a group with the same name as the user and adds the user to the group. |
Creating New Users in Linux
Creating new users in Linux does the following:
1. Provides a unique UID and GID.
- 0 is reserved for root and assigned automatically.
- 1-999 is for system accounts and services.
- 1000 and above are for regular users.
Note: Numbers vary between different operating systems. The example values are for Ubuntu.
2. Edits files that store account information.
- /etc/passwd — Lists all registered users on the system.
- /etc/shadow — Stores encrypted user passwords.
- /etc/group — Defines user groups.
- /etc/gshadow — Stores encrypted group passwords.
3. Sets user permissions on the home directory through the group.
Note: Linux also provides a command to modify existing users with usermod.
Follow the examples below to see how to add users in Linux.
Adding a User in Linux
To add a user in Linux, run the following command in the terminal:

If prompted, enter the sudo password to continue.
Without any options, the useradd command adds a user based on the predefined options in the /etc/useradd file. The new user is in a locked state and requires a password to unlock it. Use the passwd command to unlock the account:

The command prompts to enter and confirm the password.
Note: Passwords are an important security aspect. Check out our guide for strong password ideas.
After creating a password, a new entry appears automatically in the /etc/passwd file. To see the information, view the file with the cat command and grep for the user:
The fields are in the following format:

username:password:UID:GID:info:/home/directory:shell/pathThe x character represents and hides the user’s password for security reasons. The encrypted password is in the /etc/shadow file.
Adding a User in Linux and Creating Home Directory
By default, the useradd command does not create a home directory. The /etc/passwd file shows an absolute link (/home/ ). If the directory does not exist, the user redirects to home ( / ) after logging in.
To create a user and the home directory automatically, use the -m option:
Check if the directory exists with the ls command:
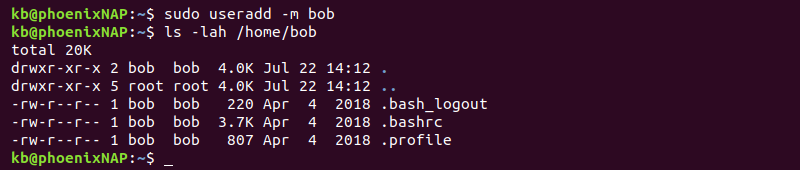
The directory contains initialization files copied from the /etc/skel directory.
Adding a User with a Specific Home Directory
To add a user in Linux with a specific home directory, use the -m option with -d and provide the directory path:

The useradd command warns that the directory already exists and doesn’t copy files from /etc/skel. Use this option to create a custom or shared home directory.
Adding a User without Home Directory
If the /etc/login.defs configuration CREATE_HOME variable value is yes , the useradd command automatically creates a home directory.
To override the default settings and add a user without a home directory, use the -M option:

The command adds the user without creating a home directory, overriding the default settings.
Adding a User with Specific User ID
To add a user with a specific user ID, use the -u tag and provide the UID:
If the UID is not unique, the terminal outputs a message and does not add the user. Check the UID with the id command:

Use a UID above 1000 to indicate a regular user.
Adding a User with Specific Group ID
To create a user and add them to a specific group, use the -g tag:
The group name or GID must exist. Otherwise, the command throws an error. Check the user’s GID with:

The output prints the user’s group ID.
Adding a User to Multiple Groups
Add a user to multiple groups with the -G option and list the group names or GIDs in a comma-separated list, followed by the username. For example:
Check the user’s groups with:

The groups must exist, and the list should not contain any spaces. The command doesn’t add the user if any groups do not exist.
Note: To add an existing user to a group, check out the following guide: How to Add User to a Group in Linux.
Adding a User with a Specific Login Shell
Each new user gets a default login shell (such as the Bourne shell or Bourne Again Shell). To explicitly define the user’s shell, add the -s tag and provide the shell’s path:
For example, to add a user and set Bash as the default login shell, run:
Check the /etc/passwd file to confirm the shell selection:

The final field shows the login shell for the new user.
Adding a User with a Specific Comment
To add a user with a specific comment, run:
To view the comment, check the /etc/passwd file and grep for the user:

The comment is for descriptive purposes only and has no actual functionality.
Adding a User with Account Expiry Date
Add a user with an account expiry date to automatically delete the account after provided date:
View the account’s expiry information with:
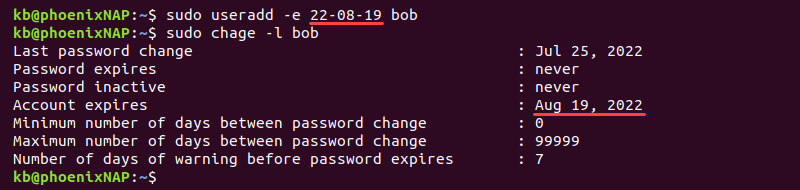
The output prints the account expiry date ( Account expires ). Use this option for temporary accounts.
Adding a User with a Deactivation Period
If a user has a password expiry set, the useradd command allows stating a period before the account deactivates after expiry. If an account expires, the expiry period will enable users to change their password and reactivate the account.
Use the -f command and add the number of days:
For example, to have an account deactivate three days after the password expires, run:
View the expiry information with:

The /etc/shadow file stores password information, including idle time (third to the last field).
Use this method to deactivate users who don’t change their password in the provided timeframe.
The deactivation period is a good security measure, and the recommended duration is 35 days. Business requirements dictate what’s the perfect duration before the account expires. If the value is too low, the consequences are costly for an administrator, whereas a high value impacts security.
Adding a System User
Programs and systems create system user accounts, which are different from regular users. Programs such as MySQL or Tomcat require a unique user account to work on the system, and daemons typically create system users during installation.
To create a system user, use the -r option:
Check the user’s information with:

The user has a UID lower than 1000, indicating it’s a system user.
The adduser Command
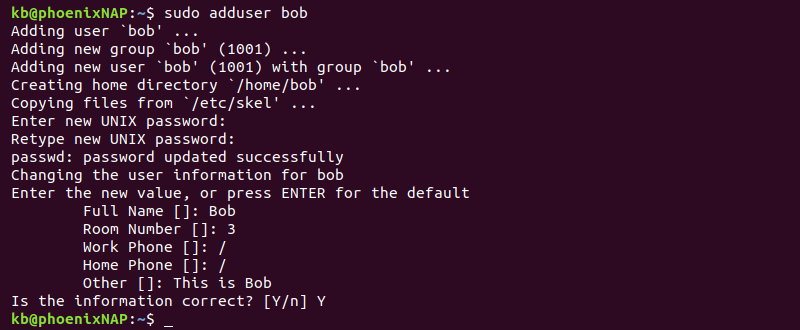
The adduser command is an alternative way to add users to a Linux system and acts as a simple interactive front end for useradd .
The command prints the user and group to the console.
Next, the command asks for the following:
- Password, which needs to be re-entered to continue.
- User information. The data acts as a comment (same as useradd -c command and option).
Press Y to complete the process. In case of a mistake, press N and reenter the correct information.
Check the parameters from the adduser command with:

The command adds all the values entered during the command execution and the Bash shell by default.
Add Multiple Users
The useradd and adduser commands do not support adding multiple users at once. To add multiple users, use a Bash for loop in a script or in the terminal directly to loop through a list of usernames.
Note: Learn what are the differences between useradd and adduser commands.
For example, to add ten users, do the following:
1. Create a text file using a text editor:
2. Append usernames to the file, entering each on a new line. For example:
Save the file and close nano (CTRL+X, Y, then Enter).
3. Use a for loop to list through the names in the file and run useradd on each:
for i in `cat ~/user_list.txt` ; do useradd $i ; done 4. Show the created users with:
for i in `cat ~/user_list.txt` ; do id $i ; done
To add passwords, exchange the command in the do clause with passwd and enter the password for each user. Alternatively, use the expect command to automate the password creation process, especially if working with a large number of users.
After completing this guide, you know how to add new users to a Linux system with the useradd command.
Next, read about privileged access management and how it helps reduce security attacks and data breaches.