- How Do I Zip All Files In A Directory In Linux?
- Installation of zip
- For Debian/Ubuntu:
- For CentOS/RHEL:
- Syntax
- How do zip Files in Linux?
- Example 1: Zipping a File
- Example 2: Zipping Multiple Files
- Method 1: Zip All Files in a Directory Through CLI
- Example 1: Compressing the Directory Including All files
- Example 2: Compressing the Directory Including All files to Another Directory
- Method 2: Zip All Files in a Directory Through GUI
- Conclusion
- Linux File Compression Options and Comparison
- Compression types
- Linux compression
- Zip For Compression
- Tar for Compression on Linux
- Gzip for Compression on Linux
- Bzip2 for Compression on Linux
- XZ for Compression on Linux
- Extracting compressed archives
- Final thoughts
How Do I Zip All Files In A Directory In Linux?
The zip is a utility to compress files and directories with no data loss. It is also used as a file package utility, and all distributions of Linux support it. The zip file is useful when you have low bandwidth for sending data between 2 servers; the user can zip the file and send it. It consumes less storage which will make them easy to store and transfer.
This article will demonstrate the methods to zip all files in a directory. The content for the post is as follows:
- Installation of zip
- How to zip Files in Linux?
- Method 1: Zip All Files in a Directory Through CLI
- Method 2: Zip All Files in a Directory Through GUI
Installation of zip
In most Linux distributions, it comes with pre-installation, but users can also install it manually. Use the following command depending on the distribution:
For Debian/Ubuntu:
For CentOS/RHEL:
To verify whether the zip utility is installed or not, run the zip command with “–version”:
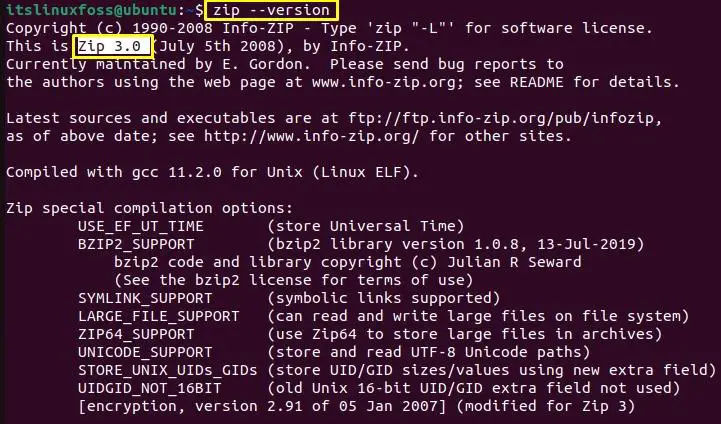
Zip version 3.0 is installed in the operating system.
The syntax for the zip command is given below:
Syntax
$ zip [File_Name.zip] [Source_File/Directory]
Type the “zip” keyword, the file name with .zip extension, and then the source file/directory name.
How do zip Files in Linux?
For a better understanding of zipping any files in Linux, check out the examples below:
Example 1: Zipping a File
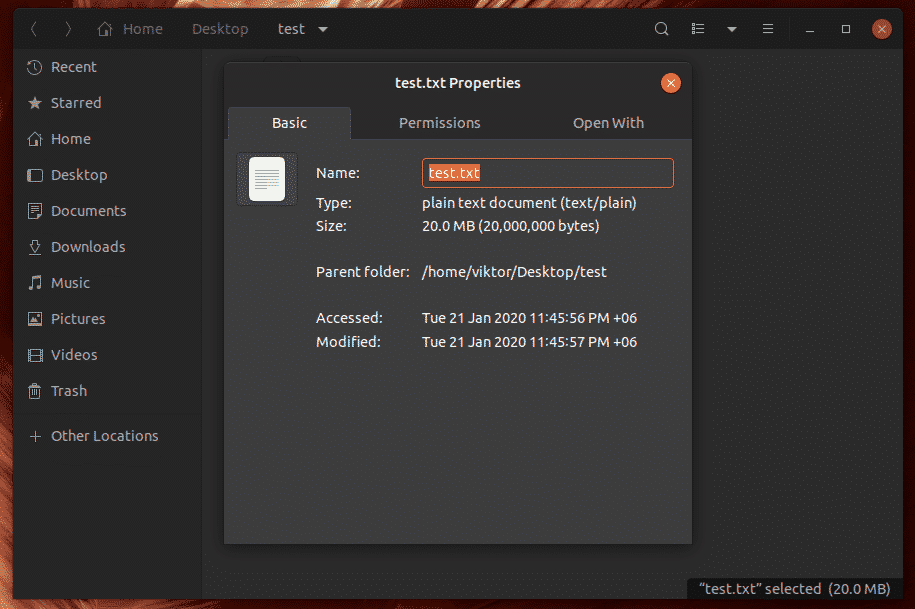
We have a “date.txt” file in our home directory. Let’s zip it using the zip utility. Run the given command in the terminal:

The date.txt file is zipped with the name date.zip. Furthermore, the zip command has also displayed the percentage of compression.
Example 2: Zipping Multiple Files
To zip the multiple files, type the file using the zip utility as follows:
$ zip All_Files.zip file1.txt file2.txt file3.txt

All the files have been compressed and stored in the “All_Files.zip”.
Method 1: Zip All Files in a Directory Through CLI
For compressing all the files in the directory, check out the implementation of the example below.
Example 1: Compressing the Directory Including All files
To compress all files present in the directory, use the “r” flag, which will compress the entire directory, including its files:
$ sudo zip -r Files.zip /Henry

The directory will be compressed including all files.
Let’s check the created zip file for the directory.

The zip file with the name “Files.zip” has been created.
Example 2: Compressing the Directory Including All files to Another Directory
To compress the entire directory to the specified directory you can specify the path before the zip file name. Run the given command in the terminal:
$ sudo zip -r /home/itslinuxfoss/Desktop/Files.zip Henry

The directory has been compressed to the “Desktop” directory.
Let’s verify it using the “ls” command:

The zip file is present in the “Desktop” directory.
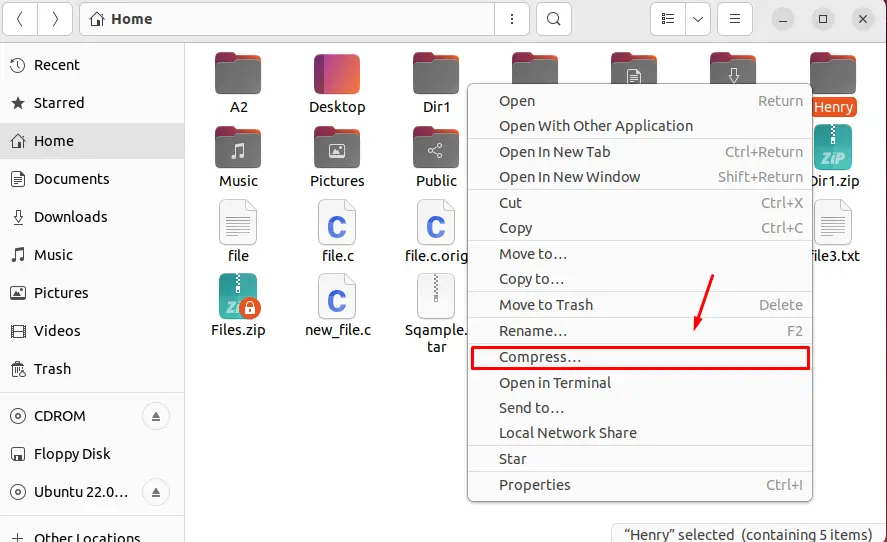
Method 2: Zip All Files in a Directory Through GUI
For zipping all files in Directory, the GUI method is also available. Just right-click on the specific directory which you want to compress and click on the “compress” option from the drop-down:
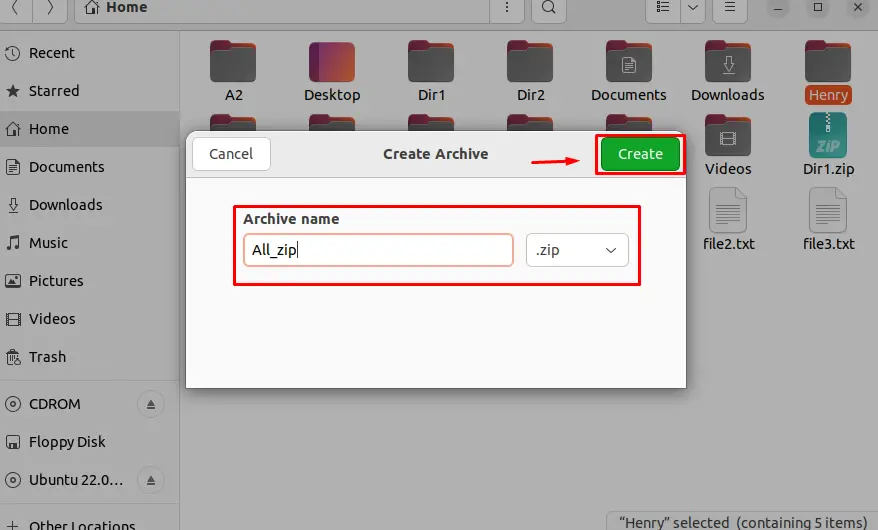
Once you click on the compress option it will ask you to enter the name of the zip file and choose the “.zip” extension from the given drop-down. After that, click on the create button as shown in the below image:
The zip file will be created which can be seen in the following screenshot:
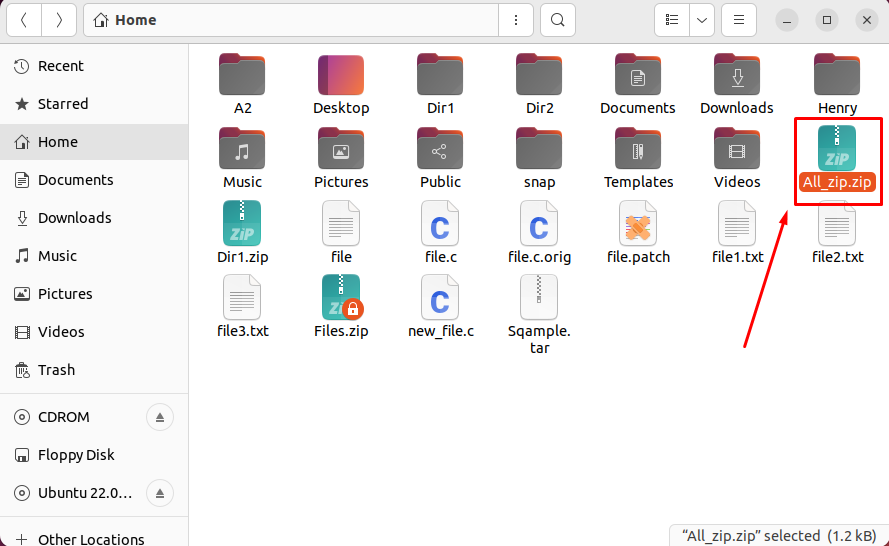
That’s how all files in a directory are zipped in Linux.
Conclusion
In Linux, zip is a utility to compress files or directories without changing their data. To zip all the files in a directory user can use the “r” flag in the command or zip the directory manually by right-clicking and hitting the “compress” option. This write-up has briefly illustrated the method to zip files and directories using the zip utility.
Linux File Compression Options and Comparison
![]()
Compression, in general, is a useful method that is essentially encoding information using less data than the original one. In the case of Linux, there are various compression options, each with its own benefits.
A generic Linux distro offers access to a handful of really useful and simple compression mechanisms. This article will only focus on them.
Compression types
Compression is encoding and representing information using fewer bits than it originally was. In the case of file compression, a compression method utilizes its own algorithm and mathematical calculation to generate an output that’s generally less than the size of the original file. Because of how different compression works and the random nature of files, the mileage may vary greatly.
There are 2 types of compression.
- Lossy compression: This is a risky type of compression that doesn’t guarantee data integrity. Essentially, once compressed, there’s a risk that the original file can’t be reconstructed using the compressed archive.
A solid example of this type of compression is the well-known MP3 format. When an MP3 is created from the original audio file, it’s significantly smaller than the original source music file. This causes loss of some audio quality. - Lossless compression: This is the most widely used type of compression. Using a “lossless” compression method, the original file can be reconstructed from the compressed file. The compression methods I’ll discuss in this article are all lossless compression methods.
Linux compression
Majority of the compression methods are available from the tool tar. As for the “zip” compression, we’ll be using the zip tool. Assuming that your system already has these tools installed, let’s get started.
At first, we need a test file. Run the following command to create one.
It’ll create a text file with 20MB size.
Now, let’s create 10 copies of the file. Together, it’s 200 MB.

Zip For Compression
Zip is quite common. For creating a zip file, the zip tool requires the following command structure.
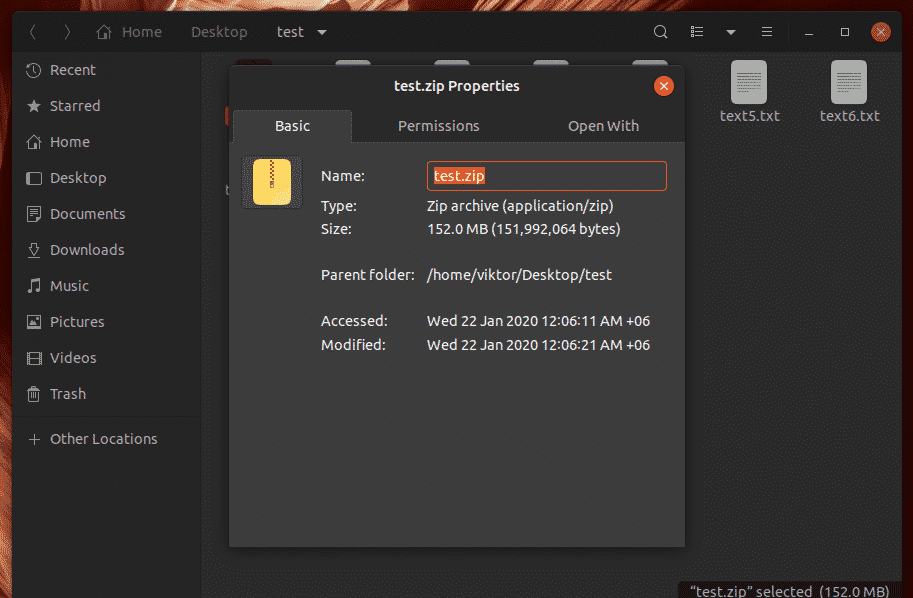
To compress all the files under the test directory in a single zip file, run this command.

The input size was 200 MB. After compression, it’s now 152 MB!
By default, the zip tool will apply the DEFLATE compression. However, it’s also capable of using bzip2 compression. Not only that, you can also create password-protected zip files! Learn more about zip.
Tar for Compression on Linux
Tar isn’t a compression method. Instead, it’s most often used for creating archives. However, it can implement a number of popular compression methods to the archive.
For handling tar (also known as “tarball”) archive, there’s the tar tool. Learn more about tar. Generally, the tar tool uses the following command structure.
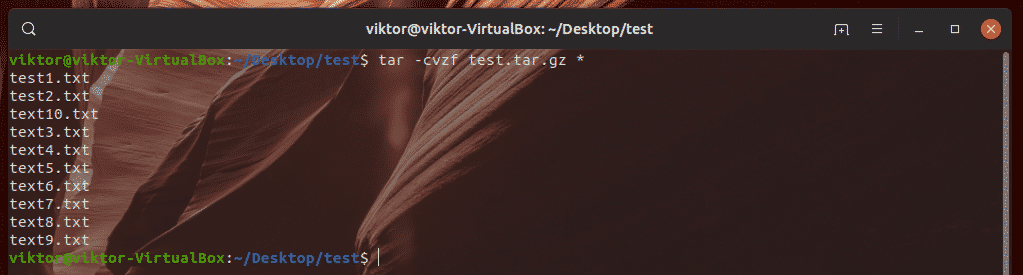
To add the test files into a single tar archive, run the following command.

Here, the file size remains the same.

Gzip for Compression on Linux
GNU Zip or gzip is another popular compression method that, in my opinion, is better than the traditional zip because of its better compression. It’s an open-source product created by Mark Adler and Jean-Loup Gailly that was originally destined to replace the UNIX compress utility.
For managing gzip archives, there are 2 tools available: tar and gzip. Let’s check out both of them.
First, the gzip tool. Here’s how the gzip command structure looks.
For example, the following command will replace test1.txt with test1.txt.gz compressed file.
If you want to compress an entire directory using gzip, run this command. Here, the “-r” flag is for “recursive” compression. Gzip will go through all the folders and compress the individual file(s) in each of them.

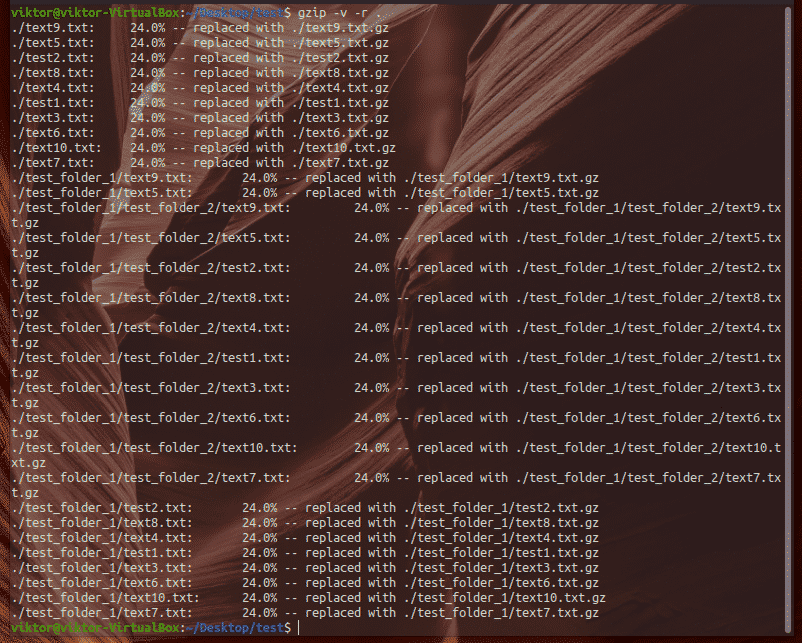
Gzip supports various compression strength value, starting from 1 (least compression, fastest) to 9 (best compression, slowest).

For better control over the output and ease-of-use, tar is better for the task. Run the following command.
The result is similar to zip using DEFLATE, resulting in 152 MB after compression.

Bzip2 for Compression on Linux
Bzip2 is a free and open-source tool that uses the Burrows-Wheeler algorithm for compression. First introduced back in 1996, bzip2 is heavily used as an alternative to the gzip compression.
Like gzip, there are 2 tools to work with bzip2: tar and bzip2.
The bzip2 tool works similar to the gzip tool. It can only work with just a single file at a time. Here’s the command structure.
Let’s compress the test1.txt file. Here, the “-v” flag is for verbose mode.
Similar to gzip, bzip2 also supports different level of compression, starting from 1 (default, less memory usage) to 9 (extreme compression, high memory usage).

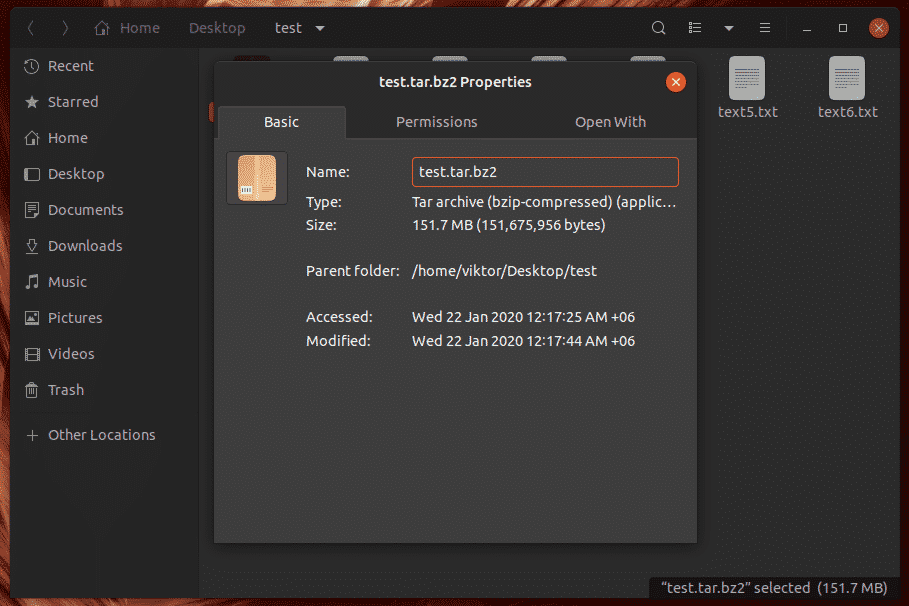
The better way of using bzip2 compression is by using tar. Use the following command.
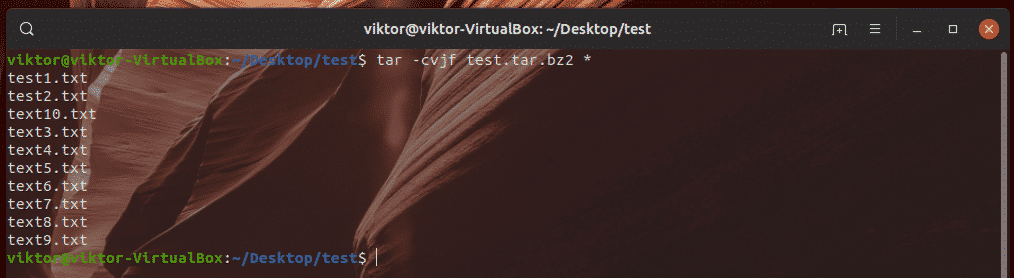
The compression is slightly improved than the previous ones. Now, the file size has shrunk to 151.7 MB.
XZ for Compression on Linux
It’s a relative newcomer in the field of compression. First released in 2009, it has seen a steady growth of usage since then.
The xz compression tool uses the LZMA2 algorithm that’s known for greater compression ratio compared to gzip and bzip2, making it a great choice when you want to save the maximum amount of disk space. However, this comes with the cost of higher memory requirements and time consumption.
File created by the XZ compression tool has the extension .xz. For compressing a single file, you can directly call the XZ tool.
For example, run the following command to compress the test1.txt file.
Similar to other compression methods mentioned, xz also supports various range of compression strength, starting from 1 (lowest compression, fastest) to 9 (best compression, slowest). If you don’t have any regard for time and just want to save space, then go for the extreme.
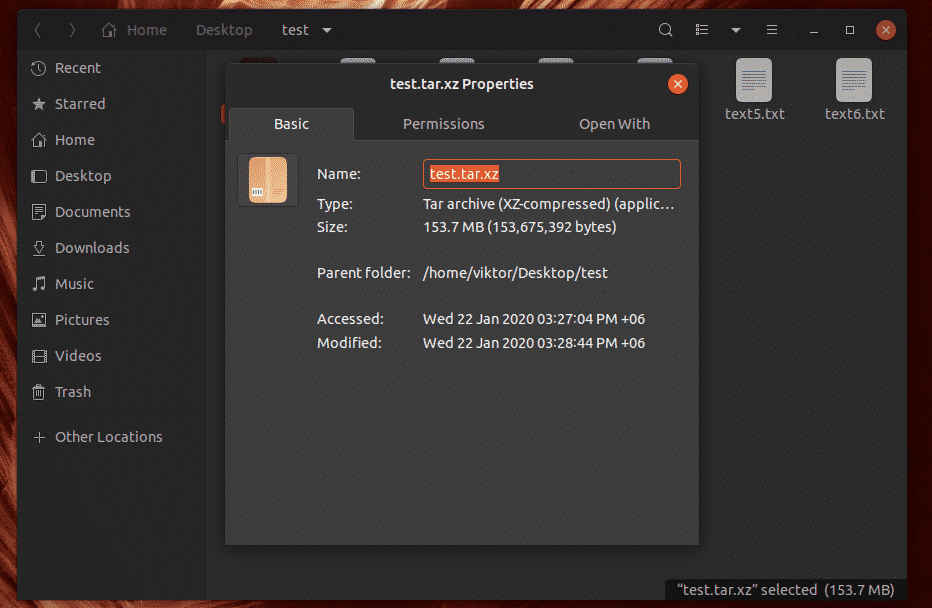
To create a compressed XZ file from all the test files, run this command.
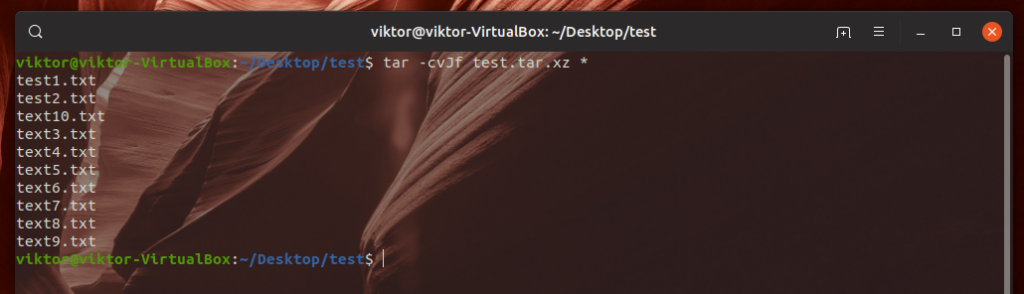
Here, the output file size is 153.7 MB.
Extracting compressed archives
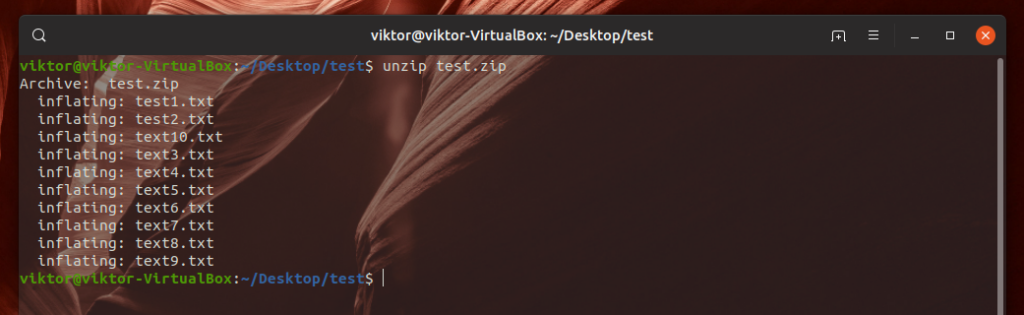
Extracting the archives we created is easier than creating them. To extract a zip file, use the following command structure.
To extract the zip archive we created, run this command. This will extract all the contents in the same directory.
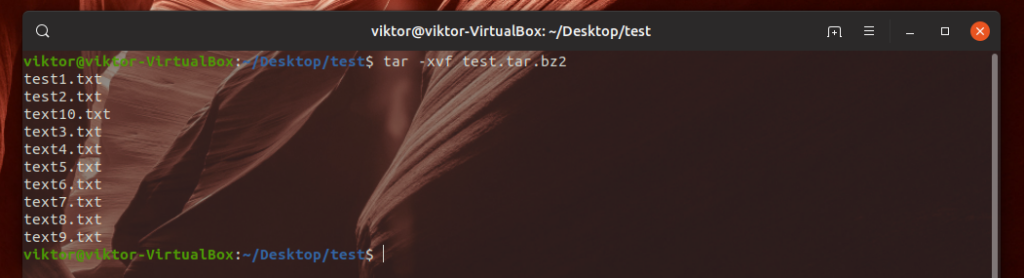
For extracting tar, tar.gz, tar.bz2 and tar.xz archives, we have to use the tar tool. The following tar command is applicable for extracting all of them.
For example, let’s extract all the files from the bz2 compressed archive.
To decompress a gzip (not tar.gz) file, run this command.

Similarly, the following command will decompress bzip2 archive.

Same command structure applies for xz archive.

Final thoughts
Hopefully, now you have enough knowledge to handle the compression tasks in different circumstances. Depending on the specific requirement, all the compression methods offer very attractive features.
One important thing to note is, the compression result won’t be the same all the time. With different data input, the output will be different. For example, in some cases, xz can offer insane compression result whereas in this example, it didn’t. Same goes for other methods.
To learn more in-depth about these tools, check out their respective man page.