Linux Serial Console
To use a serial port as console you need to compile the support into your kernel — by default it is not compiled in. For PC style serial ports it’s the config option next to menu option:
Character devices ‣ Serial drivers ‣ 8250/16550 and compatible serial support ‣ Console on 8250/16550 and compatible serial port
You must compile serial support into the kernel and not as a module.
It is possible to specify multiple devices for console output. You can define a new kernel command line option to select which device(s) to use for console output.
The format of this option is:
console=device,options device: tty0 for the foreground virtual console ttyX for any other virtual console ttySx for a serial port lp0 for the first parallel port ttyUSB0 for the first USB serial device options: depend on the driver. For the serial port this defines the baudrate/parity/bits/flow control of the port, in the format BBBBPNF, where BBBB is the speed, P is parity (n/o/e), N is number of bits, and F is flow control ('r' for RTS). Default is 9600n8. The maximum baudrate is 115200. You can specify multiple console= options on the kernel command line.
The behavior is well defined when each device type is mentioned only once. In this case, the output will appear on all requested consoles. And the last device will be used when you open /dev/console . So, for example:
console=ttyS1,9600 console=tty0
defines that opening /dev/console will get you the current foreground virtual console, and kernel messages will appear on both the VGA console and the 2nd serial port (ttyS1 or COM2) at 9600 baud.
The behavior is more complicated when the same device type is defined more times. In this case, there are the following two rules:
- The output will appear only on the first device of each defined type.
- /dev/console will be associated with the first registered device. Where the registration order depends on how kernel initializes various subsystems. This rule is used also when the last console= parameter is not used for other reasons. For example, because of a typo or because the hardware is not available.
The result might be surprising. For example, the following two command lines have the same result:
console=ttyS1,9600 console=tty0 console=tty1 console=tty0 console=ttyS1,9600 console=tty1
The kernel messages are printed only on tty0 and ttyS1 . And /dev/console gets associated with tty0 . It is because kernel tries to register graphical consoles before serial ones. It does it because of the default behavior when no console device is specified, see below.
Note that the last console=tty1 parameter still makes a difference. The kernel command line is used also by systemd. It would use the last defined tty1 as the login console.
If no console device is specified, the first device found capable of acting as a system console will be used. At this time, the system first looks for a VGA card and then for a serial port. So if you don’t have a VGA card in your system the first serial port will automatically become the console.
You will need to create a new device to use /dev/console . The official /dev/console is now character device 5,1.
(You can also use a network device as a console. See Documentation/networking/netconsole.rst for information on that.)
Here’s an example that will use /dev/ttyS1 (COM2) as the console. Replace the sample values as needed.
- Create /dev/console (real console) and /dev/tty0 (master virtual console):
cd /dev rm -f console tty0 mknod -m 622 console c 5 1 mknod -m 622 tty0 c 4 0
serial = 1,9600n8 (ttyS1, 9600 bd, no parity, 8 bits)
S1:23:respawn:/sbin/getty -L ttyS1 9600 vt100
Xfree86, svgalib, gpm, SVGATextMode
Miquel van Smoorenburg , 11-Jun-2000
Заметки о Linux, электронике, радиолюбительстве
В предыдущем посте было показано как запустить UART на отладочной плате Launchpad для MSP430. Теперь рассмотрим как общаться с платой при помощи средств командной строки Linux. Используется плата с прошивкой из предыдущего поста. Для подробностей — см. под кат
Как известно, все устройства последовательных портов представлены файлами устройств в каталоге /dev.Через эти файлы и происходит общение ОС Linux с внешним устройством на последовательном порту. Чтобы передать что-то на внешнее устройство нужно записать данные в файл устройства, а чтобы считать информацию из устройства — прочитать данные из файла устройства. Это можно делать при помощи команд cat и echo так же как для обычных файлов на диске. Или внутри программы на С при помощи вызовов ioctl(), read() и write() или библиотеки termios.
Физическим последовательным портам RS232, к которым подключались диалапные модемы на старых компьютерах, соответствуют файлы устройств /dev/ttyS*, начиная с /dev/ttyS0. Виртуальным последовательным портам, которые создаются различными конвертерами USBUART соответствуют файлы устройств /dev/ttyUSB* и /dev/ttyACM*. Ядро Linux автоматически разпознаёт подключенное устройство, загружает для него драйвер и создаёт файл устройства. Вручную устанавливать драйвер, как в ОС Windows не требуется. Например, если подключить к USB преобразователь USBUART FT232, то создаётся файл устройства /dev/ttyUSB0, с которым можно работать также как и с обычным последовательным портом. На плате Launcpad находится микросхема TUSB3410, которая тоже представляет собой конвертер USBUART. Если подключить её к USB, то создаётся файл устройства /dev/ttyACM0. Чтобы общаться с платой нужно что-либо писать/читать с этого файла.
Чтобы пользователь мог читать или писать в файл устройства последовательного порта, его нужно добавить в группу dialout. Иначе работать с последовательным портом сможет только администратор root.
Простейшим приложением с графическим интерфейсом, которое работает с последовательным портом, является CuteCOM. Он обычно уже есть в вашем дистрибутиве Linux. Его можно установить из репозиториев. При помощи CuteCOM мы работали с платой в предыдущем посте. Выглядит CuteCOM вот так:
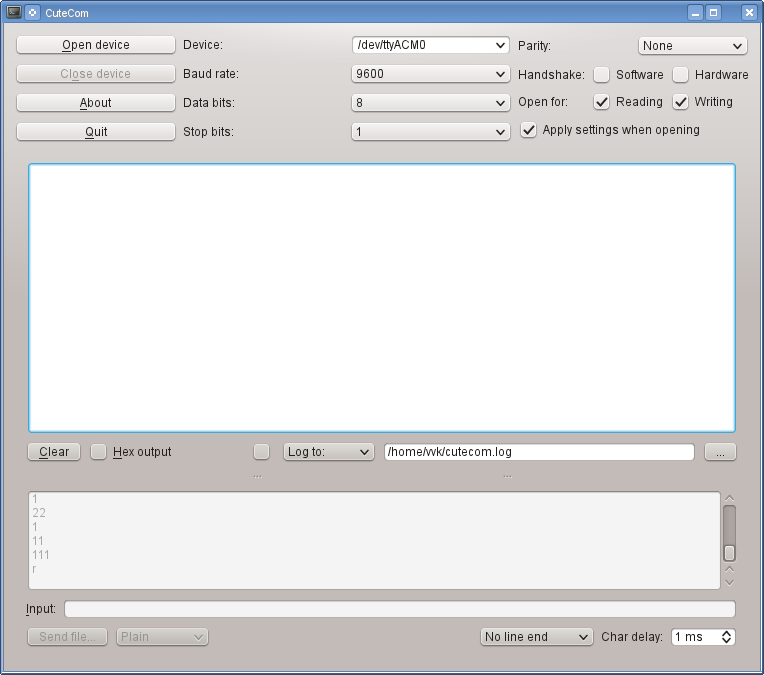
Работать с ним крайне просто. Указываем нужное устройство, если его нет в списке, то его можно впечатать вручную. Затем указываем скорость и параметры и нажимаем OpenDevice. В окне видим данные, которые пришли от устройства. В поле ввода в нижней части можем печать строку символов, которые предаются на устройство. Чтобы передать данный нажимаем Enter и смотрим ответ устройства в окне.
Теперь рассмотрим как работать с COM-портом из командной строки. Для этого служат три команды: stty, cat и echo.
Команда stty устанавливает параметры и скорость COM-порта. Её формат:
stty -F
Чтобы установить параметры для платы Launchpad для соединения на скорости 9600 нужно выполнить:
$ stty 9600 -F /dev/ttyACM0 raw -echo
Параметр raw устанавливает, что данные в компьютер передаются байт за байтом так же как приходят в порт без преобразований. Аппаратное управление потоком отключено. Подробнее о том, что включает и выключает raw — см. man stty. Если не включить raw, то скорее всего ничего работать не будет.
Теперь в той же консоли нужно набрать
$ cat /dev/ttyACM0
И можно смотреть данные, которые приходят от платы. Выход — нажать Ctrl+C.
Теперь нажимаем на плате RESET и видим, что в консоди напечатался текст.
Чтобы передать в плату данные, в другой консоли нужно использовать команду echo и перенаправление вывода в файл устройства. Наберём в другой консоли:
$ echo "1">/dev/ttyACM0
Видим, что на плате загорелся красный светодиод и в первой консоли было выдано сообщение об этом. Чтобы убрать конец строки в передаваемых данных, то нужно использовать запуск echo -n, а чтобы интерпретировать 16-ричные коды — нужно echo -e. Ключи можно комбинировать.
В итоге должно получиться так:

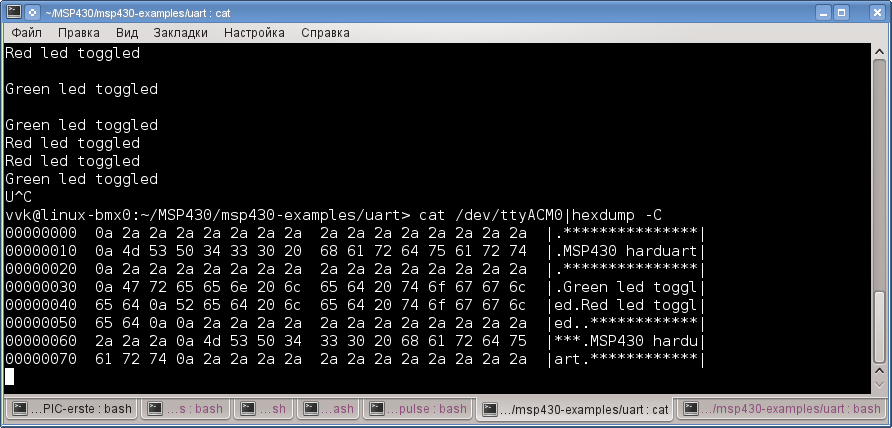
Чтобы увидеть 16-ричные коды данных, приходящих от устройства, нужно использовать команду hexdump:
$ cat /dev/ttyACM0|hexdump -C
Получится вот так:
Чтобы иметь вывод данных от устройство на экран и в текстовый файл нужно использовать tee:
$ cat /dev/ttyACM0|tee output.txt
Все эти команды можно встраивать в свои Bash-скрипты и работать с вашим устройством вообще без программирования со стороны компьютера.
Linux Serial Console
To use a serial port as console you need to compile the support into your kernel — by default it is not compiled in. For PC style serial ports it’s the config option next to menu option:
Character devices ‣ Serial drivers ‣ 8250/16550 and compatible serial support ‣ Console on 8250/16550 and compatible serial port
You must compile serial support into the kernel and not as a module.
It is possible to specify multiple devices for console output. You can define a new kernel command line option to select which device(s) to use for console output.
The format of this option is:
console=device,options device: tty0 for the foreground virtual console ttyX for any other virtual console ttySx for a serial port lp0 for the first parallel port ttyUSB0 for the first USB serial device options: depend on the driver. For the serial port this defines the baudrate/parity/bits/flow control of the port, in the format BBBBPNF, where BBBB is the speed, P is parity (n/o/e), N is number of bits, and F is flow control ('r' for RTS). Default is 9600n8. The maximum baudrate is 115200. You can specify multiple console= options on the kernel command line.
The behavior is well defined when each device type is mentioned only once. In this case, the output will appear on all requested consoles. And the last device will be used when you open /dev/console . So, for example:
console=ttyS1,9600 console=tty0
defines that opening /dev/console will get you the current foreground virtual console, and kernel messages will appear on both the VGA console and the 2nd serial port (ttyS1 or COM2) at 9600 baud.
The behavior is more complicated when the same device type is defined more times. In this case, there are the following two rules:
- The output will appear only on the first device of each defined type.
- /dev/console will be associated with the first registered device. Where the registration order depends on how kernel initializes various subsystems. This rule is used also when the last console= parameter is not used for other reasons. For example, because of a typo or because the hardware is not available.
The result might be surprising. For example, the following two command lines have the same result:
console=ttyS1,9600 console=tty0 console=tty1 console=tty0 console=ttyS1,9600 console=tty1
The kernel messages are printed only on tty0 and ttyS1 . And /dev/console gets associated with tty0 . It is because kernel tries to register graphical consoles before serial ones. It does it because of the default behavior when no console device is specified, see below.
Note that the last console=tty1 parameter still makes a difference. The kernel command line is used also by systemd. It would use the last defined tty1 as the login console.
If no console device is specified, the first device found capable of acting as a system console will be used. At this time, the system first looks for a VGA card and then for a serial port. So if you don’t have a VGA card in your system the first serial port will automatically become the console.
You will need to create a new device to use /dev/console . The official /dev/console is now character device 5,1.
(You can also use a network device as a console. See Documentation/networking/netconsole.rst for information on that.)
Here’s an example that will use /dev/ttyS1 (COM2) as the console. Replace the sample values as needed.
- Create /dev/console (real console) and /dev/tty0 (master virtual console):
cd /dev rm -f console tty0 mknod -m 622 console c 5 1 mknod -m 622 tty0 c 4 0
serial = 1,9600n8 (ttyS1, 9600 bd, no parity, 8 bits)
S1:23:respawn:/sbin/getty -L ttyS1 9600 vt100
Xfree86, svgalib, gpm, SVGATextMode
Miquel van Smoorenburg , 11-Jun-2000