- Copying devices in Linux
- 6 Answers 6
- How to Learn dd Command in Linux [15 Useful Examples]
- dd Command Syntax
- 1. How to Copy a File in Linux
- 2. How to Convert Text from Lowercase to Uppercase
- 3. How to Convert Text from Uppercase to Lowercase
- 4. Avoid Overwriting Destination File in Linux
- 5. Append Data in a File Using dd Command
- 6. Skip Bytes or Characters While Reading the Input File
- 7. Backup Linux Disk Partition Using dd Command
- 8. Restore Linux Disk Partition Using dd Command
- 9. Backup Entire Linux Hard Drive Using dd Command
- 10. Restore the Linux Hard Drive Using dd Command
- 11. Backup Master Boot Record Using dd Command
- 12. Restore Master Boot Record Using dd Command
- 13. Copy CD/DVD Drive Content Using dd Command
- 14. Create a Bootable USB Drive Using dd Command
- 15. How to Show the Progress Bar
Copying devices in Linux
I am working at an OS independent file manager, in C. I managed to copy files, links and directories, but I am not sure how to copy devices. I would appreciate any help.
6 Answers 6
To create a device file, use the mknod(2) syscall. The struct stat structure will give you the major and minor device numbers for an existing device in st_rdev .
Having said that, there is little value in «copying» a device because a device doesn’t contain anything useful. The major and minor numbers are specific to the OS on which they exist.
Thanks! I don’t know a lot about Linux specific stuff, so maybe I am wrong, but I would think that the use for this is that if someone wants to back up a part of their system they would want the devices to be backed up too (in case they delete the original directory and then they want to restore it). Is there a flaw in this logic? Because if there is really no need at all to copy them, I would rather not.
@Radu You never know how a system is set up, if someone wants to move/copy a whole directory somewhere else, they expect everything in that directory to be moved — even if its device files. And e.g. named pipes and unix domain sockets are created by the same mechanisms — those might be vital to the operation of whatever was in that directory. So better copy it.
Where exactly do I find the minor and major device numbers in the dirent structure? Which dirent fields specify that?
Got everything working, thanks! It was actually much easier than the mknod(2) man page instructions (which were very ambiguous). Just had to copy both mode and dev from the source file stats structure as arguments to mknod().
It’s not really a useful feature, IMHO. tar(1) needs to be able to do it as part of backing up a system, and setup programs need to be able to create them for you when setting up your system, but few people need to deal directly with device files these days.
Also, modern Linux systems are going to dynamic device files, created on the fly. You plug in a device and the device files appear; you unplug it and they disappear. There is really no use in being able to copy these dynamic files.
My reason for implementing this is backup purposes. Maybe someone wants to copy some dir structure and want to restore it later as it was.
Well, I had some devices in /lib/udev/devices which I deleted by mistake during my tests. They did not reappear.
@Radu, what version of Linux are you using? And did you try removing the hardware and re-plugging it, or for non-removable hardware, did you try rebooting your system?
I am using Fedora 14. I don’t know what hardware that device belonged to. I rebooted my computer and they did not reappear.
dd if=/dev/sda1 of=/some_file_or_equally_sized_partition bs=8192 if you want to copy the device-file itself, do this:
cp -p device-filename new-filename those are both equivalent device files, and can be used to access the device.
If you’re want to do this from C, use mknod() .. see «man 2 mknod»
On Linux cp -p did not copy the device block special file for me, but cp -r did provided that I was root.
cp -dpR devices /destination_directory
You don’t. Just filter them out of the view such that it can’t be done.
Use the stat function to determine the file type.
Check if you’ve the udev package, if you do, chances are that devices are generated on the fly, from the package description:
udev - rule-based device node and kernel event manager udev is a collection of tools and a daemon to manage events received from the kernel and deal with them in user-space. Primarily this involves creating and removing device nodes in /dev when hardware is discovered or removed from the system. Events are received via kernel netlink messaged and processed according to rules in /etc/udev/rules.d and /lib/udev/rules.d, altering the name of the device node, creating additional symlinks or calling other tools and programs including those to load kernel modules and initialise the device. How to Learn dd Command in Linux [15 Useful Examples]
Brief: In this advanced guide, we will discuss some practical examples of the dd command. After following this guide, advanced users will be able to work with the block devices comfortably from the command line interface.
In Linux, everything is a file and the block devices are not an exception to it. Often time, we need to work with block devices. As Linux users, we perform a variety of operations on block devices, such as, – taking a backup of a disk or partition, backing up Master Boot Record (MBR), making a bootable USB drive, and the list goes on.
Certainly, we can use graphical tools to perform all these operations. However, most Linux administrators prefer to use the dd command due to its rich functionality and robustness.
In this advanced guide, we will learn about the dd command to convert and copy files. However, unlike the cp command most of the time it’s used with block devices.
In this guide, first, we will understand the usage of the dd command with basic examples then we will discuss some advanced use cases.
dd Command Syntax
The most common syntax of the dd command is as follows:
- if – represents the input or source file.
- of – represents the output or destination file.
Precaution – It is important to note that the dd command must be used very cautiously while working with the block devices. A small mistake can cause permanent data loss. Hence it is strongly commended to try out these operations on the test machine first.
1. How to Copy a File in Linux
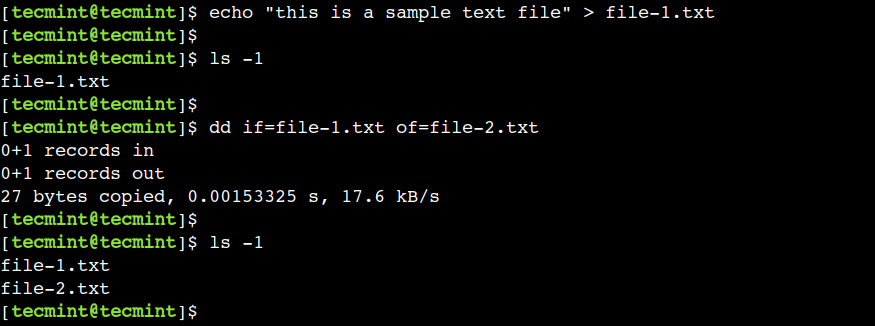
One of the basic use of the dd command is to copy a file into a current directory. Let’s understand by creating a simple text file:
$ echo "this is a sample text file" > file-1.txt
Now, let’s create a copy of it using the dd command:
In this example, the if parameter represents the source file whereas the of parameter represents the destination file.
Isn’t it exactly similar to the cp command? Then what’s so special about the dd command?
The dd command is much more powerful than the regular cp command. The latter sections of the tutorial discuss some of its advanced use cases.
2. How to Convert Text from Lowercase to Uppercase
The dd command allows us to perform case conversion. To achieve this we can use the conv parameter with it.
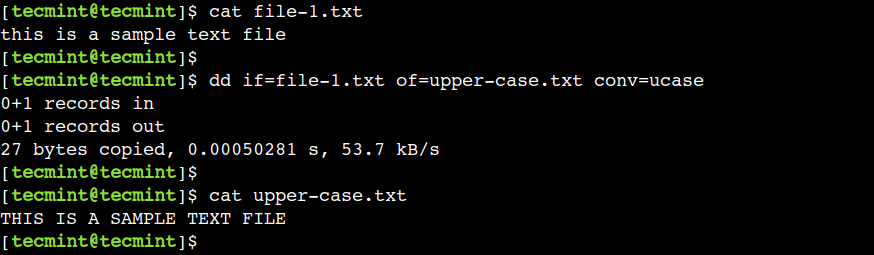
To understand this, first, display the contents of the file-1.txt file:
$ cat file-1.txt this is a sample text file
Now, let’s convert the file contents to the upper case using the following command:
$ dd if=file-1.txt of=upper-case.txt conv=ucase
In this example, the conv=ucase option is used to convert the lowercase letters to uppercase letters.
Finally, verify the contents of the newly created file:
$ cat upper-case.txt THIS IS A SAMPLE TEXT FILE
3. How to Convert Text from Uppercase to Lowercase
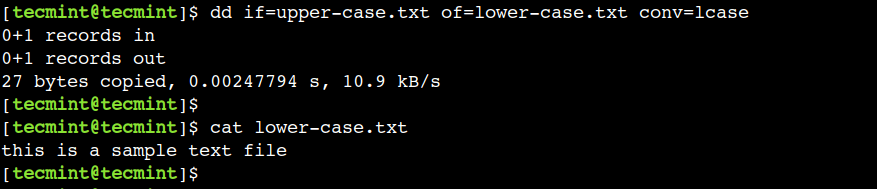
In a similar way, we can use the dd command to convert the upper case letters into lower case letters:
Let’s use the conv=lcase option to convert the upper case letters to lower case:
$ dd if=upper-case.txt of=lower-case.txt conv=lcase
Now, let’s display the contents of the newly created file and verify that the conversion has been done correctly:
$ cat lower-case.txt this is a sample text file
4. Avoid Overwriting Destination File in Linux
By default, the dd command replaces the destination file, which means it will overwrite the file if it exists at the destination with the same name.
However, we can disable this default behavior using the conv=excl option as shown.
$ dd if=file-1.txt of=file-2.txt conv=excl dd: failed to open ‘file-2.txt’ File exists
Here, we can see that the dd command has aborted the operations because the file with the same name is present at the destination.
5. Append Data in a File Using dd Command
Sometimes, we want to update the file in an append mode, which means the new contents should be added to the end of the destination file.
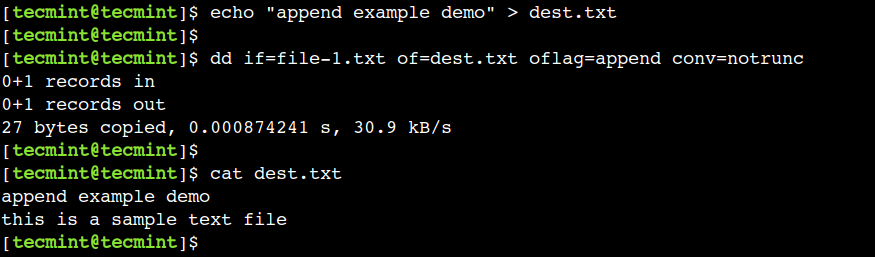
We can achieve this by combining the two flags – oflag=append and conv=notrunc . Here, the oflag represents the output flag whereas the notrunc option is used to disable the truncation at the destination.
To understand this, first, let’s create a new text file:
$ echo "append example demo" > dest.txt
Next, let’s append the contents to the dest.txt file using the following command:
$ dd if=file-1.txt of=dest.txt oflag=append conv=notrunc
Now, let’s check the contents of the dest.txt file:
$ cat dest.txt append example demo this is a sample text file
6. Skip Bytes or Characters While Reading the Input File
We can instruct the dd command to skip the first few characters while reading the input file using the ibs and skip options.
First, let’s display the contents of the file-1.txt file:
$ cat file-1.txt this is a sample text file
Next, let’s skip the first 8 characters by using the following command:
$ dd if=file-1.txt of=file-2.txt ibs=8 skip=1
Now, let’s verify the contents of the file-2.txt file:
$ cat file-2.txt a sample text file
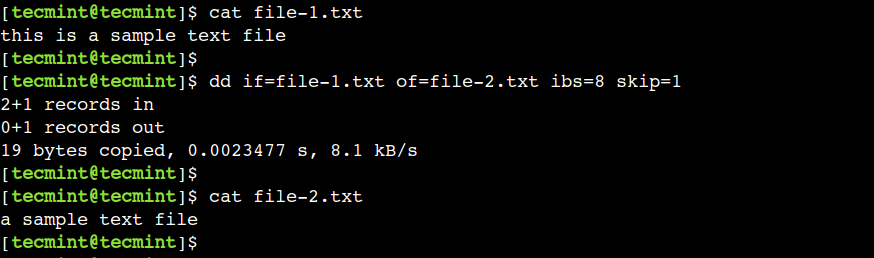
In the above output, we can see that the command has skipped the first 8 characters.
7. Backup Linux Disk Partition Using dd Command
So far we discussed the basic examples of the dd command that doesn’t require root access. Now, let’s see some advanced use cases.
Just like files, we can take the backup of the disk partition using the dd command. For example, the below command takes a backup of the /dev/sda1 partition to partition-bkp.img:
$ sudo dd if=/dev/sda1 of=partition-bkp.img

8. Restore Linux Disk Partition Using dd Command
In the previous example, we backed up the /dev/sda1 partition to the partition-bkp.img file.
Now, let’s restore it to the /dev/sdb1 partition using the following command:
$ sudo dd if=partition-bkp.img of=/dev/sdb1

It is important to note that, the size of the destination partition must be equal to or larger than the backup size.
9. Backup Entire Linux Hard Drive Using dd Command
The disk drive can have multiple partitions. So taking and restoring backup per partition can become time-consuming as the number of partitions increases. To overcome this limitation, we can back up the entire disk drive just like the partitions.
So, let’s take the backup of the /dev/sda disk using the following command:
$ sudo dd if=/dev/sda of=disk-bkp.img

The above command takes back up the entire disk including its partitions.
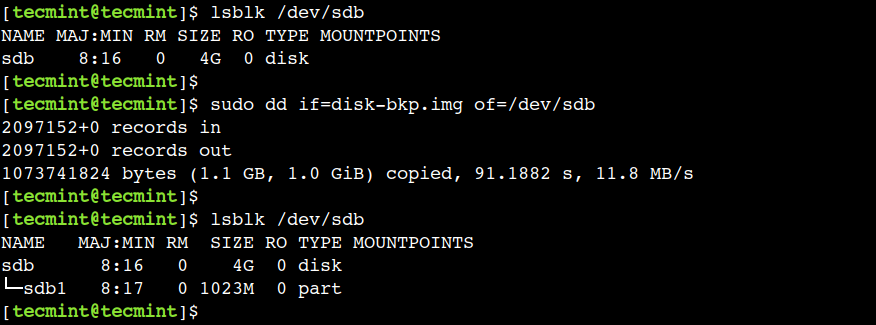
10. Restore the Linux Hard Drive Using dd Command
Just like partitions, we can restore the backup of the entire disk. In the previous example, we backed up the entire disk to the disk-bkp.img file. Now, let’s use the same to restore it on the /dev/sdb disk.
First, let’s delete all the partitions from the /dev/sdb disk and verify that all the partitions have been deleted:
Next, let’s restore the backup on the /dev/sdb drive using the following command:
$ sudo dd if=disk-bkp.img of=/dev/sdb
Finally, verify that the partition has been created on the /dev/sdb disk:
11. Backup Master Boot Record Using dd Command
The Master Boot Record (MBR) is located in the first sector of the boot disk. It stores information about the disk partitions. We can use the dd command as shown below to take a back of it:
$ sudo dd if=/dev/sda of=mbr.img bs=512 count=1
The above command takes back up the first 512 bytes i.e. one sector.

It is important to note that, the above command must be executed on the boot disk.
12. Restore Master Boot Record Using dd Command
In the previous example, we backed up the Master Boot Record (MBR). Now, let’s restore it on the /dev/sdb disk using the following command:
$ sudo dd if=mbr.img of=/dev/sdb

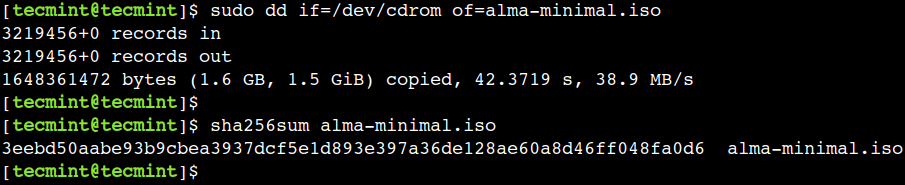
13. Copy CD/DVD Drive Content Using dd Command
Similar to the partitions and disks, we can use the dd command to copy contents from the CD or DVD drive. So let’s use the below command to do the same:
$ sudo dd if=/dev/cdrom of=alma-minimal.iso
In Linux, the CD/DVD drive is represented by the /dev/cdrom device. Hence we are using it as a source file.
Now, let’s verify that the contents have been copied successfully by verifying its checksum command:
14. Create a Bootable USB Drive Using dd Command
In the previous example, we created an iso image of the Alma Linux. Now let’s use it to create a bootable USB drive:
$ sudo dd if=alma-minimal.iso of=/dev/sdb

It is important to note that, the above command must be executed with the correct USB drive.
15. How to Show the Progress Bar
By default, the dd command doesn’t show the progress while doing the copy operation. However, we can override this default behavior using the status option.
So let’s use the status=progress option with the dd command to show the progress bar:
$ sudo dd if=alma-minimal.iso of=/dev/sdb status=progress

Conclusion
In this article, we discussed some practical examples of the dd command. Advanced users can refer to these examples in day-to-day life while working with Linux systems. However, we have to be very careful while executing these commands. Because a small mistake can overwrite the contents of the entire disk.
Do you know of any other best example of the dd command in Linux? Let us know your views in the comments below.