- Linux: Copy a directory preserving ownership, permissions, and modification date
- Validation
- Related articles
- How to Copy File Permissions and Ownership to Another File in Linux
- Copy File Permissions to Another File
- Copy File Ownership to Another File
- How to copy files and give them permission of destination directory
- 2 Answers 2
- Ubuntu Linux: Copying File/Folder permissions from One Machine to Another
- 3 Answers 3
Linux: Copy a directory preserving ownership, permissions, and modification date
File copying is about more than just content – the metadata for user ownership, permissions, and timestamps is often critical to retrieval and function.
Below are the relevant switches for metadata preservation when using cp, rsync, and tar. These typically need sudo in order to work.
copy with recursion (-r) and (-p) preserve mode,ownership,timestamps
(-a) archive recursive which preserves permissions/time/ownership, (-u) skip files that are newer on the receiver, (-v) verbose, (-h) numbers human readable.
sudo rsync -auvh —progress / # remote rsync with ssh key rsync -e «ssh -i ~/.ssh/sshprivkey» -auvh —progress / :
If you specify both sourceDir and destDir with an ending slash, the destination will be at an extra level of subfolder. Avoid this by suffixing only the source with an ending slash, e.g. “/ ”.
preserve permission (-p) verbose (-v)
tar cvfp .tar -C / . # make sure directory you are extracting to pre-exists # use sudo to allow setting permissions upon extraction mkdir -p sudo tar xvfp .tar -C
When tar’ing with -C the order is important, make sure the “-C” comes first, then the final period.
Validation
If you want to run a test, you can use a test script on my github page that creates a directory called ‘testp’, that has owners named bugs, daffy, and michael. It assigns different levels of permission, ownership, and modifications dates.
wget https://raw.githubusercontent.com/fabianlee/blogcode/master/permissiontest/testpermissions.sh chmod ug+r+x testpermissions.sh ./testpermissions.sh
This creates a directory named ‘testp’, you can view the owner, permissions, and modifications using ‘ls -l testp/*’
Test each utility described above by typing these commands.
sudo cp -rp testp testcp sudo rsync -auvh --progress testp/* testrsync tar cvfp myarchive.tar -C testp/ . mkdir testtar && tar xvfp myarchive.tar -C testtar
You can verify that the ownership, permissions, and modifications dates have been preserved by issuing the commands below and noting they all have the same metadata.
ls -l testp/* ls -l testcp/* ls -l testrsync/* ls -l testtar/*
rsync dry run (-a) archive recursive (-v) verbose, (-u) skip files newer (-n) dry run
$ sudo rsync -aunv sourceDirectory/ destinationDirectory/
Related articles
How to Copy File Permissions and Ownership to Another File in Linux
Assuming you have two files or you have just created a new file and want it to have the same permissions and ownership of an older file.
In this article, we will show you how to copy permissions and ownership from one file to another file in Linux using chmod and chown commands respectively.
Copy File Permissions to Another File
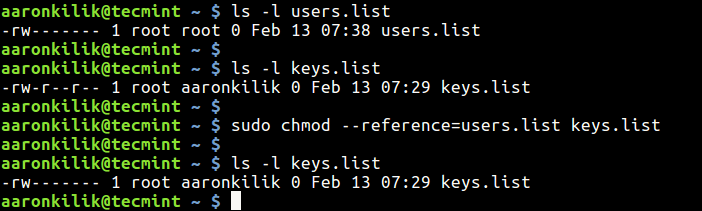
To copy file permissions from one file to another file, use chmod command with the —reference switch in the following syntax, where reference_file is the file from which permissions will be copied rather than specifying mode (i.e octal or numerical mode permissions) for file.
$ chmod --reference=reference_file file
$ ls -l users.list $ ls -l keys.list $ sudo chmod --reference=users.list keys.list $ ls -l keys.list
Copy File Ownership to Another File
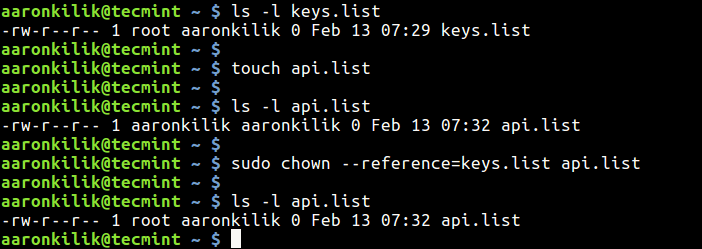
Likewise, to copy ownership from another file, use chown command with the —reference switch as well using the following syntax, where reference_file is file from which owner and group will be copied rather than specifying owner:group values for file.
$ chown --reference=reference_file file
$ ls -l keys.list $ touch api.list $ ls -l keys.list $ sudo chown --reference=keys.list api.list $ ls -l api.list
You can also copy file permissions and ownership from one file to multiple files as shown.
$ sudo chmod --reference=users.list users1.list users2.list users3.list $ sudo chown --reference=users.list users1.list users2.list users3.list
For more information, refer to the chown and chmod man pages.
You will also find these guides concerning file permissions to be useful:
That’s all! If you know any other way to copy or clone file permissions in Linux, do share with us via the feedback form below.
How to copy files and give them permission of destination directory
I am copying files from source to location. The source is not owned by me and the permission for files at source is —-rwx—. The permission of files coped to destination directory which is owned by me is —-r-x—. The permission of destination directory is drwxrwsrwx. How do I have the files with same permission of destination directory. I tried «cp —no-preserve=all» but it did not work (still the same permission).
2 Answers 2
cp --no-preserve=mode,ownership $backupfile $destination This does not set the destination directory’s permissions on newly copied files. Instead, it sets permissions of the user under which copy operation is done. For example, if you copy under root, copied files permissions will be root:root .
Let me rephrase that to «How to preserve permissions of destination directory on copy?»
I can’t take credit for the answer since I just combined a couple of answers I found on the wild. So here it comes.
Permissions are generally not propagated by the directory that files are being copied into, rather new permissions are controlled by the user’s umask. However when you copy a file from one location to another it’s a bit of a special case where the user’s umask is essentially ignored and the existing permissions on the file are preserved.
Which explains why you can’t directly propagate the permissions of the src to the dst directory.
However, there is two-step workaround to this.
- cp-metadata: Copy the attributes and only the attributes you want to preserve back to the source directory. Here is a quick script that can do this:
#!/bin/bash # Filename: cp-metadata myecho=echo src_path="$1" dst_path="$2" find "$src_path" | while read src_file; do dst_file="$dst_path$" $myecho chmod --reference="$src_file" "$dst_file" $myecho chown --reference="$src_file" "$dst_file" $myecho touch --reference="$src_file" "$dst_file" done You can leave out the touch command if you don’t want keep the timestamp. Replace myecho=echo with myecho= to actually perform the commands.
Mind that this script should be run in sudo mode in order to be able to run chown and chmod effectively
- cp —preserve : After you have successfully run the first command now it’s time to copy the contents along with the attributes to the dst directory.
—preserve[=ATTR_LIST]
preserve the specified attributes (default: mode,ownership,timestamps), if possible additional attributes: context, links, xattr, all
Ubuntu Linux: Copying File/Folder permissions from One Machine to Another
I have been given the task of transferring a large (Thousands of Files) Magento Installation to a different server. Being native to Windows, I simply downloaded the files to my pc and FTP’d them back in. However, I now realise that the permissions are all incorrect, and I can’t simply do each file one by one. Is there any way to sync/copy file permissions? I’m not sure if the users/groups must be set up the same? From the appearance I simply need the Numberical permissions to be correct. They are completely separate Servers, and the files/folders will be identical. Ubuntu 12.04 is the OS on the «new» server.
3 Answers 3
On Linux, you can back up and restore ownership and permissions (including access control lists but not SELinux contexts) with the ACL tools. Run getfacl -R >permissions.txt in the toplevel directory on the machine with the correct permissions. Copy over the output file to the target machine and run setfacl —restore=permissions.txt in the toplevel target directory.
If you need to copy ownership as well as permissions, you’ll need to do the restore part as root.
You probably want to use rsync . To get that to work, you need to install it on both machines (if it’s not installed already). After that, simply run (as root):
rsync -avrHP root@source-host:/path/to/source-directory/ /path/to/destination - You run the command on the destination host. If you want to run it on the source host, just remove the root@source-host: part from the first argument, and add a root@destination-host: argument to the second one. Note: it is not possible to run rsync with two remote hosts; only one of the ends can be a «remote» end.
- Logging in over ssh as root is at all possible. The common thing to do these days is to disable such access, for reasons of security. However, in order for rsync to be able to actually copy permissions, it needs to run as root on both ends. If it is disabled, check out /etc/ssh/sshd_config , looking for PermitRootLogin . If it is set to no , switch it to yes and restart sshd . Don’t forget to disable it again after copying the files!
- The users who have ownership on files in the source host all exist on the destination host. If not, some permission bits may be copied incorrectly.
Note that you do not need to remove your already-copied files first. Rsync will detect that the files exist, but synchronize the permissions. If there are some files which have changed since they were copied, rsync will also synchronize their contents.
Brilliant Answer, only problem is is that the original files are on a Shared box to which I have no SSH access. I will have to speak to the host company or think of a alternative somehow. Thanks for all the information anyway!
Run as root rsync -og maybe this is what you are looking for.
-o, --owner This option causes rsync to set the owner of the destination file to be the same as the source file, but only if the receiving rsync is being run as the super-user (see also the --super and --fake-super options). Without this option, the owner of new and/or transferred files are set to the invoking user on the receiving side. The preservation of ownership will associate matching names by default, but may fall back to using the ID number in some circumstances (see also the --numeric-ids option for a full discussion). -g, --group This option causes rsync to set the group of the destination file to be the same as the source file. If the receiving program is not running as the super-user (or if --no-super was specified), only groups that the invoking user on the receiving side is a member of will be preserved. Without this option, the group is set to the default group of the invoking user on the receiving side. The preservation of group information will associate matching names by default, but may fall back to using the ID number in some circumstances (see also the --numeric-ids option for a full discussion).