- Share a Folder between two Local Users
- 3 Answers 3
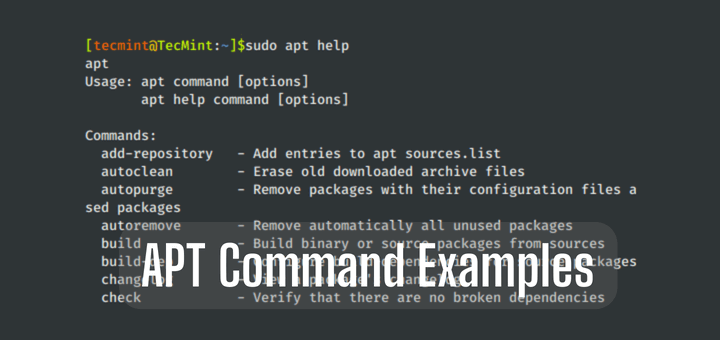
- How to Create a Shared Directory for All Users in Linux?
- Step 1 − Create the folder to be shared
- Step 2 − Create a user group
- Step 3 − Create a user group
- Step 4 − Give permissions
- Step 5 − Add users to the group
- How to Create a Shared Directory for All Users in Linux
- Related Posts
- 15 thoughts on “How to Create a Shared Directory for All Users in Linux”
- Общие папки Linux
- Общие папки в Linux
Share a Folder between two Local Users
I and my brother have User Accounts on this machine. I want to share the Documents directory with him. Is there a STRAIGHTFORWARD way to do it? I am not a power user so I am looking for a way to do this using nautilus, rather than a script or a way that requires creating symlinks. I can download an application if i have to. Last time I wanted to do this I just copied the contents to /home for both of us to use. Something I can do in System Settings would be appreciated
Once you created the shared directory with the right permission, you can just access by smb://127.0.0.1
Is «Documents Director» the name of the folder or is Director the name of the folder that resides in your Documents folder? Why no symlink creation? It can be done by drag and drop.
maybe i put the question in a wrong way.. but i want an easy way out.. methods already available give out scripts to achieve this.
@Achu i tried you method.. i get an error saying «unable to mount location, failed to mount windows share». am i missing something really obvious?
3 Answers 3
There are three steps to this process
Step One: Make your brother a member of your group.
Your group-name is same as your user-id. Say, if your user-ID is akumar your group name is also akumar . If your brother’s ID is bkumar , then you want to make bkumar a member of the group akumar . See How to manage users and groups? for how to add your brother’s user-ID to your group.
Step Two: Change the permission of the folder you want to share.
Open Nautilus. Right click on the folder you want to share. Go to permissions tab. look for the group permissions and change it into «Read and Write.» Check the box for allowing the same permissions to the files and folders inside.
Step Three: Verify that your brother can create delete files in the shared folder.
Let your brother login to the computer. Open Nautilus. It will open to your brother’s home folder. Navigate to your home folder and open the shared folder by:
click on Computer or System Files (depends on the version of Ubuntu) on the left panel.
Double click on home folder, double click on folder named akumar inside home.
Create a file in the folder. Delete the new file.
Step Four: (optional) Make a link of this folder to your brother’s home folder.
while logged in as your brother, open another window of Nautilus next to the first one, by middle-click or Ctrl +Left click. In your own home folder where the shared folder resides, hold down Ctrl + Shift and drag the shared folder to your brother’s home folder.
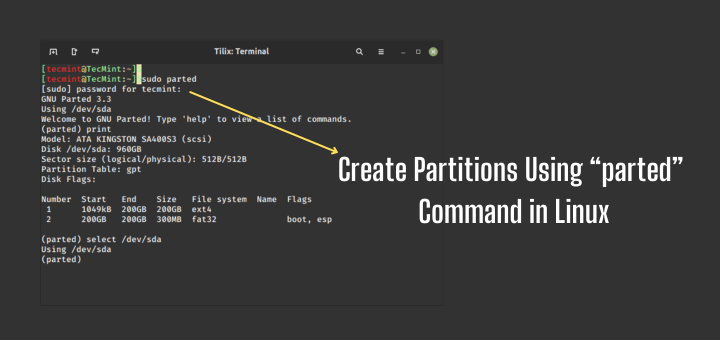
How to Create a Shared Directory for All Users in Linux?
When multiple users need access to the same set of directories of files then we need to create shared folders to be used by the users. In Linux there is concept of users and groups which can be given certain level of permissions that will enable them to share the data. Below are the steps how to create the shared folders where users can and update the files individually.
Step 1 − Create the folder to be shared
Assuming we are setting up the shared folder from scratch, lets create the folder. The -p will create the directory and would ignore any errors if the directory already exists.
sudo mkdir -p /bigproject/sharedFolder
Step 2 − Create a user group
Next, we create a user group that will be used by users requiring access to this folder.
sudo groupadd SharedUsres
Step 3 − Create a user group
Next we create a user group which will be used by users requiring access to this folder.
sudo groupadd SharedUsres
Step 4 − Give permissions
Now we assign the new group to become owner of the shared folder and give them appropriate permissions which can also be inherited by the subdirectories.
sudo chgrp -R SharedUsers /bigproject/sharedFolder sudo chmod -R 2775 /bigproject/sharedFolder
Step 5 − Add users to the group
Now we add usernames to this group show that they can use the shared folder.
useradd -D -g SharedFolder user1 useradd -D -g SharedFolder user2
How to Create a Shared Directory for All Users in Linux
As a system administrator, you may have a certain directory that you want to give read/write access to every user on a Linux server. In this guide, we will review how to enable write access to all users on a particular directory (shared directory) in Linux.
This calls for setting the appropriate access permissions, and the most effective as well as reliable method to allocating a common group for all the users who will share or have write access to the specific directory.
So, start by creating the directory and common group in case it doesn’t already exist on the system as follows:
$ sudo mkdir -p /var/www/reports/ $ sudo groupadd project
Then add an existing user who will have write access to the directory: /var/www/reports/ to the group project as below.
$ sudo usermod -a -G project tecmint

The flags and arguments used in the above command are:
- -a – which adds the user to the supplementary group.
- -G – specifies the group name.
- project – group name.
- tecmint – existing username.
Afterwards, proceed to configure the appropriate permissions on the directory, where the option -R enables recursive operations into subdirectories:
$ sudo chgrp -R project /var/www/reports/ $ sudo chmod -R 2775 /var/www/reports/
Explaining the permissions 2775 in the chmod command above:
- 2 – turns on the setGID bit, implying–newly created subfiles inherit the same group as the directory, and newly created subdirectories inherit the set GID bit of the parent directory.
- 7 – gives rwx permissions for owner.
- 7 – gives rwx permissions for group.
- 5 – gives rx permissions for others.
You can create more system users and add them to the directory group as follows:
$ sudo useradd -m -c "Aaron Kili" -s/bin/bash -G project aaronkilik $ sudo useradd -m -c "John Doo" -s/bin/bash -G project john $ sudo useradd -m -c "Ravi Saive" -s/bin/bash -G project ravi
Then create subdirectories where the new users above will store their project reports:
$ sudo mkdir -p /var/www/reports/aaronkilik_reports $ sudo mkdir -p /var/www/reports/johndoo_reports $ sudo mkdir -p /var/www/reports/ravi_reports
Now you can create files/folders and share with other users on the same group.
That’s it! In this tutorial, we reviewed how to enable write access to all users on a particular directory. To understand more about users/groups in Linux, read How to Manage Users/Groups File Permissions and Attributes.
Remember to offer us your thoughts about this article via the feedback form below.
Aaron Kili is a Linux and F.O.S.S enthusiast, an upcoming Linux SysAdmin, web developer, and currently a content creator for TecMint who loves working with computers and strongly believes in sharing knowledge.
Each tutorial at TecMint is created by a team of experienced Linux system administrators so that it meets our high-quality standards.
Related Posts
15 thoughts on “How to Create a Shared Directory for All Users in Linux”
“The standard behavior for new files and sub-directories is to ALWAYS receive the creator’s GROUP” – RHCSA RHEL 8, A. Ghori, 1st edition. In the example of this tutorial, I do not understand why we enabled setgid for the directory SINCE all the system users created (aaronkilik, john, and ravi) belong to the same group (called “project“) as the group of the parent directory “reports” (sudo chgrp -R project /var/www/reports/). I mean if the user aaronkilik or any other of the two users create a file or sub-directory in “reports“, since the aaronkilik belongs to the group called “project“, the file/sub-directory created receives the creator’s group like stated in the first phase, that is the group “project“. Why is it needed to enabled setgid for the “project” directory? Maybe there is a reason but I do not see it now. I could see the reason to enable setgid in case the three system users created belonged to different groups (in this case chmod -R 2777 /var/www/reports/ would be needed too). Thank you. Reply
Hi, Need help to set up multiple project-wise Shared Directory via GUI panel on Ubuntu on currently running the server? Reply
What if a user copies or moves a directory tree from his home directory to the shared one?
I don’t think the subdirs will magically change their group, let atone recursivelyy because they are not newly created… Reply
@Evi1 That’s correct, including the recursive option allows subdirectories to be get top directory permissions automatically. Many thanks for the heads up. Reply
Hi, I think that you do not need 2775. More secure is to use chmod -R 2770. In this case only the desired users/group can access this shared folder, and any others will not have access. Reply
@lulian Yap, your correct, we should have used chmod -R 2770, other system users will be blocked from accessing a shared directory. However, always set permissions depending on your environment needs. Reply
In my case, i needed the shared folder were shared also with apache. I had to use “chmod -R 2775”. If I used “chmod -R 2770”, apache couldn’t access to the folders. Reply
Общие папки Linux
Если вы администрируете какой-либо сервер, у вас может возникнуть необходимость создать общую папку, к которой будут иметь доступ все пользователи на сервере. Например, необходимо, чтобы они имели возможность создавать в ней файлы и все эти файлы были доступны всем пользователям на сервере.
В этой небольшой статье мы рассмотрим как настраиваются общие папки Linux с помощью стандартной системы полномочий Linux.
Общие папки в Linux
Как вы знаете, в Linux есть своя система полномочий для файлов и папок, в которой можно разрешить чтение, запись и выполнение для пользователя владельца, определённой группы пользователей и всех остальных. Если вы забыли как это работает ознакомьтесь со статьей Права доступа к файлам и Группы пользователей Linux.
Сначала давайте создадим саму папку:
Если надо разрешить доступ к папке всем, то достаточно установить такие права:
sudo chmod ugo+rw -R /var/share
sudo chmod 766 -R /var/share
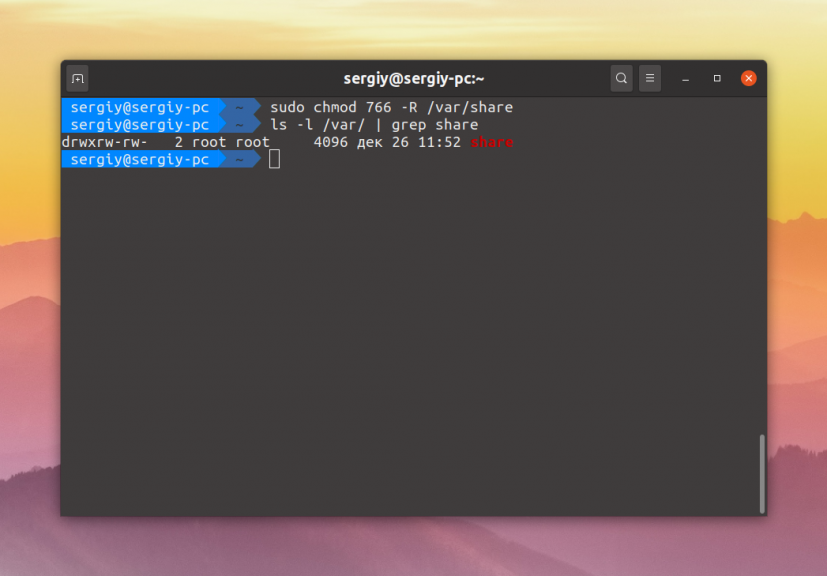
Эти две команды аналогичны. Они включают для владельца файла полный доступ к нему, а для группы и всех остальных — только чтение и запись. Опция -R позволяет применить изменения рекурсивно ко всем подпапкам и файлам в этом каталоге. Для того чтобы разрешить вообще всё используйте маску прав 777:
sudo chmod 777 -R /var/share
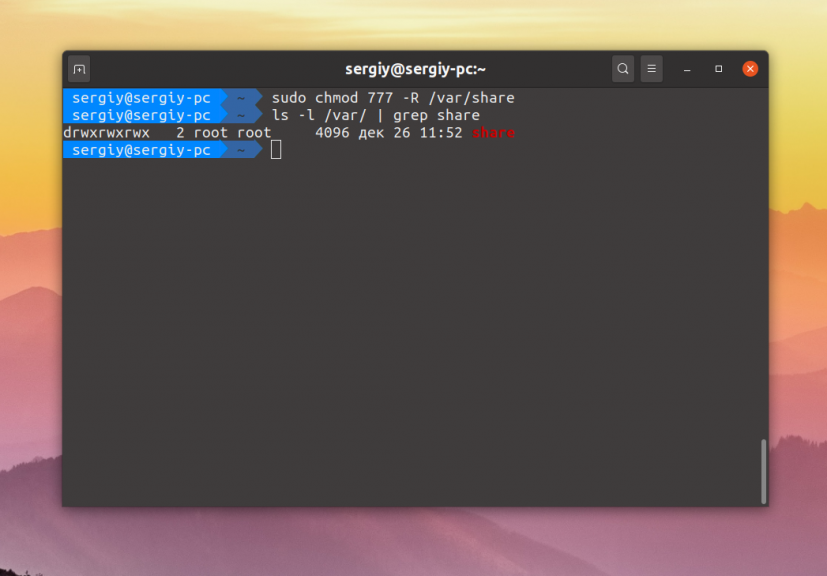
Теперь все пользователи смогут не только создавать и читать файлы в этой папке, но и выполнять их.
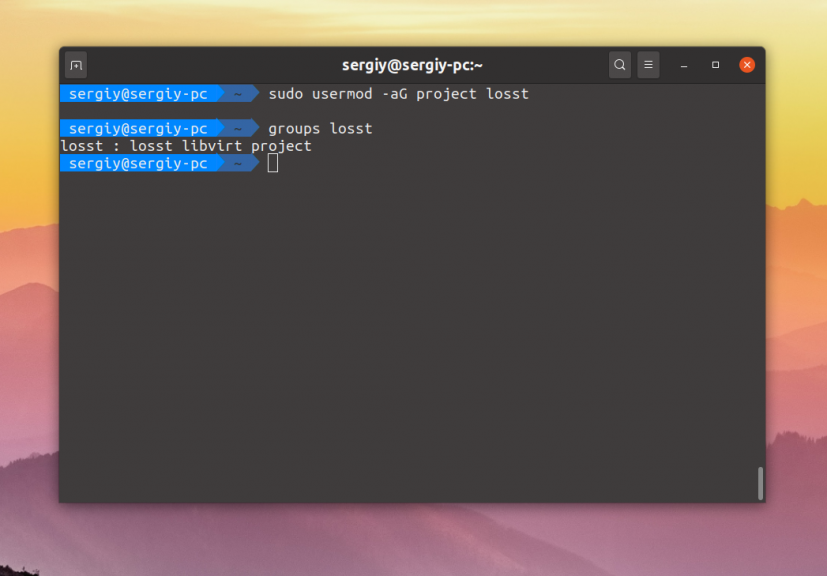
Если же надо чтобы папка была доступна только нескольким пользователям, надо объединить их в группу. Например, в группу project. Если такой группы не существует, создайте её:
Для добавления пользователя в группу используется команда usermod. Например, для пользователей losst и losst1 команды будут выглядеть так:
usermod -aG project losst
usermod -aG project losst1
Затем группу папки надо изменить на project. Для этого можно воспользоваться командой chgrp:
sudo chgrp project -R /var/share
Осталось сделать права для этой папки. Кроме стандартных прав, которые разрешают чтение, запись и выполнение файлов для группы project нам необходимо установить SGID бит. Если этот флаг устанавливается для файла, то он позволяет выполнять этот файл с правами группы файла, но если он устанавливается для папки, то все файлы и папки, создаваемые в ней будут получать ту же группу что и у этой папки. Это как раз то, что нам надо:
sudo chmod ug+rwx -R /var/share
sudo chmod +s -R /var/share
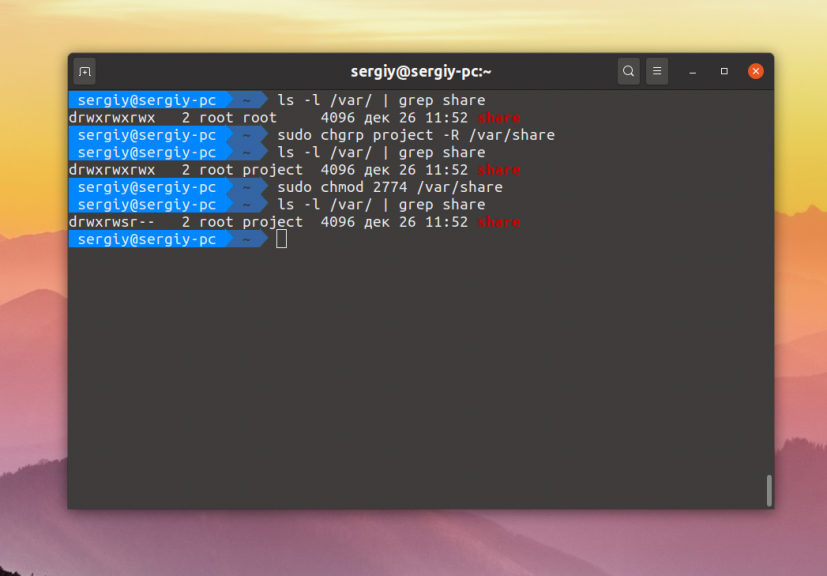
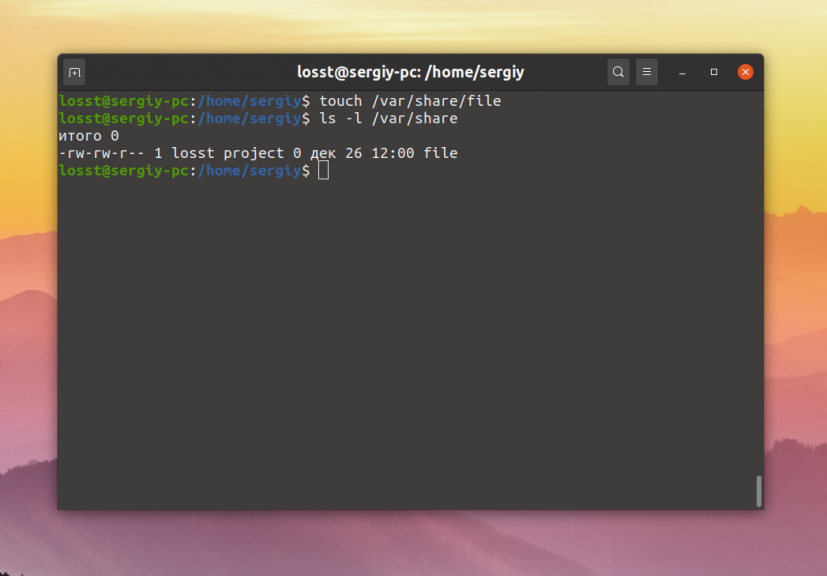
Маска прав 774 разрешает всё группе и владельцу, и разрешает только чтение всем остальным. Можно запретить им и чтение заменив 4 на 0, получится 770. После этого оба пользователя losst и losst1 смогут создавать файлы в этой папке, а также оба получат доступ к созданным файлам.
Как видите всё очень просто. А если вам надо создать общую папку, доступную по сети посмотрите на статью про настройку NFS или Samba.
Обнаружили ошибку в тексте? Сообщите мне об этом. Выделите текст с ошибкой и нажмите Ctrl+Enter.