How to Create Bootable Windows 10 image in Debian?
How can you study which field values you can use for Windows 10 iso?
OS: Debian 8.5 64 bit
Hardware: Asus Zenbook UX303UA
Linux kernel: 4.6 of backports
Related threads: How to create bootable Windows 7 iso image in Linux?, Customizing a Windows 7 install ISO
Motivation: I need Windows 10 to use Canon P-150 duplex scanner, but when I started my Windows, I got Error 0xC0000428 because Windows update has again broken things there and I use Windows otherwise so rarely; and I have no spare Windows left to make bootable media
Please check the answer I have provided here, building upon contributions from other members unix.stackexchange.com/questions/531012/… (this procedure resulted in a EFI bootable win10 ISO)
11 Answers 11
I tried the Win7 solution described by Microsoft on a Windows machine:
so went to Debian Stretch 9 to try to build the Windows 10 bootable USB using a e5.onthehub.com college/school ISO.
Using dd absolutely doesn’t work for Windows 10. This only works for Linux OSes. Use:
dd if=my-linux-os.iso of=/dev/sdX bs=4M Note: Never try write to /dev/sdX1 where X= and always check you are not overwriting your hard disk which is usually /dev/sda or /dev/sdb !
For Windows 10 you can use WoeUSB but not from the apt/yum repos. These ones are obsolete, at least for Debian 9. So instead use:
git clone https://github.com/slacka/WoeUSB.git Then follow the instructions at the end of:
You must have all the prerequisites such as gparted and so forth installed first.
I also found at the end of the process that I must run woeusb with sudo. So you just use:
sudo woeusb --device local/of/my/windows-10-image.iso /dev/sdX and hey presto it just works brilliantly. In my case my harddisk was /dev/sda and my USB drive was /dev/sdb so I wrote the ISO to /dev/sdb (again be careful, you don’t want to overwrite your OS by accident). I then installed it on a military class MSI motherboard with 2TB hard disk attached with no fast boot options inside the BIOS and it just works. I turned on absolutely every UEFI option first to get it into the right state.
I also had problems at install time, with the system hanging forever when using a Gmail email account for login and when the internet cable was connected at the second restart of the machine (during the install process). If you have this issue, disconnect internet, restart machine, let generic account be built, login, restart with internet cable
I had to use —target-filesystem NTFS like this: sudo woeusb —target-filesystem NTFS —device /path/to/image.iso /dev/sd? to avoid an error regarding file size larger than 4GB in FAT32 file system.
This worked for me even with legacy/CSM boot (Ubuntu 16.04, Windows 10 Version 1511 32bit; you can use genisoimage instead of mkisofs as well, mkisofs is just a symlink):
mkisofs \ -no-emul-boot \ -b boot/etfsboot.com \ -boot-load-seg 0x07C0 \ -boot-load-size 8 \ -iso-level 2 \ -udf \ -joliet \ -D \ -N \ -relaxed-filenames \ -o win10-1511-32bit-mod1.iso \ files/ (one long line, in bash with backslashes at the end for line continuation)
where files/ is the subdirectory which contains the extracted contents of the Windows 10 ISO.
The key point seems to be the etfsboot.com from the boot/ subdirectory of the Windows 10 ISO.
I can boot the burned disc with legacy/CSM without any problems.
I did only try out with the 1511 version of win10. If you try with other versions, please leave a comment.
No, genisoimage is a defective and dead variant of mkisofs . In case you only have a symlink, it is recommended to fetch a recent original that includes all the bug fixes and enhancements from the last 14 years.
@schily In Ubuntu 16.04, mkisofs is just a symlink to genisoimage. I’ve just tried to describe the situation at the system I’ve used for this as best as I could. But thank you for the information! So now we know that building the image even works with the 14 year old and buggy genisoimage used in Ubuntu 16.04. BTW, invoking genisoimage -version on Ubuntu 16.04 results in genisoimage 1.1.11 (Linux)
14 years ago, there have been many small bugs in the resulting filesystem image. Whether you notice them depends on what you do. Important: genisoimage has absoutely no UTF-8 support. This may be important unless you only use filenames with 7 bit ASCII. If you compare genisoimage with xorriso, genisoimage may be a win since it implements rudimentary UDF support. The new mkisofs on the other side supports user/group, permissions, symlinks, device files hardlinks and even chinese characters in filenames and better timestamps. Decide whether you are OK with a draft or like a mature program.
If you are going to boot a UEFI-based computer, just mount the Windows ISO (take care that it is a UDF formatted ISO) and copy all files to the USB drive. As long as the drive is in FAT32 format, a UEFI computer will recognize it and it will offer the option to boot from it.
On the other hand, for a BIOS-based machine, the best option is to manually configure syslinux to chainload the Windows boot. I tried this on Windows 8, but not yet on 10. /dev/sdf is your USB drive.
- Format the USB to FAT32
- Make sure the USB has only one partition, and it is boot active (GParted will help with this)
- Copy all files from the ISO to the USB drive
- Install syslinux on your Linux system
- Run syslinux -i /dev/sdf1 (the first partition on the USB drive, you can check on lsblk )
- Run dd if=/usr/lib/syslinux/bios/mbr.bin of=/dev/sdf bs=4M
- Mount the USB drive and create the directory boot/syslinux
- Copy all *.c32 files from /usr/lib/syslinux/bios to the boot/syslinux directory on the USB
- Create a syslinux.cfg text file on boot/syslinux , with the text
LABEL win10 MENU LABEL Boot Windows 10 install COM32 /boot/syslinux/chain.c32 APPEND label=win7fs ntldr=/bootmgr Edit: I’m not sure where Debian puts the syslinux files; you can find them with find / -name «mbr.bin» 2> /dev/null
How to Create Bootable Windows 11 USB Installer on Ubuntu Linux
![]()
Microsoft has announced Windows 11. Besides online upgrading, here’s how to burn Windows 11 as an USB installer in Ubuntu Linux.
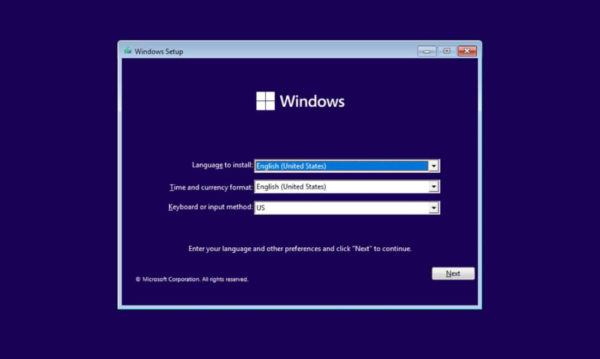
The official Windows 11 iso image will be available to download soon in next week. Though it has leaked! And you can easily install it using an USB stick.
Requirements:
Before getting started, you need a 6 GB+ USB drive, as well as a computer or laptop with:
- 1 gigahertz (GHz) or faster processor.
- 4GB+ RAM.
- 60GB+ hard disk.
- Graphics with DirectX 12 or later compatible.
- UEFI, Secure Boot capable.
- TPM 2.0 (Some succeed on old machines via WinPE).
Option 1: Boot Windows 11 iso via Ventoy:
It has been tested that Ventoy works for Windows 11. Simply install Ventoy on your USB stick and then copy the iso and boot it! See the link for more:
Option 2: Create Windows 11 USB via WoeUSB:
WoeUSB is a free and open-source Microsoft Windows® USB installation media preparer for GNU+Linux.
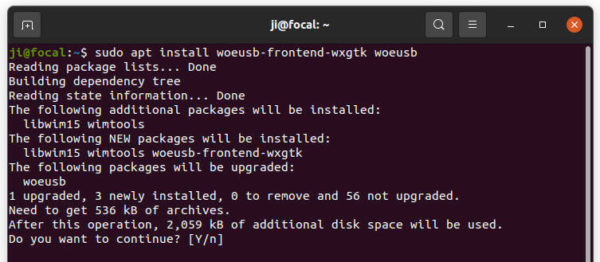
1. Install WoeUSB in Ubuntu:
For all current Ubuntu releases, including Ubuntu 18.04, Ubuntu 20.04, Ubuntu 21.04, you can install the tool from the PPA repository.
First, search for and open terminal from system app launcher.

Next, run command to add the PPA. Type user password, no asterisk feedback, when it asks and hit Enter.
sudo add-apt-repository ppa:tomtomtom/woeusb
Finally, install WoeUSB via command:
sudo apt install woeusb woeusb-frontend-wxgtk
For Ubuntu 18.04, Linux Mint, you need to run sudo apt update command to refresh package cache first.
2. Burn Windows 11 iso image:
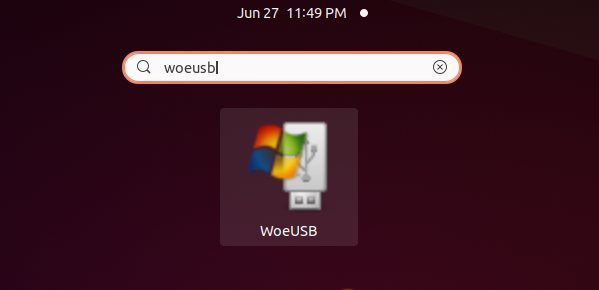
Now plug-in your USB drive! Search for and open WoeUSB from system app launcher.
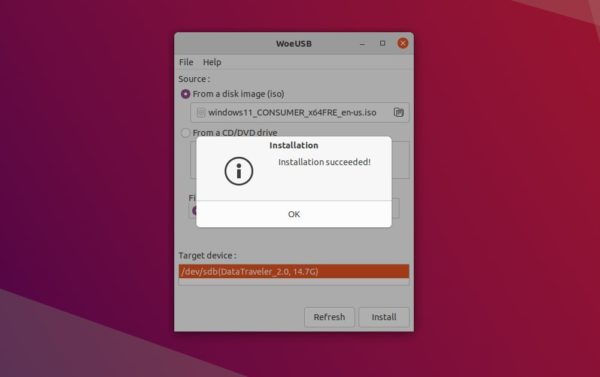
When it opens, select ‘From a disk image (iso)’ and choose your ISO image. Then highlight the USB device from ‘Target device’. Finally click on ‘Install’ button.
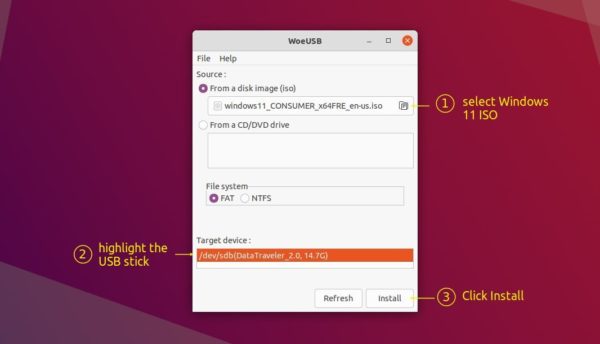
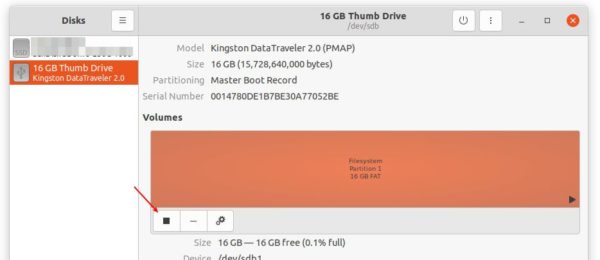
NOTE you have to unmount the USB or it will pop-up an error dialog. To do so, search for and open Disks utility.
Select your device in left pane, and click on the square icon to unmount it.
Next go back to WoeUSB, click refresh and select the USB device. After clicking on the Install button, it starts to wipe USB and burn Windows 11 into it.

When everything’s done successfully, it will prompt that installation succeeded. Close it and boot the USB to get start installing Windows 11!

Ji m
I’m a freelance blogger who started using Ubuntu in 2007 and wishes to share my experiences and some useful tips with Ubuntu beginners and lovers. Please comment to remind me outdated tutorial! And, notify me if you find any typo/grammar/language mistakes. English is not my native language. Contact me via [email protected] Buy me a coffee: https://ko-fi.com/ubuntuhandbook1