- How to make a disk image and restore from it later?
- 12 Answers 12
- With dd
- How to Make Disk Images in Linux with DD Command
- Install LSSCSI Utility
- Check Disk Information
- Create a Clone Disk Image
- Restore the Drive from Clone Image
- Conclusion
- About the author
- Aqsa Yasin
- How to make disk image with dd on Linux
- What is disk image?
- How to create whole disk image?
- How to create a partition image?
- How to create disk image using live CD or USB flash drive?
- How to restore disk image?
- Bonus tip
How to make a disk image and restore from it later?
I’m a new Linux user. I’ve reinstalled my Wubi from scratch at least ten times the last few weeks because while getting the system up and running (drivers, resolution, etc.) I’ve broken something (X, grub, unknowns) and I can’t get it back to work. Especially for a newbie like me, it’s easier (and much faster) to just reinstall the whole shebang than try to troubleshoot several layers of failed «fixing» attempts. Coming from Windows, I expect that there is some «disk image» utility that I can run to make a snapshot of my Linux install (and of the boot partition!!) before I meddle with stuff. Then, after I’ve foobar’ed my machine, I would somehow restore my machine back to that working snapshot. What’s the Linux equivalent of Windows disk imagers like Acronis True Image or Norton Ghost? Note: I found a similar question: Easy backup/restore of installed system?
Torben, under the Wubi folder (usually C:\UBUNTU, but may be some other drive & folder), you’ll find not only the loopback disk images created for your Ubuntu install, but also some other important files (like the Wubi loader). Sorry if it’s a guess, but I think it’s an educated one. 😉 Maybe (’cause I really have never tried — sorry — but wouldn’t hurt if you try it — I would) if you backup that folder while the system is in a good state, you can take Wubi back by replacing the good state over the non-functional one.
Please post this as an answer, because it sounds like a good way, specifically for Wubi installations! After my last fubar I installed a «real» Ubuntu, not Wubi, so this little trick will go into my drawer for next time I find myself in that spot.
You can just copy the files and the master boot record (freesoftwaremagazine.com/articles/…) and you’ll be fine.
Acronis True Image can capture an accurate backup while the system is running. All of the answers below except the one that mentions Ghost for linux fail because they don’t actually replace the functionality of Acronis and Ghost. There is a common belief that backups can be made on the system on which they are running. Although this is true, the backups created stand the risk of not restoring properly due to files being changed in the file-system as the backup is being made, making the backup inconsistent with itself.
12 Answers 12
With dd
dd is the low level utility that you can use to accomplish this task. It’s essentially a low level byte-for-byte copy utility. If you want the «UNIX» way of accomplishing this, then read on.
All references to the file system and hard disks are located locally on the virtual /dev/ filesystem. There are a multitude of «nodes» in /dev/ that are interfaces to almost all the devices on your computer. For example, /dev/hda or /dev/sda would refer to the first hard drive in your system (hda vs sda depends on the hard drive), and /dev/hda1 would refer to the first partition on your hard drive.
The most straight forward way to make a raw image of your partitions is to use dd to dump the entire partition to a single file (remember the OS access the partitions /dev/sda1 through a file interface). Make sure you are on a larger partition or on a secondary drive and perform the following command:
dd if=/dev/hda1 of=./part1.image to backup (repeat for different partitions) dd if=./part1.image of=/dev/hda1 to restore. When you backup /dev/hda1 this partition should be unmounted (or mounted read-only) to avoid potencial corruption.
You can use the exact same command to back up the entire hard disk (replace hda1 with hda ). You can then use any compression program (gunzip, zip, bzip) to compress the file for storage. You can use this same technique to make rote copies of entire partitions to make clones of your computer.
There is one limitation though, when restoring the backup: The partition needs to be the same size (or bigger) as the partition you took the image from, so this limits your options in case of a restore. However, you can always expand the partition after you’ve restored the backup using gparted or parted . The picture gets even muddier when you are trying to restore entire disk copies. However, if you are restoring the backup to the same exact hard drive, you don’t need to worry about this at all.
However, if you want a «friendlier» utility à la Norton Ghost then this suggestion might not be for you.
How to Make Disk Images in Linux with DD Command
![]()
Whenever it comes to wiping, backing up, or restoring Linux files, you have few tools. Although there is one alternative that still works, regardless of the Linux distribution you’re using, and that is the DD command. Creating an image of a partition or cloning a complete hard disk drive are simply the acts of making a copy of the whole disk or partition, and it is very simple with the dd command. The DD command is good for cloning disks, backups, and restoration, among other things. In this guide, we will see how to make a disk image using the DD command. Make sure you have the Ubuntu Linux system installed.
DD circumvents this by making an identical replica of the whole hard drive or partitions. So if you recover this backup, your machine will be restored to its original state. You’ll regain access to your folders, games, browser history, and sometimes even device settings. We’ll want another drive with more capacity than the one we’re cloning to replicate your drive. There would most probably be a big hard drive for this purpose.
Install LSSCSI Utility
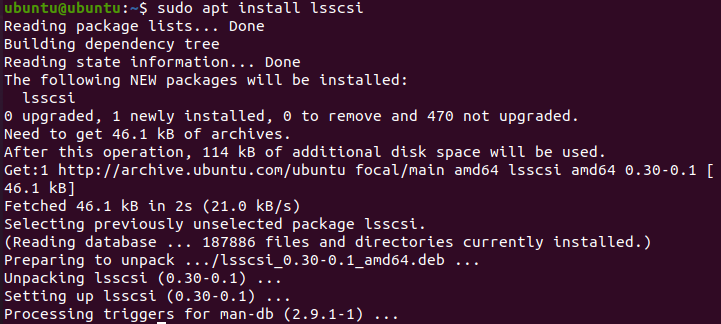
Open the command-line terminal of the Ubuntu 20.04 Linux system. Make sure to have the “lsscsi” utility installed on your system. If it is not installed, try to install it using the below “apt” command followed by the keyword “install” and “lsscsi”. It will take not more than 5 minutes to get installed, and you are good to go.
After installing the “lsscsi” utility, now it’s time to use it for listing all the storage devices of our Linux system. To list the storage drives and DVD’s execute the below command. You can see we have one disk drive and one cd/DVD device in our system.

Check Disk Information
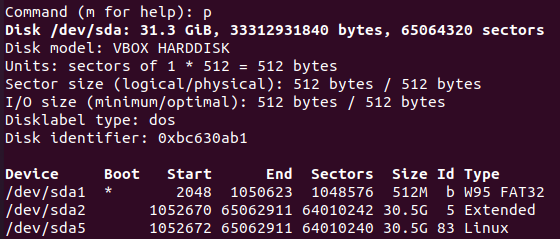
Firstly, we have to find out some information regarding the disk drive “/dev/sda”. And for this reason, we have to use the “fdisk” instruction in our command-shell with sudo privileges as below.

It will navigate to its command theme. Type “p” to check the information of disks as below. You can see it shows the total memory of the “/dev/sda” drive, its sectors, and bytes. It is showing the disk type as DOS. On the other hand, the last three lines of the snapshot show the partitions of the /dev/sda drive and their further information.
Create a Clone Disk Image
Now you have almost every piece of information regarding the “/dev/sda” drive. Press “q” to exit the commanding theme. Now, you are ready to make a disk image using the DD command. So, make yourself clear that the DD command always needs “sudo” privileges to execute. As we already know from the above image, the “/dev/sda” has three partitions, and we will make an image of one of them. So, we choose “sda1” for making its clone. You have to execute the below “DD” command followed by the “if” path and “of” path. The “if” path is of the input disk drive, which is meant to be cloned and the “of” path is for the output device disk, where it would be copied as an image. So, from this, you can understand that “sda1.img” is the cloned file for disk and sda1 is the actual drive. We have specified the bytes per second to be copied from one location to another. We assigned it a value of 1000. The command is as follows:
The output shows the number of records inputted and outputted from two locations, e.g., source and destination. It also shows the number of bytes with time seconds, copied into a destination in MB’s. This means that the clone has been effectively done.

Let’s check the destination image file to see if all the data from the source drive has been cloned into it properly or not. Use the below list command along with the path of an image file of the drive as:
The output shows the rights assigned to this image file, its size, and location. You can say that it has similar rights and size as the original disk drive have.

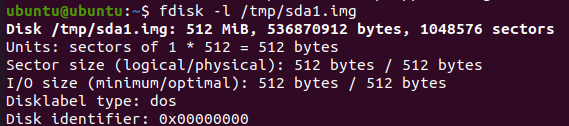
To see some more information regarding the disk image file, you have to try the below “fdisk” command followed by the flag “-l” as below.
The output shows the exact same information regarding this image file as we have seen for the original disk drive before creating this image file. It shows the size of the image drive, its total number of bytes, and total sectors.
Restore the Drive from Clone Image
Now, if you want to restore your original disk drive along with all the data it has, you have to use the DD command again to do so. While using the DD command, there is a little change in it. You have to swipe the input and output paths this time. This means you have to place the image disk file path into the “if” path, and in the “of” output path, you have to mention the location where you want to restore the image file data. Here is the command to restore the drive data from the image file:
The output shows the transfer of backup files into their actual destination. You can see the input and output number of total records and some further information regarding the numbers of bytes transferred, the total size of the disk image, and the time taken to transfer it.

Conclusion
Indeed, The method discussed before is the easiest and simplest way to clone a disk into an image file and restore the backup to get all the files and folders back.
About the author
Aqsa Yasin
I am a self-motivated information technology professional with a passion for writing. I am a technical writer and love to write for all Linux flavors and Windows.
How to make disk image with dd on Linux
Recently I had to send my notebook to service (by the way — it’s fifth time when it’s in service). When I sent my notebook first time, I made a full backup because service after repair usually delete all data on disk and install clean Windows to check if everything is OK. But when I sent my notebook third time I said ENOUGH! Every few months I had to install Linux Mint, configure it, install my apps and so on, and so on. Then I started to create images. So how to make disk image with dd on Linux and what is the disk image?
What is disk image?
Disk image is a one big file which contains every byte of some disk. Notice that it’s not a copy if files. DIsk image is created by special applications from low level disk reading. It means these applications read disk sectors byte by byte and write them to another disk creating one big file. It’s very useful when you want to change disk to another for instance HDD to SSD.
How to create whole disk image?
dd if=/dev/ORIGIN_DISK of=/dev/PLACE-TO-WRITE bs=64K conv=noerror,sync dd if=/dev/sda of=/dev/sdb bs=64K conv=noerror,sync How to create a partition image?
dd if=/dev/sda1 of=/dev/sdb1 bs=64K conv=noerror,sync Let’s stop here for a moment and see what we have here: if — input device/file of — output device/file bs=64K — The block size. Usually peope use 64K or 128K, but you can use other values if know what you do conv=noerror — dd will continue operation and ignore all read errors sync — add input blocks with zeros if there were any read errors (it means data offsets stay in sync)
How to create disk image using live CD or USB flash drive?

You should see similar to this:
Sometimes you can see different names of disk, eg. nvme for SSD M.2. To create disk image run this:
dd if=/dev/sda conv=sync,noerror bs=128K | gzip -c > SSD_image.gz DD will create compressed image of whole sda disk. The image will be in current directory. If you want to save it in another directory, tell dd where to save the image:
dd if=/dev/sda conv=sync,noerror bs=128K | gzip -c > /media/disk2/images/SSD_image.gz Above commands clone the entire hard disk, including the MBR, bootloader, all partitions, UUIDs, and data.
How to restore disk image?
gunzip -c SSD_image.gz | dd of=/dev/sda Bonus tip
dd if=/dev/sda conv=sync,noerror bs=128K status=progress | gzip -c > /media/disk2/images/SSD_image.gz ![]()
It would be great if you will comment or follow me on social media: Also you can visit my websites:
- Linux blog
- Web Agency website