- HowTo: Create Patch Using Diff Command – Linux
- Create a Patch for a Single File in Linux
- Apply a Patch to a File
- Undo a Patch
- Create a Patch for a Directory in Linux
- Apply a Patch to a Directory
- Undo a Patch
- Patching packages
- Creating patches
- Applying patches
- Using quilt
- See also
- How to Run “patch” Command in Linux?
- Syntax:
- Creating a Patch File Using “diff”:
- Source Code File 1:
- Source Code File 2:
- Checking Difference:
- Applying the Patch File:
- Take a Backup Before Applying Patch:
- Setting Backup File Version
- Validate Patch Files
- Reverse/Undo a Patch
- Conclusion:
- About the author
- Aqsa Maqbool
- Patch Command Tutorial With Examples For Linux
- Syntax
- Help
- Create Patch File
- myapp_old.c
- myapp.c
- Apply Patch File
- Take Backup Before Applying Patch
- Set Backup File Version
- Validate Patch File Without Applying or Dry run
- Reverse Patch
HowTo: Create Patch Using Diff Command – Linux
If you have made some changes to the code and you would like to share these changes with others – the best way is to provide them as a patch file.
diff is the Linux command line tool that is used for creating patches (sometimes called diffs) and requires that you have two copies of the code: one with your changes and one without.
This article explains how to create a patch for a single file or for a whole directory using diff and how to apply this patch after.
Create a Patch for a Single File in Linux
Let’s say you have some original file.
You make some changes in it and save the result to a new updated file.
Cool Tip: Have forgotten the meaning of some term in Git? Not a problem! Simply read and bookmark this article! This article →
To create a patch file containing the changes you’ve made, run the following command:
$ diff -u OriginalFile UpdatedFile > PatchFile
Apply a Patch to a File
A person, who has the original file and wants to apply the changes you’ve made, can patch the original file with the below command:
Now the original file has the same content as the updated file.
Undo a Patch
To revert a previously applied to a file patch, use this command:
Create a Patch for a Directory in Linux
You recursively copy its content to some new directory and do the necessary updates in it.
To create a patch file containing the modifications you’ve made, run the following command:
$ diff -ruN OriginalDir UpdatedDir > PatchFile
| Option | Description |
|---|---|
| -r | Recursively compare any subdirectories found |
| -u | Create a diff file in the unified format |
| -N | Treat absent files as empty |
Apply a Patch to a Directory
A person, who has the original directory and wants to apply the changes you’ve made, has to copy the original directory and the patch file to some location (e.g. /tmp ), go to that location and apply the patch with this command:
| Option | Description |
|---|---|
| -p0 | Apply the patch to the same directory structure as when the patch was created |
Now the original directory contains the content of the updated directory.
Undo a Patch
Cool Tip: Trouble with a file character encoding? Find out how to fix it! Read more →
To revert a previously applied to a directory patch, use this command:
Patching packages
This article covers how to create and how to apply patches to packages in the Arch Build System (ABS).
A patch describes a set of line changes for one or multiple files. Patches are typically used to automate the changing of source code.
Creating patches
The diff tool compares files line by line. If you save its output you have got a patch, e.g. diff —unified —recursive —text foo bar > patch . If you pass directories diff will compare the files they contain.
- Delete the src directory if you have already built the package.
- Run makepkg —nobuild which will download and extract the source files, specified in PKGBUILD , but not build them. If the system you are making the patch on does not have the required dependencies, you may have to run makepkg —nobuild —nodeps instead.
- Create two copies of the extracted directory in the src directory, one as a pristine copy and one for your altered version. We will call them package.orig and package.new .
- Make your changes in the package.new directory.
- Run diff —unified —recursive —text package.orig package.new —color and check if the patch looks good.
- Run diff —unified —recursive —text package.orig package.new > package.patch to create the patch.
- Change into the initial src/package directory from which you made copies and apply the patch using patch —strip=1 < ../package.patch . Verify that the patch is working by building and installing the modified package with makepkg --noextract --install .
Applying patches
This section outlines how to apply patches you created or downloaded from the Internet from within a PKGBUILD ‘s prepare() function. Follow these steps:
- Add an entry to the source array of the PKGBUILD for the patch file, separated from the original source url by a space. If the file is available online, you can provide the full URL and it will automatically be downloaded and placed in the src directory. If it is a patch you created yourself, or is otherwise not available, you should place the patch file in the same directory as the PKGBUILD file, and just add the name of the file to the source array so that it is copied into the src directory. If you redistribute the PKGBUILD , you should, of course, include the patch with the PKGBUILD .
- Then use makepkg -g >> PKGBUILD or updpkgsums (from pacman-contrib ) to update the sha512sums array. Or manually add an entry to the sha512sums array; you can generate the sum of your patch using sha512sum tool.
- Create the prepare() function in the PKGBUILD if one is not already present.
- The first step is to change into the directory that needs to be patched (in the prepare() function, not on your terminal! You want to automate the process of applying the patch). You can do this with something like cd «$srcdir/$pkgname-$pkgver» . $pkgname-$pkgver is often the name of a directory created by untarring a downloaded source file, but not in all cases.
- Now you simply need to apply the patch from within this directory. This is very simply done by adding patch —strip=1 —input=pkgname.patch to your prepare() function, changing pkgname.patch to the name of the file containing the diff (the file that was automatically copied into your src directory because it was in the source array of the PKGBUILD file).
An example prepare-function:
Alternatively, you can use the —directory flag of patch without having to cd first. The example above would then become:
Run makepkg (from the terminal now). If all goes well, the patch will be automatically applied, and your new package will contain whatever changes were included in the patch. If not, you may have to experiment with the —strip option of patch. While experimenting, you might find —dry-run , —reverse or —verbose options usable. Read patch(1) for more information.
Basically it works as follows. If the diff file was created to apply patches to files in myversion/ , the diff files will be applied to myversion/file . You are running it from within the yourversion/ directory (because you would cd into that directory in the PKGBUILD ), so when patch applies the file, you want it to apply it to the file file , taking off the myversion/ part. —strip=1 does this, by removing one directory from the path. However, if the developer patched in myfiles/myversion , you need to remove two directories, so you use —strip=2 .
If you do not apply a —strip option, it will take off all directory structure. This is OK if all the files are in the base directory, but if the patch was created on myversion/ and one of the edited files was myversion/src/file , and you run the patch without a —strip option from within yourversion , it will try to patch a file named yourversion/file .
Most developers create patches from the parent directory of the directory that is being patched, so —strip=1 will usually be right.
Using quilt
A simpler way to create patches is using quilt which provides better support for managing many patches, such as applying patches, refreshing patches, and reverting patched files to original state. quilt is used on Debian to manage their patches. See Using Quilt for basic information about basic quilt usage to generate, apply patches, and reverting patched files.
See also
How to Run “patch” Command in Linux?
![]()
The “patch” is a command for adding patch files to source code or text files. It takes input as a patch file and applies differences to original files. We use the “diff” tool to get the difference.
The “diff” is abbreviated as “differences” and is used to compare the content of two files and list the changes in standard output.
A set of source codes makes up a piece of software. Developers build the source code that evolves over time. Getting a new file for each update is unrealistic or time-consuming. Therefore, the safest method is to distribute improvements only. The modifications are made to the old file, and then a new or patched file is created for the new software version.
This guide shows you how to use the “diff” command to generate a patch file and then apply it with the “patch” command.
Syntax:
The syntax of the “patch” command is as follows:
$ patch [ options ] [ originalfile [ patchfile ] ]
Creating a Patch File Using “diff”:
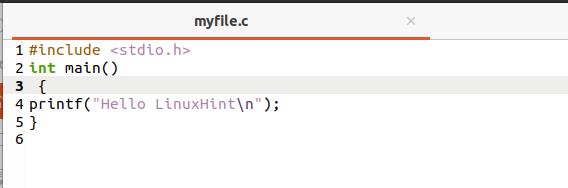
Source Code File 1:
Firstly, two different versions of a source code are required to create a patch file. The source code file I have created is named as “myfile.c”:s
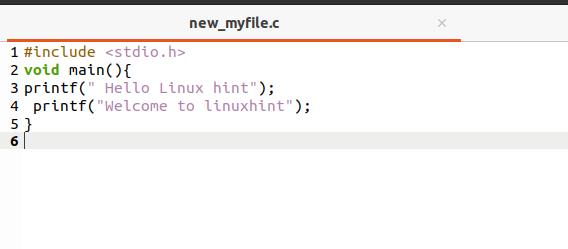
Source Code File 2:
Now, copy the content of myfile.c in the new_myfile.c, using:
Make some changes in the newly-created file:
Checking Difference:
Let’s create a patch file named as myfile.patch:

You can print the patch file by executing the command below:

Applying the Patch File:

Ensure that the patch file is in the directory where the source code file is placed.
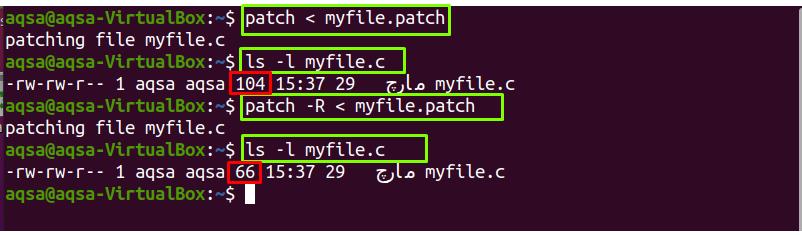
Take a Backup Before Applying Patch:
Use “-b” option to build a backup of the patch file:
Setting Backup File Version
If you need multiple backups of a single backup file, then use the “-V” option. It sets the version number of each backup file. Execute the command given below:

Validate Patch Files
If you want to verify or observe the outcome of patching, then use “–dry-run” option. It does not make any modification to the original file:

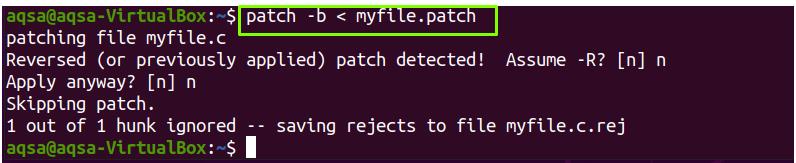
Reverse/Undo a Patch
The “-R” option is used to reverse or undo a patch that has already been applied.
Conclusion:
In Linux operating system, “patch” is a command that allows us to apply patch files to the source codes or configuration files. The patch file is used for software updating purposes. The difference between the original and new files is held in patch files and the “diff” command is used to get the difference or patch. We discussed the usage of the “diff” and the “patch” commands with a number of options such as making backups, dry-running, and reversing the applied patch.
About the author
Aqsa Maqbool
As a Software engineer, I am passionate to write about various IT related
articles but have deep interest in Linux. I spend most of my time reading Linux related blogs and IT related books. I want to serve the world with my writing skills.
Patch Command Tutorial With Examples For Linux

Patch is a command that is used to apply patch files to the files like source code, configuration. Patch files holds the difference between original file and new file. In order to get the difference or patch we use diff tool.
Software is consist of a bunch of source code. The source code is developed by developers and changes in time. Getting whole new file for each change is not a practical and fast way. So distributing only changes is the best way. The changes applied to the old file and than new file or patched file is compiled for new version of software.
Syntax
patch [options] [originalfile [patchfile]] patch -pnumHelp
Create Patch File
Now we will create patch file in this step but we need some simple source code with two different version. We call the source code file name as myapp.c .
myapp_old.c
myapp.c
Now we will create a patch file named myapp.patch .
$ diff -u myapp_old.c myapp.c > myapp.patch
We can print myapp.patch file with following command
Apply Patch File
Now we have a patch file and we assume we have transferred this patch file to the system which holds the old source code which is named myapp_old.patch . We will simply apply this patch file. Here is what the patch file contains
Take Backup Before Applying Patch
One of the useful feature is taking backups before applying patches. We will use -b option to take backup. In our example we will patch our source code file with myapp.patch .
The backup name will be the same as source code file just adding the .orig extension. So backup file name will be myapp.c.orig
Set Backup File Version
While taking backup there may be all ready an backup file. So we need to save multiple backup files without overwriting. There is -V option which will set the versioning mechanism of the original file. In this example we will use numbered versioning.
As we can see from screenshot the new backup file is named as number like myapp.c.~1~
Validate Patch File Without Applying or Dry run
We may want to only validate or see the result of the patching. There is a option for this feature. We will use --dry-run option to only emulate patching process but not change any file really.
Reverse Patch
Some times we may need to patch in reverse order. So the apply process will be in reverse. We can use -R parameter for this operation. In the example we will patch myapp_old.c rather than myapp.c
As we can see that new changes are reverted back.


