- Настройка панели в Ubuntu 18.04
- Настройка панели Ubuntu 18.04
- 1. Изменение положения Ubuntu Dash
- 2. Как убрать Ubuntu Dash
- 3. Превратить Ubuntu Dash в Dock
- 4. Превратить Ubuntu Dash в панель
- 5. Классическое меню приложений
- 6. Формат даты и времени
- 7. Расположение уведомлений
- 8. Как переместить панель вниз в Ubuntu
- 9. Глобальное меню на панели Ubuntu
- 10. Как скрыть верхнюю панель Ubuntu
- Выводы
- Create Two Panel Layout in GNOME with Dash to Panel
- Installing Dash to Panel Extension
- Configuring Dash to Panel Extension for a Two Panel Layout
- Final Result
- Conclusion
- About the author
- Nitesh Kumar
- How To Install gnome-shell-extension-dash-to-panel on Ubuntu 22.04
- What is gnome-shell-extension-dash-to-panel
- Install gnome-shell-extension-dash-to-panel Using apt-get
- Install gnome-shell-extension-dash-to-panel Using apt
- Install gnome-shell-extension-dash-to-panel Using aptitude
- How To Uninstall gnome-shell-extension-dash-to-panel on Ubuntu 22.04
- Uninstall gnome-shell-extension-dash-to-panel And Its Dependencies
- Remove gnome-shell-extension-dash-to-panel Configurations and Data
- Remove gnome-shell-extension-dash-to-panel configuration, data, and all of its dependencies
- References
- Summary
Настройка панели в Ubuntu 18.04
В этой статье мы продолжим говорить про настройку внешнего вида в Ubuntu. Сегодня нас будет интересовать настройка панелей в Ubuntu. Разработчики Gnome, окружения, используемого в Ubuntu по умолчанию, заботятся о максимальной простоте окружения, поэтому спрятали большинство более-менее интересных настроек так, что найти их достаточно сложно.
Но некоторые настройки доступны из dconf editor. Также, благодаря стараниям энтузиастов, для Gnome существует множество расширений, которые позволяют менять внешний вид и поведение панелей Ubuntu.
Настройка панели Ubuntu 18.04
Панелей в Ubuntu две, это док панель слева (Ubuntu Dash), где находятся иконки запуска приложений и меню, и верхняя панель Ubuntu, на которой расположен системный трей и календарь. Для настройки панелей вам понадобится устанавливать расширения, поэтому сначала ознакомьтесь со статьей установка расширений Gnome. Теперь займемся панелью запуска приложений.
1. Изменение положения Ubuntu Dash
По умолчанию панель запуска приложений Ubuntu находится в левой части экрана. Но её можно перенести вправо или вниз. Для этого откройте настройки системы и на вкладке Панель задач выберите нужное расположение:
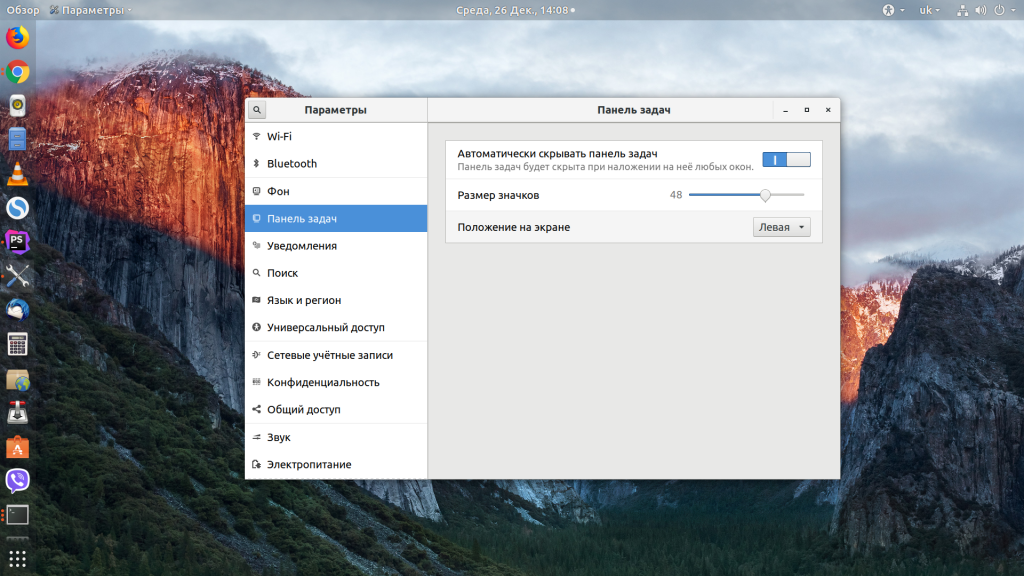

Здесь же можно включить автоматическое скрытие и настроить размер значков. Все остальные настройки нам придётся делать с помощью расширений.
2. Как убрать Ubuntu Dash
Если вы хотите полностью скрыть боковую панель Ubuntu, нужно установить расширение Dash to Dock и выполнить в терминале такие команды:
gsettings set org.gnome.shell.extensions.dash-to-dock autohide false
gsettings set org.gnome.shell.extensions.dash-to-dock dock-fixed false
gsettings set org.gnome.shell.extensions.dash-to-dock intellihide false
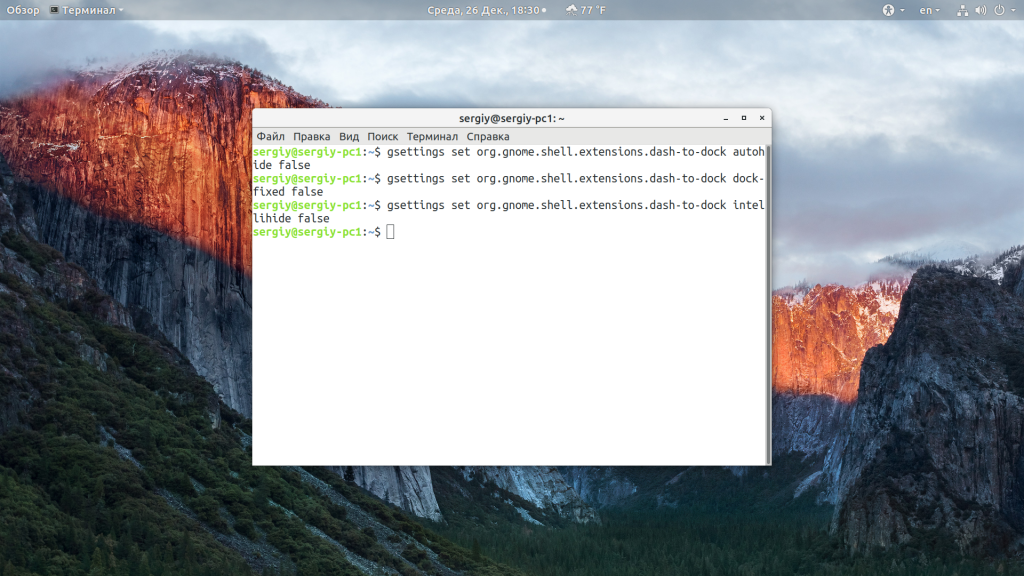
Чтобы вернуть всё обратно, присвойте всем параметрам значение true вместо false.
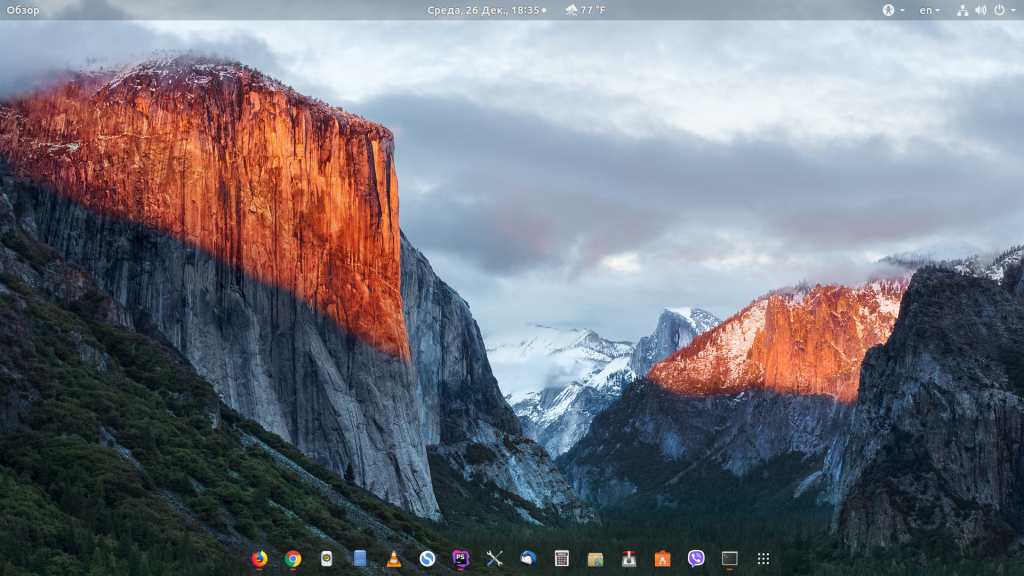
3. Превратить Ubuntu Dash в Dock
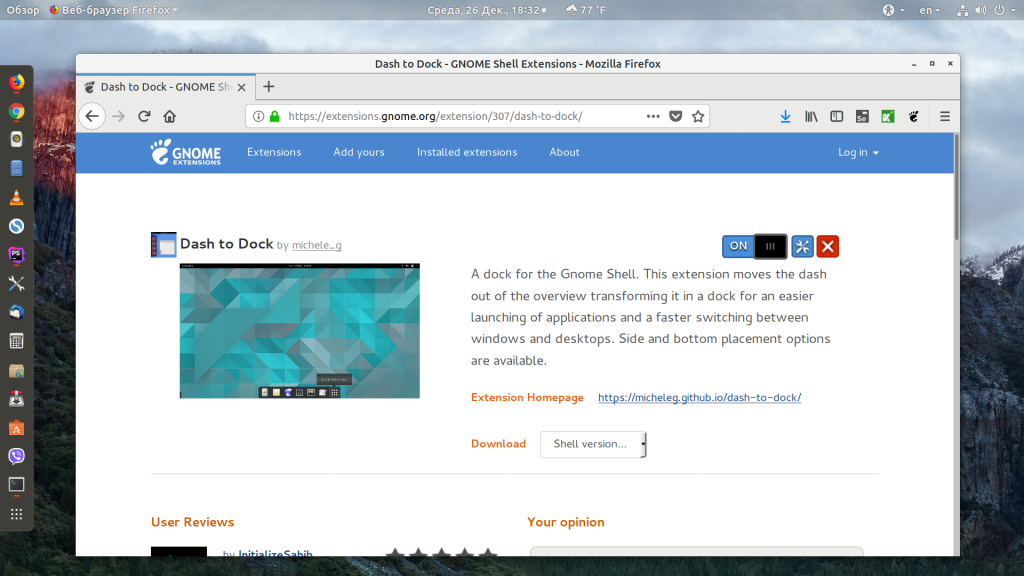
С помощью расширения Dash to Dock вы можете превратить вашу панель запуска в док панель, похожую на ту, что используется в MacOS. Для этого установите и активируйте расширение Dash to Dock:
Чтобы открыть настройки расширения, кликните по значку меню правой кнопкой и выберите Dash to Dock Параметры:
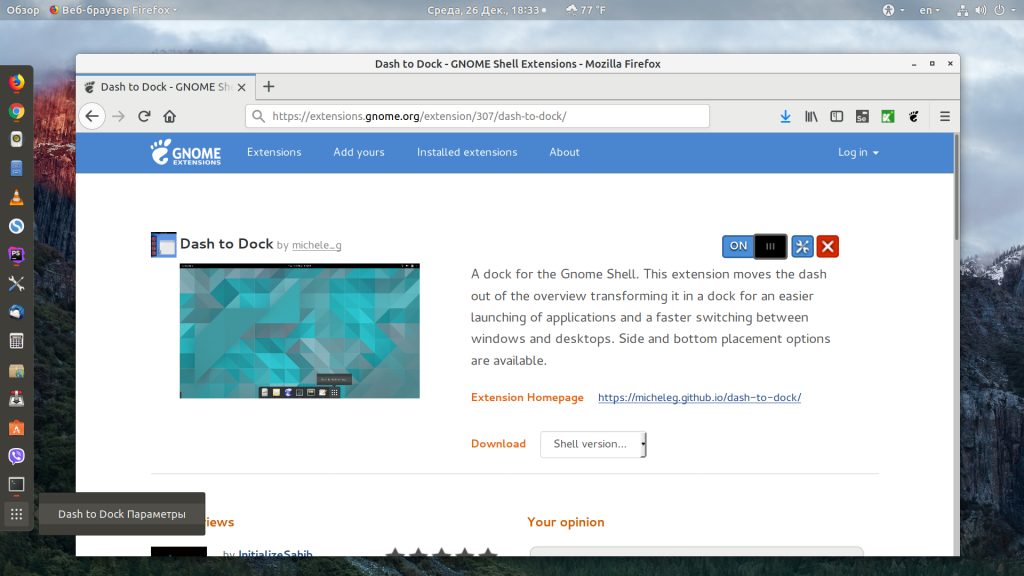
Здесь вы можете настроить позицию док панели, например, внизу экрана, размер значков, поведение, а также внешний вид.
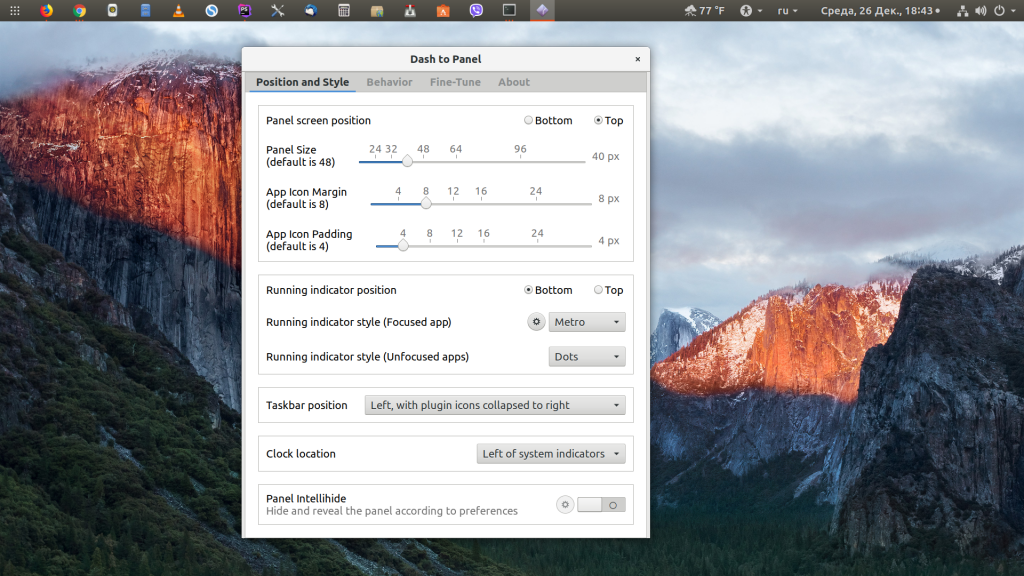
4. Превратить Ubuntu Dash в панель
С помощью расширения Dash to Panel панель задач Ubuntu 18.04 можно совместить с панелью Dash и перенести вниз экрана, выглядеть это будет вот так:

Настойки панели Ubuntu открываются так же, как и в предыдущем варианте, здесь можно настроить размер панели, её расположение (сверху или внизу), а также её поведение.
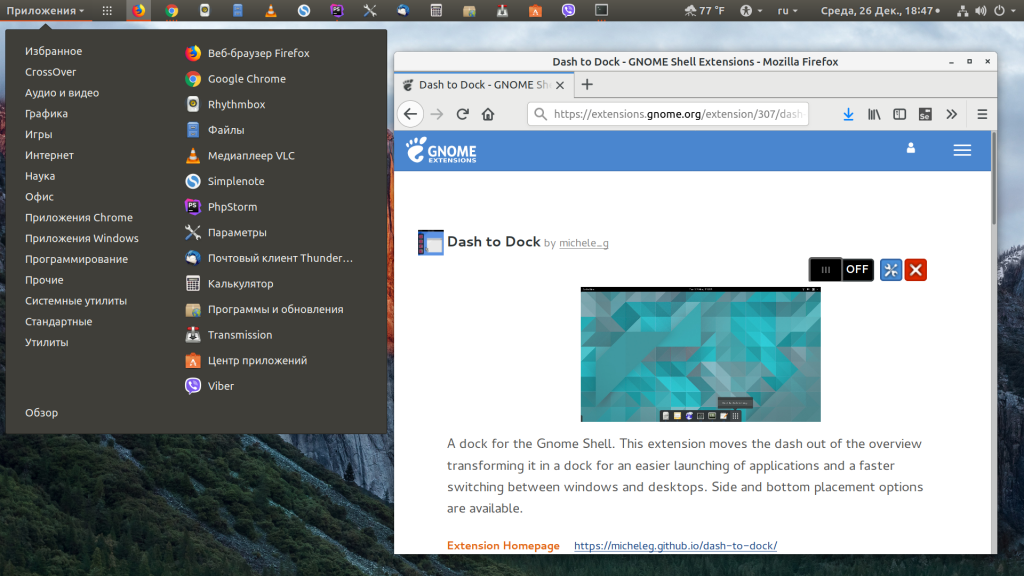
5. Классическое меню приложений
Многие пользователи привыкли к классическому меню приложений, похожему на то, что мы можем видеть в Windows. Такое меню можно получить, установив и активировав расширение Application Menu:
6. Формат даты и времени
С основными возможностями настройки панели запуска разобрались, пора переходить ко второй, верхней панели. Здесь вы можете изменить формат вывода даты и времени. Для этого активируйте расширение Panel Date Format.
По умолчанию расширение выводит дату в формате %Y-%m-%d. Формат можно изменить с помощью dconf такой командой:
dconf write /org/gnome/shell/extensions/panel-date-format/format «‘формат»
Вот основные сокращения, которые вы можете использовать:
- %A — полное название дня недели;
- %B — название месяца;
- %C — столетие;
- %d — день месяца в формате 01-31;
- %e — день месяца в формате 1-31;
- %H — часы в формате 00-24;
- %I — часы в формате 01-12;
- %m — месяц в формате 01-12;
- %M — минуты в формате 0-59;
- %Y — год;
7. Расположение уведомлений
Система и приложения могут отправлять пользователю уведомления, которые по умолчанию выводятся вверху, в центре экрана. Если вы изменили расположение панели Ubuntu, возможно, вы захотите изменить место вывода уведомлений. Для этого воспользуйтесь расширением Panel OSD.
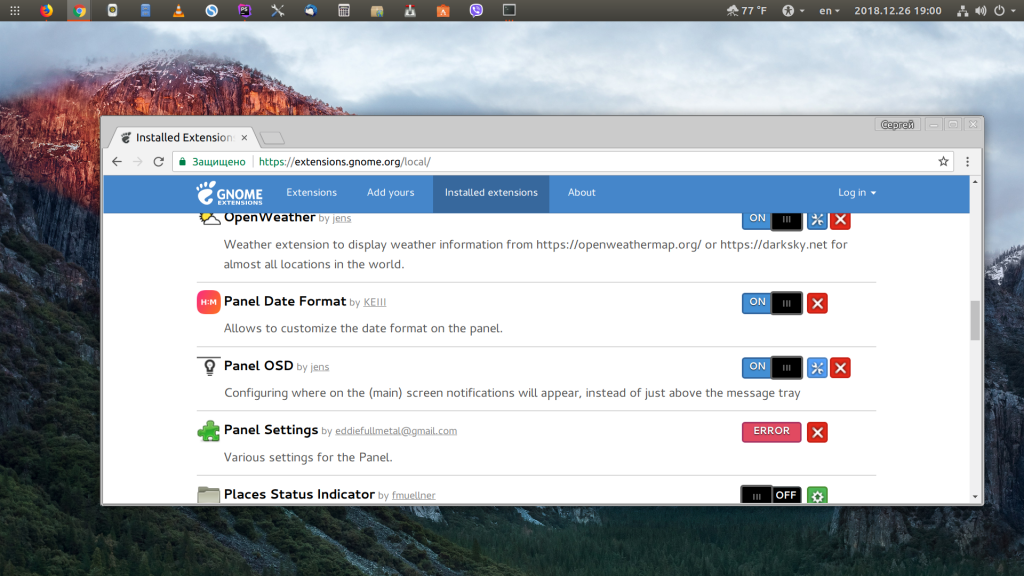
Окно настроек расширения можно открыть на вкладке Installed Extensions:
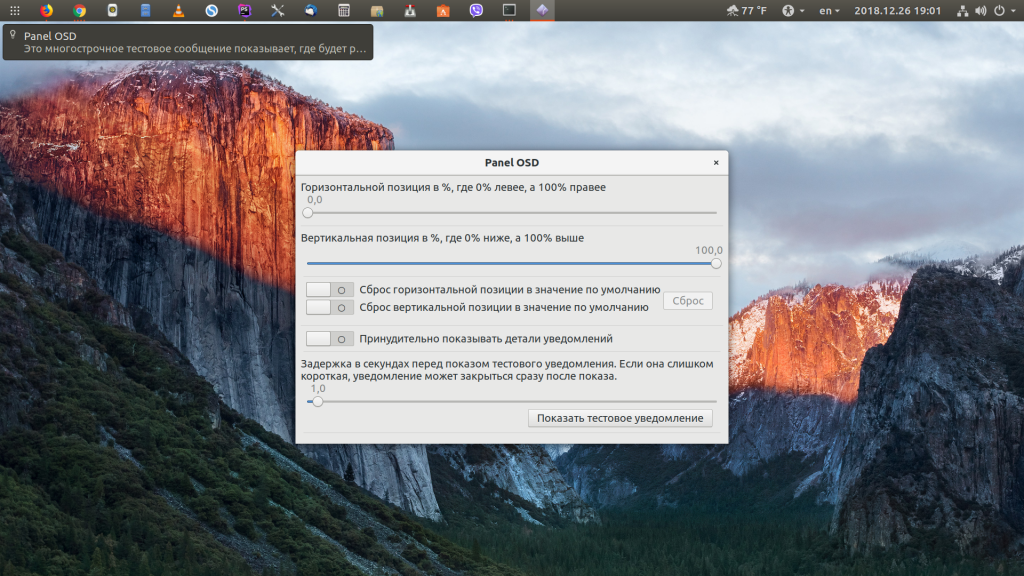
Здесь вы можете точно отрегулировать место появления уведомлений по вертикали и горизонтали с помощью двух ползунков. Например, я хочу, чтобы уведомления показывались сверху, слева.
8. Как переместить панель вниз в Ubuntu
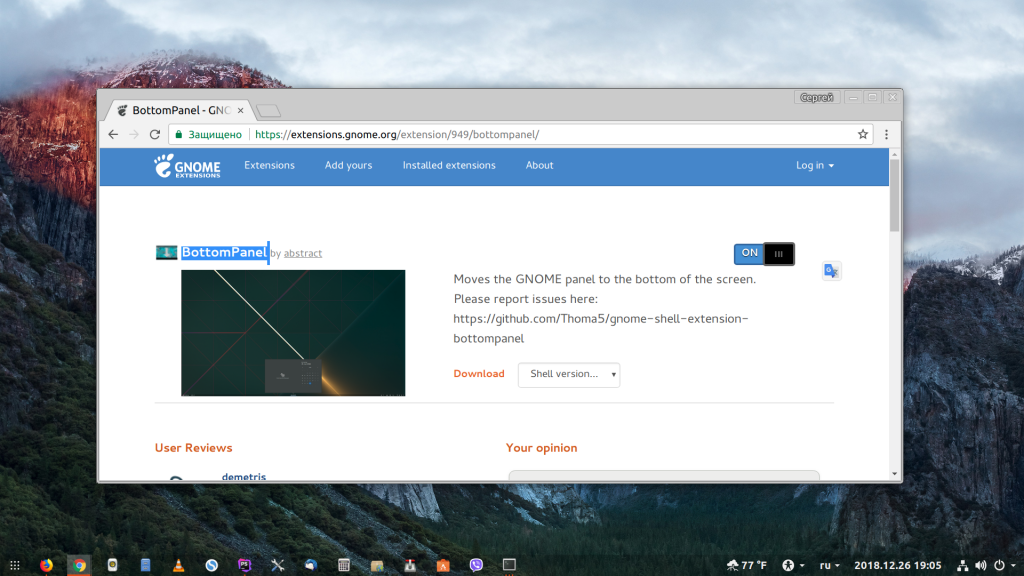
Если вы хотите переместить панель вниз без использования расширения Dash to Panel, то можно воспользоваться расширением BottomPanel. Просто установите его, и ваша системная панель будет перемещена вниз экрана.
9. Глобальное меню на панели Ubuntu
В Ubuntu Unity была такая функция как глобальное меню, когда меню активного приложения выносилось на верхнюю панель. Многим пользователям эта возможность очень нравилась. Сейчас такого поведения можно достичь с помощью расширения Gnome Global Application Menu, чтобы дата не мешала нашему меню, её можно переместить вправо расширением Frippery Move Clock. Так будет выглядеть меню для Firefox:

10. Как скрыть верхнюю панель Ubuntu
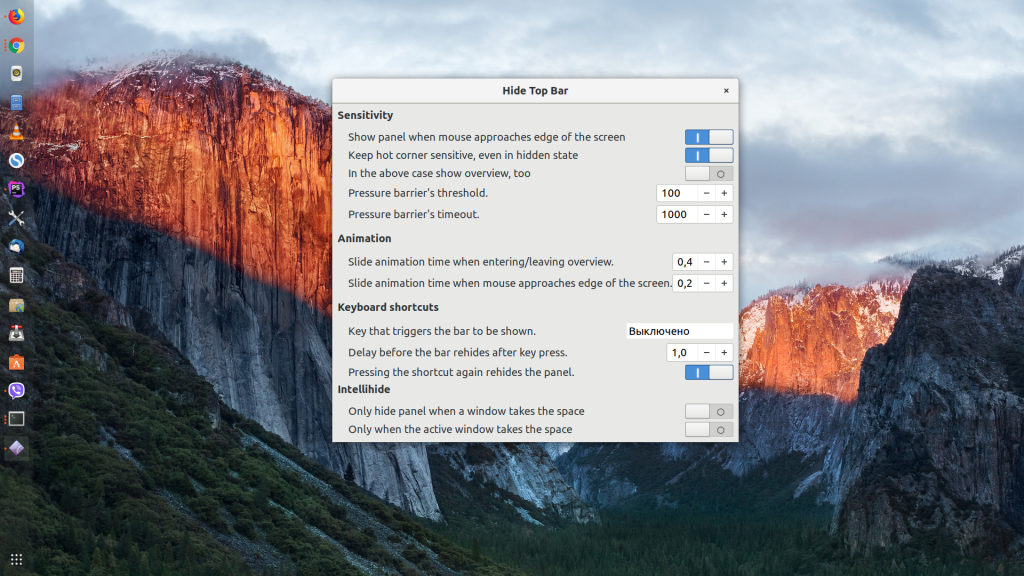
Чтобы убрать верхнюю панель Ubuntu, используйте расширение Hide Top Bar. После активации расширения панель прячется только тогда, когда её перекрывают какие-либо окна. Если вы хотите прятать панель Ubuntu всегда, откройте настройки расширения и отключите пункт Only hide panel when a window takes the space. Затем включите Show panel when mouse approaches edge of the screen, чтобы отображать панель, когда мышка прикасается к краю экрана.
Выводы
В этой небольшой статье мы разобрали, как выполняется настройка панели Ubuntu 18.04. Даже несмотря на то, что в интерфейсе Gnome намного меньше настроек, чем в KDE, здесь можно много чего настроить и сделать по своему вкусу. Вы можете сделать Ubuntu похожей на MacOS, Windows или вообще на что угодно, нужно только включить фантазию и потратить немного времени на настройку.
Обнаружили ошибку в тексте? Сообщите мне об этом. Выделите текст с ошибкой и нажмите Ctrl+Enter.
Create Two Panel Layout in GNOME with Dash to Panel
![]()
“Dash to Panel” is a GNOME Shell extension that can be installed in Ubuntu, Fedora and other GNOME Shell based Linux distributions. It aims to provide an alternative and much more customizable application dock / taskbar for managing pinned and running apps.
Until recently, Dash to Panel was limited to a single panel that combined application menus, taskbar and system tray. However, a new update for Dash to Panel was released a couple of months back, allowing users to create two panels. Using this new option, you can now emulate the classic GNOME2 layout, featuring a two panel setup for managing system tray and taskbar. This article will explain how to create this two panel layout using Dash to Panel GNOME Shell extension.
Installing Dash to Panel Extension
To install Dash to Panel extension, you must first enable support for installing shell extensions through web browsers.
To enable installation of GNOME Shell extensions in Ubuntu through Chrome, Chromium and Chromium based browsers, run the command below:
To enable installation of extensions through Firefox browser, install this addon for Firefox.
To enable extension integration in other GNOME Shell based Linux distributions, follow instructions available here.
Now to install Dash to Panel extension, simply visit the extension page in Chrome, Chromium, Chromium based browsers or Firefox and toggle it on. When prompted, click on the “Install” button. Once the installation has finished, Dash to Panel should automatically activate. In case you cant see Dash to Panel taskbar, logout and re-login to your desktop. You can also check the status of Dash to Panel extension from “GNOME Tweaks” app that can be installed through the package manager of your Linux distribution.
Configuring Dash to Panel Extension for a Two Panel Layout
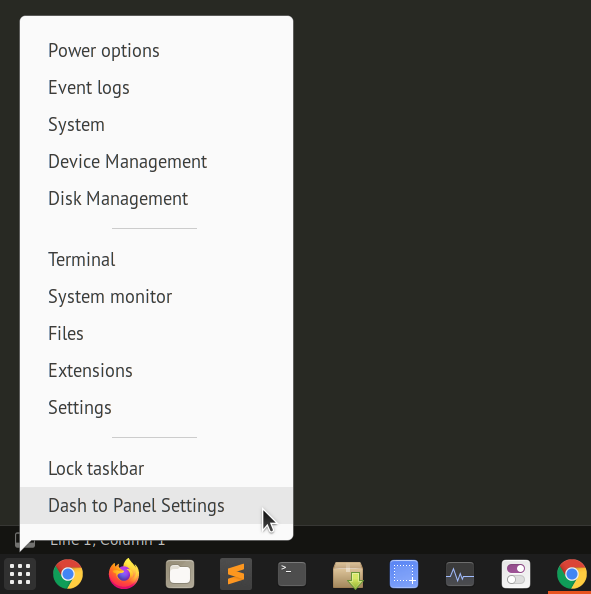
Right click on the app grid icon on the Dash to Panel taskbar. Click on “Dash to Panel Settings”, as shown in the screenshot below:
Next, go to “Fine-Tune” tab and toggle on “Keep original gnome-shell top panel” option, as shown in the screenshot below:
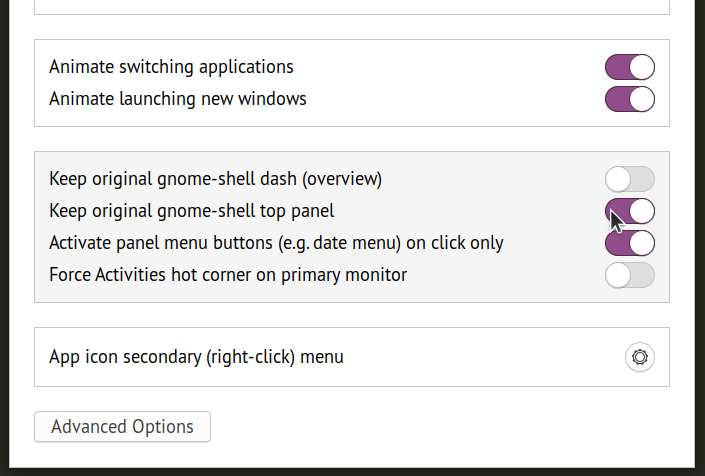
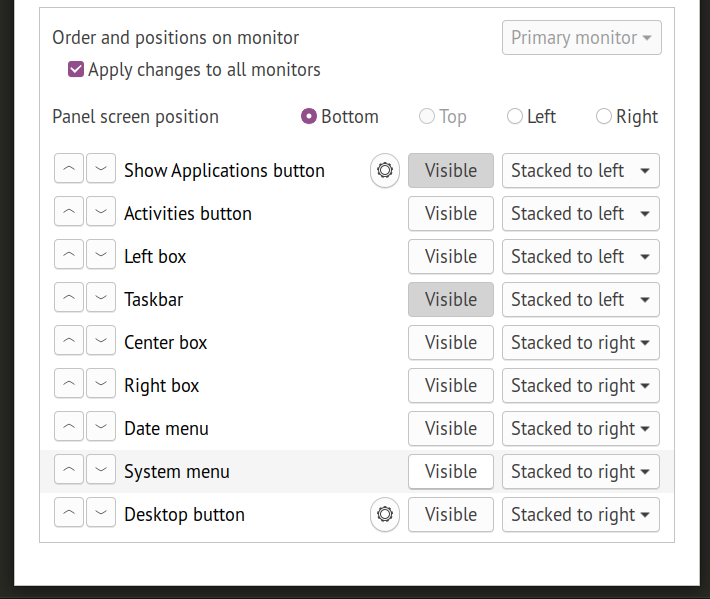
You will now get a two panel layout with the original top panel remaining intact. The second panel, where the taskbar resides, may get duplicate system tray icons same as the top panel. To disable these icons, go to “Position” tab in Dash to Panel Settings and change visibility of individual elements, as shown in the screenshot below:
Your Dash to Panel two panel layout now should be complete. Note that by default, Dash to Panel uses an “icon only” taskbar. To get classic panel layout where each running app’s label is also shown, some more tweaks are needed.
Go to the “Behavior” tab and click on “Ungroup applications”.
You should now have a taskbar that shows both icons and labels for running apps, improving readability and accessibility. You can further tweak the behavior of taskbar labels by clicking on the cog icon just next to “Ungroup applications” toggle button.

Final Result
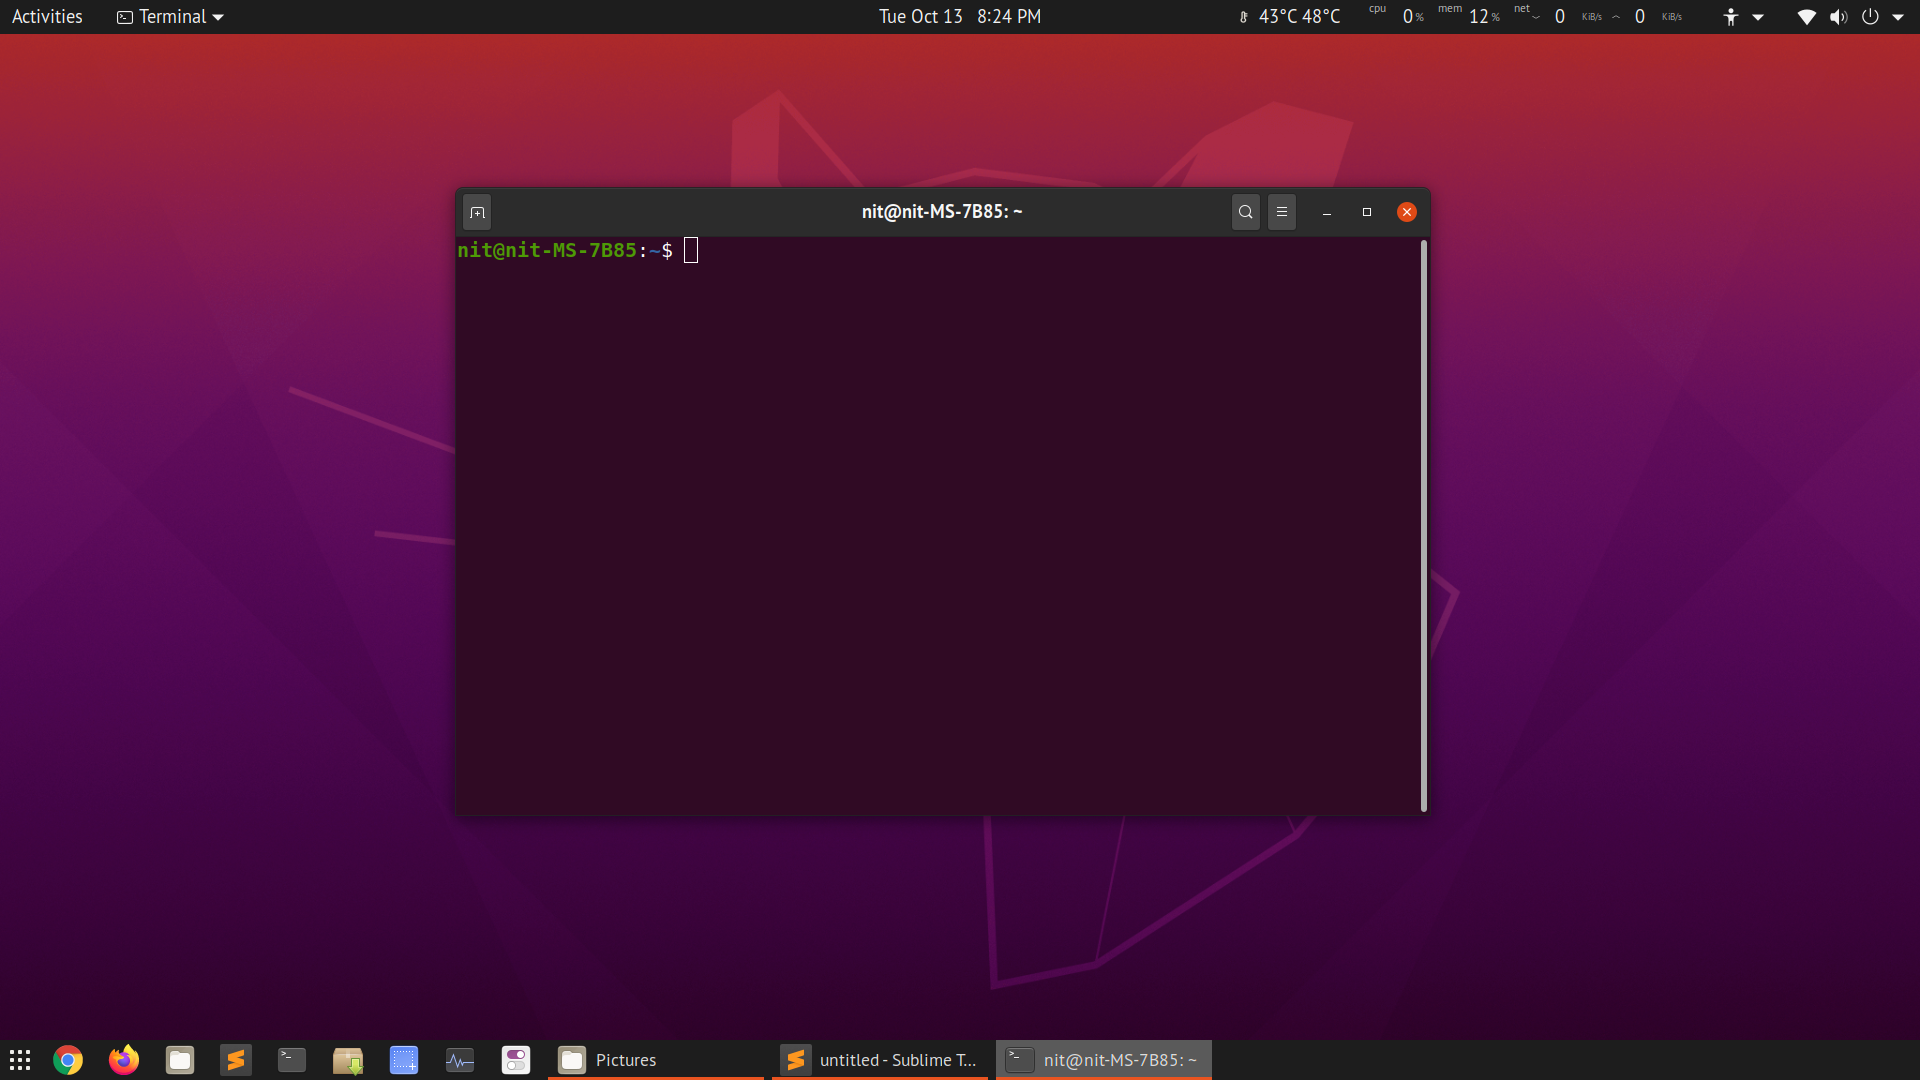
Here is a screenshot of Dash to Panel two panel layout on my desktop. After following the instructions above, you should get a layout identical to this screenshot. The bottom panel also allows you to show your favorite (pinned) apps, similar to the two panel layout commonly seen in classic GNOME setup and MATE desktop environment.
Conclusion
Many Linux users prefer the “classic GNOME” session where a two panel layout is provided using some extensions. These extensions are fairly basic and do not provide many customization options. Underneath, the classic session also uses GNOME shell session so there is no major advantage using it as far as performance is concerned. You may very well use Dash to Panel extension to get a two panel layout without installing an extra session that needs to be switched from the login screen.
About the author
Nitesh Kumar
I am a freelancer software developer and content writer who loves Linux, open source software and the free software community.
How To Install gnome-shell-extension-dash-to-panel on Ubuntu 22.04
In this tutorial we learn how to install gnome-shell-extension-dash-to-panel on Ubuntu 22.04.
What is gnome-shell-extension-dash-to-panel
Moves the dash into the GNOME main panel so that the application launchers and system tray are combined into a single panel, similar to that found in KDE Plasma and Windows 7+.
A separate dock is no longer needed for easy access to running and favorited applications.
There are three ways to install gnome-shell-extension-dash-to-panel on Ubuntu 22.04. We can use apt-get , apt and aptitude . In the following sections we will describe each method. You can choose one of them.
Install gnome-shell-extension-dash-to-panel Using apt-get
Update apt database with apt-get using the following command.
After updating apt database, We can install gnome-shell-extension-dash-to-panel using apt-get by running the following command:
sudo apt-get -y install gnome-shell-extension-dash-to-panel Install gnome-shell-extension-dash-to-panel Using apt
Update apt database with apt using the following command.
After updating apt database, We can install gnome-shell-extension-dash-to-panel using apt by running the following command:
sudo apt -y install gnome-shell-extension-dash-to-panel Install gnome-shell-extension-dash-to-panel Using aptitude
If you want to follow this method, you might need to install aptitude first since aptitude is usually not installed by default on Ubuntu. Update apt database with aptitude using the following command.
After updating apt database, We can install gnome-shell-extension-dash-to-panel using aptitude by running the following command:
sudo aptitude -y install gnome-shell-extension-dash-to-panel How To Uninstall gnome-shell-extension-dash-to-panel on Ubuntu 22.04
To uninstall only the gnome-shell-extension-dash-to-panel package we can use the following command:
sudo apt-get remove gnome-shell-extension-dash-to-panel Uninstall gnome-shell-extension-dash-to-panel And Its Dependencies
To uninstall gnome-shell-extension-dash-to-panel and its dependencies that are no longer needed by Ubuntu 22.04, we can use the command below:
sudo apt-get -y autoremove gnome-shell-extension-dash-to-panel Remove gnome-shell-extension-dash-to-panel Configurations and Data
To remove gnome-shell-extension-dash-to-panel configuration and data from Ubuntu 22.04 we can use the following command:
sudo apt-get -y purge gnome-shell-extension-dash-to-panel Remove gnome-shell-extension-dash-to-panel configuration, data, and all of its dependencies
We can use the following command to remove gnome-shell-extension-dash-to-panel configurations, data and all of its dependencies, we can use the following command:
sudo apt-get -y autoremove --purge gnome-shell-extension-dash-to-panel References
Summary
In this tutorial we learn how to install gnome-shell-extension-dash-to-panel package on Ubuntu 22.04 using different package management tools: apt, apt-get and aptitude.