- How to Set a Static IP on Debian 11
- Prerequisites
- Configure Static IP Address using the Graphical User Interface ( GUI )
- Configure Static IP Address using the terminal
- Conclusion
- How to set up a static IP address on Debian 11
- Why use a static IP
- Setting up a static IP on Debian 11
- (Method 1) Set up static IP via the terminal
- (Method 2) Set up static IP from the GUI
- Conclusion
How to Set a Static IP on Debian 11

On a DHCP network, your Linux system will usually receive an IP address automatically from the DHCP server which, in most cases, is the router. The IP configuration will usually comprise the IPv4 address, the netmask, gateway, and the DNS settings. This is usually convenient for desktop or client PCs which only need to access the internet or network resources.
However, the case is different when you want to set up a server. In this case, you would need to configure a static IP to make the server always available via the same IP address. With DHCP, the IP address is bound to change once the lease time is over leading to the unavailability of the server.
In this guide, we will take you through a walk-through of how to set a static IP on Debian 11. We will demonstrate how you can configure a static IP on both the desktop GUI and server instances.
Prerequisites
As you set sail, ensure that you have an instance of Debian 11 server installed and set up. In addition, ensure that you have configured a sudo user.
There are two ways of configuring a static IP on Debian. You can achieve this using GUI or on command-line.
Configure Static IP Address using the Graphical User Interface ( GUI )
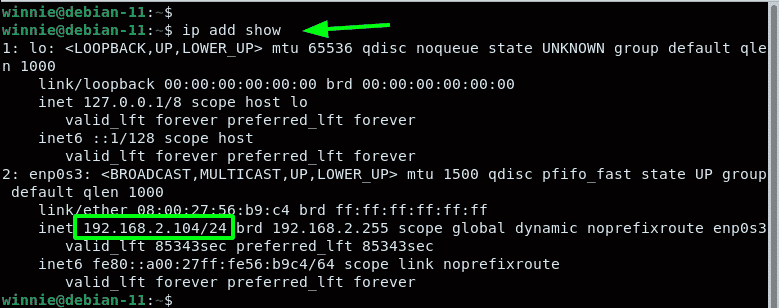
If you are running a Debian 11 desktop instance, log in using your username and password. Before we configure the static IP, first confirm the IP address assigned to your system. In our case, we have a Debian PC with an IP address of 192.168.2.104 in a DHCP network.
You can verify this using the command shown.
$ ip addr show
In our system, enp0s3 interface is the active link that is assigned the IP address. This may be something else in your case.
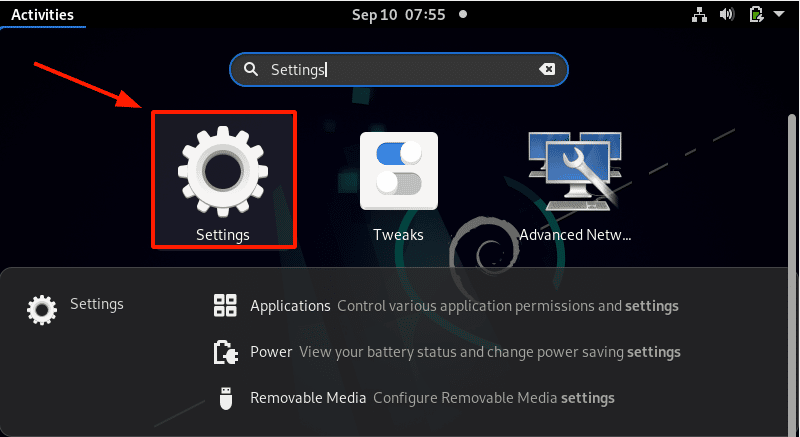
To get started with setting the static IP, click on ‘Activities’ on the left far corner. Search for and click on the ‘Settings’ icon.
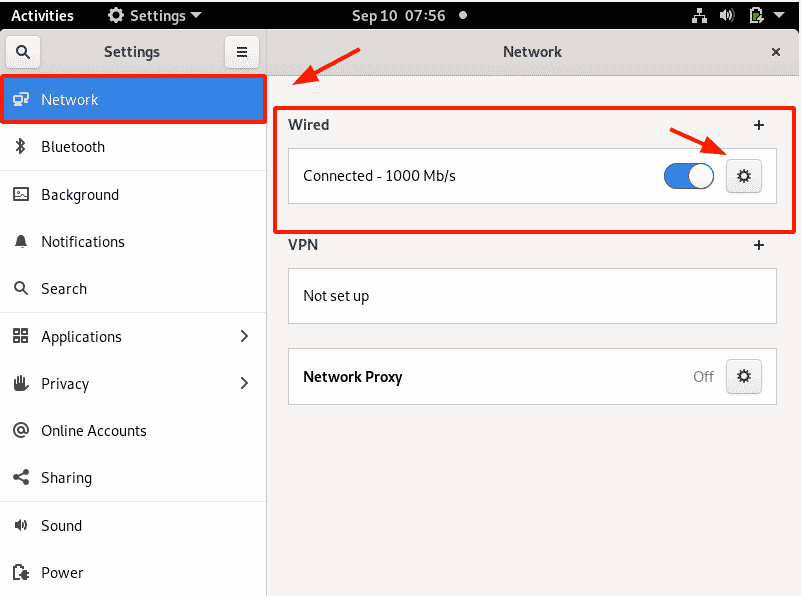
On the ‘Settings’ page, select the ‘Network’ tab. Next, head over to the ‘Wired’ section and click on the small gear wheel as indicated.
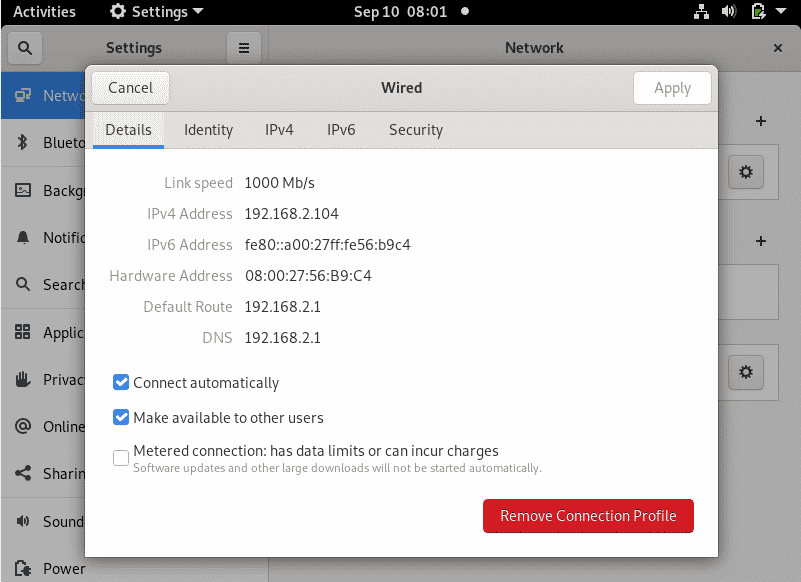
This displays the current IP address configuration as shown. As we confirmed earlier, our current IP address is 192.168.2.104. This has been dynamically allocated to the active interface using the DHCP service.
We are going to override the DHCP settings and manually set a static IP which will persist even upon a reboot.
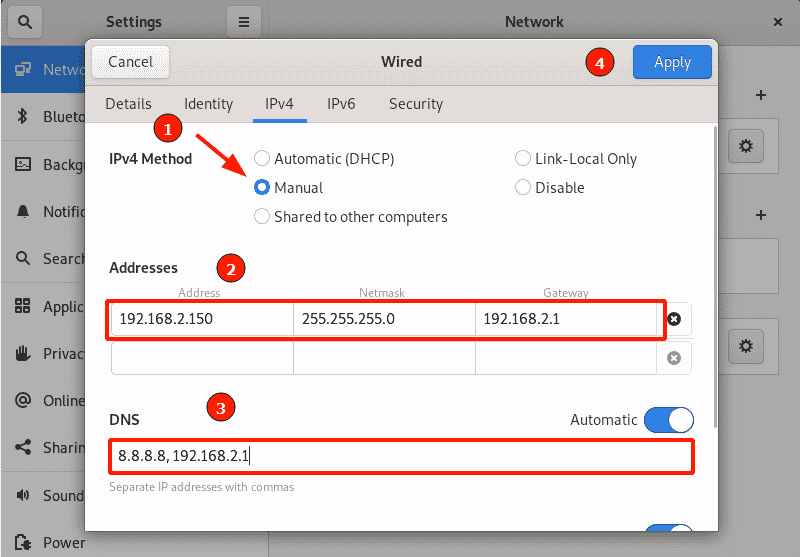
Click the IPv4 tab. Switch from ‘Automatic’ to ‘Manual’ in the IPv4 method section. Thereafter, specify your desired IP address, netmask, and default gateway. Be sure to also provide the preferred DNS settings.
To apply the changes made, click the ‘Apply’ button.
You need to restart the networking daemon or service for the Debian system to implement the new static IP settings. So, turn the toggle button off and then on.
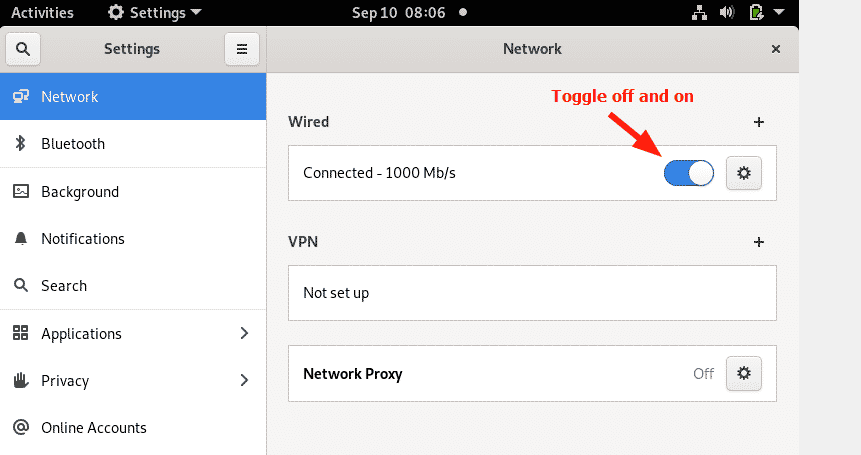
Click on the gear icon once more to verify that the static IP settings have been applied.

On the terminal, verify that the network interface has acquired the newly configured IP address:
$ ip addr show
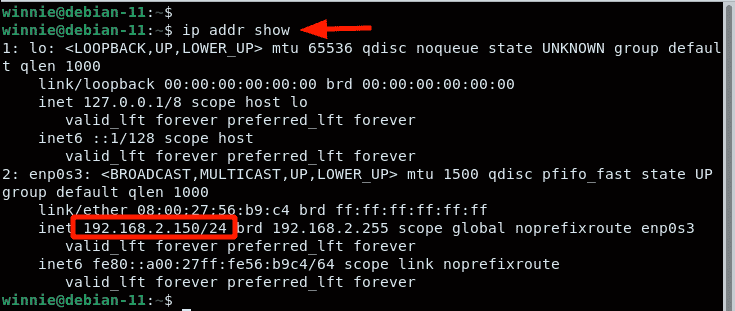
The output is a confirmation that the system was successfully configured using a static IP. Let’s now shift gears and explore setting a static IP on the command line.
Configure Static IP Address using the terminal
If you are running a headless server, or are connecting to a remote server via SSH, the only option available is to configure the static IP on the command line.
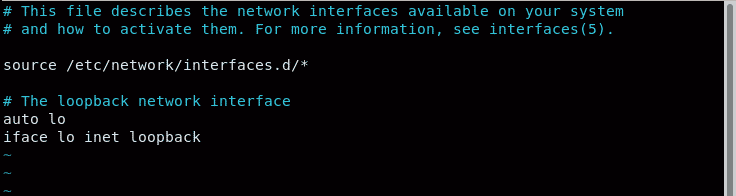
The network configuration settings are stored in the /etc/network/interfaces file. Have a peek at the file as follows. Feel free to use Nano editor if you don’t have vim installed.
$ sudo vim /etc/network/interfaces
By default, only the loopback settings are specified.
We are going to specify the IP settings for our active network interface. But before making any changes, make a backup of the configuration file.
$ sudo cp /etc/network/interfaces /etc/network/interface.bak

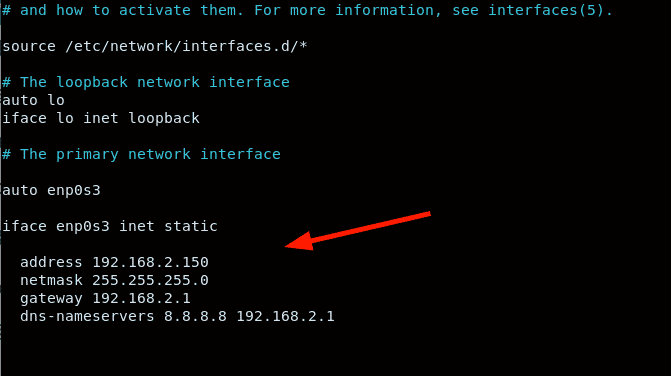
Specify the IP settings as provided. Ensure to make your settings in accordance with your network subnet.
auto enp0s3 iface enp0s3 inet static address 192.168.2.150 netmask 255.255.255.0 gateway 192.168.2.1 dns-nameservers 8.8.8.8 192.168.2.1
To apply the changes, restart the networking service.
$ sudo systemctl restart networking
This will disconnect you from the server if you are connected via SSH. Reconnect using the newly set static IP address.

Conclusion
We have outlined two methods of assigning a static IP on your Debian 11 PC – using GUI and the terminal. The former is the easier option when working on a Debian desktop and the latter comes in handy when configuring a remote server via an SSH client.
Karim Buzdar holds a degree in telecommunication engineering and holds several sysadmin certifications including CCNA RS, SCP, and ACE. As an IT engineer and technical author, he writes for various websites.
How to set up a static IP address on Debian 11

W hen installing any operating system, it is always set to receive network configuration from the DHCP (Dynamic Host Configuration Protocol) server. That includes IP address, routing, subnet, Gateway address, DNS information, and other network configurations. While that is always ok and enough to give you access to the internet, there are situations where a static IP address would be much more preferred. The main challenge with using the DHCP to assign IP addresses is that the IP is dynamic and might change.
To better understand the difference between Static and dynamic examples, let’s use a simple example. You have WiFi at your house, but you decide to go to a coffee shop with your laptop and use the internet there. When you come back to your home, there is a high probability that the DHCP will assign you a different IP address.
Why use a static IP
- It’s much easier to set up and manage DNS
Setting up a static IP on Debian 11
This post will guide you on setting up a static IP on Debian 11. There are two main methods that we can utilize.
We will look at both methods. Let’s get started.
(Method 1) Set up static IP via the terminal
Before configuring our static IP address, we need to know the network interfaces we are connected to. There are several commands that we can use to achieve that. One of the most popular commands to list network interfaces on Linux is the ifconfig command. Unfortunately, this command is now deprecated and doesn’t come pre-installed on most systems.
The other command to list network interfaces is the IP command. Execute the command below on your Terminal.

From the image above, you can see we are connected to the network interface ens33 and the currently assigned IP address is 192.168.1.52 .
With that information, we can now set our static IP address. Execute the command below to open the /etc/network/interfaces configuration file with nano editor.
sudo nano /etc/network/interfaces
If you have not done any configurations before, the file will look as shown below.

To set a static IP, add lines below at the end of the file.
auto ens33
iface ens33 inet static
address 192.168.1.52
netmask 255.255.255.0
gateway 192.168.1.21
dns-nameservers 8.8.4.4 8.8.8.8
- auto ens33 : Here, we specify that we want to use the ens33 network interface.

Save the file (Ctrl + S) and Exit (Ctrl + X) when done.
To apply the configurations, we will need to restart the networking service. Execute the command below.
sudo systemctl restart NetworkManager
That’s it! You have successfully set a static IP address for your Debian 11 system. Now, when you reboot your system or travel and come back and connect to your WiFi network, the IP address will not change dynamically.
(Method 2) Set up static IP from the GUI
If you are not a command-line person, GNOME (the default Desktop Environment for the Debian system) has provided you with a simple and intuitive interface to configure a static IP address.
First, launch the Settings app from the applications menu and select the ‘Network’ option from the left-hand side panel.

You can see the network interface you are connected to and the necessary network information from this screen. In our case, we are connected to the ens33 network interface.
To set a static IP address, click on the Settings icon (gear icon) next to the network interface you want to set the static IP address.

Network interface settings
That will open a configuration window where you can perform several network settings. Select the IPv4 tab and in the IPv4 method section, enable the “manual” radio button. A section will appear below where you must fill in the IP address, subnet mask, and Gateway address.

Leave the DNS and Routes set as automatic. But if you still want to use your DNS settings and Routes, click on the button next to the ‘Automatic’ tag to enable ‘manual’ mode.
Click the ‘Apply’ button at the top to save the new configurations. To confirm that your static IP address was set successfully, click on the Settings icon next to the network interface and check the ‘details’ section.

That’s it! You have successfully enabled a static IP address from the Graphical User Interface.
Conclusion
This post has given you a step-by-step guide on setting up a static IP address on the Debian 11. We have looked at two methods – setting a static IP via the command line and setting a static IP from the Graphical User Interface. We have also looked at the advantages of using a static IP address and the various scenarios best if you used a static IP. We hope you found this article helpful. If you have any queries or comments, please don’t hesitate to leave a comment below.