- How to Clean Install NVIDIA Drivers on Debian 11
- Uninstall Official NVIDIA Drivers from Debian 11
- Install NVIDIA Drivers From the Debian Repository
- Enable contrib and non-free Repositories
- Install the Drivers
- Confirm the Installation
- Install NVIDIA Drivers From the Official Website
- Final Thoughts
- Sign Up for Our Newsletters
- Saved searches
- Use saved searches to filter your results more quickly
- BeanGreen247/Debian_10_Proprietary_NVIDIA_Driver_Install_Guide
- Name already in use
- Sign In Required
- Launching GitHub Desktop
- Launching GitHub Desktop
- Launching Xcode
- Launching Visual Studio Code
- Latest commit
- Git stats
- Files
- README.md
- About
How to Clean Install NVIDIA Drivers on Debian 11

Looking for a way to clean install NVIDIA drivers on Debian 11? This tutorial shows you the full process.
Many new Linux users get confused about graphics drivers. Unlike Windows, it’s more complex on Linux. And let’s face it, if you’re a gamer or a graphic designer, you need those drivers. Installing NVIDIA drivers and dealing with drivers on Linux, in general, can be tedious.
This guide will make this process pretty easy. We will walk you through the required steps to clean install NVIDIA drivers on Debian 11.
Uninstall Official NVIDIA Drivers from Debian 11
Since this will be a clean install, you must remove any NVIDIA drivers you installed previously. This step is necessary only if you have the drivers in your system. If you just freshly installed Debian or you don’t have any graphics drivers currently, you can move on to the next step.
Open your terminal and update the system with this command:
Now you can remove the existing NVIDIA drives completely from your device. To do that, run the following command:
$ sudo apt remove --purge nvidia-*
In our case, we didn’t have any NVIDIA drivers installed, so nothing was removed. If you have the drivers, press Y to confirm the uninstallation.
You may also remove the dependency packages of the official NVIDIA drivers. Use the below command:
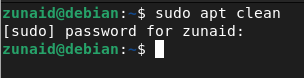
$ sudo apt autoremove --purgeYou can also try and clean any remaining cached NVIDIA driver packages. For that, use this command:
Next, you need to reboot your device so that the changes take effect. Reboot your system with this command:
One way to check whether the uninstallation was successful is by checking the current graphics drivers in use. To do so, run the following command:

You’re not supposed to get any output, just like the screenshot above.
Install NVIDIA Drivers From the Debian Repository
After you’ve removed all the NVIDIA drivers from your device, it’s time to install the new ones.
First, let’s check if your device has an NVIDIA GPU installed in it. You can check this with this command:

We’re just using a fresh Debian on a Virtual Machine. So your output will vastly differ from ours. And since you’re here, you should already have an NVIDIA GPU installed. Just check the version after running the above command.
When you’re done checking, move on to the installation process.
Enable contrib and non-free Repositories
We must add these two repositories to our source list since these contain the NVIDIA driver packages. To add the ‘contrib’ repo, run this command:
$ sudo apt-add-repository contrib
It should be added. After that, add the ‘non-free’ repo using this command:
$ sudo apt-add-repository non-free
Both repositories have been added to the list. Now let’s update the source list like before. Run this command:

The package repository cache has been successfully updated.
Install the Drivers
Now that we have the required repos, we can install the NVIDIA drivers. Install them by running this command:
$ sudo apt install nvidia-driver
When prompted for confirmation, press ‘Y’ to confirm. It’s a big package, so it will take a while to fully download and install the necessary packages. Till it’s finished, wait patiently.
During the installation, you may face a window with a conflicting kernel module message. In that case, press OK to continue.
Once the installation is complete, reboot your device again with this command:
Confirm the Installation
To check if the drivers were installed correctly or not, go to ‘Activities’.
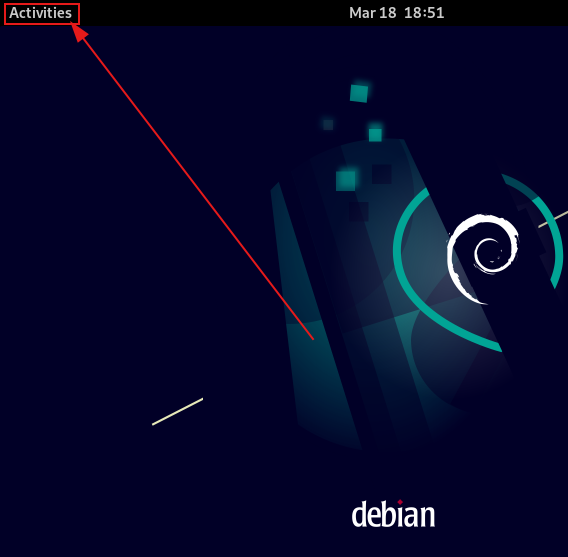
In the search bar, start typing ‘nvidia’. You should notice the NVIDIA X Server Settings app.
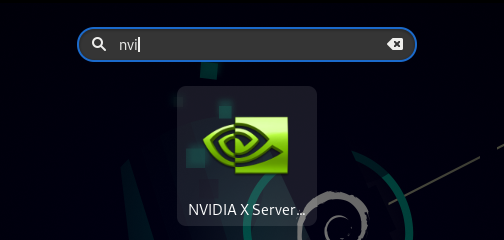
Run the app. If the app runs successfully, then the setup is successful. You can also check if the NVIDIA modules loaded correctly by running this command:
Install NVIDIA Drivers From the Official Website
Another way of installing NVIDIA drivers is to download them from the official site and run the installation files. In this method, you will still need the contrib and non-free repositories. So add them by following that step.
Once added, install the Nvidia Detect utility by running this command:
$ sudo apt install nvidia-detect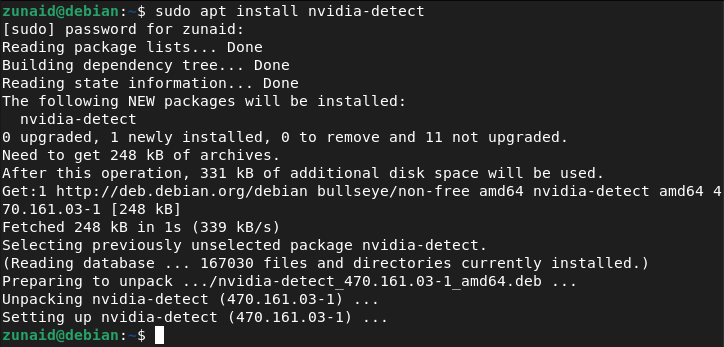
You can use this tool to detect the NVIDIA GPU model you’re using. To do that, use this command:

In your case, you should see the appropriate GPU model. You will also get some suggested driver series and driver package names.
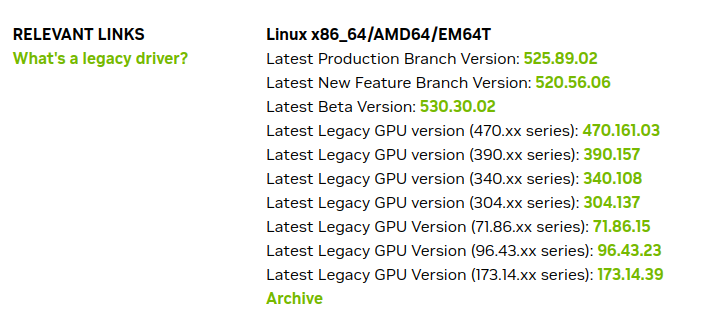
Now you can head over to the NVIDIA drivers list page and download the correct driver for your system.
Click on the link to take you to the download page.

Press the ‘Download’ button. You should see an agreement page like below:
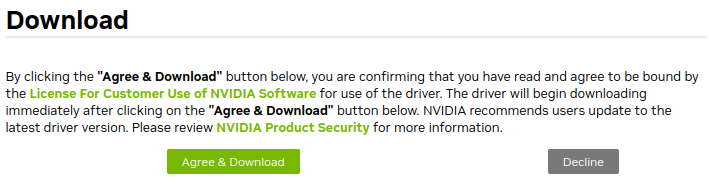
To proceed, press ‘Agree & Download’. Choose the directory where you want to save the file.
The download should start.
While it’s being downloaded, you can install the driver prerequisites in the meantime. For that, use this command:
$ sudo apt -y install linux-headers-$(uname -r) build-essential libglvnd-dev pkg-configIf you have other graphics drivers(like nouveau) installed, you need to disable them first. So create a configuration file in nano. Use this command:
$ sudo nano /etc/modprobe.d/blacklist-nouveau.confAdd these lines to the file:
blacklist nouveau options nouveau modeset=0Save and exit. Now run this command to rebuild the initramfs kernel:
Since you’ve disabled the default GPU drivers, you need to switch to CUI now. Enable multi-user login with CLI mode using this command:
$ systemctl set-default multi-user.targetReboot your device after that. Login to your system as the root user. Let’s install the drivers now. Go to the right directory and run this command:
Replace ‘driver_file’ with the corresponding name. Wait for it to complete.
While it’s being installed, you can set GUI as default again. Run this command:
$ systemctl set-default graphical.targetFinally, reboot your device with this command:
Final Thoughts
This guide shows you how to clean install NVIDIA Drivers on Debian 11. We’ve shown you how you can fully remove installed NVIDIA packages to make room for the latest ones. Then we walked you through the process of installing the drivers. If you followed this tutorial correctly, you should get ready to use the drivers by now.
If this guide helped you, please share it.
Zunaid is currently pursuing his bachelor’s degree in Information & Communication Technology at Jahangirnagar University. He’s always eager to share his love for all things tech. With a passion for coding, writing, and Linux, he is well-equipped to share his knowledge and insights with readers. LinkedIn GitHub
Sign Up for Our Newsletters
By checking this box, you confirm that you have read and are agreeing to our terms of use regarding the storage of the data submitted through this form.
Saved searches
Use saved searches to filter your results more quickly
You signed in with another tab or window. Reload to refresh your session. You signed out in another tab or window. Reload to refresh your session. You switched accounts on another tab or window. Reload to refresh your session.
Steps on installing proprietary NVIDIA drivers on Debian 10.
BeanGreen247/Debian_10_Proprietary_NVIDIA_Driver_Install_Guide
This commit does not belong to any branch on this repository, and may belong to a fork outside of the repository.
Name already in use
A tag already exists with the provided branch name. Many Git commands accept both tag and branch names, so creating this branch may cause unexpected behavior. Are you sure you want to create this branch?
Sign In Required
Please sign in to use Codespaces.
Launching GitHub Desktop
If nothing happens, download GitHub Desktop and try again.
Launching GitHub Desktop
If nothing happens, download GitHub Desktop and try again.
Launching Xcode
If nothing happens, download Xcode and try again.
Launching Visual Studio Code
Your codespace will open once ready.
There was a problem preparing your codespace, please try again.
Latest commit
Git stats
Files
Failed to load latest commit information.
README.md
Install proprietary NVIDIA driver on Debian 10
Go follow these legends, they helped making this guide what it is today
edit your /etc/apt/sources.list file by appending «contrib non-free» at the end of the lines beginning with deb.
deb http://deb.debian.org/debian stretch main contrib non-free deb-src http://deb.debian.org/debian stretch main deb http://deb.debian.org/debian stretch-updates main contrib non-free deb-src http://deb.debian.org/debian stretch-updates main deb http://security.debian.org/ stretch/updates main contrib non-free deb-src http://security.debian.org/ stretch/updates main It will ask you to type a new sudo password.
First install nvidia-detect
sudo apt -y install nvidia-detect Next use nvidia-detect to find your gpu
First install these packages and build linux depemdecies.
sudo apt-get autoclean sudo apt-get clean sudo apt-get update sudo apt-get upgrade sudo apt-get dist-upgrade sudo apt-get -f install sudo dpkg --configure -a sudo apt install firmware-linux build-essential gcc-multilib linux-headers-amd64 dracut sudo apt build-dep linux NOTE: If it says that it will remove initramfs-tools its fine let it remove it
Download driver from https://www.nvidia.com/object/unix.html Those who need the legacy driver look for Latest Legacy GPU version.
Disable Nouveau and other drivers that might have conflicts with the installation.
echo 'blacklist amd76x_edac' | sudo tee -a /etc/modprobe.d/blacklist.conf echo 'blacklist vga16fb' | sudo tee -a /etc/modprobe.d/blacklist.conf echo 'blacklist rivafb' | sudo tee -a /etc/modprobe.d/blacklist.conf echo 'blacklist rivatv' | sudo tee -a /etc/modprobe.d/blacklist.conf echo 'blacklist nvidiafb' | sudo tee -a /etc/modprobe.d/blacklist.conf echo 'blacklist nouveau' | sudo tee -a /etc/modprobe.d/blacklist.conf sudo dracut -v /boot/initramfs-$(uname -r).img $(uname -r) Next disable display manager. To find out witch you are using type
sudo cat /etc/X11/default-display-manager sudo systemctl stop lightdm If you see a black screen just press CTRL+ALT+F1 and type
sudo apt install initramfs-tools sudo systemctl set-default multi-user.target NOTE: If it says that it will remove dracut its fine let it remove it
if it fails run these commands
sudo apt-get autoclean sudo apt-get clean sudo apt-get update sudo apt-get upgrade sudo apt-get dist-upgrade sudo apt-get -f install sudo dpkg --configure -a sudo update-initramfs -u Log in as root with the password we have set up earlier.
Next go to Downloads forlder
sudo apt install linux-headers`uname -r` Now, add some libraries to your system
sudo apt install build-essential sudo apt install libglvnd-dev pkg-config I would recommend to enable 32-bit support if prompted.
Next select Install and overwrite existing filesort installation.
It should ask you to generate X-org configuration. Accept that too.
If not, run nvidia-xconfig after the installer finishes.
sudo systemctl set-default graphical.target And that’s it. You should have succesfully installed the proprietary NVIDIA driver.
About
Steps on installing proprietary NVIDIA drivers on Debian 10.