- Как установить Debian Linux с USB flash
- Введение
- Шаг 1: Найти компьютер с Linux и USB флешку
- Шаг 2: Подключить USB флешку к компьютеру
- Шаг 3: Скачивание файла загрузочного образа для USB устройства
- Шаг 4: Подготовка USB диска к загрузке
- Шаг 5: Загрузка netinstall или business CD-образа
- Шаг 6: Копирование ISO образа на USB диск
- Источники
- Linux debian установка usb
- 4.3.1. Preparing a USB stick using a hybrid CD/DVD image
- How to Make a Debian 11 Bootable USB
- Pre-requisites
- How to make USB a Debian 11 bootable USB on Linux OS
- Step 1: Attach the ISO image
- Step 2: Select the USB
- Step 3: Start the process of making USB bootable
- How to make a Debian 11 bootable USB on Windows
- Step 1: Open and configure Rufus
- Step 2: Start the process
- Conclusion
Как установить Debian Linux с USB flash
В этой статье вы узнаете, как создать USB flash диск, с которого можно будет установить Debian Linux.
Введение
Здесь я расскажу, как подготовить загрузочную USB флешку с Debian Lenny и установить с неё Debian на любой накопитель (IDE/USB HDD). Заметьте, что в этой статье описывается не то, как установить Debian на USB диск/флешку, а то, как создать «Инсталляционный USB диск». То есть результатом станет то, что вы сможете установить Debian Lenny с USB накопителя, вместо традиционного CD-ROM.
Существует несколько путей установки Debian Lenny:
1. С помощью CD/DVD дисков, которые можно скачать с сайта Debian или заказать у многих поставщиков
2. С помощью дискеты (floppy)
3. С помощью USB-накопителя (брелка). Именно это здесь и описано.
4. С помощью загрузки по сети (PXE boot)
Метод 1 самый популярный и простой.
Метод 2 устарел и очень мало людей используют его.
Методы 3 и 4 не очень понятны, однако разработчики Debian проделали много работы, чтобы сделать их на столько простыми, на сколько это возможно.
Шаг 1: Найти компьютер с Linux и USB флешку
Вам нужен компьютер с уже запущенным линуксом и USB флешка размером как минимум 256 Мб, которую мы подготовим в качестве инсталляционного диска.
Шаг 2: Подключить USB флешку к компьютеру
Подключите ваш USB накопитель к компьютеру с запущенным Linux’ом и убедитесь, что он определился ядром Linux. Большинство ядер в современных дистрибутивах Linux могут определять USB устройства на лету и не требуют чего-то специфичного. Вы можете проверить, что USB устройство определилось или не определилось с помощью следующей команды:
и вы увидите что-то типа этого:
[373982.581725] sd 8:0:0:0: [sdc] 4001760 512-byte hardware sectors (2049 MB)
[373982.582718] sd 8:0:0:0: [sdc] Write Protect is off
[373982.582718] sd 8:0:0:0: [sdc] Mode Sense: 03 00 00 00
[373982.582718] sd 8:0:0:0: [sdc] Assuming drive cache: write through
[373982.584152] sd 8:0:0:0: [sdc] 4001760 512-byte hardware sectors (2049 MB)
[373982.585718] sd 8:0:0:0: [sdc] Write Protect is off
[373982.585718] sd 8:0:0:0: [sdc] Mode Sense: 03 00 00 00
[373982.585718] sd 8:0:0:0: [sdc] Assuming drive cache: write through
[373982.585718] sdc:
[373982.589280] sd 8:0:0:0: [sdc] Attached SCSI disk
Шаг 3: Скачивание файла загрузочного образа для USB устройства
Теперь скачайте файл boot.img.gz отсюда
Замечание: Этот образ предназначен для архитектуры i386. Вам необходимо найти образ для вашей архитектуры здесь. Под «архитектурой» подрузамевается тип той системы, НА которую вы собираетесь установить Debian Lenny.
Например, если вы собираетесь установить Debian на компьютер с архитектурой AMD64, вам необходимо перейти в директорию /installer-amd64/ и скачать файл boot.img.gz оттуда.
Шаг 4: Подготовка USB диска к загрузке
Замечание: На этом шаге будут удалены все данные с вашго USB диска!
Теперь выполните следующую команду:
где sdX — имя вашего USB устройства (sdc в этом руководстве). Узнать имя можно с помощью команды dmesg (см. шаг 2)
Теперь хорошая идея — вытащить и воткнуть обратно вашу USB флешку, чтобы новая структура/таблица разделов распозналась Linux’ом. Это обновит таблицу разделов, хранимую udev.
Проверка: Вы можете проверить успешность этого шага, выполнив следующие команды:
и вы должны увидить инсталляционные файлы, такие как syslinux.cfg, setup.exe, и так далее.
Замечание: Здесь нет суффиксов «1» или «2», таких как /dev/sdc1 или /dev/sdc2. После того, как вы скопировали на флешку образ boot.img.gz на ней нет таблицы разделов, файловая система создана прямо на самом устройстве.
Шаг 5: Загрузка netinstall или business CD-образа
До сих пор мы только что подготовили USB флешку для загрузки, но нам всё ещё нужен инсталляционный образ, который будет использован для установки Debian. У вас есть два варианта:
1. Скачать ISO образ netinstall размером 150-180MB отсюда. Netinstall устанвливает базовую систему, сеть не нужна.
2. Скачать businesscard образ размером около 40 MB отсюда. Для установки требуется сеть.
Шаг 6: Копирование ISO образа на USB диск
Теперь мы должны выполить последний шаг — скопировать скачаный ранее (на предыдущем шаге) ISO образ на USB диск. Чтобы сделать это, выполните следующие команды:
# mount /dev/sdX /mnt
# cp /mnt
# umount /dev/sdX
Вот и всё. Вы успешно создали установочный USB диск, который может быть всегда с собой и использован вами в любом месте для установки Debian Linux. Просто подключите USB диск к компьютеру, на котором вы собираетесь установить Debian Lenny и выберите в БИОСе загрузку с USB. Теперь CD-ROM вообще не трубуется!
Источники
Перевод мой, некоторые дополнения — тоже.
Linux debian установка usb
To prepare the USB stick, we recommend to use a system where GNU/Linux is already running and where USB is supported. With current GNU/Linux systems the USB stick should be automatically recognized when you insert it. If it is not you should check that the usb-storage kernel module is loaded. When the USB stick is inserted, it will be mapped to a device named /dev/sdX , where the « X » is a letter in the range a-z. You should be able to see to which device the USB stick was mapped by running the command lsblk before and after inserting it. (The output of dmesg (as root) is another possible method for that.) To write to your stick, you may have to turn off its write protection switch.
The procedures described in this section will destroy anything already on the device! Make very sure that you use the correct device name for your USB stick. If you use the wrong device the result could be that all information on, for example, a hard disk is lost.
4.3.1. Preparing a USB stick using a hybrid CD/DVD image
Debian installation images for this architecture are created using the isohybrid technology; that means they can be written directly to a USB stick, which is a very easy way to make an installation media. Simply choose an image (such as the netinst, CD or DVD-1) that will fit on your USB stick. See Раздел 4.1, «Official Debian GNU/Linux installation images» to get an installation image.
The installation image you choose should be written directly to the USB stick, overwriting its current contents. For example, when using an existing GNU/Linux system, the image file can be written to a USB stick as follows, after having made sure that the stick is unmounted:
#cpdebian.iso/dev/sdX#sync
Simply writing the installation image to USB like this should work fine for most users. For special needs there is this wiki page.
Information about how to do this on other operating systems can be found in the Debian CD FAQ.
Образ должен быть записан на устройство, представляющее весь диск, а не отдельный раздел, например /dev/sdb, а не /dev/sdb1. Не используйте программы типа unetbootin , которые изменяют образ.
How to Make a Debian 11 Bootable USB
![]()
Most devices come with a pre-installed OS; however, you can change the OS as per your likeness or requirements. Nowadays, the computing machines even do not have built-in DVD/CD drives; therefore, users have no choice other than switching to the new methods. Usually, pen drives are being used to get new operating systems; you can make USB bootable by using the iso image of operating systems. To make it bootable, there are several tools available that help to extract important files from iso image and then add those files to the USB drive to make it functional. In this post, we have briefly described the step-by-step procedure to make a Debian 11 bootable USB.
Before getting into the core part, let’s have a look at the prerequisites to make Debian 11 USB bootable:
Pre-requisites
The following are the prerequisites packages that are necessary to be on your parent operating system:
Debian 11 ISO image : The primary requirement in making USB bootable is to get the ISO image of the OS; to download ISO image of Debian 11 click below:
Download Debian 11 ISOUSB drive : You will require a pen drive with minimum space of 4GB, but it is recommended to use an 8GB pen drive for this bootable process
Tool to make USB bootable: As we are using Linux-based OS to make USB bootable for Debian 11 therefore we have used balenaEtcher tool in this guide to make the USB bootable; you can download and install “balenaEtcher” for Linux by following the link below:
Download balenaEtcherYou have multiple options of supported operating systems; as we are using Linux to make Debian 11 OS bootable, so we have chosen “Linux x64” version of balenaEtcher:
How to make USB a Debian 11 bootable USB on Linux OS
Once you are done with the prerequisites; you are ready to start the core process.
Step 1: Attach the ISO image
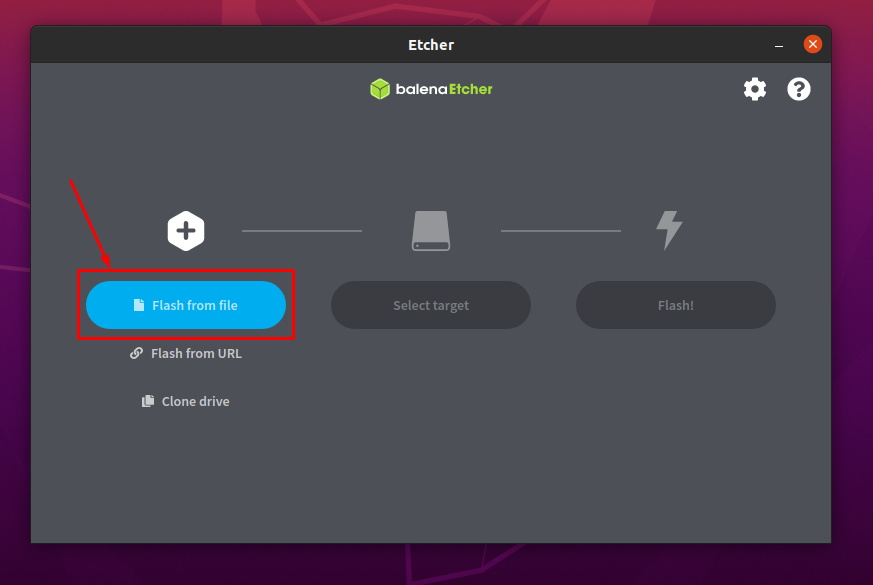
Firstly, launch the balenaEtcher tool: you can see one active and two inactive options. The active option must be performed first to activate the other option: thus, click on “Flash from file” to look for ISO image of Debian 11 from your PC:
Note: you can directly attach the file by navigating to “Flash from URL” and can “Clone drive” to get the ISO file. However, it is recommended to download the ISO image and then use balenaEtcher.
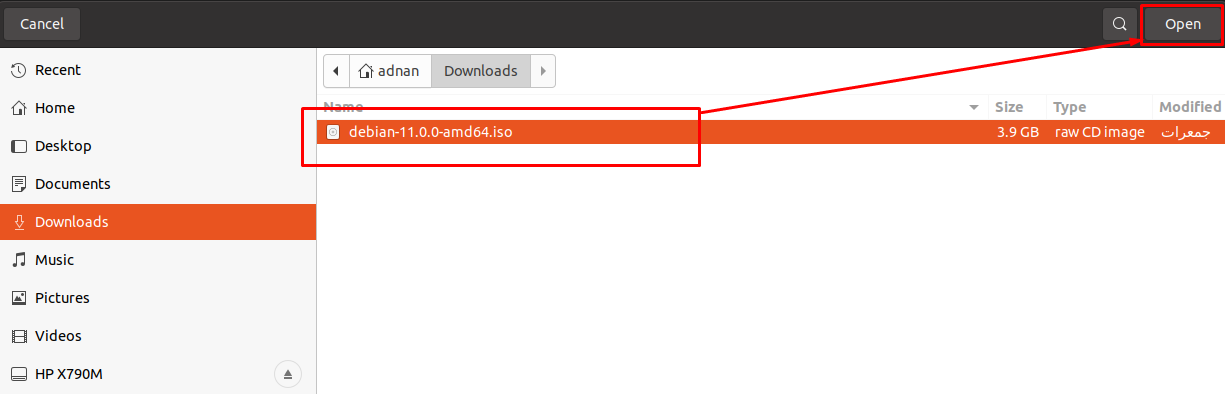
Select the image from the location where you have saved it and click on “Open”:
Step 2: Select the USB
It is observed that the ISO image has been added successfully:
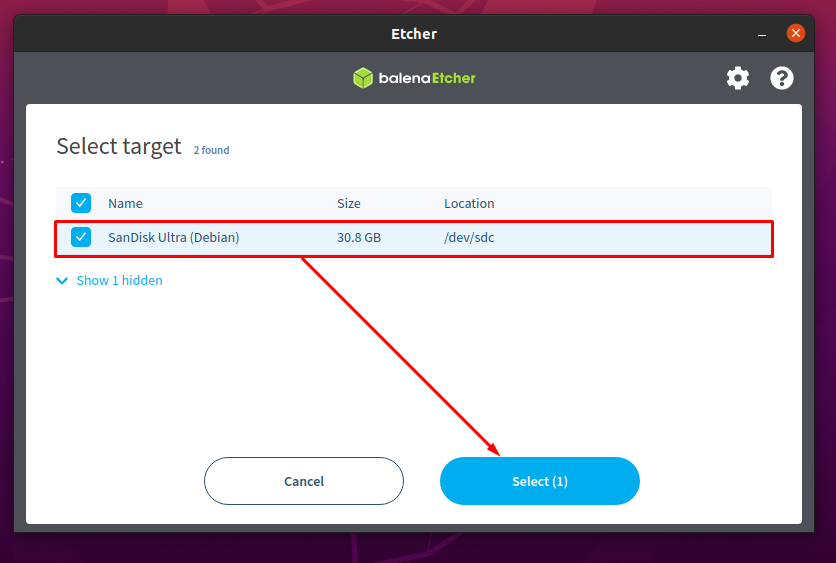
Insert the USB into your system and click on “Select Target” to select the USB:

The time you clicked on “Select target”; you will see the list of inserted USB drives:
Check the USB option and click on “Select” to continue:
Step 3: Start the process of making USB bootable
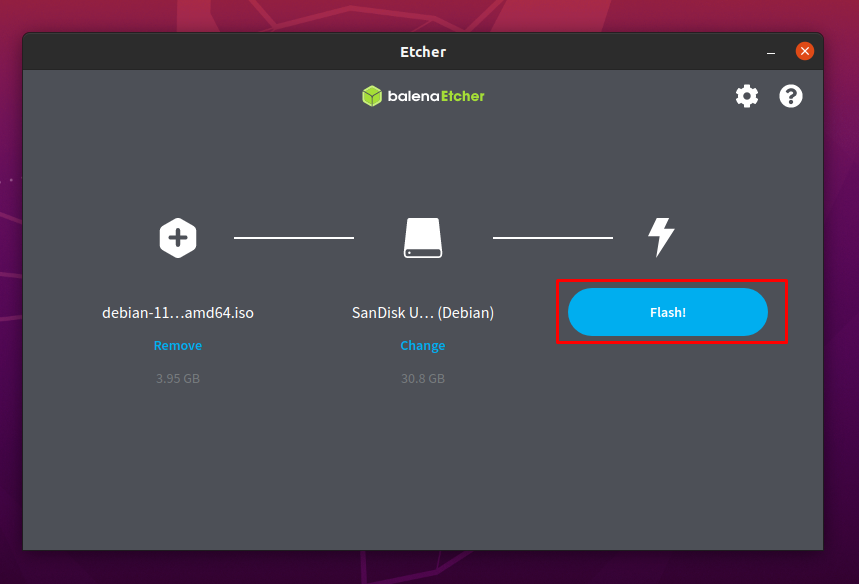
After the successful completion of first two steps; you will observe that ISO image option and USB option both are completed and can be seen in the image below:

Now, click on “Flash” to get the ISO image mapping on your USB to make it bootable:
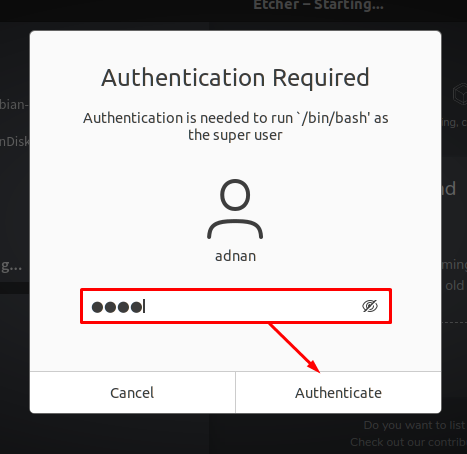
The time you will click on “Flash”; you will get an authentication prompt: enter your password and click on “Authenticate” to resume the flashing:
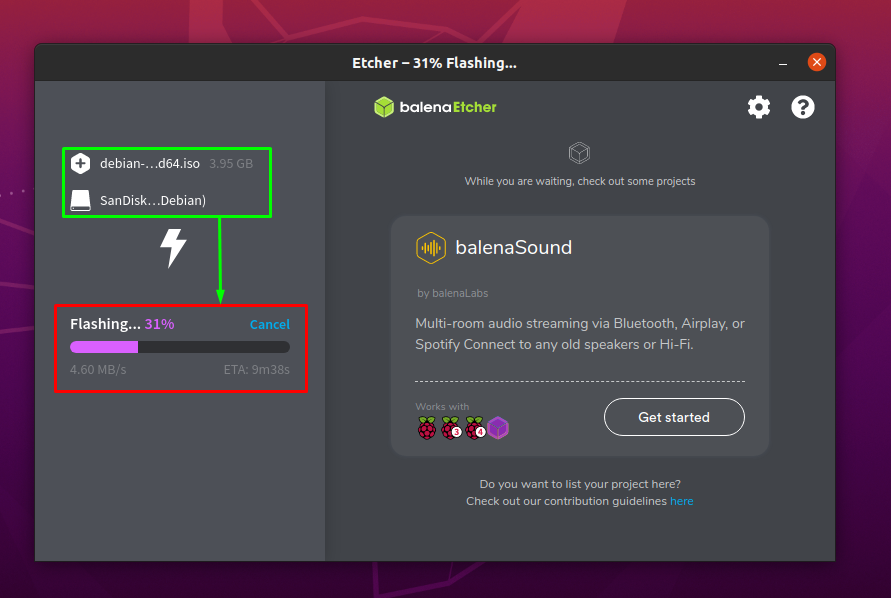
It will take few minutes to complete the flashing process:
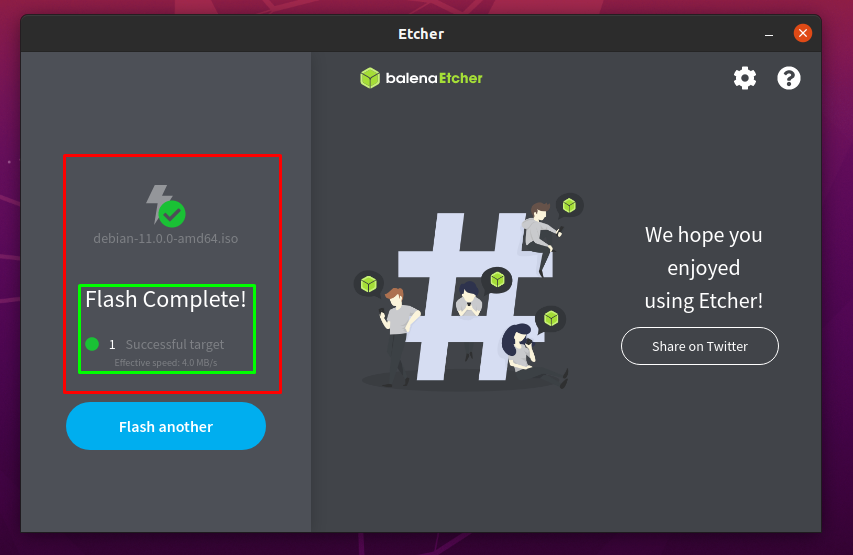
Once the process is completed; balenaEtcher will show a “Flash Complete” as can be seen below:
How to make a Debian 11 bootable USB on Windows
If your parent OS is Windows, you can follow the simple steps that are performed in this section:
You have to download the tool for making USB bootable on Windows; we are using Rufus tool in this section:
Note: You can use balenaEtcher as well to perform the above said task:
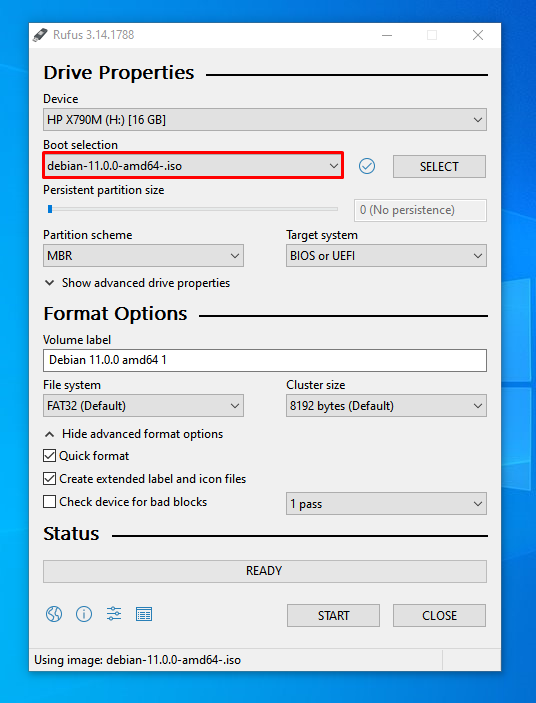
Step 1: Open and configure Rufus
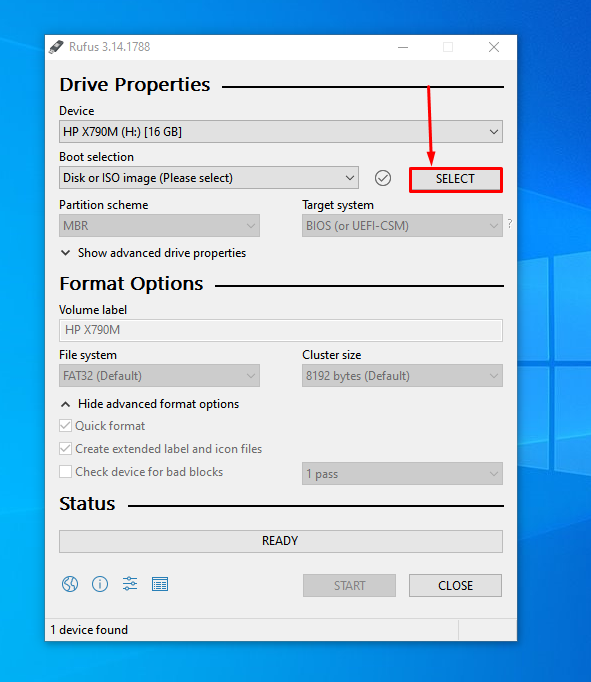
Firstly, attach USB to your windows and open Rufus; it will automatically fetch the USB details as can be seen below; click on “SELECT” to choose the Debian 11 image from your windows computer:
Choose the Debian 11 ISO image and once selected you can see the ISO file has been added:
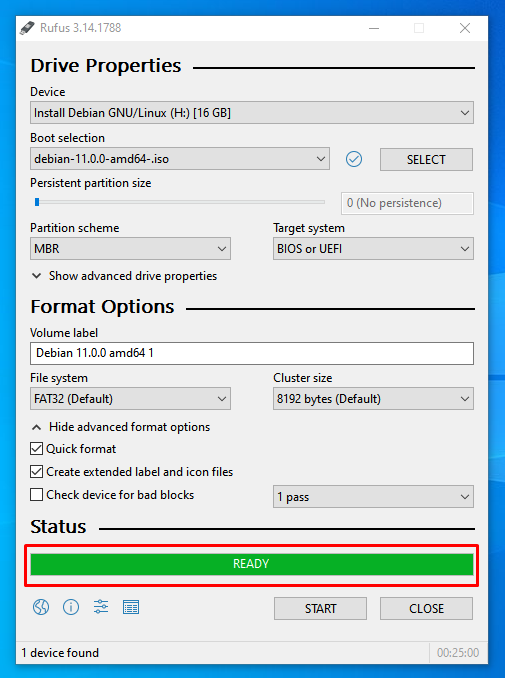
Step 2: Start the process
Rufus allows you to configure the settings as per your own requirements; but the default setting is good to go with; so, click on START at the end of window to start making the USB bootable:

This process will take several minutes to complete; once completed you will notice a “READY” status:
Conclusion
Operating systems have a key role to ease the interaction of users with hardware; moreover, it also facilitates you to connect the software with respective hardware to make it operational. Every user has its own set of requirements when choosing the operating system; many individuals use the computing machine just for documentation or its supportive programs. Therefore, they are not choosy about the operating systems; whereas professional users are OS oriented because every operating system has its own tools, advantages at advanced level. In this post, we have demonstrated the possible ways to make Debian 11 bootable USB; either you will have to use Windows based or Linux-based OS to make the USB bootable. We have explained both the possibilities; hence, a Linux user as well as Windows user can follow these steps to get Debian 11 on their USB.