- how to change DNS server permanently on Ubuntu 20.04?
- How to set DNS name servers on Ubuntu Linux?
- Method 1: Set the DNS NameServer from Ubuntu Desktop Using the Network Manager
- Method 2: Set the DNS NameServer Using Netplan with Network Manager and Static IP
- Set Custom DNS NameServer from Command-line Using Netplan with Networkd
- Conclusion:
- About the author
- Samreena Aslam
- How to setup DNS manually on Linux?
- 2 Answers 2
- DNS Config Under Linux
- Getting Back The Control Of DNS
- 1. Resolvconf:
- 2. Dnsmasq Service:
- 3. Network Manager:
- 4. Network Interfaces:
- 5. DHCP Client:
- 6. Rdnssd Service:
- 7. Resolved Service:
- 8. Netconfig:
- Setting The DNS Server
how to change DNS server permanently on Ubuntu 20.04?
I know there are other posts here asking this, but those suggestions do not help, the configuration keeps changing and I simply cannot get my own changes to persist. I have the Google 8.8.8.8 and 8.8.4.4 servers in my Network Manager configuration in the GUI, and systemd-resolv —status returns
Link 2 (enp38s0f1) Current Scopes: DNS DefaultRoute setting: yes LLMNR setting: yes MulticastDNS setting: no DNSOverTLS setting: no DNSSEC setting: no DNSSEC supported: no Current DNS Server: 8.8.8.8 DNS Servers: 8.8.8.8 8.8.4.4 DNS Domain: ~. ;; Query time: 0 msec ;; SERVER: 192.168.1.1#53(192.168.1.1) ;; WHEN: Mon Oct 05 11:08:26 EDT 2020 ;; MSG SIZE rcvd: 83 so my default route 192.168.1.1 as DNS . Furthermore, /etc/resolv.conf is a symlink to /run/systemd/resolve/resolv.conf , which in turn reads
# Generated by dhcpcd from enp38s0f1.dhcp, wlp0s20f3.dhcp # /etc/resolv.conf.head can replace this line domain fios-router.home nameserver 192.168.1.1 # /etc/resolv.conf.tail can replace this line The only enp38s0f1.dhcp file on this system (I’ve searched / ) is /run/dhcpcd/resolv.conf/enp38s0f1.dhcp , which reads
# Generated by dhcpcd from enp38s0f1.dhcp domain fios-router.home search fios-router.home nameserver 192.168.1.1 I have tried to write in other nameservers there, but they do not persist. In the past I’ve made the changes persistent by making the file immutable with chattr +i , but
lsattr /run/dhcpcd/resolv.conf/enp38s0f1.dhcp lsattr: Inappropriate ioctl for device While reading flags on /run/dhcpcd/resolv.conf/enp38s0f1.dhcp so that attribute is not available here. And besides, I shouldn’t have to make the file immutable anyway: there should presumably be some way I can control the DNS server.. Edit: In response to comments below:
$ dpkg -l *dnsmasq* --- Desired=Unknown/Install/Remove/Purge/Hold | Status=Not/Inst/Conf-files/Unpacked/halF-conf/Half-inst/trig-aWait/Trig-pend |/ Err?=(none)/Reinst-required (Status,Err: uppercase=bad) ||/ Name Version Architecture Description +++-================-===============-============-============================================ un dnsmasq (no description available) ii dnsmasq-base 2.80-1.1ubuntu1 amd64 Small caching DNS proxy and DHCP/TFTP server un dnsmasq-base-lua (no description available) How to set DNS name servers on Ubuntu Linux?
![]()
DNS nameservers (resolvers) provide a method to translate the domain name into the IP addresses. It is provided by the ISP (internet service providers) and is used by various other devices to do the DNS lookup for a requested domain.
We will show you in this tutorial how to set or configure the DNS nameserver using different methods on the Ubuntu system. All configurations have been performed on Ubuntu 20.04 system.
Two different approaches that can be used to set the DNS NameServer on Ubuntu 20.04 Linux system:
- Set the DNS NameServer from Ubuntu Desktop using the Network Manager
- Set the DNS NameServer from command-line using netplan
Method 1: Set the DNS NameServer from Ubuntu Desktop Using the Network Manager
Setting up the DNS NameServer from the Ubuntu desktop using the Network Manager is quite simple and requires no technical knowledge. Just simply follow the below-mentioned steps:
1. Open the system “Settings” window on your system.
2. If you are connected with Wi-Fi then, click on the “wifi” tab. Otherwise, click on the “Network” tab, if you have a “wired” connection.
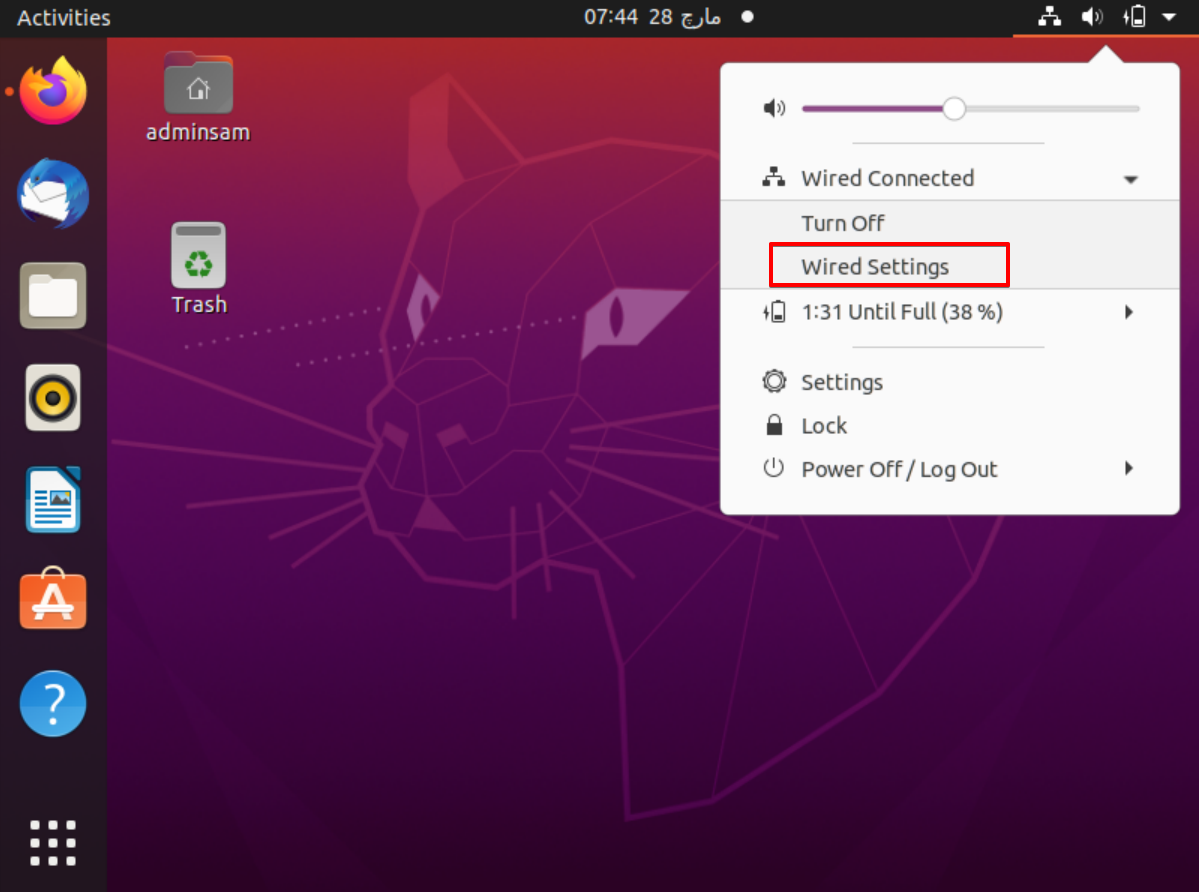
3. The Settings window can also launch from the top-right menu. Click on the drop-down icon and select the “wired settings” option from the displaying list, which is also shown in the following screenshot:
4. Click on the cog icon that is displayed under the “wired” heading to access the Network Manager configurations.

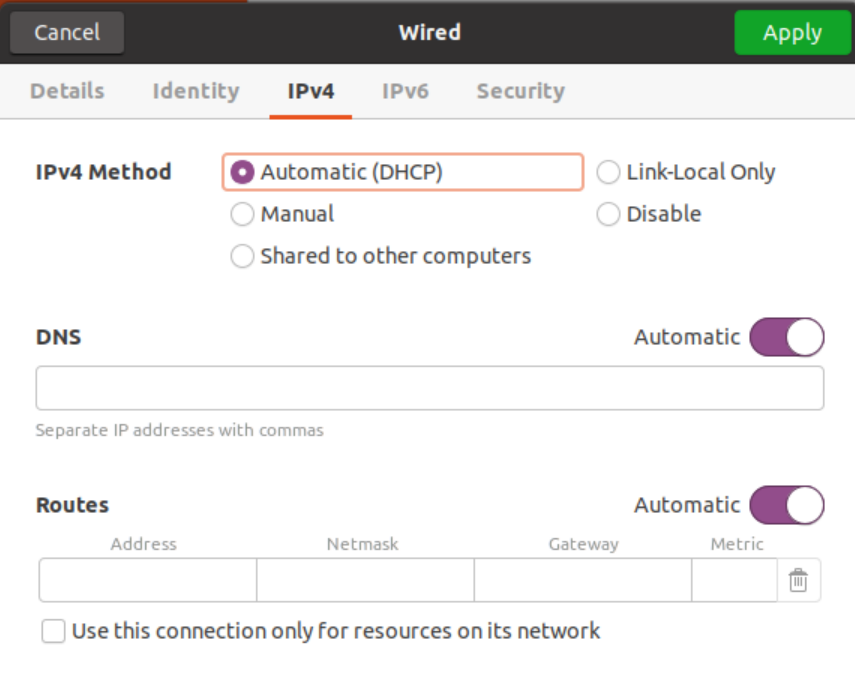
5. Now, go into the “IPV4” settings tab and select the IPV4 method where the default “Automatic (DHCP)” is selected.
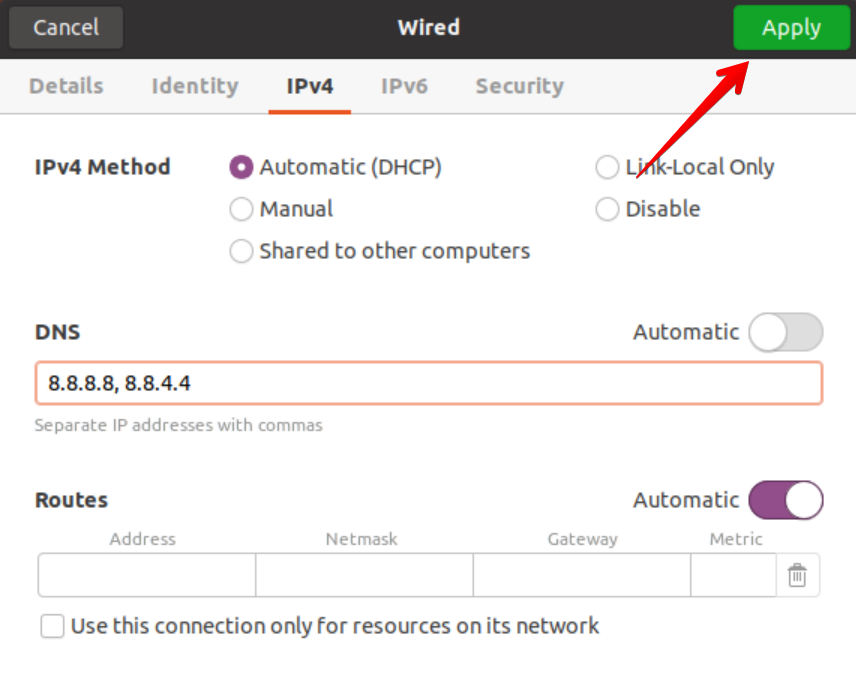
Toggle the automatic button to disable this option and enter the DNS resolver IP address separated by a comma to set the DNS nameserver, which is shown in the following screenshot:
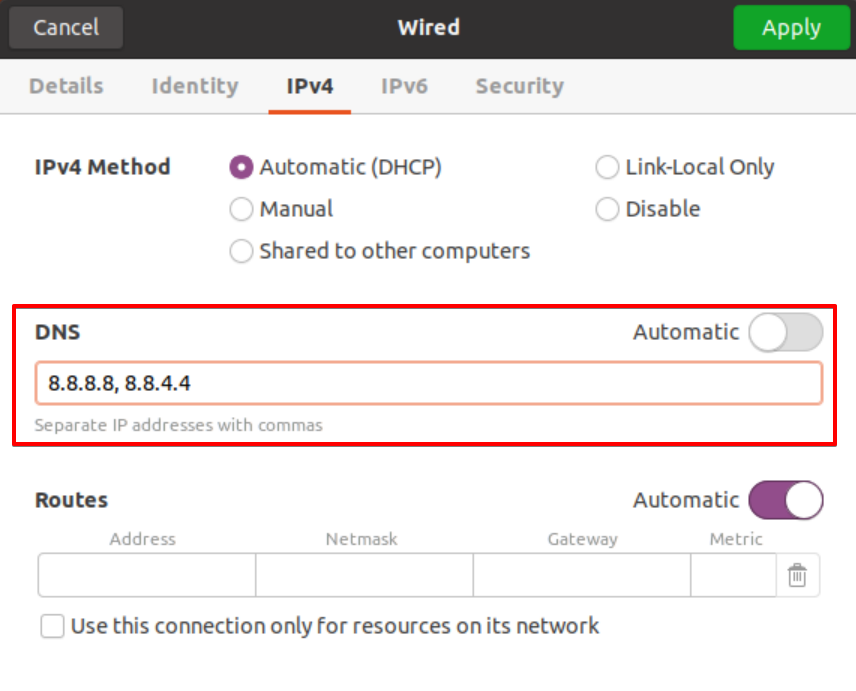
We have used the Google DNS server resolver IP address.
Method 2: Set the DNS NameServer Using Netplan with Network Manager and Static IP
In previous Ubuntu distributions, the DNS resolvers were easily configured using the ‘/etc/resolv.conf’ file, just editing the values and saving the file for use. The systemd-resolved service provides DNS name resolution to local applications or services and this can be simply configured with Netplan, which is the default network management tool on Ubuntu 20.04.
To set the DNS resolvers with the netplan, follow the below-mentioned steps:
1. Open the terminal by running the “ip a” command list with your Wi-Fi/ethernet details. Carefully, note your IP address, netmask, and default gateway from the following screenshot that displays on executing the IP command.
2. Open the netplan configuration file. All netplan configuration files are stored in the /etc/netplan directory. So, open the “/etc/netplan/01-network-manager-all.yaml” file. The file name may vary from one setup to another. Type the below-mentioned command to open this configuration file using the nano text editor.
In this file, you can configure the IP address, gateway, network interfaces, DNS nameservers, and so on.
The general syntax of this configuration file is given below, and it can be modified by a system administrator.
network:
version: 2
renderer: NetworkManager
ethernets:
[device-name]:
dhcp4: false
addresses: [ip-address/netmask]
gateway4: default-gateway
nameservers:
addresses: [DNS_nameserver-1, DNS_nameserver-2]
Here, the following lines of code need to change in this configuration file.
version: 2
renderer: NetworkManager
ethernets:
enp0s3:
dhcp4: false
addresses: [10.0.2.15/24]
gateway4: 192.168.1.1
nameservers:
addresses: [8.8.8.8, 8.8.4.4]

The “192.168.1.1” is the default gateway and the IP address is “10.0.2.15”. Replace your own gateway, netmask, and IP in the above configuration file. More than two DNS nameservers can be defined in a configuration and these nameservers should be separated with a comma. In the above file, “8.8.8.8, 8.8.4.4” are the DNS resolvers for Google. Save the configuration file and exit from this file by pressing “Ctrl+x”.
3. Now, use the following command to apply changes on this file with netplan:

The above command will generate the configuration systemd resolved service.
4. To verify the DNS resolver configuration, use the following command:
The systemd-resolve -status command shows a bundle of information. This is the reason for using the “grep” command to filter the “DNS Servers” string from all details.
The following output shows on the terminal; it means that it verifies the DNS nameserver and is set now.

Set Custom DNS NameServer from Command-line Using Netplan with Networkd
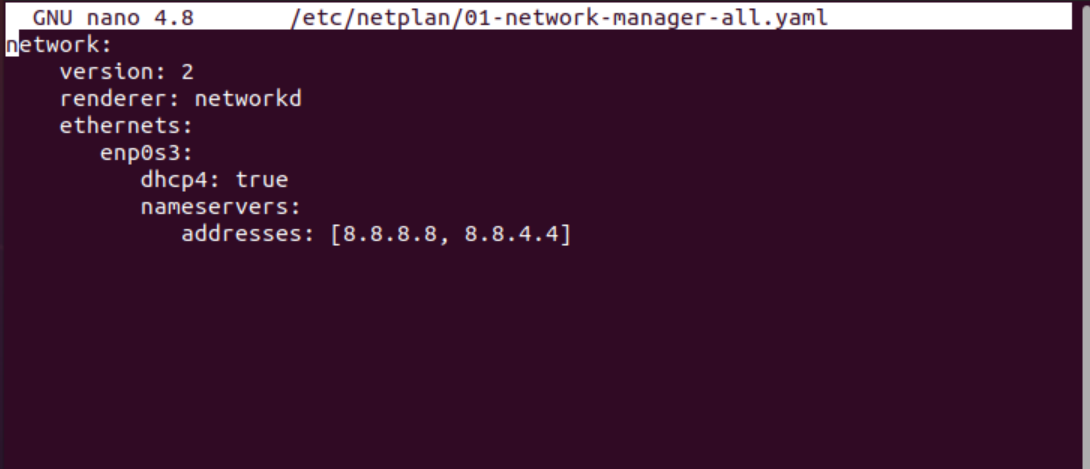
To set the DNS Name Server using the netplan and network, copy the following code in the netplan configuration file:

Enter the below-given configurations in this file:
network:
version: 2
renderer: networkd
ethernets:
enp0s3:
dhcp4: true
nameservers:
addresses: [8.8.8.8, 8.8.4.4]
Type the command given below to apply changes with netplan:

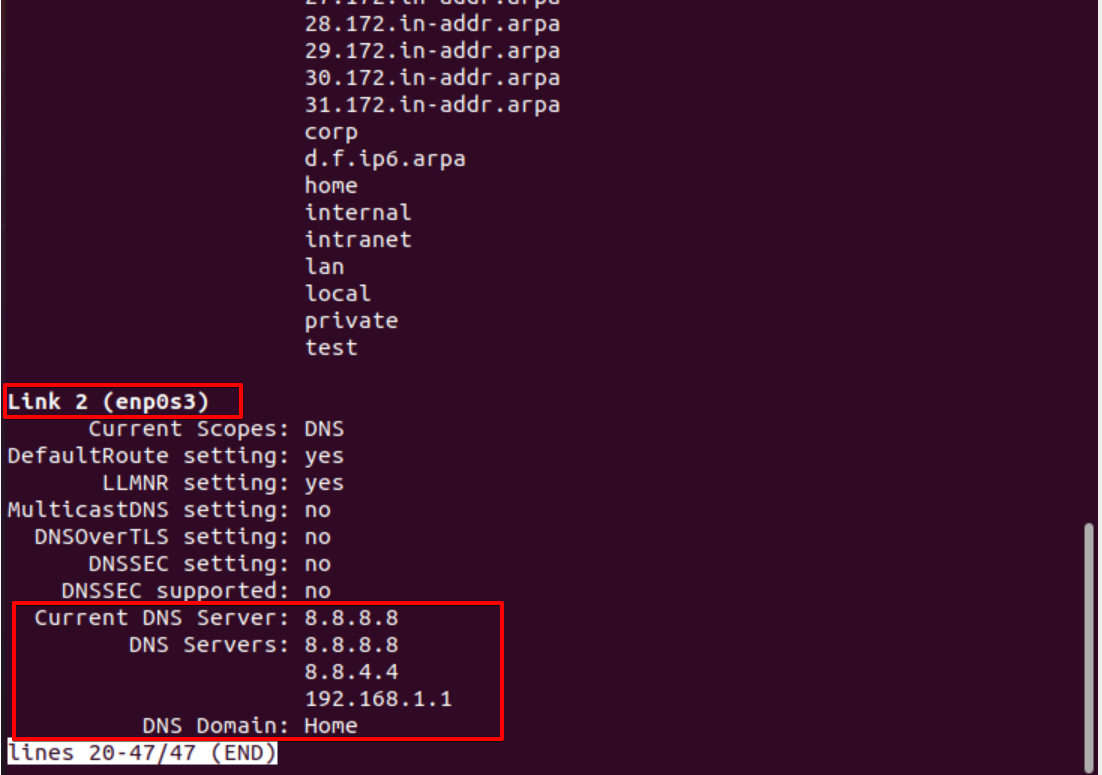
Now, verify the Current DNS nameserver using the following command:
The following output prints on the terminal window:
To again the default DNS configurations or remove the netplan configurations, remove all data and paste the following code in the configuration file:
network:
version: 2
renderer: NetworkManager
Now, apply changes using the following command:
Check the current DNS Nameserver by using the following command:
From the following displayed output, you will notice the default DNS nameserver to be set on your system:

Conclusion:
We have discussed in this article, how to configure the DNS nameserver using the desktop interface and command line. We have also seen how to configure the netplan changes on the Ubuntu system to change the DNS nameserver. You can set the custom DNS nameserver by using the netplan and networkd services as well.
About the author
Samreena Aslam
Samreena Aslam holds a master’s degree in Software Engineering. Currently, she’s working as a Freelancer & Technical writer. She’s a Linux enthusiast and has written various articles on Computer programming, different Linux flavors including Ubuntu, Debian, CentOS, and Mint.
How to setup DNS manually on Linux?
In Linux /etc/resolv.conf get often overwritten when we setup the DNS, because of the multitude of programs managing the DNS servers. How to properly setup the DNS ?
2 Answers 2
DNS Config Under Linux
DNS usage on linux is done over a set of routines in the C library that provide access to the Internet Domain Name System (DNS). The resolver configuration file ( resolv.conf ) contains information that is read by the resolver routines the first time they are invoked by a process. In short each process requesting DNS will read /etc/resolv.conf over library. The NSS is layered on top of this, and is configured by /etc/nsswitch.conf .
Linux DNS config are located in the file /etc/resolv.conf BUT there are a number of programs/services that wants to automatically manage and handle the DNS configuration file at /etc/resolv.conf . In some situations you may want to manage this file yourself. Each program/service managing DNS have its own configuration files like /etc/dnsmasq.conf (for dnsmasq service) and append the DNS config at connection change and/or on other events. a quick solution is to lock the DNS config file with chattr +i /etc/resolv.conf but this is not recommended in certain case, a better solution is to setup correctly all the program/services using the DNS like (dnsmasq/network-manager/resolvconf/etc.)
Getting Back The Control Of DNS
Here is an exhaustive list of setups to get back the control of resolv.conf and avoid having it overwritten (how to disable/setup DNS from other location other than resolv.conf) note that resolvconf is an independent program from resolv.conf, also depending on your system/config you may not have one or many of the programs listed here.
1. Resolvconf:
cat /etc/resolvconf/resolv.conf.d/head nameserver 8.8.4.4 cat /etc/resolvconf/resolv.conf.d/base nameserver 8.8.4.4 systemctl disable --now resolvconf.service 2. Dnsmasq Service:
cat /etc/dnsmasq.conf server=1.1.1.1 server=8.8.4.4 sudo systemctl restart dnsmasq.service 3. Network Manager:
$ cat /etc/NetworkManager/conf.d/no-dns.conf [main] dns=none $ cat /etc/NetworkManager/conf.d/dns.conf [main] dns=default [global-dns] searches=example.com [global-dns-domain-*] $ cat /usr/lib/NetworkManager/conf.d/resolved.conf [main] dns=systemd-resolved $ cat /usr/lib/NetworkManager/conf.d/resolvconf.conf [main] rc-manager=resolvconf systemctl restart NetworkManager.service 4. Network Interfaces:
$ cat /etc/network/interfaces #nameservers # or dns-search like so # dns-search x.y dns-nameservers 4.4.4.4 8.8.8.8 5. DHCP Client:
$ cat /etc/dhcp3/dhclient.conf supersede domain-name-servers ,; 6. Rdnssd Service:
systemctl disable --now rdnssd.service 7. Resolved Service:
systemctl disable --now systemd-resolved.service 8. Netconfig:
/etc/sysconfig/network/config cat /etc/sysconfig/network/config NETCONFIG_DNS_POLICY="" Setting The DNS Server
Example of a /etc/resolv.conf configuration
#Cloudflare nameserver 1.0.0.1 #Google #nameserver 8.8.8.8 #nameserver 8.8.4.4 #Cloudflare #nameserver 1.1.1.1 #Classic Config #nameserver 192.168.1.1 #search lan