- How to set Oracle’s Java as the default Java in Ubuntu?
- 9 Answers 9
- Ubuntu: where is java_home environment variable stored
- 4 Answers 4
- How to set JAVA_HOME for Java?
- How to Set JAVA_HOME Variable in Ubuntu Linux Correctly
- Step 1: Check if JDK is installed
- Step 2: Get the location of JDK executable (Java Compiler)
- Step 3: Setting JAVA_HOME variable
How to set Oracle’s Java as the default Java in Ubuntu?
How do I change the value of JAVA_HOME in Ubuntu to point to Oracle’s Java? Should it point to java-6-sun or java-6-sun-1.6.0.24 ?
9 Answers 9
export JAVA_HOME=/usr/lib/jvm/java-7-oracle /usr/lib/jvm/java7-oracle should be a symbolic link pointing to /usr/lib/jvm/java-7-oracle-[version number here] .
The reason it’s a symbolic link is that in case there’s a new version of the JVM, you don’t need to update your .bashrc file, it should automatically point to the new version.
If you want to set JAVA_HOME environment variables globally and at system level means use should set in /etc/environment file.
@AHungerArtist You get that if you install openjdk or other officially supported Ubuntu packages. Unfortunately, it’s not supported for the Oracle JDK using the webupd8/java ppa. In fact, it’s entirely unclear to me, what the oracle-java7-set-default package does.
If you want to change it globally and at system level;
JAVA_HOME=/usr/lib/jvm/java-7-oracle @metdos Works nice, but referencing variables ain’t working for me. $JAVA_HOME doesn’t resolve when used like this PATH=$JAVA_HOME/bin , tried restarting, no effect. Do I have to export or set JAVA_HOME either in this file or my profile?
@Raffian I’m not sure about the different corner cases, this way it worked perfectly for me, for more information I would recommend you to read help.ubuntu.com/community/EnvironmentVariables
to set Oracle’s Java SE Development Kit as the system default Java just download the latest Java SE Development Kit from here then create a directory somewhere you like in your file system for example /usr/java now extract the files you just downloaded in that directory:
$ sudo tar xvzf jdk-8u5-linux-i586.tar.gz -C /usr/java now to set your JAVA_HOME environment variable:
$ JAVA_HOME=/usr/java/jdk1.8.0_05/ $ sudo update-alternatives --install /usr/bin/java java $/bin/java 20000 $ sudo update-alternatives --install /usr/bin/javac javac $/bin/javac 20000 make sure the Oracle’s java is set as default java by:
$ update-alternatives --config java you get something like this:
There are 2 choices for the alternative java (providing /usr/bin/java). Selection Path Priority Status ------------------------------------------------------------ * 0 /opt/java/jdk1.8.0_05/bin/java 20000 auto mode 1 /opt/java/jdk1.8.0_05/bin/java 20000 manual mode 2 /usr/lib/jvm/java-6-openjdk-i386/jre/bin/java 1061 manual mode Press enter to keep the current choice[*], or type selection number: pay attention to the asterisk before the numbers on the left and if the correct one is not set choose the correct one by typing the number of it and pressing enter. now test your java:
if you get something like the following, you are good to go:
java version "1.8.0_05" Java(TM) SE Runtime Environment (build 1.8.0_05-b13) Java HotSpot(TM) Server VM (build 25.5-b02, mixed mode) also note that you might need root permission or be in sudoers group to be able to do this. I’ve tested this solution on both ubuntu 12.04 and Debian wheezy and it works in both of them.
Ubuntu: where is java_home environment variable stored
I am new to Linux. Could someone help me find where is the java environment in my system and please adjust any wrong believes I wrote before?
JAVA_HOME is not part of the JRE (see this answer). It’s just a convention used by some Java-based tools. You should not expect any installation to set it for you.
4 Answers 4
grep JAVA_HOME /etc/environment /etc/bash.bashrc /etc/profile.d/* /etc/profile In my case after installing java from webupd8team ppa in Ubuntu 18.04 the scripts with setting and exporting JAVA_HOME variable are located in
/etc/profile.d/jdk.csh:setenv JAVA_HOME /usr/lib/jvm/java-8-oracle /etc/profile.d/jdk.sh:export JAVA_HOME=/usr/lib/jvm/java-8-oracle When installing java with the webupd8team ppa you will need to set the JAVA_HOME environment variable yourself. You can do this in many ways. How I did it is as follows:
- Run the sudo update-alternatives —config java command to get the list of java installations. It will also display the location of the java executable. e.g. /usr/lib/jvm/java-8-oracle/jre/bin/java .
- From the java installation that you use select the path up to jre . e.g. /usr/lib/jvm/java-8-oracle/ . This will become your JAVA_HOME path.
- Then edit your ~/.bashrc file and add the following line: export JAVA_HOME=»/usr/lib/jvm/java-8-oracle/» .
- Either restart your terminal, or type bash .
This should set the JAVA_HOME environment variable.
I don’t have an Ubuntu with Java right now, but I’ve done this in the past. http://www.janosgyerik.com/installing-java-and-setting-java_home-in-ubuntu/
Edit /etc/jvm , add this line to the top of the list: /path/to/your/jvm , which in your case is probably: /usr/lib/jvm/java-7-oracle but you have to check, maybe locate java-7-oracle` might help.
Thanks to the above step, the java executable will find the right version of Java. You can confirm this by running the command:
However, setting JAVA_HOME is a different matter. These commands worked in my older version of Ubuntu to detect + set + confirm JAVA_HOME :
. /usr/share/java-common/java-common.sh eval $(jvm_config) export JAVA_HOME echo $JAVA_HOME If the output looks good, then add these lines to your ~/.bashrc or ~/.profile .
Janos, I noted that /etc/jvm is empty in my Ubuntu but following your instructions about locate, I think I can make a question more specific: in Windows I must set java environment variable otherwise the Eclipse wouldn’t run. Now, as my first work in linux, I just installed java but I didn’t set any environment variable for java and Eclipse is running perfectly for my surprise. I guess that in linux for some reason setting environment variables is not necessary for Eclipse to work. I noted that there is a link
. I noted that in /usr/bin there is a link to /etc/alternatives/java which in turn is also a link for /usr/lib/jvm/java-7-oracle/jre/bin/java. Then I guess that in linux it is enough to put a link in /usr/bin which points to the binaries file. Am I right?
@user79885 Eclipse needs JAVA_HOME to know where to find Java it can use for compiling your projects. I guess this is easier to do in Linux, for example it’s easy to detect if a java executable exists and track down its path and figure out the correct JAVA_HOME. This is just a guess, I don’t know how it really does it.
@user79885 . as per the links in /usr/bin , don’t mess with them manually. Let the package manager set those things, or use the update-alternatives command.
How to set JAVA_HOME for Java?
You can set your JAVA_HOME in /etc/profile as Petronilla Escarabajo suggests. But the preferred location for JAVA_HOME or any system variable is /etc/environment .
Open /etc/environment in any text editor like nano or gedit and add the following line:
JAVA_HOME="/usr/lib/jvm/open-jdk" (java path could be different)
Use source to load the variables, by running this command:
Then check the variable, by running this command:
Usually most linux systems source /etc/environment by default. If your system doesn’t do that add the following line to ~/.bashrc (Thanks @pje)
When i tried to run Android Studio (that has IntelliJ IDEA as a base), i had an error message very similar to @advocate’s: «‘tools.jar’ seems to be not in Android Studio classpath.» After fiddling a lot with JAVA_HOME without success, i decided to take a look at studio.sh, the shellscript that starts Android Studio. As a wild guess, i set JDK_HOME to the same value expected for JAVA_HOME, and voila! It installed without great problems.
For those doing software development, don’t put your JAVA_HOME in /etc/environment unless you want to reboot everytime you switch JDK versions.
This is a temporary solution, as others pointed out. No one would want to run source every time they restart their bash.
As others have pointed out, this doesn’t stick between terminal sessions. What I did to address this is just added the line source /etc/environment to the top of my bash config file ~/.bashrc so that it loads all my environment settings on startup. Working for me so far.
How to Set JAVA_HOME Variable in Ubuntu Linux Correctly
If you are running Java programs on Ubuntu using Eclipse, Maven or Netbeans etc, you’ll need to set JAVA_HOME to your path. Otherwise, your system will complain that “java_home environment variable is not set”.
In this beginner’s tutorial, I’ll show the steps to correctly set Java Home variable on Ubuntu. The steps should be valid for most other Linux distributions as well.
The process consists of these steps:
- Making sure Java Development Kit (JDK) is installed.
- Finding the correct location of JDK executable.
- Setting the JAVA_HOME variable and making the change permanent.
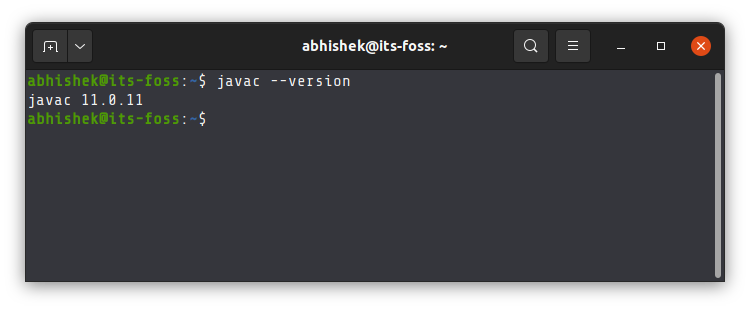
Step 1: Check if JDK is installed
The simplest way to check if Java Development Kit (JDK) is installed on your Linux system is by running this command:
The above command checks the version of Java compiler. If it is installed, it will show the Java version.
If the command shows an error like javac command not found, you’ll have to install JDK.
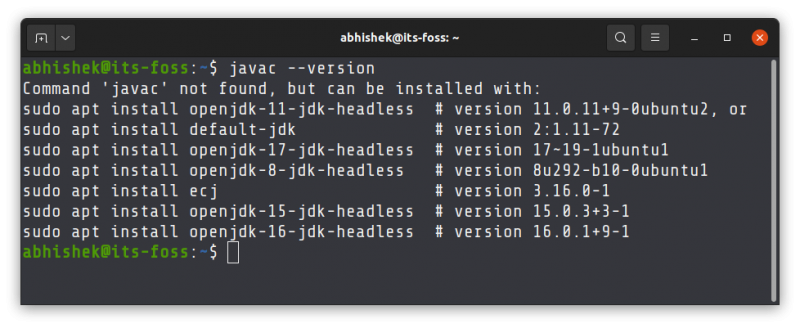
If Java Compiler is not installed on your system, install Java Development Kit using this command:
sudo apt install default-jdkThis will install the default Java version in your current Ubuntu version. If you need some other specific Java version, you’ll have to specify it while installing Java on Ubuntu.
Once you have made sure that Java Compiler is present on your system, it’s time to find its location.
Step 2: Get the location of JDK executable (Java Compiler)
The executable is usually located in the /usr/lib/jvm directory. I won’t left you on your own for a guessing game. Instead, let’s find out the path of the Java executable.
Use the which command to get the location of Java Compiler executable:
The problem here is that the location it gives is actually a symbolic link. You’ll have to follow it a couple of times:
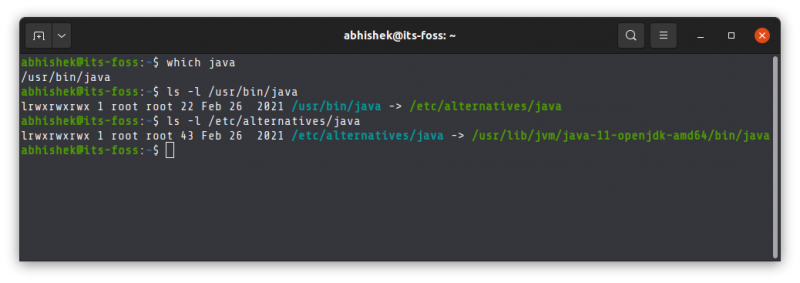
And when you find a path like /usr/lib/jvm/java-11-openjdk-amd64/bin/javac, you remove the /bin/javac from it to get something like /usr/lib/jvm/java-11-openjdk-amd64
An easier method is to follow the symbolic link and get to the actual executable file directly using this command:
readlink -f `which javac` | sed "s:/bin/javac::"The readlink command follows a symbolic link. I have used ` around which java. This is called command substitution and it replaces the command with its output. Sed is then used to replace /bin/javac by nothing and thus removing it altogether.
In my example, the location of the executable file is /usr/lib/jvm/java-11-openjdk-amd64. It could be different for you. Copy the correct path you got from the above command in your system. You know, you can copy paste in the Ubuntu terminal.
Step 3: Setting JAVA_HOME variable
Now that you have got the location, use it to set the JAVA_HOME environment variable:
export JAVA_HOME=/usr/lib/jvm/java-11-openjdk-amd64/bin/javaCheck the value of JAVA_HOME directory:
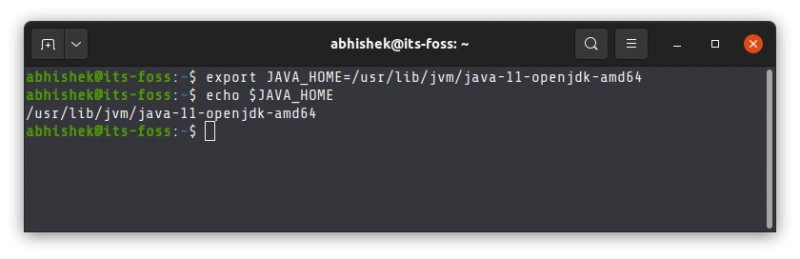
Try to run your program or project in the SAME TERMINAL and see if it works.
This is not over yet. The JAVA_HOME variable you just declared is temporary. If you close the terminal or start a new session, it will be empty again.
To set JAVA_HOME variable ‘permanently’, you should add it to the bashrc file in your home directory.
You can use the Nano editor for editing files in the Linux terminal. If you do not want that and take a simple copy-paste approach, use the following commands:
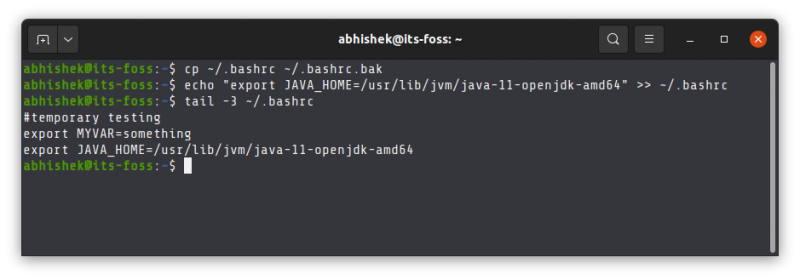
Back up your bashrc file (in case you mess it, you can get it back):
Next, use the echo command to append the export command you used at the beginning of this section. Change the command below to use the correct path as displayed by your system in.
echo "export JAVA_HOME=/usr/lib/jvm/java-11-openjdk-amd64" >> ~/.bashrcVerify that it has been correctly added to the end of the file:
The above tail command will show the last 3 lines of the specified file.
Here’s the entire output of the above three commands.
Now, even if you exit the session or restart the system, the JAVA_HOME variable will still be set to the value you specified. That’s what you want, right?
Do note that if you change the default Java version in the future, you’ll have to change the value of JAVA_HOME and point it to the correct executable path.
I hope this tutorial not only helped you to set Java Home, it also taught you how you are doing it.
If you are still facing issues or have any questions or suggestions, please let me know in the comments.