- Install the Awesome Zsh and Make it the Default Shell
- What is Zsh (Z Shell)?
- How to install Zsh
- Make zsh the default shell
- Saved searches
- Use saved searches to filter your results more quickly
- Installing ZSH
- How To Change The Default Shell In Linux (Bash, Zsh, Fish, Etc.)
- How to change the default login shell using chsh (from the command line)
- Change the shell for your user in a terminal application
Install the Awesome Zsh and Make it the Default Shell
This tutorial will give you a short introduction to Zsh, steps to install Zsh and make it a default shell whenever you login to terminal.
What is Zsh (Z Shell)?
Z Shell (zsh in short), is a shell just like bash. It is used as a login shell (where you get a greeting and you will type in username and password) and as a command line interpreter (where you type Linux commands such as ls, cd).
You might wonder why someone needs to switch if every shell does these two functions. One of the main reasons is that his/her’s relative experience with different shells. And another reason is that each shell has unique features such as auto-completion, frequently used commands listing, etc. Feel free to share your reason in the comments.
How to install Zsh
This tutorial is tested on Ubuntu 18.04 LTS. It should work with other versions of Ubuntu as well. If not, tell us in the comments.
You can install zsh with following commands in Debian/Ubuntu based distributions:
sudo apt-get update sudo apt-get install zshYou need sudoer rights to run above commands. If you don’t have such rights, contact your system admin. If you are the administrator, then refer to this article to learn about creating a sudoer.
In Fedora, Red Hat and CentOS, you can use the DNF package manager to install Zsh:
To check whether you have installed zsh correctly or not, run zsh by zsh —version.
Once done with the installation, you need to do a little configuration setup (if you haven’t done it already). First, change the shell by typing zsh in the terminal to get a prompt like this.
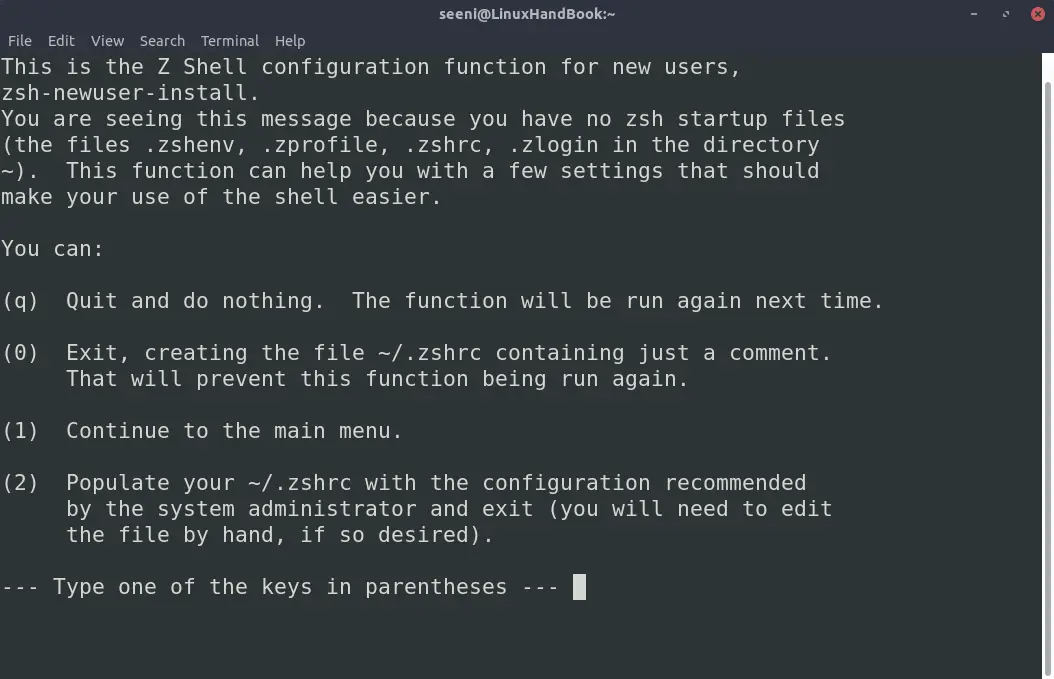
If you want to explore the options choose 1 and set it up. But I would recommend choosing 2 for now and then change the configuration whenever you need it.
Note that when you are running zsh for the first time and you accidentally happened to have one of these files (.zshenv .zshrc, .zlogin), the above prompt will not appear at that situation. Delete the files if you want to avoid using older configurations and run zsh again.
Make zsh the default shell
You can make any shell as your default shell if you know the location(or symbolic link) of the shell. In our case, zsh has a symbolic link /bin/zsh.
Above command will set zsh as the default shell for seeni. after a getting a password to check whether user running this command is “seeni,”. If you are the doing for it another user and you are the root or you have sudoer permissions, prepend sudo to the above command as follows.
When you login the next time, check which shell you are using. If it’s zsh, this means that zsh is now the default shell on your system.
Congratulations! You manage to install zsh and make it the default shell. I hope you found this article useful. If you have suggestions or questions about this article, please let us know in the comments.
Saved searches
Use saved searches to filter your results more quickly
You signed in with another tab or window. Reload to refresh your session. You signed out in another tab or window. Reload to refresh your session. You switched accounts on another tab or window. Reload to refresh your session.
Installing ZSH
- Zsh?
- Install and set up zsh as default
- How to install zsh on many platforms
- macOS
- Ubuntu, Debian & derivatives (Windows 10 WSL | Native Linux kernel with Windows 10 build 1903)
- OpenSUSE
- Arch Linux or Manjaro
- Void Linux
- Fedora
- OpenBSD
- FreeBSD
- Centos/RHEL
- Cygwin
- Solus
- Funtoo/Gentoo
- Alpine Linux
- MSYS2
- Termux (Android)
- KISS Linux
- Slackware Linux
- Add yours


We have other stuff, have a look!
Clone this wiki locally
This wiki is automatically published from ohmyzsh/wiki. To edit this page, go to ohmyzsh/wiki, make your changes and submit a Pull Request.
Oh My Zsh is a framework for Zsh, the Z shell.
- In order for Oh My Zsh to work, Zsh must be installed.
- Please run zsh —version to confirm.
- Expected result: zsh 5.0.8 or more recent
- Please run echo $SHELL from a new terminal to confirm.
- Expected result: /usr/bin/zsh or similar
Install and set up zsh as default
If necessary, follow these steps to install Zsh:
- There are two main ways to install Zsh:
- With the package manager of your choice, e.g. sudo apt install zsh (see below for more examples)
- From source, following the instructions from the Zsh FAQ.
- Verify installation by running zsh —version . Expected result: zsh 5.0.8 or more recent.
- Make it your default shell: chsh -s $(which zsh) or use sudo lchsh $USER if you are on Fedora.
- Note that this will not work if Zsh is not in your authorized shells list ( /etc/shells ) or if you don’t have permission to use chsh . If that’s the case you’ll need to use a different procedure.
- If you use lchsh you need to type /bin/zsh to make it your default shell.
- Log out and log back in again to use your new default shell.
- Test that it worked with echo $SHELL . Expected result: /bin/zsh or similar.
- Test with $SHELL —version . Expected result: ‘zsh 5.8’ or similar
How to install zsh on many platforms
Try zsh —version before installing it from Homebrew. Preferably newer than or equal to 5.0.8 .
To set zsh as your default shell, execute the following assuming a default install of Homebrew
- Recent macOS versions: For m1 macs:
Assuming you have Homebrew installed. If not, most versions of macOS ship zsh by default, but it’s normally an older version. Alternatively, you may also use MacPorts
sudo port install zsh zsh-completions
Ubuntu, Debian & derivatives (Windows 10 WSL | Native Linux kernel with Windows 10 build 1903)
If you don’t have apt , the recommended package manager for end users [1] [2] [3] [4] , you can try apt-get or aptitude .
Other distributions that apply include: Linux Mint, elementary OS, Zorin OS, Raspbian, MX Linux, Deepin.
cd /usr/ports/shells/zsh/ && make install clean

To reduce memory usage, optionally enable zsh-mem options with
before running «make install».
sudo yum update && sudo yum -y install zshInstall the zsh package using the installer. Unfortunately Cygwin doesn’t have a standard command line interface. You could, however, setup apt-cyg and install zsh as follows:
The easiest way to change the default shell is to set your SHELL user environment variable. Search for «Edit Environment variables for your account» to bring up the environment variables window, create a new variable named «SHELL» and give it the value «/usr/bin/zsh/».
Alternatively: Open Cygwin (in BASH) then type:
Once the .bashrc file is open, add this line to the very top:
Close and save the file. Close and reopen Cygwin. It will execute the command every time you load the terminal and run your zsh shell.
How To Change The Default Shell In Linux (Bash, Zsh, Fish, Etc.)
This article explains how to change the default shell in Linux. Using this you can set Bash, sh, Zsh, Csh, Fish, etc. as your shell.
The article includes instructions for changing the login shell from the command line using chsh, or changing the shell only for a particular terminal application. While the article is targeted at Linux users, this should also work on other Unix-like systems.
How to change the default login shell using chsh (from the command line)
To change the default login shell we’ll use chsh , a command line tool to change the login shell.
This program changes the login shell by modifying the /etc/passwd file and setting the $SHELL environment variable. You can override the default shell in a terminal application, by setting the shell from the terminal settings — see the second part of this article for details.
A note for Fedora users. Fedora doesn’t have chsh installed by default and to use it, you must install a package called util-linux-user . If you want to skip installing this package, you can use lchsh instead to change the login shell, which is available by default:
It’s important to note that using chsh, a normal user may only change the login shell for the current account, while the superuser may change the login shell for any account, including the root account. Also, the default behavior for non-root users is to accept only shells listed in the /etc/shells file, and issue a warning for root user.
So before changing your shell, list all the shells listed in the /etc/shells file from your Linux system by using the following command:
$ cat /etc/shells
# /etc/shells: valid login shells
/bin/sh
/bin/bash
/bin/rbash
/bin/dash
/usr/bin/tmux
/bin/zsh
If the shell you want to use is not listed here, it may not be installed on your system. So install it (for example, install Zsh on Debian / Ubuntu / Linux Mint / Pop!_OS using: sudo apt install zsh ) and check again.
To change the shell for your user, run:
This runs chsh in an interactive mode, asking you for the password, then listing your current shell (most Linux distributions use Bash as the default shell) and asking you to enter a value for your new shell. Here’s the command with its output:
$ chsh
Password:
Changing the login shell for logix
Enter the new value, or press ENTER for the default
Login Shell [/bin/bash]:
To change your shell, type the path to the new shell (which exists in /etc/shells ) and press the Enter key.
For example, to change the shell for the current user from Bash to Zsh:
$ chsh
Password:
Changing the login shell for logix
Enter the new value, or press ENTER for the default
Login Shell [/bin/bash]: /bin/zsh
In case you’re using a chsh version that doesn’t launch with an interactive prompt after executing chsh , change the login shell for your user directly:
E.g. to change the shell to Zsh:
After changing your account’s shell, logout and re-login to use the new shell.
To change the login shell for another user or for the root user, login to the shell prompt as root using su — , sudo -i , sudo su , etc., and run:
- To change the shell for the root account (and when prompted, enter the login shell you want to use, with its full path):
- To change the shell of another user (this also works for the root user, using root as the username):
This time we’ve used chsh with the -s option, which changes the login shell directly (doesn’t run in an interactive mode). Here, SHELL is the new shell (e.g. /bin/zsh ) and USERNAME is the user for which you’re changing the shell; for example, to change the shell to /bin/zsh for the user Logix , you’d use: chsh -s /bin/zsh Logix ).
Change the shell for your user in a terminal application
You can use a shell that’s different from the login shell ( $SHELL ) for a particular terminal application, if that application allows setting a custom shell or running a custom command instead of the default shell.
As a side note, you may also change the current shell (non-permanent change) by typing the shell command you want to use in a terminal (e.g. if you type «zsh», you’ll switch to using Zsh for that session; exit by typing «exit».).
Take GNOME Terminal for example (used in GNOME and Cinnamon desktops as the default terminal). Open its Preferences , click on the current active profile (usually called Default or Unnamed if you haven’t changed it or added new profiles) in the left-hand sidebar, then click on the Command tab:
This is where you can set a custom shell to be used with this application only. Enable the Run a custom command instead of my shell option, then in the Custom command field enter the full path to the shell you want to use, e.g. /bin/zsh , /bin/bash , etc.
In Xfce4 Terminal, open the Preferences and on the General tab you’ll need to enable an option called Run a custom command instead of my shell , then enter the custom command below that (this being the shell you want to use with this terminal, e.g. /bin/zsh , /usr/bin/fish , etc.).
Using KDE Plasma’s Konsole, go to Settings -> Edit Current Profile , and on the General tab, change the Command field to the full path of the shell you want to use (once again, something like: /bin/zsh , /bin/bash , /usr/bin/fish , etc.).
Using Guake, you can change the user shell from its Preferences , on the Shell tab, where you’ll find an option called Default interpreter that allows choosing any shell listed in /etc/shells .
For terminals that allow running a custom shell you should also find an option that allows running the command as a login shell (usually called just that: «Run command as a login shell»). To read on the differences between a login shell and an interactive shell, see this page.
Setting this is the same in most cases, so I won’t give any more examples. However, it’s worth noting that not all terminal applications have options to allow using a custom shell — in such cases, use the chsh command to change the login shell, as explained above.

