- How To Allow or Deny SSH Root Login in Linux
- Deny SSH Access to a User or Group
- Disable SSH Access for Root User
- Conclusion
- How to Disable SSH Login to Specific User in Linux
- Disable SSH Access to User
- Disable SSH Root Access
- How To Disable Root Login on Ubuntu 20.04
- Prerequisites
- Step 1 — Logging In and Checking auth.log
- Step 2 — Disabling Root Login
- Step 3 — Testing Root Login
- Conclusion
How To Allow or Deny SSH Root Login in Linux
If you want to allow SSH access for one or two particular users from the remote Linux or Unix server, and you need to edit the configuration file named sshd_config under /etc/ssh directory using your vi/vim text editor:
$ sudo vim /etc/ssh/sshd_config
then adding the following line into the file:
AllowUsers devops devops01
If you want to allow an entire group for SSH Access, and you can edit the configuration file /etc/ssh/sshd_config using vim text editor:
$ sudo vim /etc/ssh/sshd_config
add the following line into the file:
Then those users who are in the “ devops ” group can be able to ssh access from the remote server.
You need to restart SSHD service to take effect for changes by using the following command:
$ sudo systemctl restart sshd.service
Deny SSH Access to a User or Group
If you want to deny SSH access to a user or group, and you can edit the sshd_config file by adding the following lines:
$ sudo vim /etc/ssh/sshd_config
Adding the following lines:
DenyUsers devops DenyGroups devops
save and close the file and restart sshd service.
Disable SSH Access for Root User
If you want to disable SSH Access for root user, and you also need to edit /etc/ssh/sshd_config file using your vim text editor:
$ sudo vim /etc/ssh/sshd_config
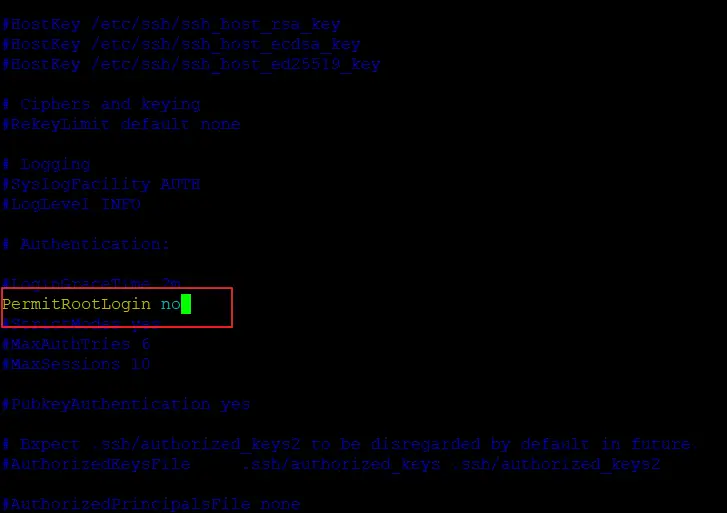
find the following line and uncomment it, and set the value to no.
Save and close the file. and restart the sshd service with the following command:
$ sudo systemctl restart sshd
Let’s try to ssh to your server using root user, type:
devops@devops:~$ ssh root@192.168.3.50 The authenticity of host '192.168.3.50 (192.168.3.50)' can't be established. ECDSA key fingerprint is SHA256:dcUJtf8y1Wq2N+CD15pabodk9DhjpQI/RI7P5+5AhBI. Are you sure you want to continue connecting (yes/no)? yes Warning: Permanently added '192.168.3.50' (ECDSA) to the list of known hosts. root@192.168.3.50's password: Permission denied, please try again. root@192.168.3.50's password:
From the above outputs, you can see that you are not able to user root user to ssh to your server.
Conclusion
You should know that how to allow or deny ssh access to your server for root user or a particular user or group by modifying /etc/ssh/sshd_config file in your Linux system.
How to Disable SSH Login to Specific User in Linux
As you might already know, SSH (Secure Shell) is a network protocol for securely accessing a computer remotely. The server and client software in Linux are thereby known as SSH Server and SSH Client respectively and have many implementations.
By default, SSH allows you to log in to any user of the computer, as long as you have the password for the user. However, this comes with the same problem which is faced by any software using password-based authentication: an invitation for an attacker to exploit and gain admin access.
Today, we will see how to disable SSH login to a specific user, and more importantly, to the root user.
Disable SSH Access to User
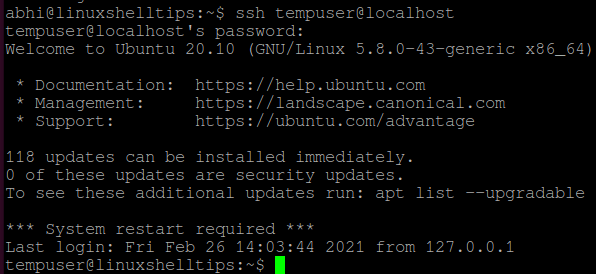
You can log in to a system using SSH with any user, using the following syntax:
Right now, SSH access is allowed on my machine for all users. Let us now deny access to a particular user called ‘tempuser‘.
Open file ‘/etc/ssh/sshd_config’ in any text editor.
$ sudo vim /etc/ssh/sshd_config
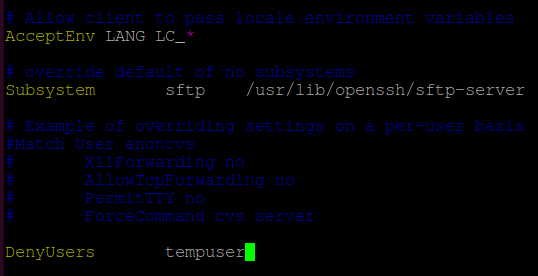
Add the following line at the end of the file:
Important: There is a ‘Tab‘ between ‘DenyUsers‘ and ‘tempuser‘ and not space. It won’t recognize the directive if you add a space.
Restart SSH server with the following command:
$ sudo systemctl restart sshd
If you are using a system that does not have SystemD, run:
$ sudo service sshd restart
Now, try logging in to localhost with user ‘tempuser’ using SSH. It should show the error ‘Permission denied’, as displayed below:
Disable SSH Root Access
The same way described above can be used to disable login to a root user. However to disable complete root access, i.e., to disable access to all root users, follow the steps given below.
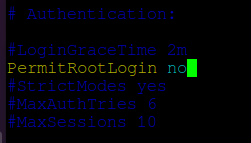
Open the file ‘/etc/ssh/sshd_config’ in any text editor and search for the string ‘PermitRootLogin’. Uncomment the line and if it has any other value, set the value to ‘no’.
Save and exit the file. Restart SSH with:
$ sudo systemctl restart sshd
Or if you are not having SystemD:
$ sudo service sshd restart
Now try logging in to localhost with user ‘root’. It will also show the error ‘Permission Denied’.
Conclusion
In this article, we learned how to disable SSH login access to a specific user. Restricting access to a Non-root user depends on individual scenarios, however, access to Root must be always restricted.
If there is a need for remote Root access, you should set up SSH with RSA authentication, which is more secure than password authentication. Read the man page of SSH (‘man ssh’) for more details.
Thanks for reading and let us know your thoughts in the comments section below!
How To Disable Root Login on Ubuntu 20.04
All Linux-based machines come with a default root user that has all privileges on the machine; by default, you always act as a root user (a superuser). Good security practices recommend that you disable the root login over SSH to prevent unauthorized access to your Linux-based machine by any other user. Disabling root login prevents root access over SSH to your Linux-based machine, which means that no one will have unlimited privileges. Following the recommended security practices, you should create an additional user with almost all superuser privileges to access the account.
In this tutorial, you will disable the root login on Ubuntu, preventing unauthorized root access over SSH and improving your Linux-based system’s security.
Prerequisites
To complete this tutorial, you will need:
- One Ubuntu 20.04 server with a non-root user with sudo privileges, a firewall, and at least 1GB of RAM, which you can set up by following the Ubuntu 20.04 initial server setup guide.
Step 1 — Logging In and Checking auth.log
In this step, you will access your server via your sudo -enabled, non-root user to check the authentication attempts to your server. By reviewing the authentication log, you may see both authorized and unauthorized login attempts.
During the prerequisites, you created a new user and added that user to the sudo group to grant administrative privileges. You will use this sudo user to access your machine because you won’t be able to SSH as a root user after disabling the root login.
Based on your chosen login method, log into your server using SSH. If you logged into your root account using the SSH keys during the initial server setup, you must use a key-based mechanism as password authentication is disabled when using a key-based login for your server. Otherwise, use the password-based login with the sudo-enabled user password.
Log into your server as your sudo -enabled user (in this tutorial, it will be sammy) using the following command for password-based login:
If using a key-based login method, log into your server as your sudo -enabled user with the following command:
The -i flag represents the identity file from which your_private_key is read for authentication.
Next, inspect the auth.log file by moving to the /var/log directory:
Use cat auth.log to display the contents of the file:
Enter your password if prompted.
You will receive an output similar to this:
OutputMay 29 18:46:32 ubuntu sshd[3886]: Disconnected from invalid user cally 43.155.90.144 port 47454 [preauth] May 29 18:51:56 ubuntu sshd[3890]: Received disconnect from 195.38.129.16 port 10017:11: Bye Bye [preauth] May 29 18:51:56 ubuntu sshd[3890]: Disconnected from authenticating user root 195.38.129.16 port 10017 [preauth] May 29 18:52:24 ubuntu sshd[3892]: Received disconnect from 178.128.234.248 port 58660:11: Bye Bye [preauth] May 29 18:52:24 ubuntu sshd[3892]: Disconnected from authenticating user root 178.128.234.248 port 58660 [preauth] May 29 18:52:34 ubuntu sshd[3894]: Received disconnect from 43.134.106.128 port 33854:11: Bye Bye [preauth] May 29 18:52:34 ubuntu sshd[3894]: Disconnected from authenticating user root 43.134.106.128 port 33854 [preauth] May 29 18:53:07 ubuntu sshd[3896]: Invalid user projects from 176.183.60.72 port 42070 May 29 18:53:07 ubuntu sshd[3896]: Received disconnect from 176.183.60.72 port 42070:11: Bye Bye [preauth] May 29 18:53:07 ubuntu sshd[3896]: Disconnected from invalid user projects 176.183.60.72 port 42070 [preauth] May 29 18:57:27 ubuntu sshd[3900]: Received disconnect from 92.255.85.135 port 20436:11: Bye Bye [preauth] May 29 18:57:27 ubuntu sshd[3900]: Disconnected from authenticating user root 92.255.85.135 port 20436 [preauth] May 29 19:06:40 ubuntu sshd[3903]: Invalid user default from 27.71.207.190 port 57513 May 29 19:06:41 ubuntu sshd[3903]: Connection closed by invalid user default 27.71.207.190 port 57513 [preauth] . The auth.log file logs all authentication attempts made to a server. You might see a lot of unknown and unauthorized requests being received by your server. For this reason, you might want to disable root login on your system and rotate your keys and passwords regularly.
You have now reviewed the authentication logs that indicate your server has received more than just your authentication requests. Next, you will update your server’s SSH configuration so that the root access is completely disabled on your server.
Step 2 — Disabling Root Login
In this step, you will edit the sshd_config file to disable the root login and then restart the sshd daemon to read the configuration after the modifications.
The sshd_config file stores the SSH daemon configuration containing the parameters used by sshd . The daemon is responsible for handling SSH connections. You need to restart the sshd daemon to apply the configuration changes. This configuration change will instruct the sshd not to permit root login over SSH.
Open the file sshd_config located in the /etc/ssh directory using nano or your favorite text editor:
Review the file, looking for the PermitRootLogin line:
Output. #LoginGraceTime 2m PermitRootLogin yes #StrictModes yes #MaxAuthTries 6 #MaxSessions 10 . Change the value of the key PermitRootLogin from yes to no :
Output. #LoginGraceTime 2m PermitRootLogin no #StrictModes yes #MaxAuthTries 6 #MaxSessions 10 . Next, you will restart the sshd daemon to read the configuration after the modifications you just made.
Use the following command to restart the daemon:
This command will restart the sshd service using systemctl .
In this step, you changed the configuration file to deny root login requests and restarted the sshd to read the latest configuration. Next, you will test whether root login is disabled or not by making a root login attempt to your server.
Step 3 — Testing Root Login
After disabling the root login, try logging into a new terminal session with SSH as root. Use the following commands based on your preferred login mechanism.
If using password-based login:
The attempt to SSH as root will fail with an error message like this:
Outputroot@your_server_ip: Permission denied (publickey). To access to server again, log into your server with the sudo -enabled non-root user credentials to confirm that you can still access the server.
If using password-based login:
You can now continue using the server as needed.
Conclusion
In this article, you configured the sshd configuration to disable the root login on Ubuntu. Now you know how to prevent root login to your Linux-based machines, thus adding an extra layer of security to your machines.
To continue setting up your machine, read more on How to Keep Ubuntu 20.04 Servers Updated.
Thanks for learning with the DigitalOcean Community. Check out our offerings for compute, storage, networking, and managed databases.


