How to correctly set hostname and domain name?
I am also renting a domain name, let’s name it domain.org . What I would like to do would be to rename my server as server1.domain.org .
This means configuring my hostname as server1 and my domain name as domain.org .
How can I do it correctly?
Indeed, the manpage for hostname is not clear. To me at least:
- When called with one argument or with the —file option, the commands set the host name or the NIS/YP domain name. hostname uses the sethostname(2) function, while all of the three domainname, ypdomainname and nisdomainname use setdomainname(2). Note, that this is effective only until the next reboot. Edit /etc/hostname for permanent change.
- You cannot change the FQDN with hostname or dnsdomainname.
So it seems that editing /etc/hostname is not enough? Because if it really changed the hostname, it would have changed the FQDN. There’s also a trick I read to change the hostname with the command sysctl kernel.hostname=server1 , but nothing says whether this is the correct way or an ugly trick.
- What is the correct way to set the hostname?
- What is the correct way to set the domain name?
5 Answers 5
- You’ll want to edit /etc/hostname with your new hostname.
- Then, run sudo hostname $(cat /etc/hostname) .
Setting your domain, assuming you have a resolvconf binary:
- In /etc/resolvconf/resolv.conf.d/head , you’ll add then line domain your.domain.name (not your FQDN, just the domain name).
- Then, run sudo resolvconf -u to update your /etc/resolv.conf (alternatively, just reproduce the previous change into your /etc/resolv.conf ).
If you do not have resolvconf , just edit /etc/resolv.conf , adding the domain your.domain.name line.
Finally, update your /etc/hosts file. There should be at least one line starting with one of your IP (loopback or not), your FQDN and your hostname. grepping out ipv6 addresses, your hosts file could look like this:
127.0.0.1 localhost 1.2.3.4 service.domain.com service In response to hostnamectl suggestions piling up in comments: it is not mandatory, nor exhaustive.
It can be used as a replacement for step 1 & 2, IF you OS ships with systemd. Whereas the steps given above are valid regardless of systemd being present (pclinuxos, devuan, . ).
Both those conf files say DO NOT EDIT THIS FILE BY HAND — YOUR CHANGES WILL BE OVERWRITTEN on my server (same version).
Don’t be fooled by the fact that the «DO NOT EDIT» warning appears in /etc/resolvconf/resolv.conf.d/head . Everything in the head file is prepended to the resulting /etc/resolv.conf output file, so that’s why the warning is in there, so that it shows up in the final result. Threw me for a loop at first.
This doesn’t seem to apply to 18.04 LTS — there’s no such file /etc/resolvconf/resolv.conf.d/head and there’s no such utility resolvconf .
Note also that if you use AWS you’ll also need to preserve the hostname after reboots — sudo nano /etc/cloud/cloud.cfg update preserve_hostname: true (default is false ).
127.0.0.1 hostname.domain.com hostname localhost MUST HAVE SINGLE HOSTNAME after FQDN in /etc/hosts file. Works fine on Ubuntu 18.04.1 and all other versions. On EC2 and elsewhere.
Didn’t mess with resolve file or anything else.
That shows hostname in shell and then has the FQDN when you need it.
@MikeCiffone Technically, hostname should not contain the domain name — i.e. should not be FQDN. Many deployments do it, but it should not be done that way. Note that in-kernel hostname under Linux after 1.0 is restricted to 64 characters (see man 2 sethostname ) because that’s the value of HOST_NAME_MAX . (Until 1.0 it was mere 8 bytes.)
@bfontaine You don’t have to care about any of the reasons I’ll state — most of my hosts were configured with hostname=fqdn most of the time, and they worked. One reason is that your FQDN, not shortname, is then limited to 63ch ( HOST_NAME_MAX ). Another is that molly-guard will require you to type fqdn, not the shortname. Another is that hostname CLI prints out the full FQDN, not just hostname -f . Another is that some software might print out FQDN in place of shortname, or append the domain a second time to the FQDN (i.e. foo.example.org.example.org instead of foo.example.org ).
You can, of course, dismiss all of these as hypotheticals — but I feel correctness of having the hostname contain just, well, the hostname is more correct and professional.
Instructions written against Ubuntu 18.04.3 LTS (bionic)
sudo hostnamectl set-hostname server1 Check result by running hostnamectl :
root@www:/# hostnamectl Static hostname: server1 Change the domain via new network manager, Netplan, by editing /etc/netplan/01-netcfg.yaml and changing the search parameter:
sudoedit /etc/netplan/01-netcfg.yaml
# This file describes the network interfaces available on your system # For more information, see netplan(5). network: version: 2 renderer: networkd ethernets: eth0: dhcp4: yes nameservers: search: [ domain.org ]
Test changes by logging in a second time, and running sudo netplan try in one of the sessions and checking settings in the other:
# netplan try Do you want to keep these settings? Press ENTER before the timeout to accept the new configuration Changes will revert in 97 seconds Configuration accepted.
# systemd-resolve --status . Link 2 (eth0) Current Scopes: DNS LLMNR setting: yes MulticastDNS setting: no DNSSEC setting: no DNSSEC supported: no DNS Servers: 8.8.8.8 8.8.4.4 DNS Domain: domain.org
# cat /etc/resolv.conf . nameserver 127.0.0.53 options edns0 search domain.org
# hostname -f server1.domain.org
It all is well, press ENTER at the sudo netplan try prompt to make things permanent.
[…] You cannot change the FQDN with hostname or dnsdomainname. The recommended method of setting the FQDN is to make the hostname be an alias for the fully qualified name using /etc/hosts, DNS, or NIS. For example, if the hostname was "ursula", one might have a line in /etc/hosts which reads 127.0.1.1 ursula.example.com ursula Technically: The FQDN is the name getaddrinfo(3) returns for the host name returned by gethostname(2). The DNS domain name is the part after the first dot. Therefore it depends on the configuration of the resolver (usually in /etc/host.conf) how you can change it. Usually the hosts file is parsed before DNS or NIS, so it is most common to change the FQDN in /etc/hosts. If a machine has multiple network interfaces/addresses or is used in a mobile environment, then it may either have multiple FQDNs/domain names or none at all. Therefore avoid using hostname --fqdn, hostname --domain and dnsdomainname. hostname --ip- address is subject to the same limitations so it should be avoided as well. […]
This was kindly pointed out by poige in another thread and is exactly what Lutz proposed here.
You should not put your fqdn into /etc/hostname .
I tried to change my domain entry from myhome.local to myhome.lan I had to edit the /etc/hosts file and the /etc/network/interfaces file. My /etc/hosts file now looks like:
127.0.0.1 localhost 192.168.3.2 server.myhome.lan server
and my /etc/network/interfaces file now looks like:
# This file describes the network interfaces available on your system # and how to activate them. For more information, see interfaces(5). source /etc/network/interfaces.d/* # The loopback network interface auto lo iface lo inet loopback # The primary network interface auto enp2s0 iface enp2s0 inet static address 192.168.3.2 netmask 255.255.255.0 network 192.168.3.0 broadcast 192.168.3.255 gateway 192.168.3.1 # dns-* options are implemented by the resolvconf package, if installed dns-nameservers 192.168.3.1 dns-search myhome.lan
Как привязать домен к серверу Ubuntu + Apache
Здравствуйте! Буду краток (пишу больше для себя). Если вас интересует, как привязать домен к серверу (например VPS), то нужно проделать все, что ниже, только везде, где адрес сайта выделен жирным вставить свой домен: Предположим, что мы уже загрузили сайт на сервер, например, в папку /var/www/site.com/ Создаем файл с конфигурацией домена по адресу (расширение файла .conf […]
Буду краток (пишу больше для себя).
Если вас интересует, как привязать домен к серверу (например VPS), то нужно проделать все, что ниже, только везде, где адрес сайта выделен жирным вставить свой домен:
Предположим, что мы уже загрузили сайт на сервер, например, в папку
/var/www/site.com/
/etc/apache2/sites-available/site.com.conf
ServerAdmin [email protected] ServerName site.com ServerAlias www.site.com DocumentRoot /var/www/site.com ErrorLog $/error.log CustomLog $/access.log combined
sudo a2ensite site.com.conf
sudo service apache2 restart
Привязка домена закончена!
Написал данную статью для себя, т.к. иногда нужно прикрепить домен, а когда есть своя заметка, то настройка домен, как и любая другая работа, происходит намного быстрее, зачем искать по инету инфу и проходить один и тот же путь заново?
Если что-то нужно дополнить или поправить, пишите внизу, там не нужно регистрироваться, вводить каптчу и даже почта не обязательна.
Creating custom domain name instead of localhost in Ubuntu
In ubuntu, the local server by default is referred by the name “localhost”. However, you can also create a custom domain name for your local server instead of using localhost. This article explains the process to create your own custom domain name instead of using localhost. Here ‘hackdx.md’ is created as our domain, which can be taken as per need.
Note: This article is compiled focusing on Linux users but the process is similar for windows user with some minor changes.
Below are the steps to create your own custom domain name instead of using localhost, in Ubuntu:
Step 1: If you are new to Linux you can install apache server and PHP as given below otherwise skip this step. Apache is used to host PHP script. If you have already installed then also skip this step.
You can check your server by typing ‘localhost’ into your browser. If you get apache ubuntu default page i.e you have successfully installed apache2 server. 
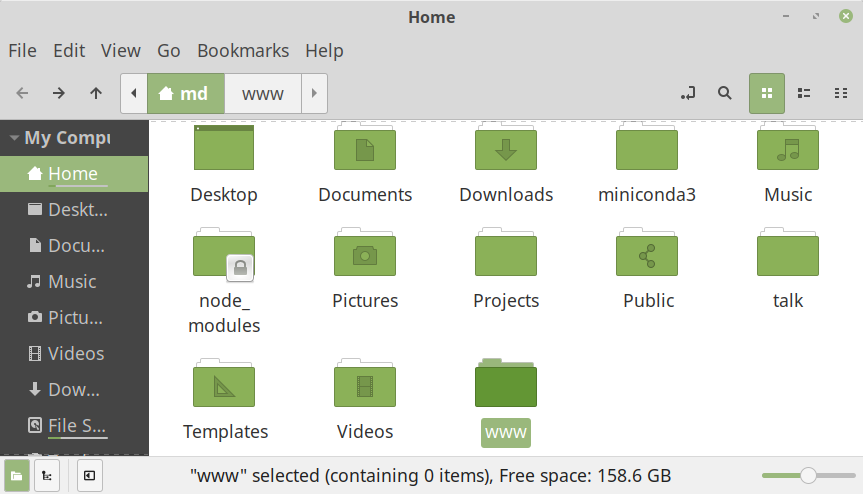
Step 2:Create a folder which you want to use as root directory of your server. Here I am using /home/md/www as my root directory. You can name it anything you like, naming www is not mandatory.
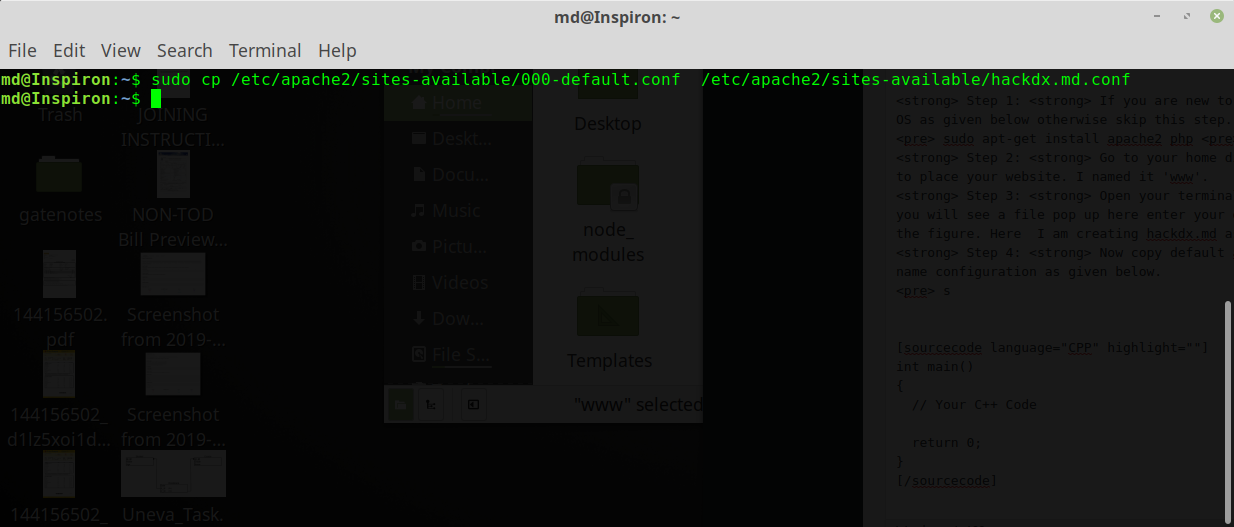
Step 4: Now copy default apache2 configuration file for your new domain name configuration as given below. You can do for as many domain as you want. This step is required so that you can see your newly created domain at hachdx.md or your own domain. You can also add in default conf but creating new file is recommended as you may mess up with original default file. This can be done with the below command:
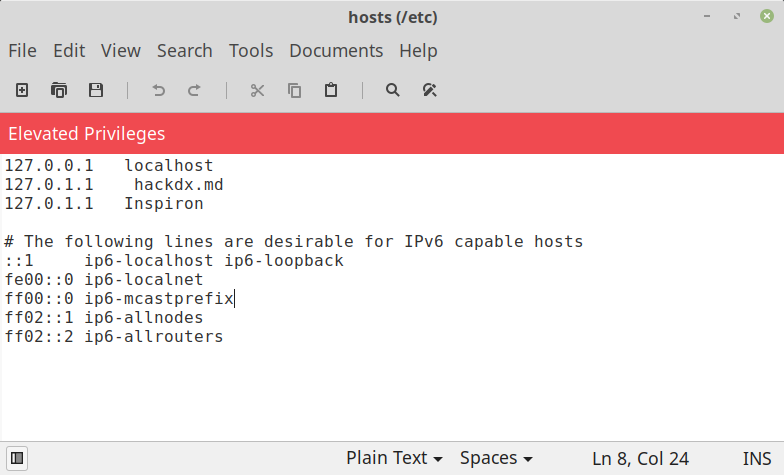
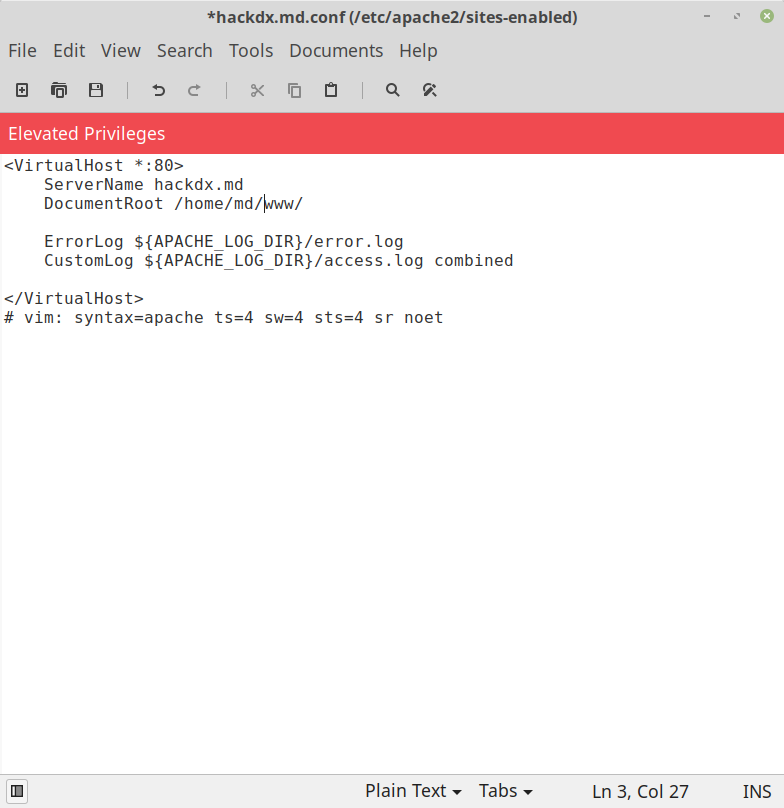
Step 5: Now add entries to our configuration file ‘hackdx.md.conf’ as given in the figure. We are creating /home/md/www as root directory and giving hacdx.md as domain name or server name. All different domain can also be added to this file if you want to create at a different location. Like /home/md/sample etc, a corresponding entry must exist in the /etc/hosts file.
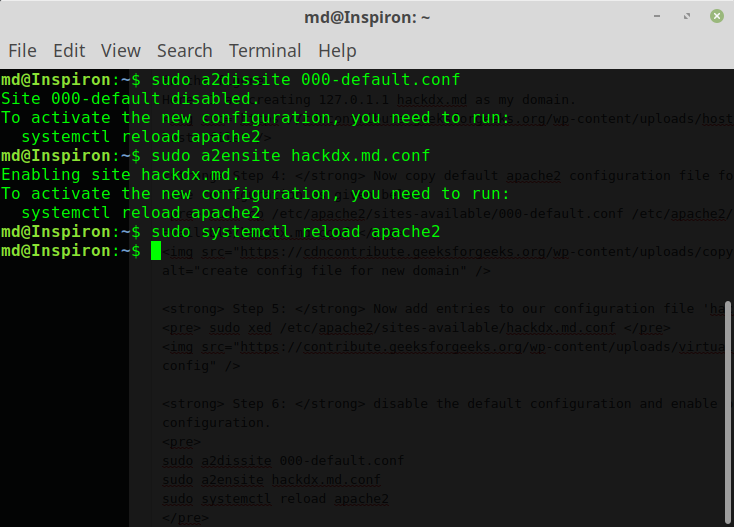
Step 6:Disable the default configuration and enable our new configuration for newly created domain hackdx.md.conf.
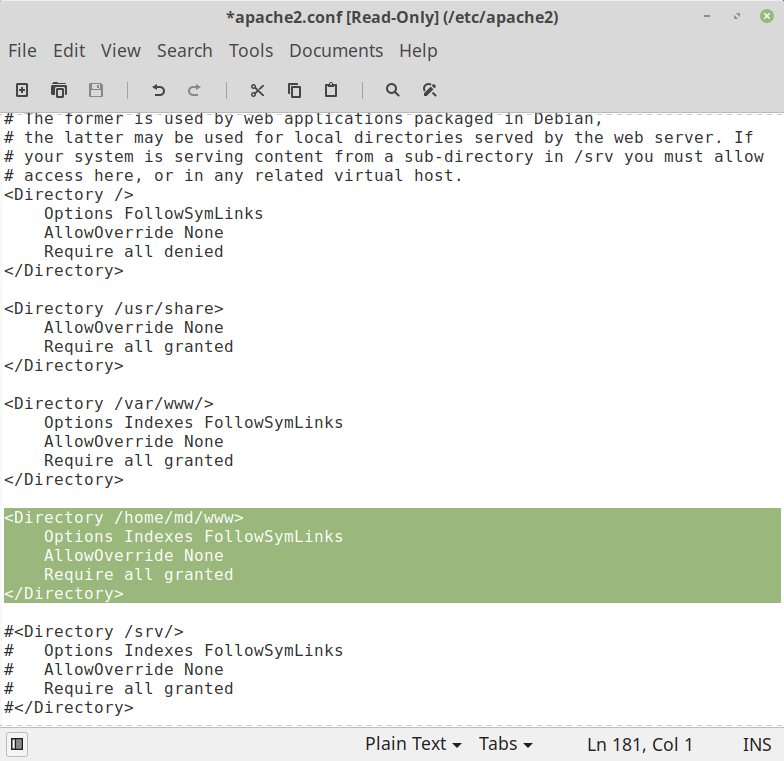
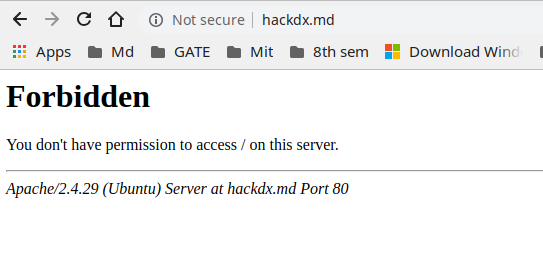
Step 7:update apache2 config file also in case you get forbidden error. You may get this error because apache2 is not recognizing new root document location /home/md/www, by adding these lines apache know about the root location. Run this command to edit apache2.conf
Add these lines to your apache2.conf file as given in the figure.
Step 8: Finally, reload the apcahe2 service put this command in your terminal.
Step 9: You are ready now check by typing your URL to the browser. You can test by writing a simple PHP script in www folder. Now you can put your files in www directory and enjoy using the PHP server. 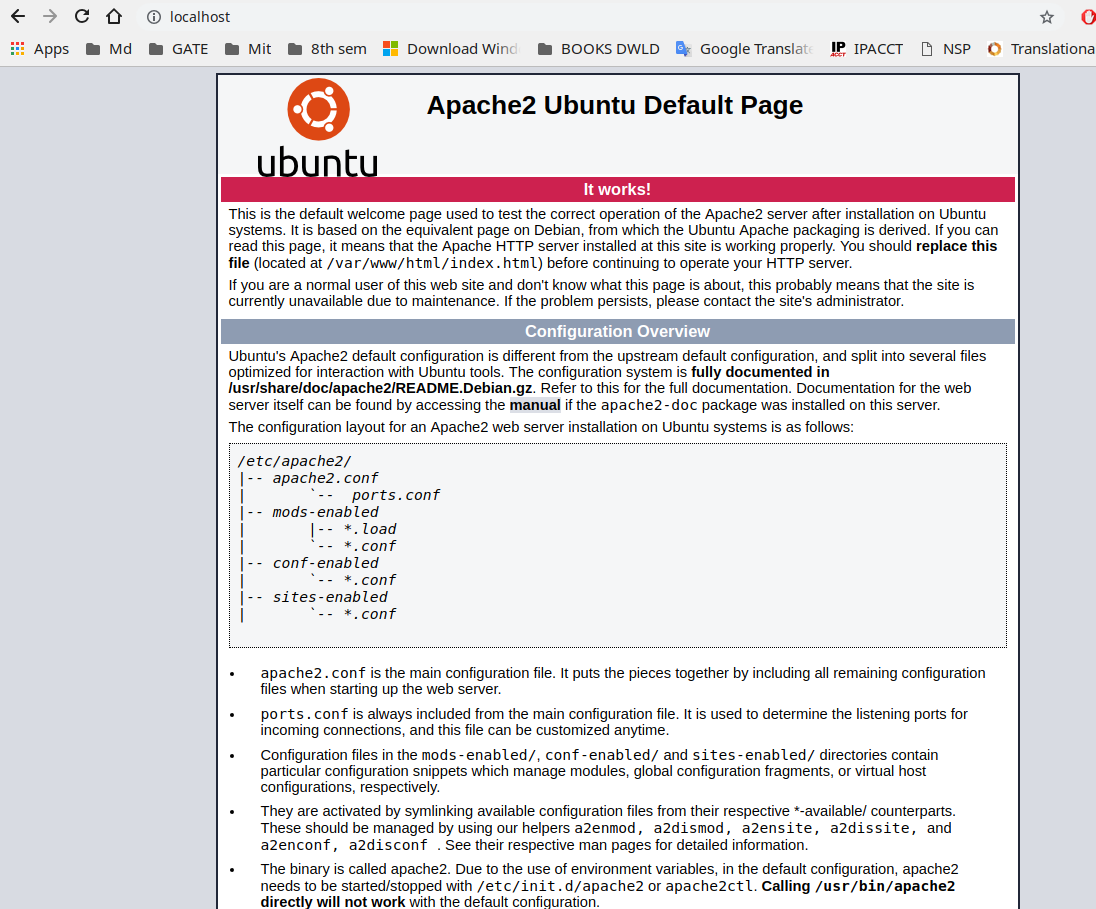
 Run this command to edit apache2.conf