- Build ASP.NET Core applications deployed as Linux containers into an AKS/Kubernetes orchestrator
- Creating the ASP.NET Core Project using Visual Studio 2022
- Register the Solution in an Azure Container Registry (ACR)
- Create an ACR instance
- Create the image in Release mode
- Create a new Tag for the Image
- Push the image into the Azure ACR
- deploy-webapi.yml
- deploy-webapp.yml
Build ASP.NET Core applications deployed as Linux containers into an AKS/Kubernetes orchestrator
This content is an excerpt from the eBook, Containerized Docker Application Lifecycle with Microsoft Platform and Tools, available on .NET Docs or as a free downloadable PDF that can be read offline.
Azure Kubernetes Services (AKS) is Azure’s managed Kubernetes orchestrations services that simplify container deployment and management.
- An Azure-hosted control plane
- Automated upgrades
- Self-healing
- User-configurable scaling
- Simpler user experience for both developers and cluster operators.
The following examples explore the creation of an ASP.NET Core 6.0 application that runs on Linux and deploys to an AKS Cluster in Azure, while development is done using Visual Studio 2022 version 17.0.
Creating the ASP.NET Core Project using Visual Studio 2022
ASP.NET Core is a general-purpose development platform maintained by Microsoft and the .NET community on GitHub. It’s cross-platform, supporting Windows, macOS and Linux, and can be used in device, cloud, and embedded/IoT scenarios.
This example uses a couple of simple projects based on Visual Studio templates, so you don’t need much additional knowledge to create the sample. You only have to create the project using a standard template that includes all the elements to run a small project with a REST API and a Web App with Razor pages, using ASP.NET Core 6.0 technology.
For reference, you can download the sample from .NET Application Architecture’s repo explore-docker.

Figure 4-35. Creating an ASP.NET Core Web Application in Visual Studio 2022.
To create the sample project in Visual Studio, select File > New > Project, select the Web project type and then the ASP.NET Core Web Api template. You can also search for the template if you need it.
Then enter the application name and location as shown in the next image.
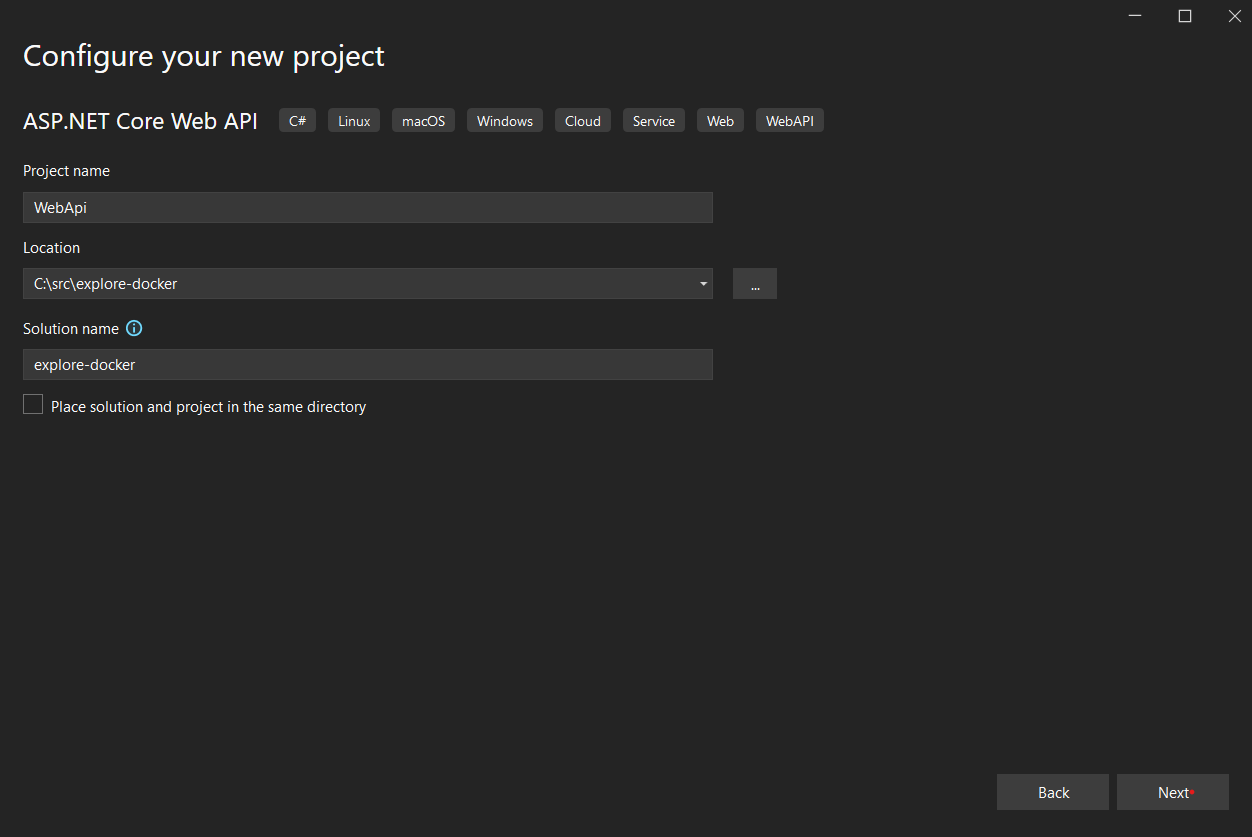
Figure 4-36. Enter the project name and location in Visual Studio 2022.
Verify that you’ve selected ASP.NET Core 6.0 as the framework. .NET 6 is included in the latest release of Visual Studio 2022 and is automatically installed and configured for you when you install Visual Studio.
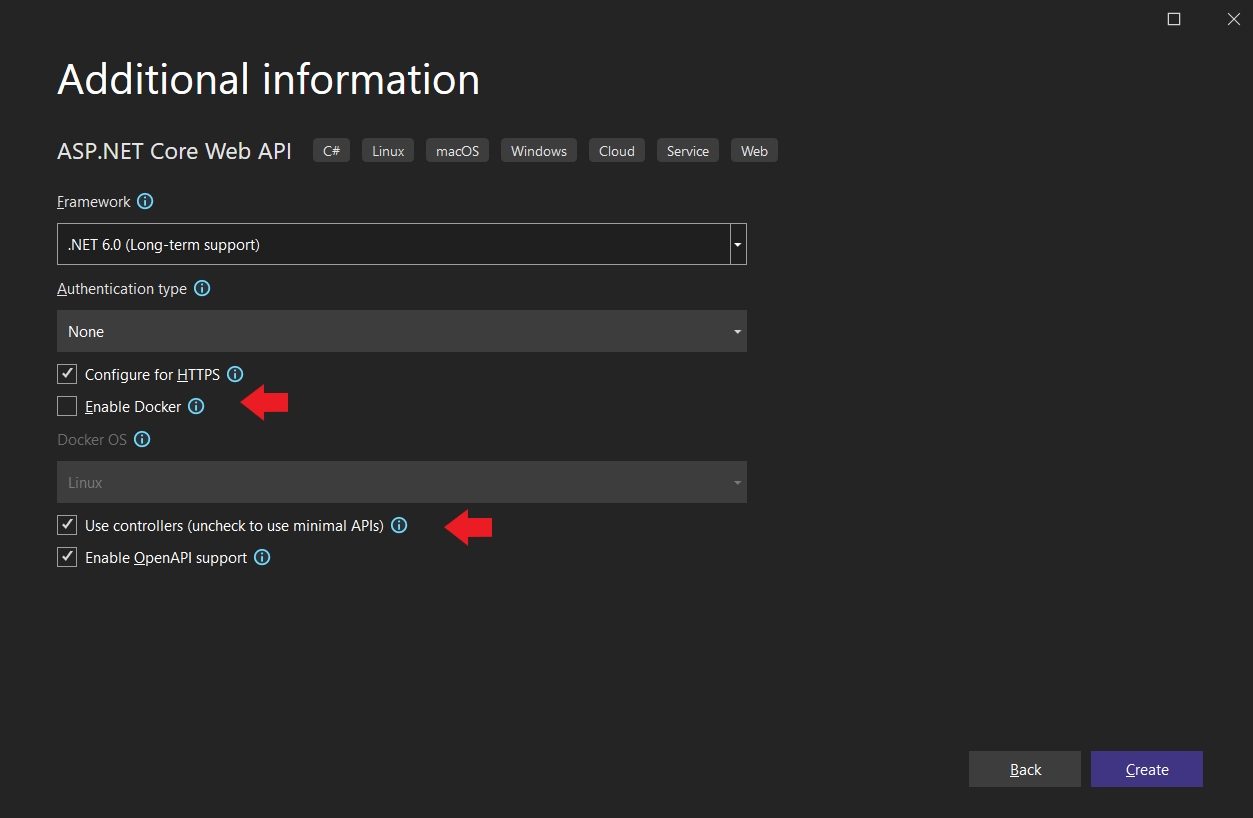
Figure 4-37. Selecting ASP.NET CORE 6.0 and Web API project type
Notice Docker support is not enabled now. You’ll do that in the next step after the project creation. You’ll also notice that by default controller option is checked. You can uncheck that if you want to Create a minimal web API with ASP.NET Core.
To show you can «Dockerize» your project at any time, you’ll add Docker support now. So right-click on the project node in Solution Explorer and select Add > Docker support on the context menu.
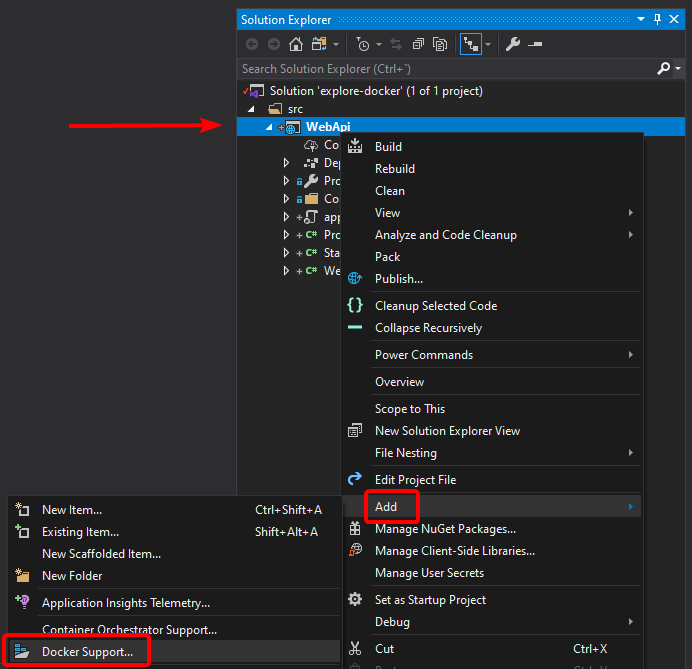
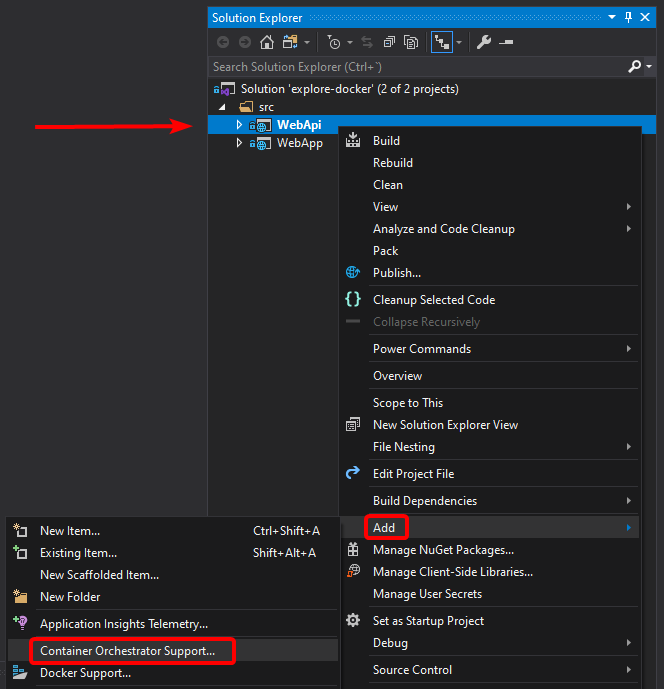
Figure 4-40. Adding orchestrator support to WebApi project.
When you choose the Docker Compose option, which is fine for local development, Visual Studio adds the docker-compose project, with the docker-compose files as shown in image 4-41.
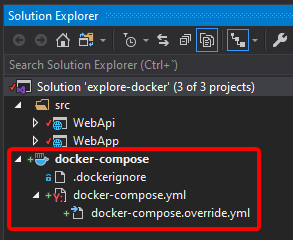
Figure 4-41. Adding orchestrator support to WebApi project.
The initial files added are similar to these ones:
version: "3.4" services: webapi: image: $webapi build: context: . dockerfile: WebApi/Dockerfile webapp: image: $webapp build: context: . dockerfile: WebApp/Dockerfile version: "3.4" services: webapi: environment: - ASPNETCORE_ENVIRONMENT=Development - ASPNETCORE_URLS=https://+:443;http://+:80 ports: - "80" - "443" volumes: - $/Microsoft/UserSecrets:/root/.microsoft/usersecrets:ro - $/ASP.NET/Https:/root/.aspnet/https:ro webapp: environment: - ASPNETCORE_ENVIRONMENT=Development - ASPNETCORE_URLS=https://+:443;http://+:80 ports: - "80" - "443" volumes: - $/Microsoft/UserSecrets:/root/.microsoft/usersecrets:ro - $/ASP.NET/Https:/root/.aspnet/https:ro To run your app with Docker Compose, you just have to make a few tweaks to docker-compose.override.yml .
services: webapi: #. ports: - "51080:80" - "51443:443" #. webapp: environment: #. - WebApiBaseAddress=http://webapi ports: - "50080:80" - "50443:443" #. Now you can run your application with the F5 key, or by using the Play button, or the Ctrl + F5 key, selecting the docker-compose project, as shown in image 4-42.

Figure 4-42. Adding orchestrator support to WebApi project.
When running the docker-compose application as explained, you get:
- The images built and containers created as per the docker-compose file.
- The browser open in the address configured in the «Properties» dialog for the docker-compose project.
- The Container window open (in Visual Studio 2022 version 17.0 and later).
- Debugger support for all projects in the solution, as shown in the following images.
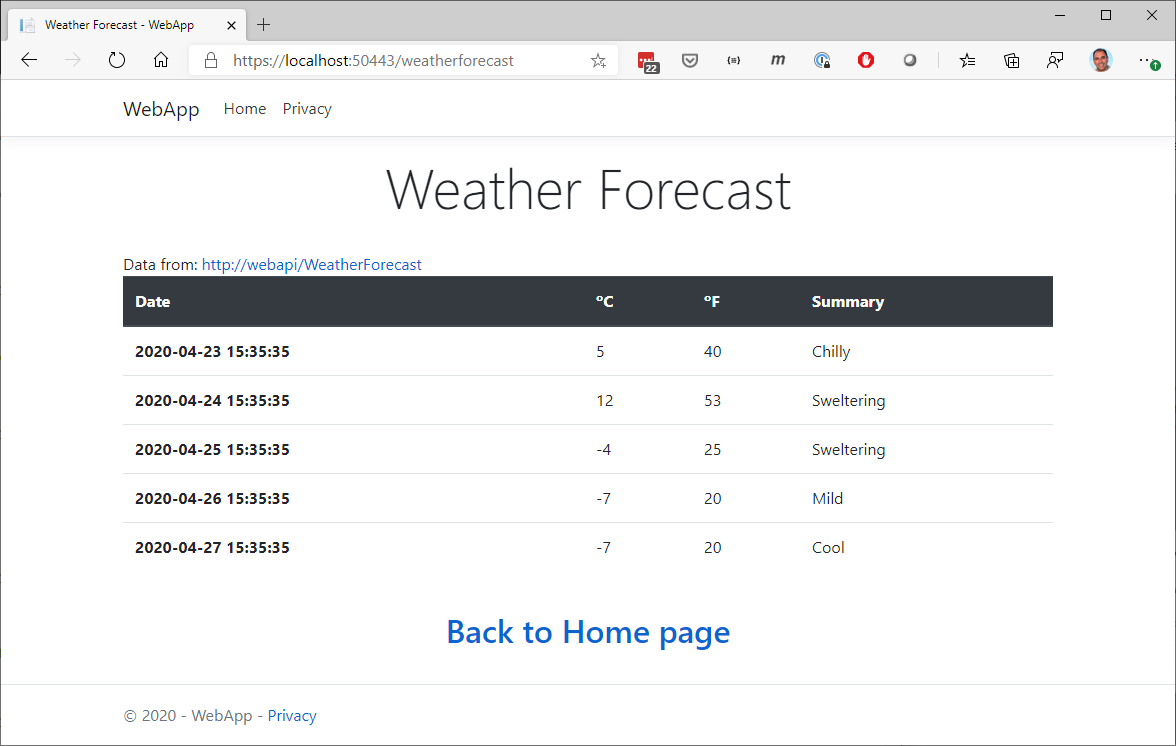
Figure 4-43. Browser window with an application running on multiple containers.
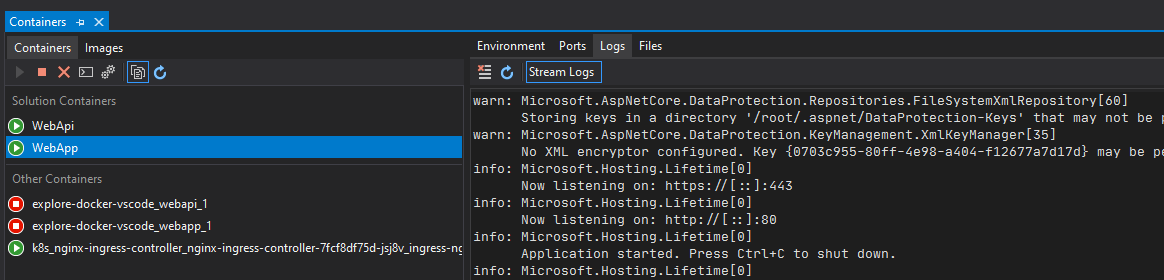
Figure 4-44. Visual Studio «Containers» window
The Containers window lets you view running containers, browse available images, view environment variables, logs, and port mappings, inspect the filesystem, attach a debugger, or open a terminal window inside the container environment.
As you can see, the integration between Visual Studio 2022 and Docker is completely oriented to the developer’s productivity.
Of course, you can also list the images using the docker images command. You should see the webapi and webapp images with the dev tags created by the automatic deployment of our project with Visual Studio 2022.

Figure 4-45. View of Docker images
Register the Solution in an Azure Container Registry (ACR)
You can upload the images to the Azure Container Registry (ACR), but you could also use Docker Hub or any other registry, so the images can be deployed to the AKS cluster from that registry.
Create an ACR instance
Run the following command from the az cli:
az acr create --name exploredocker --resource-group explore-docker-aks-rg --sku basic --admin-enabled The container registry name (e.g exploredocker ) must be unique within Azure, and contain 5-50 alphanumeric characters. For more details, refer Create a container registry
Create the image in Release mode
You’ll now create the image in Release mode (ready for production) by changing to Release, as shown in Figure 4-46, and running the application as you did before.

Figure 4-46. Selecting Release Mode
If you execute the docker images command, you’ll see both images created, one for debug (dev) and the other for release (latest) mode.
Create a new Tag for the Image
Each container image needs to be tagged with the loginServer name of the registry. This tag is used for routing when pushing container images to an image registry.
You can view the loginServer name from the Azure portal, taking the information from the Azure Container Registry
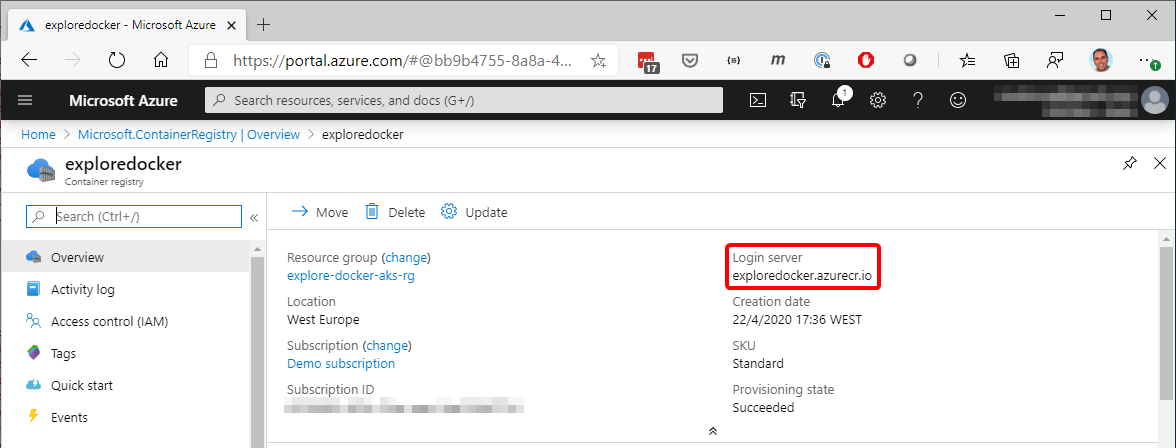
Figure 4-47. View of the name of the Registry
Or by running the following command:
az acr list --resource-group --query "[]." --output table 
Figure 4-48. Get the name of the registry using az cli
In both cases, you’ll obtain the name. In our example, exploredocker.azurecr.io .
Now you can tag the image, taking the latest image (the Release image), with the command:
After running the docker tag command, list the images with the docker images command, and you should see the image with the new tag.

Figure 4-49. View of tagged images
Push the image into the Azure ACR
Log in to the Azure Container Registry
az acr login --name exploredocker Push the image into the Azure ACR, using the following command:
This command takes a while uploading the images but gives you feedback in the process. In the following image, you can see the output from one image completed and another in progress.
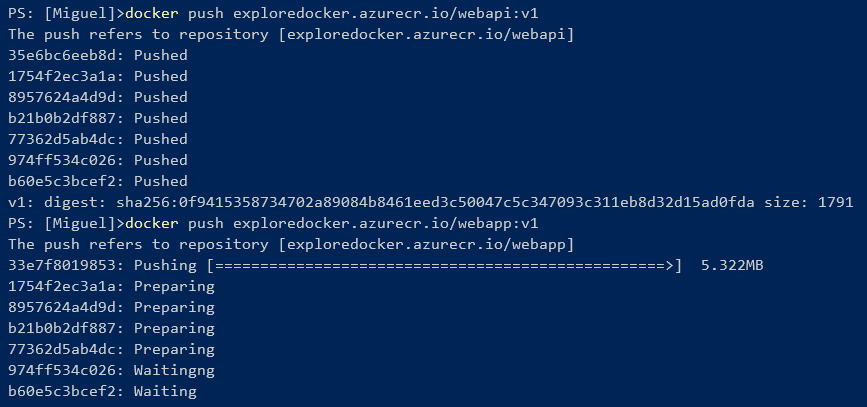
Figure 4-50. Console output from the push command.
To deploy your multi-container app into your AKS cluster you need some manifest .yaml files that have, most of the properties taken from the docker-compose.yml and docker-compose.override.yml files.
deploy-webapi.yml
apiVersion: apps/v1 kind: Deployment metadata: name: webapi labels: app: weather-forecast spec: replicas: 1 selector: matchLabels: service: webapi template: metadata: labels: app: weather-forecast service: webapi spec: containers: - name: webapi image: exploredocker.azurecr.io/webapi:v1 imagePullPolicy: IfNotPresent ports: - containerPort: 80 protocol: TCP env: - name: ASPNETCORE_URLS value: http://+:80 --- apiVersion: v1 kind: Service metadata: name: webapi labels: app: weather-forecast service: webapi spec: ports: - port: 80 targetPort: 80 protocol: TCP selector: service: webapi deploy-webapp.yml
apiVersion: apps/v1 kind: Deployment metadata: name: webapp labels: app: weather-forecast spec: replicas: 1 selector: matchLabels: service: webapp template: metadata: labels: app: weather-forecast service: webapp spec: containers: - name: webapp image: exploredocker.azurecr.io/webapp:v1 imagePullPolicy: IfNotPresent ports: - containerPort: 80 protocol: TCP env: - name: ASPNETCORE_URLS value: http://+:80 - name: WebApiBaseAddress value: http://webapi --- apiVersion: v1 kind: Service metadata: name: webapp labels: app: weather-forecast service: webapp spec: type: LoadBalancer ports: - port: 80 targetPort: 80 protocol: TCP selector: service: webapp The previous .yml files only enable the HTTP ports, using the ASPNETCORE_URLS parameter, to avoid issues with the missing certificate in the sample app.
You can see how to create the AKS Cluster for this sample in section Deploy to Azure Kubernetes Service (AKS) on this guide.
Now you’re almost ready to deploy using kubectl, but first you must get the credentials from the AKS Cluster with this command:
az aks get-credentials --resource-group explore-docker-aks-rg --name explore-docker-aks 
Figure 4-51. Getting credentials from AKS into the kubectl environment.
You also have to allow the AKS cluster to pull images from the ACR, using this command:
az aks update --name explore-docker-aks --resource-group explore-docker-aks-rg --attach-acr exploredocker The previous command might take a couple of minutes to complete. Then, use the kubectl apply command to launch the deployments, and then kubectl get all get list the cluster objects.
kubectl apply -f deploy-webapi.yml kubectl apply -f deploy-webapp.yml kubectl get all 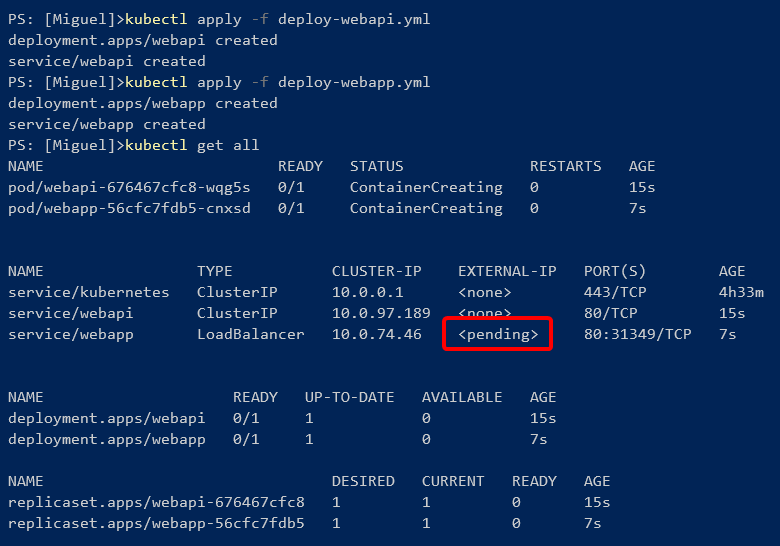
Figure 4-52. Deployment to Kubernetes
You’ll have to wait a while until the load balancer gets the external IP, checking with kubectl get services , and then the application should be available at that address, as shown in the next image:
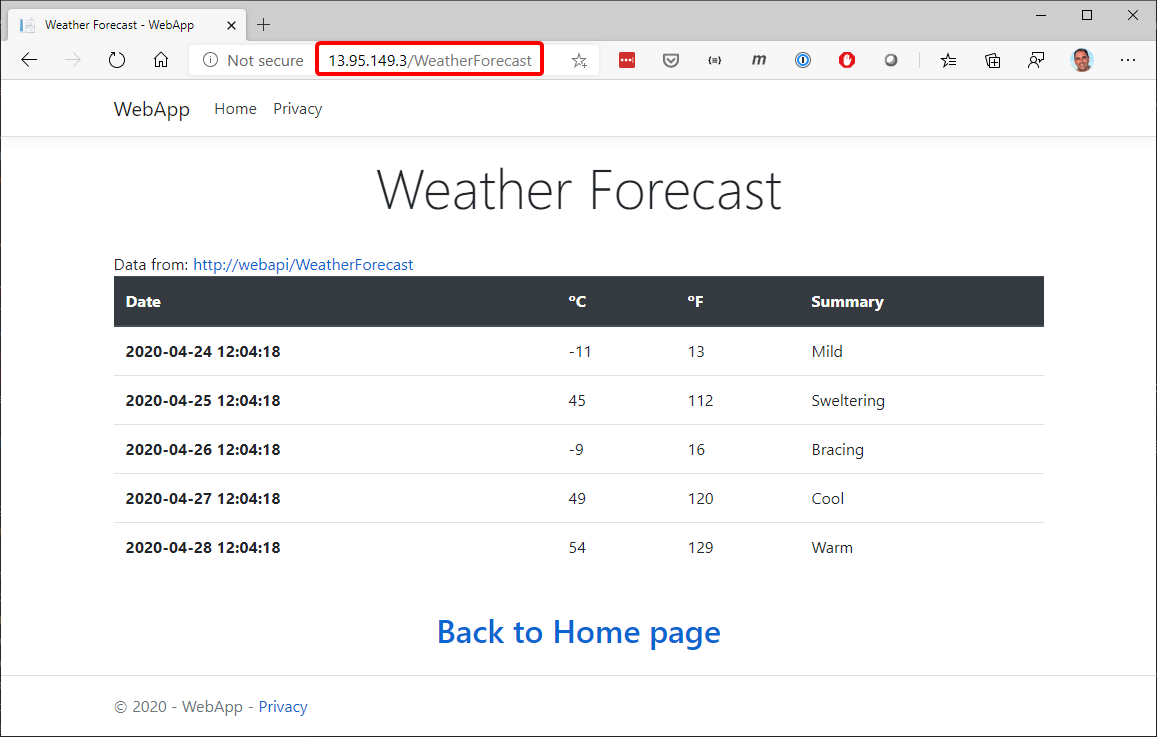
Figure 4-53. Deployment to Kubernetes
When the deployment completes, you can access the Kubernetes Web UI with a local proxy, using an ssh tunnel.
First you must create a ClusterRoleBinding with the following command:
kubectl create clusterrolebinding kubernetes-dashboard --clusterrole=cluster-admin --serviceaccount=kube-system:kubernetes-dashboard And then this command to start the proxy:
az aks browse --resource-group exploredocker-aks-rg --name explore-docker-aks A browser window should open at http://127.0.0.1:8001 with a view similar to this one:
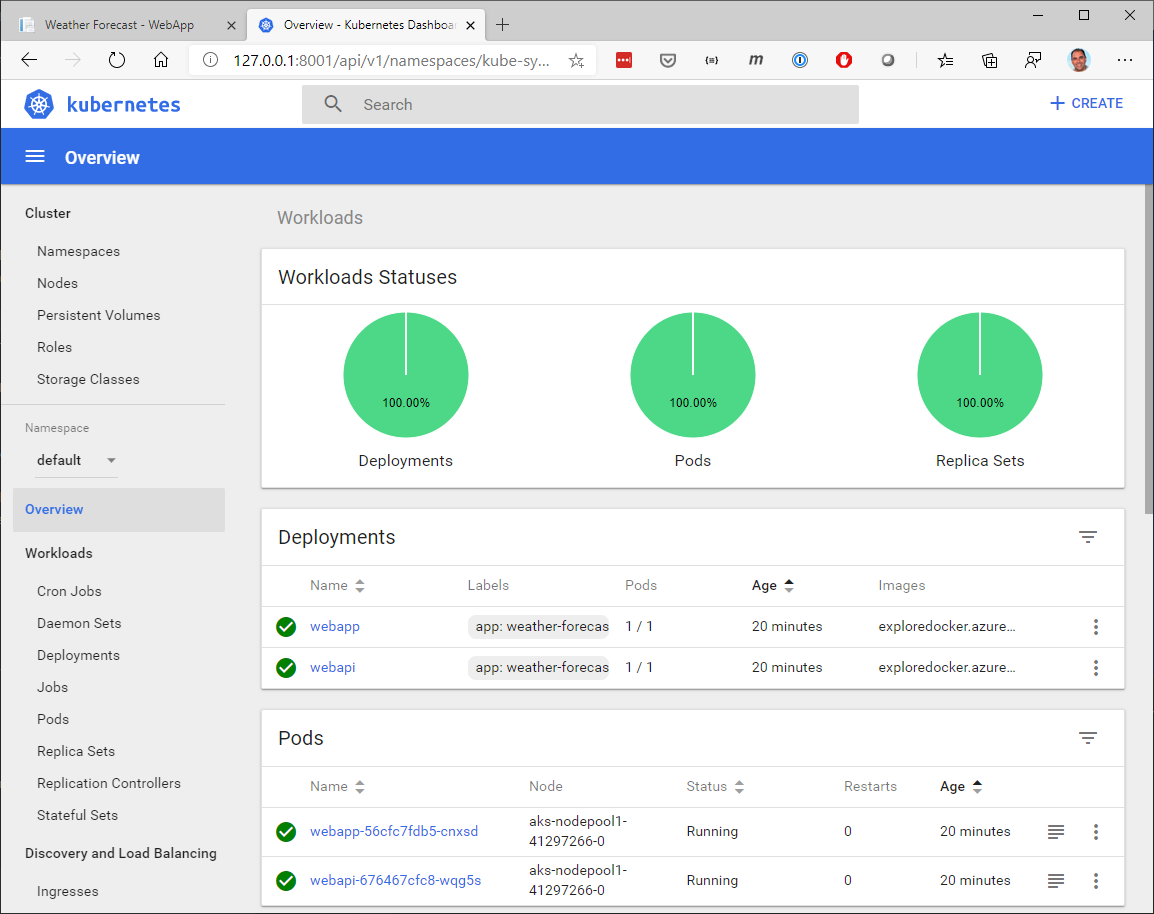
Figure 4-54. View Kubernetes cluster information
Now you have your ASP.NET Core application, running in Linux containers, and deployed to an AKS cluster on Azure.