- Install .NET on Linux by using an install script or by extracting binaries
- .NET releases
- Dependencies
- RPM dependencies
- DEB dependencies
- Common dependencies
- Scripted install
- Manual install
- Verify downloaded binaries
- Use a checksum file to validate
- Set environment variables system-wide
- Next steps
- Часть 1.3. Установка .NET Core в Linux
- Предварительные требования
- Установка .NET Core
- Версии .NET Core
- Определение правильного имени пакета
- Обратная связь
Install .NET on Linux by using an install script or by extracting binaries
This article demonstrates how to install the .NET SDK or the .NET Runtime on Linux by using the install script or by extracting the binaries. For a list of distributions that support the built-in package manager, see Install .NET on Linux.
Install the SDK (which includes the runtime) if you want to develop .NET apps. Or, if you only need to run apps, install the Runtime. If you’re installing the Runtime, we suggest you install the ASP.NET Core Runtime as it includes both .NET and ASP.NET Core runtimes.
Use the dotnet —list-sdks and dotnet —list-runtimes commands to see which versions are installed. For more information, see How to check that .NET is already installed.
.NET releases
There are two types of supported releases, Long Term Support (LTS) releases or Standard Term Support (STS). The quality of all releases is the same. The only difference is the length of support. LTS releases get free support and patches for 3 years. STS releases get free support and patches for 18 months. For more information, see .NET Support Policy.
The following table lists the support status of each version of .NET (and .NET Core):
| ✔️ Supported | ❌ Unsupported |
|---|---|
| 7 (STS) | 5 |
| 6 (LTS) | 3.1 |
| 3.0 | |
| 2.2 | |
| 2.1 | |
| 2.0 | |
| 1.1 | |
| 1.0 |
Dependencies
It’s possible that when you install .NET, specific dependencies may not be installed, such as when manually installing. The following list details Linux distributions that are supported by Microsoft and have dependencies you may need to install. Check the distribution page for more information:
For generic information about the dependencies, see Self-contained Linux apps.
RPM dependencies
If your distribution wasn’t previously listed, and is RPM-based, you may need the following dependencies:
If the target runtime environment’s OpenSSL version is 1.1 or newer, you’ll need to install compat-openssl10.
DEB dependencies
If your distribution wasn’t previously listed, and is debian-based, you may need the following dependencies:
- libc6
- libgcc1
- libgssapi-krb5-2
- libicu67
- libssl1.1
- libstdc++6
- zlib1g
Common dependencies
If the .NET app uses the System.Drawing.Common assembly, libgdiplus will also need to be installed. Because System.Drawing.Common is no longer supported on Linux, this only works on .NET 6 and requires setting the System.Drawing.EnableUnixSupport runtime configuration switch.
You can usually install a recent version of libgdiplus by adding the Mono repository to your system.
Scripted install
The dotnet-install scripts are used for automation and non-admin installs of the SDK and Runtime. You can download the script from https://dot.net/v1/dotnet-install.sh. When .NET is installed in this way, you’ll need to install dependencies required by your Linux distribution. Use the links in the Install .NET on Linux article for your specific Linux distribution.
Bash is required to run the script.
You can download the script with wget :
wget https://dot.net/v1/dotnet-install.sh -O dotnet-install.sh Before running this script, you’ll need to grant permission for this script to run as an executable:
The script defaults to installing the latest long term support (LTS) SDK version, which is .NET 6. To install the latest release, which may not be an (LTS) version, use the —version latest parameter.
./dotnet-install.sh --version latest To install .NET Runtime instead of the SDK, use the —runtime parameter.
./dotnet-install.sh --version latest --runtime aspnetcore You can install a specific major version with the —channel parameter to indicate the specific version. The following command installs .NET 7.0 SDK.
./dotnet-install.sh --channel 7.0 To enable .NET on the command line, see Set environment variables system-wide.
Manual install
As an alternative to the package managers, you can download and manually install the SDK and runtime. Manual installation is commonly used as part of continuous integration testing or on an unsupported Linux distribution. For a developer or user, it’s better to use a package manager.
Download a binary release for either the SDK or the runtime from one of the following sites. The .NET SDK includes the corresponding runtime:
Extract the downloaded file and use the export command to set DOTNET_ROOT to the extracted folder’s location and then ensure .NET is in PATH. Exporting DOTNET_ROOT makes the .NET CLI commands available in the terminal. For more information about .NET environment variables, see .NET SDK and CLI environment variables.
Alternatively, after downloading the .NET binary, the following commands may be run from the directory where the file is saved to extract the runtime. Running the following commands makes the .NET CLI commands available at the terminal and sets the required environment variables. Remember to change the DOTNET_FILE value to the name of the downloaded binary:
DOTNET_FILE=dotnet-sdk-7.0.100-linux-x64.tar.gz export DOTNET_ROOT=$(pwd)/.dotnet mkdir -p "$DOTNET_ROOT" && tar zxf "$DOTNET_FILE" -C "$DOTNET_ROOT" export PATH=$PATH:$DOTNET_ROOT:$DOTNET_ROOT/tools The preceding install script approach allows installing different versions into separate locations so you can choose explicitly which one to use by which app.
Verify downloaded binaries
After downloading an installer, verify it to make sure that the file hasn’t been changed or corrupted. You can verify the checksum on your computer and then compare it to what was reported on the download website.
When you download an installer or binary from an official download page, the checksum for the file is displayed. Select the Copy button to copy the checksum value to your clipboard.
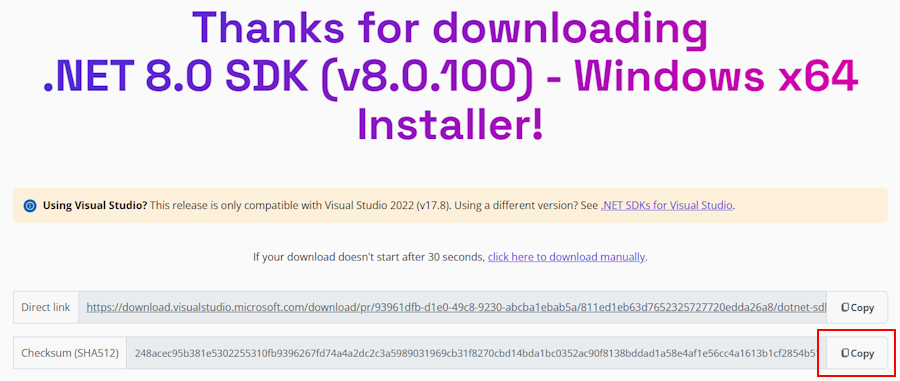
Use the sha512sum command to print the checksum of the file you’ve downloaded. For example, the following command reports the checksum of the dotnet-sdk-7.0.304-linux-x64.tar.gz file:
$ sha512sum dotnet-sdk-7.0.304-linux-x64.tar.gz f4b7d0cde432bd37f445363b3937ad483e5006794886941e43124de051475925b3cd11313b73d2cae481ee9b8f131394df0873451f6088ffdbe73f150b1ed727 dotnet-sdk-7.0.304-linux-x64.tar.gz Compare the checksum with the value provided by the download site.
Even though a Linux file is shown in these examples, this information equally applies to macOS.
Use a checksum file to validate
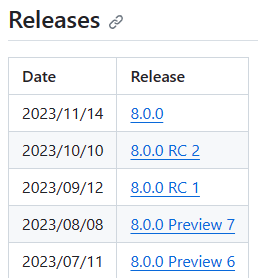
The .NET release notes contain a link to a checksum file you can use to validate your downloaded file. The following steps describe how to download the checksum file and validate a .NET install binary:
- The release notes page for .NET 7 on GitHub at https://github.com/dotnet/core/tree/main/release-notes/7.0 contains a section named Releases. The table in that section links to the downloads and checksum files for each .NET 7 release:

- Select the link for the version of .NET that you downloaded. The previous section used .NET SDK 7.0.304, which is in the .NET 7.0.7 release.
- In the release page, you can see the .NET Runtime and .NET SDK version, and a link to the checksum file:
- Copy the link to the checksum file.
- Use the following script, but replace the link to download the appropriate checksum file:
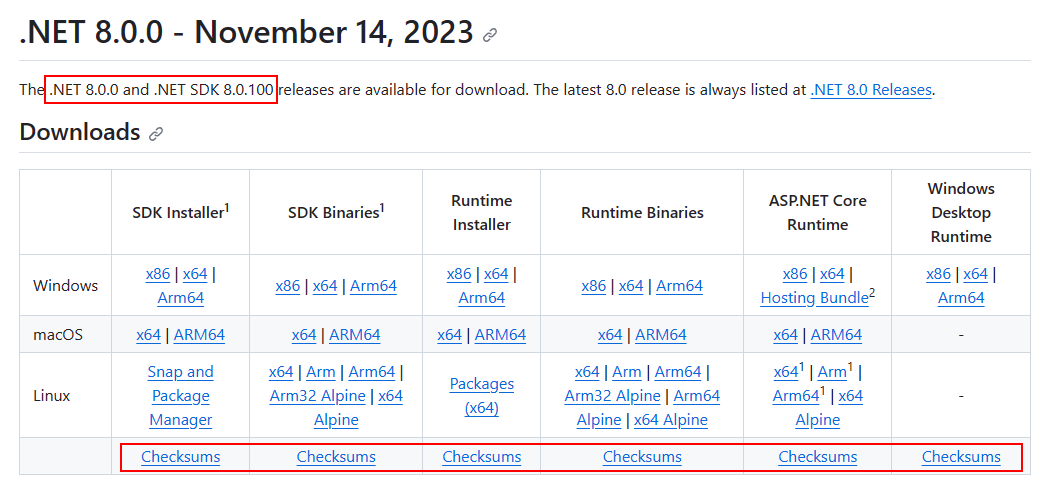
curl -O https://dotnetcli.blob.core.windows.net/dotnet/checksums/7.0.7-sha.txt $ sha512sum -c 7.0.7-sha.txt --ignore-missing dotnet-sdk-7.0.304-linux-x64.tar.gz: OK If you see the file marked as FAILED, the file you downloaded isn’t valid and shouldn’t be used.
$ sha512sum -c 7.0.7-sha.txt --ignore-missing dotnet-sdk-7.0.304-linux-x64.tar.gz: FAILED sha512sum: WARNING: 1 computed checksum did NOT match sha512sum: 7.0.7-sha.txt: no file was verified Set environment variables system-wide
If you used the previous install script, the variables set only apply to your current terminal session. Add them to your shell profile. There are a number of different shells available for Linux and each has a different profile. For example:
Set the following two environment variables in your shell profile:
- DOTNET_ROOT This variable is set to the folder .NET was installed to, such as $HOME/.dotnet :
export DOTNET_ROOT=$HOME/.dotnet export PATH=$PATH:$DOTNET_ROOT:$DOTNET_ROOT/tools Next steps
Часть 1.3. Установка .NET Core в Linux
В этой части вы узнаете, как установить .NET Core в Linux.
В этом разделе предполагается, что вы используете Ubuntu и используете средство командной строки APT для установки приложений.
Предварительные требования
В этой части предполагается, что вам известны следующие процессы:
- Как выполнять команды в качестве суперпользователя (root).
- Установка приложений с помощью диспетчеров пакетов.
Если вы по крайней мере не знакомы с этими процессами, прежде чем продолжить, ознакомьтесь с предыдущими частями.
Установка .NET Core
Справочные сведения об этой процедуре см. в разделе «Подготовка системы Linux для .NET Core».
Поддерживаемые версии .NET Core в разных дистрибутивах Linux см. в разделе «Установка .NET в Linux».
В этой статье вы можете выбрать версию Linux, чтобы получить инструкции по дистрибутиву. Так как мы используем Ubuntu 18.04, мы будем выполнять инструкции из раздела «18.04» пакета SDK для .NET или среды выполнения .NET на Ubuntu.
Начните с выполнения следующих команд:
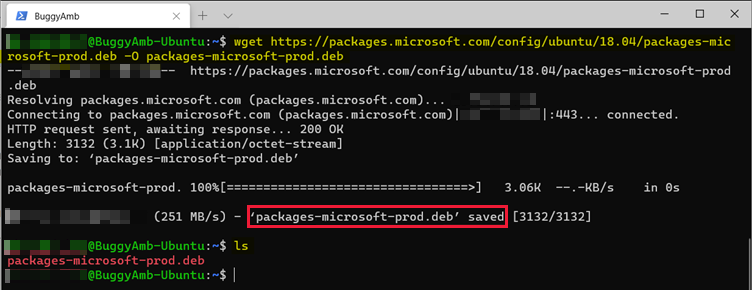
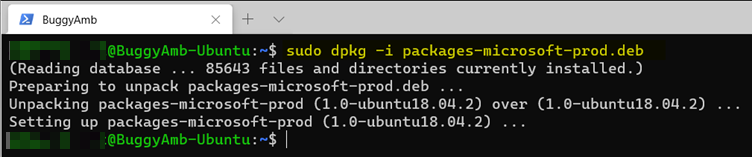
wget https://packages.microsoft.com/config/ubuntu/18.04/packages-microsoft-prod.deb -O packages-microsoft-prod.deb sudo dpkg -i packages-microsoft-prod.deb Первая команда — это wget команда. Согласно странице справки, это wget неинтерактивный сетевой загрузщик. Он скачивает файлы с HTTP-серверов в каталоге. Он может выполняться в фоновом режиме, даже если пользователь не выполнил вход. Эта wget команда скачивает файл Packages-microsoft-prod.deb packages.microsoft.com с серверов в текущем каталоге.
При выполнении ls команды wget мы должны увидеть, что пакет скачан в текущем каталоге.
Во второй команде — dpkg диспетчер пакетов для Debian и Ubuntu. Эта команда добавляет ключ подписи пакета Майкрософт в список доверенных ключей, а затем добавляет репозиторий пакетов.
Так как мы скачали и добавили новый репозиторий пакетов, диспетчер пакетов должен знать об этом. Поэтому необходимо обновить диспетчер пакетов с помощью команды sudo apt update .
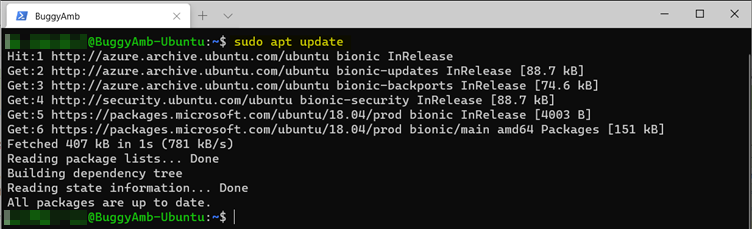
Теперь диспетчер пакетов знает о репозитории Майкрософт, и мы можем продолжить установку.
Версии .NET Core
На момент написания этой статьи последняя версия .NET Core — 5.0. Рекомендуется установить последнюю версию. Однако также следует установить пакет SDK для .NET Core 3.1. Это необходимо, так как в лабораториях по устранению неполадок, приведенных в этой серии статей, предполагается, что вы используете Нестрогое приложение ASP.NET Core, которое мы используем для устранения неполадок ASP.NET Core приложений. Текущая версия Висяка — .NET Core 3.1.
Различные версии этих приложений могут успешно выполняться параллельно на одном компьютере.
Определение правильного имени пакета
В разделе «Установка других версий » пакета SDK для .NET или среды выполнения .NET в Ubuntu пакеты .NET Core именуются в формате — , и имеют следующие условия:
- Продукт — dotnet илиaspnetcore. Обратите внимание , что aspnetcore также устанавливается при установке .NET Core.
- Тип — пакет SDK или среда выполнения.
- На момент написания этой статьи поддерживаемые версии .NET Core : 5.0, 3.1, 3.0 и 2.1.
Например, если вы хотите установить версию 5.0 ASP.NET Core, то продуктом будет aspnetcore-runtime-5.0.
Так как для этой серии статей необходимо установить пакет SDK для .NET Core 3.1, имя пакета будет dotnet-sdk-3.1.
Вы должны знать, как устанавливать пакеты с помощью APT. В противном случае ознакомьтесь с предыдущими частями. Чтобы установить пакет SDK для .NET Core 3.1, выполните команду sudo apt install dotnet-sdk-3.1 .
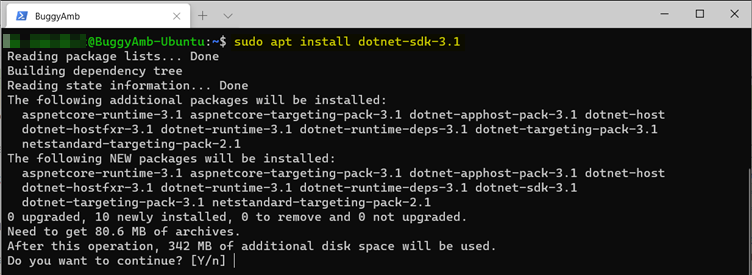
Введите y и нажмите клавишу ВВОД. Диспетчер пакетов скачивает и устанавливает .NET Core и ASP.NET Core среды выполнения и пакеты SDK.
Вы также можете установить пакет SDK для .NET 5.0, выполнив команду sudo apt install dotnet-sdk-5.0 .
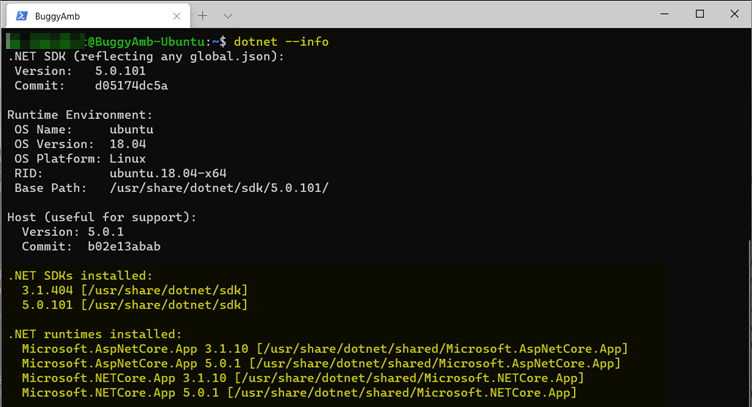
Теперь проверьте установку сред выполнения и пакетов SDK, выполнив команду dotnet —info . На следующем снимке экрана показано, что среды выполнения и пакеты SDK для .NET Core 3.1 и 5.0 устанавливаются параллельно.
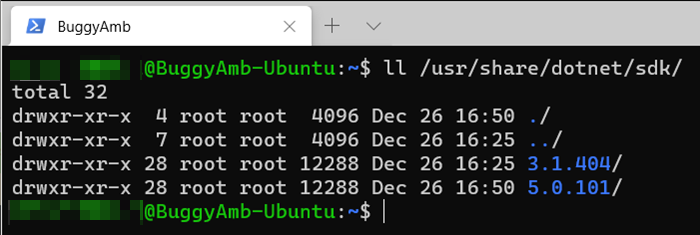
Как .NET Core, так и ASP.NET Core среды выполнения устанавливаются вместе с пакетом SDK для .NET Core. Если проверить папку пакета SDK ll /usr/share/dotnet/sdk , вы также увидите обе версии.
Теперь установлены пакеты SDK и среды выполнения .NET Core. В следующей части мы создадим ASP.NET Core с помощью средств .NET CLI.
Заявление об отказе от ответственности за сведения о продуктах сторонних производителей
В этой статье упомянуты программные продукты независимых производителей. Корпорация Майкрософт не дает никаких гарантий, подразумеваемых и прочих, относительно производительности и надежности этих продуктов.
Обратная связь
Были ли сведения на этой странице полезными?