- How to install “Intel Wi-Fi 6 AX200 driver”
- Method for the Installation of Intel Wi-Fi-6 AX200
- Conclusion
- Easy Linux Tips Project
- Intel WiFi: install the latest driver
- Check whether you’re using the iwlwifi driver
- First try toggling some options
- Preparation for installing a newer driver
- The officially backported iwlwifi driver
- (obsolete)
- The iwlwifi driver straight from upstream
How to install “Intel Wi-Fi 6 AX200 driver”
Intel AX200 is one of the latest adapters that is used to access Wi-Fi on your system. It can access networks such as Wi-Fi and Bluetooth at high speeds. It also supports Wi-Fi 6 (and lower versions) and Bluetooth 5.0 (and its lower releases). Through this article, you will learn how you can download and install the driver for the Intel wifi 6 AX200 on your Ubuntu system.
Method for the Installation of Intel Wi-Fi-6 AX200
Modern computing devices tend to use Wi-Fi rather than ethernet. To properly utilize it, the appropriate drivers must be installed on the system. This section will show you how you can find and install the Intel Wi-Fi AX200 driver on your system successfully.
Step 1: Check system adapter
Firstly, it is important to ensure that AX200 is correctly implemented into your system. To check which wireless device your system has, open the terminal and enter this statement:
If you have AX200 in your system, you should find a message like this in the outcome:
05:00.0 Network controller: Intel Corporation WiFi 6 AX200 (rev 1a)Step 2: Find and download your driver
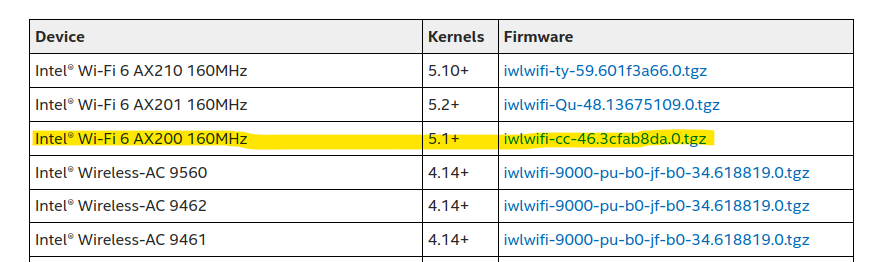
Open this link and find the corresponding driver that you need and download it:
In this case, we need the following driver as highlighted down below:
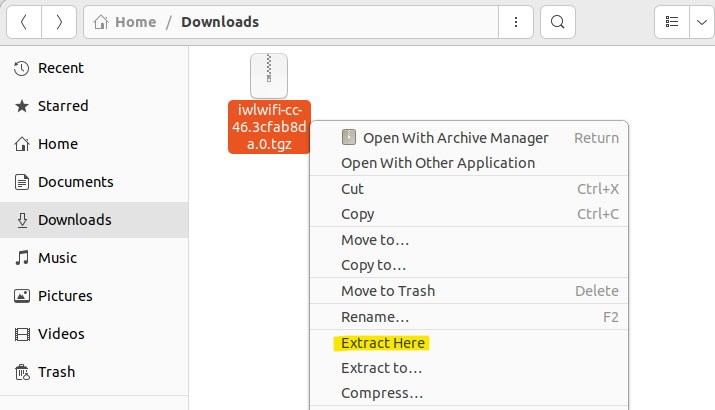
Step 3: Extract the downloaded file
After downloading the driver. Open your “Downloads” folder and extract the file as shown:
Step 4: Change the present directory
Once extracted, you can open the terminal and go into the directory where your extracted files are present. In our case, the files are in the “Downloads/iwlwifi-cc-46.3cfab8da.0” directory. The following commands lead us to that directory:
$ cd Downloads $ cd iwlwifi-cc-46.3cfab8da.0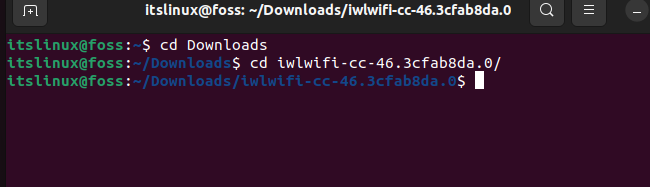
Step 5: Install the driver
Once you are inside the directory (where the files are extracted), you can install the wifi 6 ax200 driver via the following command. The command copies the “iwlwifi-cc-a0-46.uncode” file to “/lib/firmware” which ultimately installs the intel wifi 6 ax200 driver on Linux:
$ sudo cp iwlwifi-cc-a0-46.ucode /lib/firmwareThe file is copied to this directory since it is linked directory to the hardware of the system. The driver will be read by the system hardware once it is transferred to this directory.
This should install the driver onto your system. Reboot your system, and it will start working
Conclusion
The “Intel wifi 6 ax200 driver” can be installed by downloading the “tar” file from the website and extract/copy the installation files into “/lib/firmware”. Once this driver is successfully installed on your system, the wifi card that is installed on your system will be able to perform its function to its maximum potential. This post has demonstrated the method to install “Intel wifi 6 ax200 driver” in Linux.
TUTORIALS ON LINUX, PROGRAMMING & TECHNOLOGY
Easy Linux Tips Project
Easy tips for Linux Mint and Ubuntu, both for beginners and for advanced users.
Intel WiFi: install the latest driver
When you have an Intel WiFi chipset that’s not too ancient, it’ll run on the iwlwifi driver (old Intel chipsets might use the iwlegacy driver of the ipw2200 driver).
In certain circumstances you may need a newer iwlwifi driver for your Intel wireless card, than the one that’s available by default in Linux Mint and Ubuntu. For getting that, you have the following options:
Check whether you’re using the iwlwifi driver
1. First check whether your WiFi chipset actually runs on the iwlwifi driver:
a. Launch a terminal window.
(You can launch a terminal window like this: *Click*)
b. Use copy/paste to transfer this line into the terminal:
Does the terminal output contain the word iwlwifi (in red letters)? If so, proceed with the next step.
First try toggling some options
2. In some cases your current iwlwifi driver already performs better when certain options are toggled, in which case it doesn’t need to be replaced. Which is why you should try that first.
You can do that as follows:
a. Launch a terminal window.
(You can launch a terminal window like this: *Click*)
b. Copy/paste the following blue command line into the terminal (this is one long line, don’t chop it up!):
echo «options iwlwifi bt_coex_active=0 swcrypto=1 11n_disable=8» | sudo tee /etc/modprobe.d/iwlwifi-3options.conf
Press Enter. Type your password when prompted. In Ubuntu this remains entirely invisible, not even dots will show when you type it, that’s normal. Press Enter again.
Hereby you achieve three things:
— With bt_coex_active=0 you disable the Bluetooth feature of the WiFi chipset, which sometimes interferes;
— With swcrypto=1 you shift the signal encryption from the hardware (WiFi chipset) to the software, thus taking some load off the WiFi chipset;
— With 11n_disable=8 you enable antenna aggregation (Tx AMPDU). Don’t be confused because of the option name 11n_disable : when its value is set to 8 it does not disable anything, but enables transmission antenna aggregation (Tx AMPDU).
d. No improvement? Then undo this hack, by removing the file that contains the toggled options, with this terminal command:
sudo rm -v /etc/modprobe.d/iwlwifi-3options.conf
Reboot your computer and proceed with item 3 below.
Preparation for installing a newer driver
3. Now you need to prepare your system for installing a newer driver. Proceed like this:
a. First establish temporary internet connection for your computer by means of your cell phone.
b. Launch a terminal window.
(You can launch a terminal window like this: *Click*)
c. Copy/paste the following command line into the terminal:
sudo apt-get install mokutil && mokutil —sb-state
Press Enter. Type your password when prompted. In Ubuntu this remains entirely invisible, not even dots will show when you type it, that’s normal. In Mint this has changed: you’ll see asterisks when you type. Press Enter again.
If it reports that Secure Boot is enabled: reboot and disable Secure Boot in the BIOS. In order to do this, you might need to set an administrator password in the BIOS first.
Disabling Secure Boot is no loss: it adds no meaningful security anyway. It’s primarily a means for Microsoft to enforce its vendor lock-in on your computer.
Proceed with the next step.
The officially backported iwlwifi driver
4. The first replacement driver version to try is the officially backported iwlwifi driver. Install it like this:
a. First establish temporary internet connection for your computer by means of your cell phone.
b. Launch a terminal window.
(You can launch a terminal window like this: *Click*)
c. Copy/paste the following command line into the terminal, in order to install it:
sudo apt-get install backport-iwlwifi-dkms
Press Enter. Type your password when prompted. In Ubuntu this remains entirely invisible, not even dots will show when you type it, that’s normal. In Mint this has changed: you’ll see asterisks when you type. Press Enter again.
(obsolete)
5. This item has been removed because it was outdated.
The iwlwifi driver straight from upstream
6. Still no avail? The third and final option is the iwlwifi driver straight from upstream at kernel.org. For installing that, you can proceed as follows:
a. First establish temporary internet connection for your computer by means of your cell phone.
b. Launch a terminal window.
(You can launch a terminal window like this: *Click*)
c. First copy/paste the following command line into the terminal, in order to install the application git:
Press Enter. Type your password when prompted. In Ubuntu this remains entirely invisible, not even dots will show when you type it, that’s normal. In Mint this has changed: you’ll see asterisks when you type. Press Enter again.
d. Then download the driver packages with the following command (use copy/paste):
git clone git://git.kernel.org/pub/scm/linux/kernel/git/firmware/linux-firmware.git
Press Enter. Note: it’s a big download of several hundred MB’s, so this may take a while!
e. Now go to the folder with the driver, by executing this command:
f. Then from that folder, move the new driver to the right location, with this command (use copy/paste):
sudo cp -v -u iwlwifi* /lib/firmware
g. Now acquaint your system with the new driver, by means of this terminal command (use copy/paste):
sudo update-initramfs -uk all
h. Reboot your computer. Your wireless Intel card should now run on the new driver.
i. Then launch a terminal and clean up the considerable amount of debris with this command (use copy/paste):
j. Finally, use the following command to lock the package linux-firmware to its current version, in order to prevent potential future problems by updates:
sudo apt-mark hold linux-firmware
Do you want more tips and tweaks? There’s a lot more of them on this website!
To the content of this website applies a Creative Commons license.