- Setting your proxy in CentOS and Red Hat
- Environment Variables
- Persistent User Proxy Settings
- Global Proxy Settings
- How to set up proxy using http_proxy & https_proxy environment variable in Linux?
- What is Proxy Server?
- Check current proxy configuration status (https_proxy/https_proxy)
- Set up proxy server using http_proxy environment variable
- Set up proxy without username and password
- Set up proxy with username and password
- Set up proxy with domain, username and password
- Special character (@) handling
- Set up proxy permanently using /etc/environment
- Set up proxy permanently using /etc/profile.d
- 4 thoughts on “How to set up proxy using http_proxy & https_proxy environment variable in Linux?”
- How to configure proxy settings on Ubuntu 18.04
- Ubuntu Desktop Network Settings
- Ubuntu Terminal Proxy Settings
- Single User Temporary Proxy Settings
- Single User Persistent Proxy Settings
- All Users
- Related Posts:
- Republish This Article
- RECOMMENDED BOOKS
- Recent Posts
- Tags
- Recent Comments
Setting your proxy in CentOS and Red Hat
Most organizations funnel all Internet-bound traffic through a proxy server. In environments such as these you will need to configure your Red Hat-based distribution to pass traffic to the proxy server.
In this article I will provide instructions on how to configure your proxy for various use cases, from a default global configuration to temporary individual configurations.
The following instructions are not inherent to RedHat distributions only. They can be applied to any Linux distribution with little or no conversion.
Environment Variables
Setting the proxy on a Linux installation is primarily done via setting environment variables. There are three variables available – for HTTP traffic, HTTPS traffic, and by-pass traffic.
HTTP_PROXY
Sets an endpoint for all HTTP traffic traversing port 80.
HTTPS_PROXY
Similar to HTTP_PROXY, this sets an endpoint for all traffic SSL\TLS encrypted traffic traversing port 443.
NO_PROXY
A comma-delimited list of subnets, IP addresses, hostnames and domain names to exclude from proxy. Traffic matching any of the patterns set here will go directly to the destination host.
The export command is used to set environment variables. The follow three examples show you how to set your HTTP, HTTPS and NO_PROXY settings.
export http_proxy=http://my.proxy:8080
export https_proxy=https://my.proxy:8443
no_proxy=192.168.1.*,localhost,example.org
Proxy settings set this way will not persist beyond your user session, and they will only apply to your current user session. In the next section creating persistent proxy settings will be covered.
Persistent User Proxy Settings
When we export variables as environment variables the lifespan is only as long as the user session. In order to have to have a persistent configuration we can use a users’ profile script.
- Open the profile script for a user into a text editor
- Add lines to the configuration to export your desired proxy environment variables.
export http_proxy=http://my.proxy:8080 export https_proxy=https://my.proxy:8443 no_proxy=192.168.1.*,localhost,example.org
Global Proxy Settings
When you want your proxy settings to persist globally, for every user account on your server, you can add the proxy environment variables to the default profile script. The default profile is applied every time a user creates a new session, and it runs prior to the user’s profile.
- Open the default profile script into a text editor
export http_proxy=http://my.proxy:8080 export https_proxy=https://my.proxy:8443 no_proxy=localhost,*.my.org,192.168.*
How to set up proxy using http_proxy & https_proxy environment variable in Linux?
In this article I will share the steps to set up proxy server using https_proxy and https_proxy environment variable.

What is Proxy Server?
A proxy server is a dedicated computer or a software system running on a computer that acts as an intermediary between an endpoint device, such as a computer, and another server from which a user or client is requesting a service. The proxy server may exist in the same machine as a firewall server or it may be on a separate server, which forwards requests through the firewall.
Check current proxy configuration status (https_proxy/https_proxy)
This variable will show if there is a proxy server configured on the system:
# echo $http_proxy # echo $https_proxy
If these variables are empty it would mean that there are no proxy servers configured on the system level.
Set up proxy server using http_proxy environment variable
The http_proxy and https_proxy environment variable is used to specify proxy settings to client programs such as curl and wget .
Set up proxy without username and password
Execute the below command with valid SERVER_IP and PORT on the terminal. This will enable proxy configuration for the current session but these values will not be persistent across reboot.
# export http_proxy=http://SERVER:PORT/
Set up proxy with username and password
You can modify the earlier command to add the username and password value assuming a valid authentication is required to enable the proxy server configuration. But again this command will also enable proxy server for the current session only and will not be persistent across reboots.
# export http_proxy=http://USERNAME:PASSWORD@SERVER:PORT/
Set up proxy with domain, username and password
Assuming you are also required to add domain detail while setting up proxy configuration on your system then use the below command
# export http_proxy=http://DOMAIN\\USERNAME:PASSWORD@SERVER:PORT/
Special character (@) handling
With more complex and robust handling of special characters in username or password follow How to setup http or https proxy with special characters in username and password
When the username or password uses the @ symbol, add a backslash (\) before the @ — for example:
export http_proxy=http://DOMAIN\\USERN\@ME:PASSWORD@SERVER:PORT
export http_proxy=http://DOMAIN\\USERNAME:P\@SSWORD@SERVER:PORT
Set up proxy permanently using /etc/environment
Now as I have highlighted above the above commands will work only for the current active session but will not be available across reboots. So to make these changes persistent define the environment variables in /etc/environment file:
# echo "http_proxy=http://proxy.example.com:3128/" >> /etc/environment
Set up proxy permanently using /etc/profile.d
For bash and sh users, add the export line given above into a new file called /etc/profile.d/http_proxy.sh file:
# echo "export http_proxy=http://proxy.example.com:3128/" > /etc/profile.d/http_proxy.sh
For csh and tcsh users, use the following command to set the http_proxy variable in a new file called /etc/profile.d/http_proxy.csh file:
# echo "setenv http_proxy http://proxy.example.com:3128/" > /etc/profile.d/http_proxy.csh
The extension of these files determines which shell will read them. The commands are not interchangeable.
Replace http_proxy with https_proxy in the export argument to enable proxy over SSL/TLS. This information will be provided by the Network Team who have provided the proxy server related details.
Lastly I hope the steps from the article to setup proxy using http_proxy and https_proxy environment variable in Linux was helpful. So, let me know your suggestions and feedback using the comment section.
Didn’t find what you were looking for? Perform a quick search across GoLinuxCloud
If my articles on GoLinuxCloud has helped you, kindly consider buying me a coffee as a token of appreciation.

For any other feedbacks or questions you can either use the comments section or contact me form.
Thank You for your support!!
4 thoughts on “How to set up proxy using http_proxy & https_proxy environment variable in Linux?”
Your example “Set up proxy permanently using /etc/environment” should use a double redirect (>>) to APPEND instead of a single redirect (>) to OVERWRITE the environment file. If someone were to copy/paste your example, they would overwrite any other existing environment settings in their /etc/environment file! # echo “http_proxy=http://proxy.example.com:3128/” >> /etc/environment Reply
I would like to set up a proxy in debian10 via environment file.
The username, password, however, includes a comma (,)
How does that affect the phrasing? Reply
How to configure proxy settings on Ubuntu 18.04

Proxies are commonly found on business networks, but they are increasingly becoming popular for personal use. The following tutorial will show you multiple ways of setting your proxy in Ubuntu 18.04, allowing you to browse the Internet with additional privacy.
This tutorial will cover the following three areas. Use the one the fits your needs.
Desktop: learn how to set your proxy settings from within the desktop.
Terminal: set environment variables for your proxy server when using a terminal or console.
All users: setting the proxy settings for all users on the system.
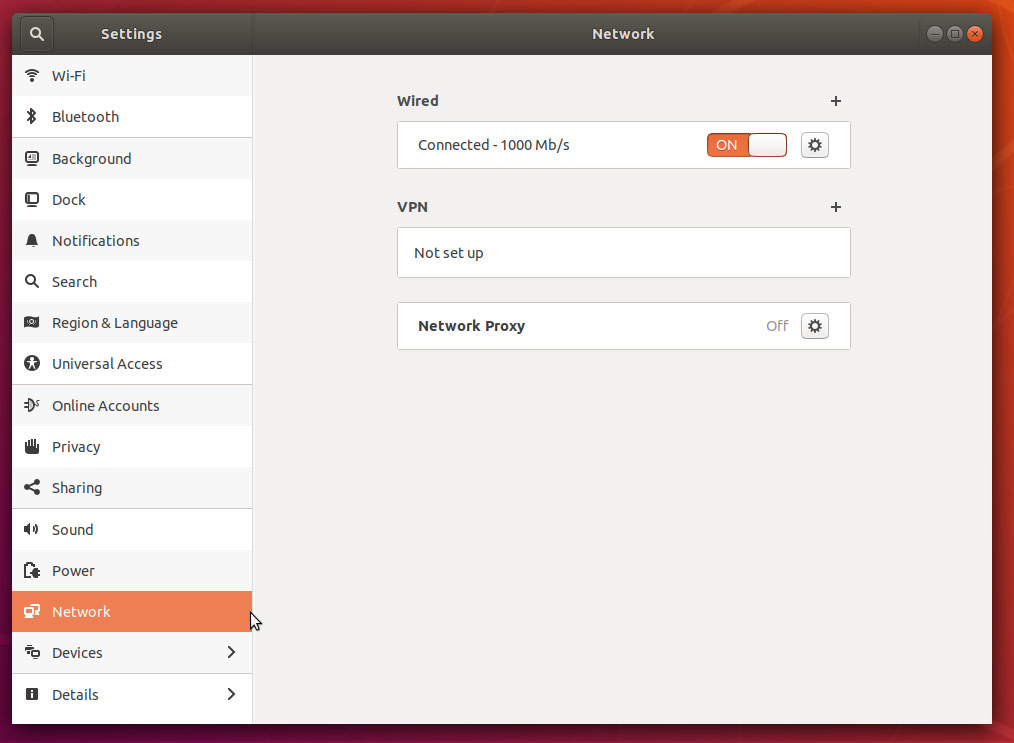
Ubuntu Desktop Network Settings
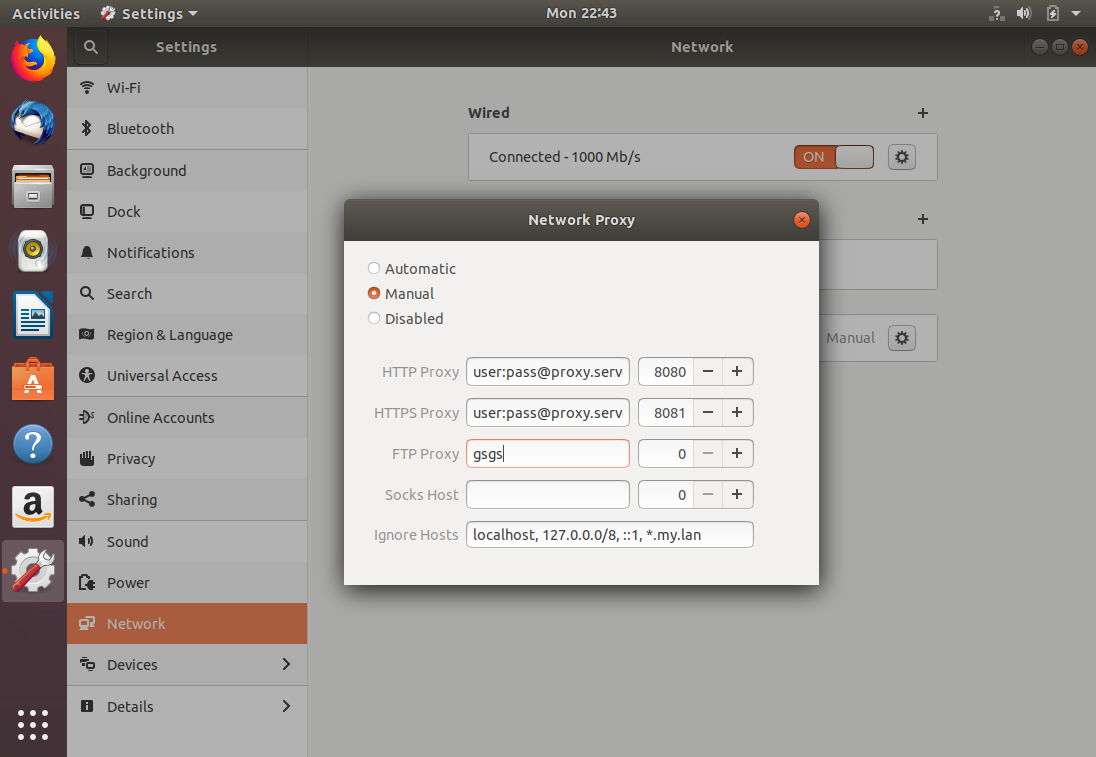
To configure your proxy settings in Ubuntu Desktop you need to access Network Settings. Within there you can set a number of parameters, including proxy settings for HTTP traffic, HTTPS traffic, and FTP traffic.
Equally as important as setting your Internet proxy settings is setting Ignore Hosts, to prevent local traffic from going through your proxy server.
To set your proxy in Ubuntu Desktop, do the following:
- Open the Application launcher by clicking the “Show Applications” icon, located at the bottom of the left-hand quick application access bar.
- Type in ‘Settings’
- Click the ‘Settings’ icon.
- From the left-hand navigation, click the Network tab.

- Click the cog icon near the Network Proxy label.

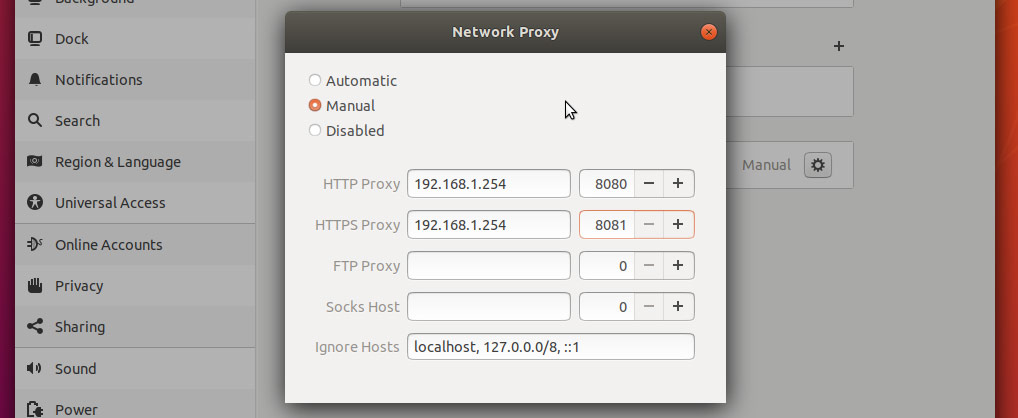
- A dialog box will appear where you can set your proxy settings.
- In the appropriate text fields, enter your proxy server’s hostname or IP address. Ensure you change the port number to match your proxy server’s, too.

- Close the dialog box. Your settings will be automatically saved.
Ubuntu Terminal Proxy Settings
Like every Linux distribution, proxy settings can be set using environment variables. There are a number of variables available to use, ranging from HTTP traffic to FTP traffic.
Proxy settings can be either persistent by setting them in your profile, or non-persistent by setting them from the shell session.
Proxy Environment Variables| Variable | Description |
|---|---|
| http_proxy | Proxy server for HTTP Traffic. |
| https_proxy | Proxy server for HTTPS traffic |
| ftp_proxy | Proxy server for FTP traffic |
| no_proxy | Patterns for IP addresses or domain names that shouldn’t use the proxy |
The value for every proxy setting, except for no_proxy, uses the same template. They all require a hostname, but you may optionally specify a proxy server port and your user credentials if required to do so. For example:
Single User Temporary Proxy Settings
You may not always want to force Internet traffic through a proxy. Sometimes you need to override existing settings, and you can do this safely by setting the proxy environment variables from the command line.
The following will set a proxy for HTTP and HTTPS, while preventing local traffic from going through the proxy. Our example proxy server endpoint is my.proxy.server:8080 for HTTP traffic and my.proxy.server:8081 for HTTPS.
- Open a Terminal window where you need proxy access.
- Set and export the HTTP_PROXY variable.
export NO_PROXY=localhost,127.0.0.1,*.my.lan.domain
Single User Persistent Proxy Settings
export http_proxy=username:[email protected]:8080 export https_proxy=username:[email protected]:8081 exprot no_proxy=localhost, 127.0.0.1, *.my.lan
All Users
You will need administrative rights to perform this task. All versions of Ubuntu and Debian have a file called /etc/environment. Within this file, we can set global variables and other such things.
Similar to how you set proxy settings for your own local proxy, we’ll be adding the environment variables to this file. The variables will be set when a new user session is created, which is to say when you log in next.
- Using an administrator account, open /etc/environment into a text editor.
Related Posts:
Republish This Article
We believe in the free flow of information. We use a Creative Commons license, so you can republish our articles for free, online or in print.
RECOMMENDED BOOKS
Continuous Delivery should be considered the bible for anyone in Ops, Dev, or DevOps. The book provides key strategies for improving system reliability, configuration management, and ensuring web applications can be delivered to production frequently, and easily. A recommended buy for anyone in IT.
Recent Posts
Tags
Recent Comments
- Manoel Campos da Silva Filho on How to Set Default Maven and Java settings per Project
- Fauzi Hassan on How to set the Proxy for Docker on Ubuntu
- Yassine Akermi on How to Reset Jenkins Admin users Password
- István Siroki on How to Configure Networking in Ubuntu 20.04 with NetPlan
- Mihamina Rakotomandimby on How to Reset Jenkins Admin users Password