- Unable to Mount RAID1 md0 — wrong fs type, bad option, bad superblock on /dev/md0, missing codepage or helper program, or other error
- Wrong fs type, bad option, bad superblock on /dev/sdaX
- Format external drive to ext4
- Create directory for mounted external usb drive
- Create the www-data user to the group
- Give permissions
- Get the gid, uid and uuid
- Give the instruction to fstab
- Automated mount test
- Normal mount test
- How to Fix “Wrong Fs Type, Bad Option, Bad Superblock” Error?
- Reason: Unsupported Filesystem or Incorrect Mount Options
- Solution: Fixing the “Wrong Fs Type, Bad Option, Bad Superblock” Error
- Conclusion
- Mount LVM to recover data: wrong fs type, bad option, bad superblock on
- 1 Answer 1
Unable to Mount RAID1 md0 — wrong fs type, bad option, bad superblock on /dev/md0, missing codepage or helper program, or other error
sudo mdadm --create --verbose /dev/md0 --level=1 --raid-devices=2 /dev/sdb /dev/sdc mdadm: /dev/sdb appears to be part of a raid array: level=raid1 devices=2 ctime=Sun Nov 5 20:36:10 2017 mdadm: Note: this array has metadata at the start and may not be suitable as a boot device. If you plan to store '/boot' on this device please ensure that your boot-loader understands md/v1.x metadata, or use --metadata=0.90 mdadm: size set to 625000768K mdadm: automatically enabling write-intent bitmap on large array Continue creating array? yes mdadm: Defaulting to version 1.2 metadata mdadm: array /dev/md0 started. sudo mdadm --examine --scan --config=/etc/mdadm/mdadm.conf ARRAY /dev/md/0 metadata=1.2 UUID=1e236272:3e68ea7b:fab6ba77:eb211675 name=SPCURTIS81-projSERV:0 sudo mount /dev/md0 /home/ste/mnt/ mount: /home/ste/mnt: wrong fs type, bad option, bad superblock on /dev/md0, missing codepage or helper program, or other error. I’ve Google’d and searched on here but I’m struggling to find anything which I understand to relate directly to this. Some of the following info may or may not however be of use. lsblk
NAME MAJ:MIN RM SIZE RO TYPE MOUNTPOINT sda 8:0 0 465.8G 0 disk ├─sda1 8:1 0 18.6G 0 part / ├─sda2 8:2 0 1K 0 part ├─sda5 8:5 0 442.4G 0 part /home └─sda6 8:6 0 4.8G 0 part └─cryptswap1 253:0 0 4.8G 0 crypt sdb 8:16 0 596.2G 0 disk └─md0 9:0 0 596G 0 raid1 sdc 8:32 0 596.2G 0 disk └─md0 9:0 0 596G 0 raid1 fsck Same result for both sdb & sdc — fsck from util-linux 2.30.1 cat /proc/mdstat
Personalities : [linear] [multipath] [raid0] [raid1] [raid6] [raid5] [raid4] [raid10] md0 : active raid1 sdc[1] sdb[0] 625000768 blocks super 1.2 [2/2] [UU] [===>. ] resync = 18.5% (116140608/625000768) finish=78.1min speed=108513K/sec bitmap: 5/5 pages [20KB], 65536KB chunk Wrong fs type, bad option, bad superblock on /dev/sdaX
I am trying to create an automated mount for an external hard drive, but it keeps failing. I am a little newbiew at linux. I have googled and searched in StackExchange and I tried a lot of things, but I did not find a solution for my problem. OS: Raspbian Stretch Those are the steps I did:
Format external drive to ext4
sudo mkfs.ext4 /dev/sda1 -L hdd_moc mke2fs 1.43.4 (31-Jan-2017) /dev/sda1 contains a ext4 file system labelled 'hdd_owncloud' last mounted on Mon Feb 12 09:34:38 2018 Proceed anyway? (y,N) y Creating filesystem with 244181760 4k blocks and 61046784 inodes Filesystem UUID: b9b47e44-db76-40de-a0ed-940c9699799a Superblock backups stored on blocks: 32768, 98304, 163840, 229376, 294912, 819200, 884736, 1605632, 2654208, 4096000, 7962624, 11239424, 20480000, 23887872, 71663616, 78675968, 102400000, 214990848 Allocating group tables: done Writing inode tables: done Creating journal (262144 blocks): done Writing superblocks and filesystem accounting information: done Create directory for mounted external usb drive
Create the www-data user to the group
sudo groupadd www-data sudo usermod -a -G www-data www-data Give permissions
sudo chown -R www-data:www-data /mnt/hdd_moc sudo chmod -R 775 /mnt/hdd_moc ls -l /mnt total 4 drwxrwxr-x 2 www-data www-data 4096 Feb 12 10:06 hdd_moc Get the gid, uid and uuid
id -g www-data 33 id -u www-data 33 ls -l /dev/disk/by-uuid total 0 lrwxrwxrwx 1 root root 15 Feb 12 09:49 9a7608bd-5bff-4dfc-ac1d-63a956744162 -> ../../mmcblk0p2 lrwxrwxrwx 1 root root 15 Feb 12 09:49 B60A-B262 -> ../../mmcblk0p1 lrwxrwxrwx 1 root root 10 Feb 12 10:12 b9b47e44-db76-40de-a0ed-940c9699799a -> ../../sda1 Give the instruction to fstab
sudo nano /etc/fstab proc /proc proc defaults 0 0 PARTUUID=ed7ab5b3-01 /boot vfat defaults 0 2 PARTUUID=ed7ab5b3-02 / ext4 defaults,noatime 0 1 UUID=b9b47e44-db76-40de-a0ed-940c9699799a /mnt/hdd_moc auto nofail,uid=33,gid=33,umask=0027,dmask=0027,noatime 0 0 Automated mount test
sudo mount -a mount: wrong fs type, bad option, bad superblock on /dev/sda1, missing codepage or helper program, or other error In some cases useful info is found in syslog - try dmesg | tail or so. Normal mount test
sudo mount /dev/sda1 /mnt/hdd_moc -> It works, I can do a "ls". How to Fix “Wrong Fs Type, Bad Option, Bad Superblock” Error?
When a Linux user mounts a filesystem, then they might have come across the “Wrong Fs Type, Bad Option, Bad Superblock” error. This can be troublesome, especially if someone is not familiar with Linux filesystem management.
In this article, the common causes of this error will be explained in detail by discussing the below outline.
- Reason: Unsupported Filesystem or Incorrect Mount Options
- Solution: Fixing the “Wrong Fs Type, Bad Option, Bad Superblock” Error
- Step 1: Identify the Affected Filesystem
- Step 2: Check the Filesystem Type
- Step 3: Check the Mount Options
- Step 4: Check the Superblock
- Step 5: Mount the Filesystem
Reason: Unsupported Filesystem or Incorrect Mount Options
The “Wrong Fs Type, Bad Option, Bad Superblock” error occurs when the system tries to mount a filesystem with an unsupported filesystem type or incorrect mount options. It can also be caused by a damaged or corrupted superblock containing critical information about the filesystem.
If a user encounters this error, they cannot access the data on the affected filesystem, so the solution to resolve this problem is explained below.
Solution: Fixing the “Wrong Fs Type, Bad Option, Bad Superblock” Error
The solution to resolve this error depends on multiple steps, which are as follows:
Step 1: Identify the Affected Filesystem
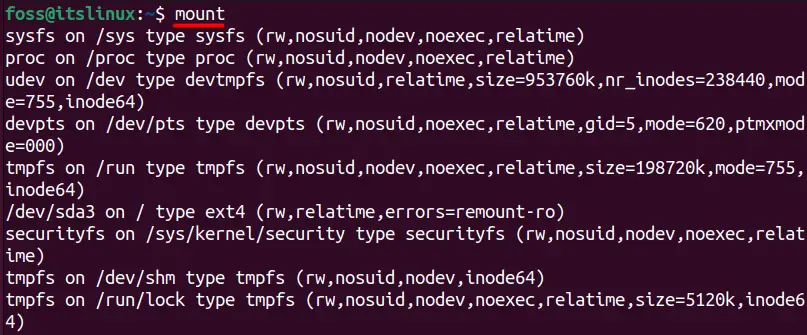
The first step in fixing this error is to identify the affected filesystem. This can be done by running the mount command as shown below:
This will display a list of all mounted filesystems on a system, and a user needs to look for the filesystem that is causing the error.
Step 2: Check the Filesystem Type
Once users have identified the affected filesystem, the next step is to check its filesystem type. This can be done by running the blkid command followed by the device name of the filesystem. Let’s assume that the affected filesystem is /dev/sda3, so to check its filesystem type, a user need to run the following command in the terminal:

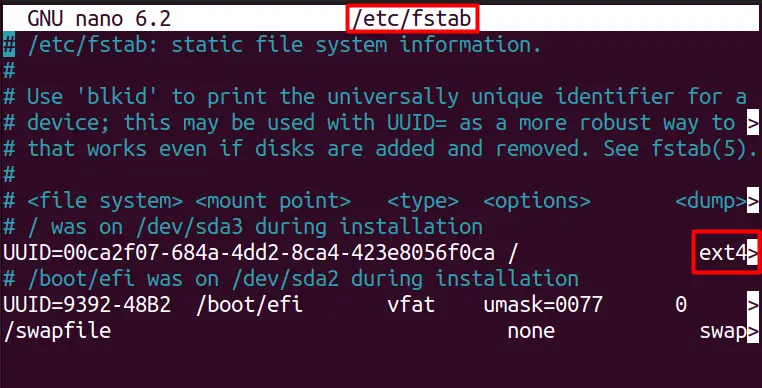
Step 3: Check the Mount Options
After identifying the filesystem type, the next step is to check the mount options, which can be done by looking at the /etc/fstab file. Make sure that the mount options are correct for the filesystem type.
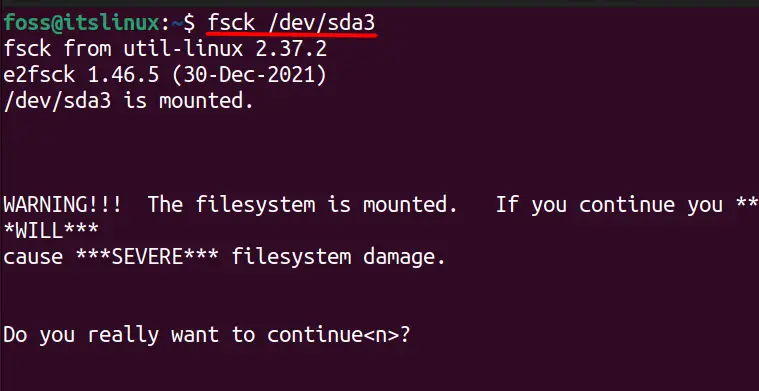
Step 4: Check the Superblock
If the filesystem type and mount options are correct, the next step is to check the superblock. A user can do this by running the fsck command followed by the device name of the filesystem. This command will scan the filesystem for errors and repair any damaged superblocks.
Step 5: Mount the Filesystem
Once a user follows the above steps properly and resolves any error, they should try to mount the filesystem again using the mount command. If the mount is successful, A user should be able to access their data.
Conclusion
The user normally faces the “Wrong fs type, bad option, bad superblock” error by mounting a file system, and resolving it can be a challenging issue. Some of the most common causes have been discussed in this article, along with the solution to resolve this error.
Mount LVM to recover data: wrong fs type, bad option, bad superblock on
How do i mount lvm disk used by VM on host machine (Proxmox), so i can copy files? The VM (Xpenology) is broken and I can’t boot on it anymore. I had 2 4TB disk in RAID 1 mounted on it and I want to get back my data but I can’t mount the LVM. (I’m only interested in Disk_1 and Disk_2) Here are some info:
root@pr0xm0x:~# lvs LV VG Attr LSize Pool Origin Data% Meta% Move Log Cpy%Sync Convert vm-100-disk-0 Disk_1 -wi-a----- 3.55t vm-100-disk-0 Disk_2 -wi-a----- 3.55t data pve twi-aotz-- root@pr0xm0x:~# mount /dev/Disk_1/vm-100-disk-0 /mnt/Disk_1/ mount: /mnt/Disk_1: wrong fs type, bad option, bad superblock on /dev/mapper/Disk_1-vm--100--disk--0, missing codepage or helper program, or other error.
1 Answer 1
The names of the logical volumes suggest that the LVs are being used as virtual disks for the VMs, so each LV may contain a partition table and one or more partitions - and your parted output proves that's exactly what is happening.
You won't be able to directly mount /dev/Disk_1/vm-100-disk-0 any more than you could mount /dev/sda when it has partitions defined. When you mount something, the filesystem driver expects the actual filesystem to begin from the very first block of the device you're trying to mount, not at some distance into the device (i.e. after the partition table and possibly other partitions).
First, use losetup -f : it will report the first unused /dev/loopN device. Use the actual device reported by this command in place of /dev/loopN in any subsequent commands.
Bind the LV to the loop device and request losetup to auto-create partition devices for it:
losetup -P /dev/loopN /dev/Disk_1/vm-100-disk-0
This will create devices like /dev/loopNp1 , /dev/loopNp2 etc., through which you will be able to access each individual partition of the virtual disk contained in the LV.
(If you have an old version of losetup that won't recognize the -P option, the command kpartx can be used as a substitute, as suggested by Bravo in the comments. Depending on your distro, kpartx may be available as a separate package or packaged together with device-mapper-multipath tools.)
If the virtual disk contains regular partitions, you should now be able to just mount them. But if the virtual disk also contains LVM physical volumes, you will have to activate the LVM volume group before you can access its LVs: vgchange -ay should be enough to activate any and all detectable LVM volume groups.
When you're done accessing the virtual disk, remember to undo any steps you needed to access its partitions in the proper order:
- unmount any partitions/LVs you mounted from the virtual disk
- if the virtual disk contained LVM volumes, deactivate any LVM volume groups you activated with vgchange -an . If you are unsure of the name of the volume group, the output of the pvs command should be helpful.
- if you used kpartx , run kpartx -d /dev/loopN to delete the partition devices as a separate step.
- use losetup -d /dev/loopN to unbind the loop device (and any partition devices created by losetup -P ).
Never leave a VM's virtual disk mounted to the host system like this while you actually run the virtual machine the disk belongs to: that would make the filesystem caches of the host and the VM go out of sync and into conflict with each other, leading rapidly to data corruption on the virtual disk.