- Настройка прокси на CentOS 7/8
- Настройка для ОС
- Настройка для пакетных менеджеров
- How to set up proxy using http_proxy & https_proxy environment variable in Linux?
- What is Proxy Server?
- Check current proxy configuration status (https_proxy/https_proxy)
- Set up proxy server using http_proxy environment variable
- Set up proxy without username and password
- Set up proxy with username and password
- Set up proxy with domain, username and password
- Special character (@) handling
- Set up proxy permanently using /etc/environment
- Set up proxy permanently using /etc/profile.d
- 4 thoughts on “How to set up proxy using http_proxy & https_proxy environment variable in Linux?”
- How to Configure Proxy Settings on Ubuntu 20.04
- Setting Up Proxy with Ubuntu Desktop GUI
- Setting up Proxy With Ubuntu Desktop Terminal
- Setting Up Temporary Proxy for a Single User
- Setting Up Permanent Proxy for a Single User
- Setting Up Permanent Proxy for All Users
- Setting Up Proxy for APT
Настройка прокси на CentOS 7/8
Ремарка, которую можно пропустить: Помню свой первый день на работе, тогда мне поручили настраивать сервер на CentOS 7. Установить необходимые пакеты, уже не помню точно что, но не суть. Я тогда еще обладатель ПК на windows погуглил и нашел команду yum install pack_name .
И как же я был удивлен, когда это не сработало. Корпоративные сервера чаще всего находятся в изоляции от интернета, и для доступа необходимо настраивать прокси. Но я тогда не знал об этом, и устанавливал пакеты вручную, скачивая их сначала к себе и перенося на сервер, то еще занятие, на это ушел целый день 😄
Потом я узнал о существовании прокси, которое открывало доступ в интернет. Сейчас расскажу, как его настроить.
Особенность использования прокси в том, что его надо настраивать везде. Недостаточно настроить только на уровне ОС, надо также настроить на уровне каждого приложения, даже у пакетного менеджера типа yum и dnf , нужно указать прокси.
Настройка для ОС
Первым делом настраиваем прокси на linux машине. Для этого нужно установить значения для некоторых переменных среды.
export http_proxy="http://SERVER:PORT/" export https_proxy="http://SERVER:PORT/" export no_proxy="127.0.0.1,localhost" export HTTP_PROXY="http://SERVER:PORT/" export HTTPS_PROXY="http://SERVER:PORT/" export NO_PROXY="127.0.0.1,localhost"Если у вас есть логин и пароль:
export http_proxy="http://USERNAME:PASSWORD@SERVER:PORT/" export https_proxy="http://USERNAME:PASSWORD@SERVER:PORT/" export no_proxy="127.0.0.1,localhost" export HTTP_PROXY="http://USERNAME:PASSWORD@SERVER:PORT/" export HTTPS_PROXY="http://USERNAME:PASSWORD@SERVER:PORT/" export NO_PROXY="127.0.0.1,localhost"Если в имени пользователя или пароле используется символ @ , добавьте обратную косую черту ( \ ) перед @ .
Данным способом мы установили временное прокси, после перезагрузки подключение пропадет. Чтобы добавить постоянное прокси, нужно изменить файл /etc/environment .
Если вам повезло и редактор nano был предустановлен, то воспользуйтесь им, добавив следующие строчки:
sudo nano /etc/environment export http_proxy="http://USERNAME:PASSWORD@SERVER:PORT/" export https_proxy="http://USERNAME:PASSWORD@SERVER:PORT/" export no_proxy="127.0.0.1,localhost" export HTTP_PROXY="http://USERNAME:PASSWORD@SERVER:PORT/" export HTTPS_PROXY="http://USERNAME:PASSWORD@SERVER:PORT/" export NO_PROXY="127.0.0.1,localhost"Если повезло чуть меньше, и установлен только редактор vi. Инструкция будет чуть сложнее, сначала открываем файл в редакторе:
Далее необходимо нажать клавишу i, чтобы войти в режим редактирования, после вставляем наши заветные строчки:
export http_proxy="http://USERNAME:PASSWORD@SERVER:PORT/" export https_proxy="http://USERNAME:PASSWORD@SERVER:PORT/" export no_proxy="127.0.0.1,localhost" export HTTP_PROXY="http://USERNAME:PASSWORD@SERVER:PORT/" export HTTPS_PROXY="http://USERNAME:PASSWORD@SERVER:PORT/" export NO_PROXY="127.0.0.1,localhost"Чтобы сохранинть изменения санчала нажмите ESC , а далее наберите :wq , чтобы выйти без сохранения нажмите ESC и наберите просто :q
Если вам совсем не повезло, и по какой-то причине редакторов совсем не предустановлено, то воспользуйтесь следующей командой:
Настройка для пакетных менеджеров
Теперь настроим прокси для пакетных менеджеров yum и dnf . Для этого отредактируем файл /etc/yum.conf , добавив в конец следующие строки:
Для авторизации укажите также следующие строки:
proxy_username=USERNAME proxy_password=PASS proxy_auth_method=basicHow to set up proxy using http_proxy & https_proxy environment variable in Linux?
In this article I will share the steps to set up proxy server using https_proxy and https_proxy environment variable.

What is Proxy Server?
A proxy server is a dedicated computer or a software system running on a computer that acts as an intermediary between an endpoint device, such as a computer, and another server from which a user or client is requesting a service. The proxy server may exist in the same machine as a firewall server or it may be on a separate server, which forwards requests through the firewall.
Check current proxy configuration status (https_proxy/https_proxy)
This variable will show if there is a proxy server configured on the system:
# echo $http_proxy # echo $https_proxy
If these variables are empty it would mean that there are no proxy servers configured on the system level.
Set up proxy server using http_proxy environment variable
The http_proxy and https_proxy environment variable is used to specify proxy settings to client programs such as curl and wget .
Set up proxy without username and password
Execute the below command with valid SERVER_IP and PORT on the terminal. This will enable proxy configuration for the current session but these values will not be persistent across reboot.
# export http_proxy=http://SERVER:PORT/
Set up proxy with username and password
You can modify the earlier command to add the username and password value assuming a valid authentication is required to enable the proxy server configuration. But again this command will also enable proxy server for the current session only and will not be persistent across reboots.
# export http_proxy=http://USERNAME:PASSWORD@SERVER:PORT/
Set up proxy with domain, username and password
Assuming you are also required to add domain detail while setting up proxy configuration on your system then use the below command
# export http_proxy=http://DOMAIN\\USERNAME:PASSWORD@SERVER:PORT/
Special character (@) handling
With more complex and robust handling of special characters in username or password follow How to setup http or https proxy with special characters in username and password
When the username or password uses the @ symbol, add a backslash (\) before the @ — for example:
export http_proxy=http://DOMAIN\\USERN\@ME:PASSWORD@SERVER:PORT
export http_proxy=http://DOMAIN\\USERNAME:P\@SSWORD@SERVER:PORT
Set up proxy permanently using /etc/environment
Now as I have highlighted above the above commands will work only for the current active session but will not be available across reboots. So to make these changes persistent define the environment variables in /etc/environment file:
# echo "http_proxy=http://proxy.example.com:3128/" >> /etc/environment
Set up proxy permanently using /etc/profile.d
For bash and sh users, add the export line given above into a new file called /etc/profile.d/http_proxy.sh file:
# echo "export http_proxy=http://proxy.example.com:3128/" > /etc/profile.d/http_proxy.sh
For csh and tcsh users, use the following command to set the http_proxy variable in a new file called /etc/profile.d/http_proxy.csh file:
# echo "setenv http_proxy http://proxy.example.com:3128/" > /etc/profile.d/http_proxy.csh
The extension of these files determines which shell will read them. The commands are not interchangeable.
Replace http_proxy with https_proxy in the export argument to enable proxy over SSL/TLS. This information will be provided by the Network Team who have provided the proxy server related details.
Lastly I hope the steps from the article to setup proxy using http_proxy and https_proxy environment variable in Linux was helpful. So, let me know your suggestions and feedback using the comment section.
Didn’t find what you were looking for? Perform a quick search across GoLinuxCloud
If my articles on GoLinuxCloud has helped you, kindly consider buying me a coffee as a token of appreciation.

For any other feedbacks or questions you can either use the comments section or contact me form.
Thank You for your support!!
4 thoughts on “How to set up proxy using http_proxy & https_proxy environment variable in Linux?”
Your example “Set up proxy permanently using /etc/environment” should use a double redirect (>>) to APPEND instead of a single redirect (>) to OVERWRITE the environment file. If someone were to copy/paste your example, they would overwrite any other existing environment settings in their /etc/environment file! # echo “http_proxy=http://proxy.example.com:3128/” >> /etc/environment Reply
I would like to set up a proxy in debian10 via environment file.
The username, password, however, includes a comma (,)
How does that affect the phrasing? Reply
How to Configure Proxy Settings on Ubuntu 20.04
Using a proxy server as an internet access intermediary is a common business scenario. However, personal users can also benefit from increased network security, privacy, and speed provided by proxies.
In this tutorial, you will learn how to set up your Ubuntu 20.04 system to work with a proxy server.

- Ubuntu 18.04 or later
- Access to terminal with sudo privileges
- Proxy info (web or IP address, username, and password)
Note: If you wish to set up one of your machines to act as a proxy, refer to How to Set Up & Install Squid Proxy Server on Ubuntu.
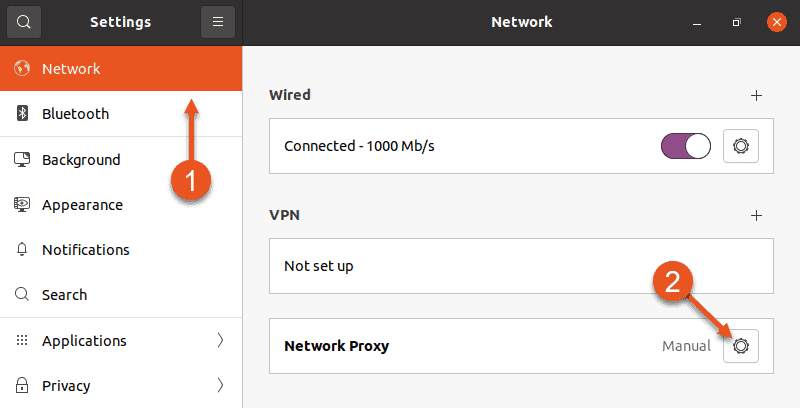
Setting Up Proxy with Ubuntu Desktop GUI
1. To access proxy settings using the Ubuntu GUI, open Ubuntu’s main Settings.
2. Select the Network setting in the menu on the left side of the window.
3. Then, click the cog in the Network Proxy section.
4. A Network Proxy dialogue appears. Choose Manual and enter your proxy info into the fields below.
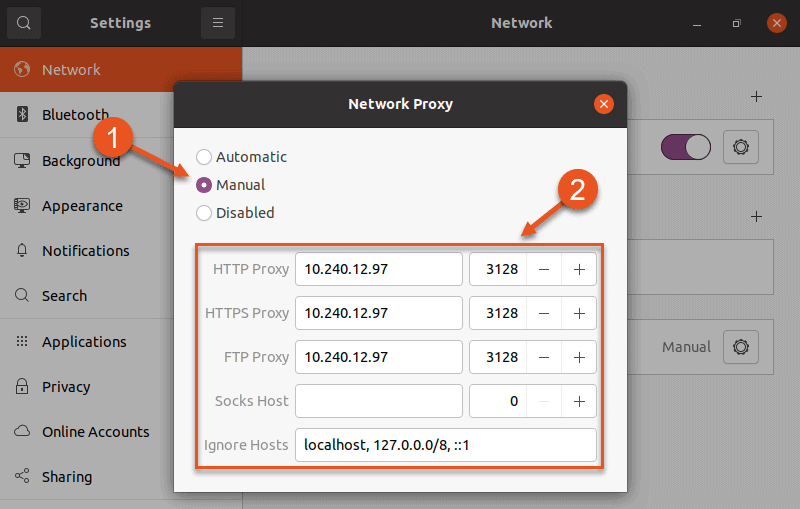
5. Exit the dialogue and Ubuntu will automatically apply the proxy settings.
Setting up Proxy With Ubuntu Desktop Terminal
Use the command line interface for more granular control of proxy settings. This allows you to:
- Make temporary or permanent changes to the configuration.
- Set up proxy for a single user or for all users.
Setting Up Temporary Proxy for a Single User
A temporary proxy connection resets after a system reboot. To establish such a connection for the current user, use the export command.
The syntax for establishing a temporary proxy connection is:
export HTTP_PROXY=[username]:[password]@[proxy-web-or-IP-address]:[port-number] export HTTPS_PROXY=[username]:[password]@[proxy-web-or-IP-address]:[port-number] export FTP_PROXY=[username]:[password]@ [proxy-web-or-IP-address]:[port-number] . export NO_PROXY=localhost,127.0.0.1. 1Provide the proxy address (web or IP), followed by the port number. If the proxy server requires authentication, add your proxy username and password as the initial values.
This is what the set of commands should look like in terminal:

The purpose of the NO_PROXY line is to tell the system that local traffic should ignore the proxy.
Setting Up Permanent Proxy for a Single User
As stated above, proxy settings configured through a terminal window reset after you reboot your system. To make permanent changes for a single user, edit the .bashrc file.
1. Open the file with a text editor of your choice:
2. Now add the following lines at the bottom of the .bashrc file:
export HTTP_PROXY="[username]:[password]@[proxy-web-or-IP-address]:[port-number]" export HTTPS_PROXY="[username]:[password]@[proxy-web-or-IP-address]:[port-number]" export FTP_PROXY="[username]:[password]@ [proxy-web-or-IP-address]:[port-number]" . export NO_PROXY="localhost,127.0.0.1. 1"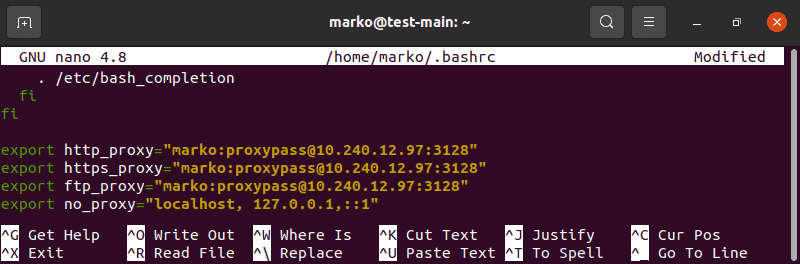
4. Then, run the following command in to apply the new settings to the current session:
Setting Up Permanent Proxy for All Users
To permanently set up proxy access for all users, you have to edit the /etc/environment file.
1. First, open the file in a text editor:
2. Next, update the file with the same information you added to the .bashrc file in the previous scenario:
export HTTP_PROXY="[username]:[password]@[proxy-web-or-IP-address]:[port-number]" export HTTPS_PROXY="[username]:[password]@[proxy-web-or-IP-address]:[port-number]" export FTP_PROXY="[username]:[password]@ [proxy-web-or-IP-address]:[port-number]" . export NO_PROXY="localhost,127.0.0.1. 1"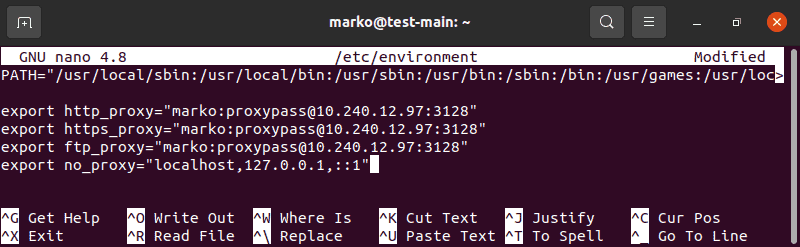
3. Save the file and exit. The changes will be applied the next time you log in.
Setting Up Proxy for APT
On some systems, the apt command-line utility needs a separate proxy configuration, because it does not use system environment variables.
1. To define proxy settings for apt, create or edit (if it already exists) a file named apt.conf in /etc/apt directory:
2. Add the following lines to the file:
Acquire::http::Proxy "http://[username]:[password]@ [proxy-web-or-IP-address]:[port-number]"; Acquire::https::Proxy "http://[username]:[password]@ [proxy-web-or-IP-address]:[port-number]";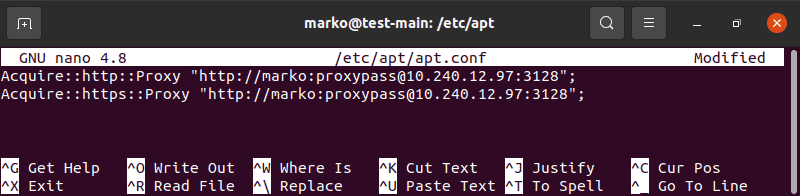
3. Save the file and exit. The configuration will be applied after a reboot.
This tutorial provided instructions on how to set up proxy settings on Ubuntu 20.04. You should now know how to make temporary and permanent changes to your system’s proxy configuration, for a single user or for the entire system.