- How to create virtual block device (loop device/filesystem) in Linux
- Create a file
- Create the loop device
- Create the filesystem
- Mount the loopback filesystem
- Removing loop device
- Enable Encryption on loop filesystem
- Maximum Lopback devices allowed
- Some more articles you might also be interested in …
- How to Create Device Files in Linux Using mknod Command
- mknod Command Syntax
- 1. Create Unnamed Pipe in Linux
- 2. Create a Named Pipe in Linux
- 3. Create a Character Device File in Linux
- 4. Create a Block Device File in Linux
- 5. Create a Device File With Permissions
- How do I create a raw (no filesystem) loopback device that passes as a legitimate blockdevice?
- Backstory
- 2 Answers 2
How to create virtual block device (loop device/filesystem) in Linux
Linux supports a special block device called the loop device, which maps a normal file onto a virtual block device. This allows for the file to be used as a “virtual file system” inside another file. With Linux it’s possible to create a file-system inside a single file. These storage devices are available as device files such as /dev/device_name.
Create a file
1. First step is to create a file of desired size. The following command will create a file that is 1 GB in size:
# dd if=/dev/zero of=loopbackfile.img bs=100M count=10 10+0 records in 10+0 records out 1048576000 bytes (1.0 GB) copied, 1.26748 s, 827 MB/s
2. Verify the size of the file you have just created.
# du -sh loopbackfile.img 1000M loopbackfile.img
Create the loop device
1. Next step is to create a loop device with the file. Use the command “losetup” to create a loop device “loop0”
# losetup -fP loopbackfile.img
Here,
-f – find the first unused loop device. If a file argument is present, use this device. Otherwise, print its name.
-P – force kernel to scan partition table on newly created loop device.
2. To print the loop device generated using the above command use “losetup -a”.
# losetup -a /dev/loop0: [64769]:4199216 (/root/loopbackfile.img)
Create the filesystem
1. Now lets create a ext4 filesystem on the loopback device.
# mkfs.ext4 /root/loopbackfile.img mke2fs 1.42.9 (28-Dec-2013) /root/loopbackfile.img is not a block special device. Proceed anyway? (y,n) y Discarding device blocks: done Filesystem label= OS type: Linux Block size=4096 (log=2) Fragment size=4096 (log=2) Stride=0 blocks, Stripe width=0 blocks 64000 inodes, 256000 blocks 12800 blocks (5.00%) reserved for the super user First data block=0 Maximum filesystem blocks=262144000 8 block groups 32768 blocks per group, 32768 fragments per group 8000 inodes per group Superblock backups stored on blocks: 32768, 98304, 163840, 229376 Allocating group tables: done Writing inode tables: done Creating journal (4096 blocks): done Writing superblocks and filesystem accounting information: done
Mount the loopback filesystem
1. We can now mount the loopback filesystem onto a directory. The “-o loop” additional option is used to mount loopback filesystems.
# mkdir /loopfs # mount -o loop /dev/loop0 /loopfs
2. Verify the size of the new mount point and type of filesystem using below commands.
# df -hP /loopfs/ Filesystem Size Used Avail Use% Mounted on /dev/loop1 969M 2.5M 900M 1% /loopfs
# mount | grep loopfs /dev/loop0 on /loopfs type ext4 (rw,relatime,seclabel,data=ordered)
Removing loop device
If you want remove the new filesystem, use the following steps:
1. Umount and delete the directory /loopfs
umount /loopfs rmdir /loopfs
2. Delete the loopback device “loop0” created using the “losetup -d” command.
3. Finally remove the file “/root/loopbackfile.img” used to create the loop device.
Enable Encryption on loop filesystem
‘losetup’ also allows to enable data encryption in order to get a crypted filesystem. The syntax to created a encrypted loop device si as shown below:
# losetup [ -e encryption ] loop_device file
The following encryption algorithms are accepted:
- NONE use no encryption (default).
- XOR use a simple XOR encryption.
- DES use DES encryption.
DES encryption is only available if the optional DES package has been added to the kernel. DES encryption uses an additional start value that is used to protect passwords against dictionary attacks.
Maximum Lopback devices allowed
You may get an error message ‘no such device’ while creating more than 8 loopback devices. This happens because You are being limited by the amount of loop devices available. Depending on your system, add ‘options loop max_loop=X’ to /etc/modprobe.conf on CentOS/RHEL 5 or create a new file named like disk.conf in directory /etc/modprobe.d on CentOS/RHEL 6. (Where X is number of loop device you need).
Some more articles you might also be interested in …
How to Create Device Files in Linux Using mknod Command
In Linux, everything is a file, even physical devices such as disk drives, CD/DVD ROM, and floppy disks are represented using files. However, these files are not regular data files. Instead, these special files are called device files and they can generate or receive the data.
Usually, all the special files are present under the /dev directory. Some of the common examples of special files are /dev/null, /dev/zero, /dev/full, and /dev/sr0.
The special files can be of the type character or block. As the name suggests, the character files process one character at a time where as the block files process multiple characters at a time.
In this advanced guide, we will discuss how to create a device file using the mknod command. After following this guide, Linux users will be able to work with different kinds of device files confidently.
mknod Command Syntax
The syntax of the mknod command is slightly different than the other Linux commands. The main difference is that we need to specify the major and minor numbers while creating a character and block device files:
$ mknod [OPTIONS] [MAJOR] [MINOR] .
In the above syntax, the square brackets ([]) represent the optional arguments whereas angular brackets (<>) represent the mandatory arguments.
In Linux, the major number is used to specify the device driver that needs to be used. This number is assigned while registering a device driver.
In a similar way, the minor number is used to specify the actual device. We can find the reserved major and minor numbers in the Linux kernel’s documentation.
1. Create Unnamed Pipe in Linux
In Linux, we use pipes to enable inter-process communication. In Shell, the pipe is represented using the vertical line (|) . It reads the output of the previous process and sends it as the input to the next process.
Let’s understand this with a simple example:
In this example, we are using the pipe to read the output of the echo command and send it as the input to the wc command for further processing.
Here, we have used the vertical line (|) to create a pipe. However, this creates an unnamed pipe and its scope is limited to the current command only. In the next example, we will see how to create a named pipe.
2. Create a Named Pipe in Linux
We can use the mknod command to create a named pipe. The named pipe resides on the file system just like any other regular file. However, its main purpose is to allow inter-process communication between unrelated processes.
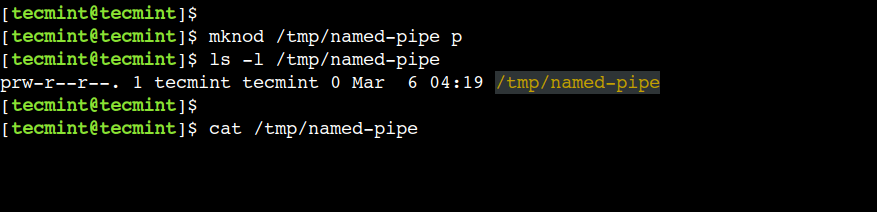
First, let’s specify the device type as p to create a named pipe:
$ mknod /tmp/named-pipe p $ ls -l /tmp/named-pipe
Now, let’s try to read the file:
Here, we can see that the cat command is waiting infinitely:
Next, let’s open another terminal and write some data to the /tmp/named-pipe file:
$ echo "tecmint.com" > /tmp/named-pipe
Finally, head over to the first terminal to view the result:
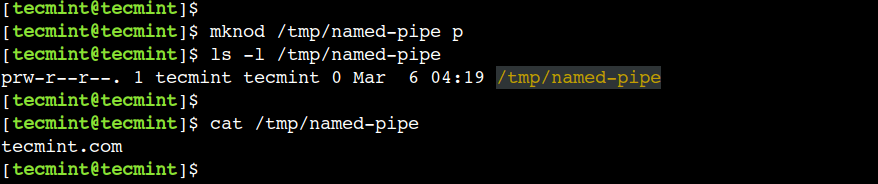
Here, we can see that the echo and cat commands are able to communicate using the named pipe.
3. Create a Character Device File in Linux
In a similar way, we can use the device type as c to create a character device. However, we must have to use the major and minor numbers while creating a character device.
Let’s use the ls command to find the major and minor numbers of the /dev/full device:

In the above output, the comma-separated pair of numbers i.e. 1, 7 represent the major and minor numbers respectively.
In Linux, the /dev/full device always returns the No space left on the device error. To understand this, let’s write some data to this device:

Now, let’s use the mknod command to create a new device that behaves the same as /dev/full device:
$ sudo mknod /tmp/full-device c 1 7
Next, let’s change the file permissions:
$ sudo chmod 666 /tmp/full-device $ ls -l /tmp/full-device
Finally, write some data to the newly created device:
$ echo "tecmint" > /tmp/full-device
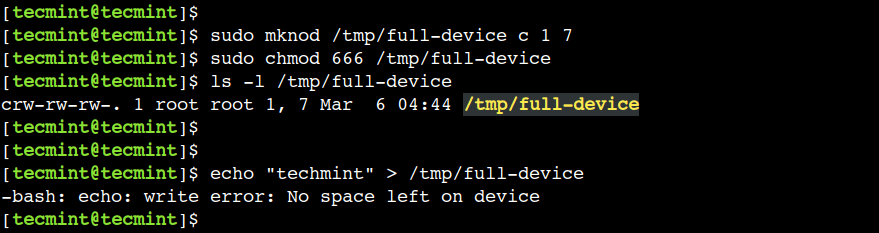
It is important to note that, the newly created character device behaves like the /dev/full device because of the same major and minor numbers.
4. Create a Block Device File in Linux
In addition to this, we can specify the device type as b to create a block device. To create a block device we must have to use the major and minor numbers.
In Linux, /dev/sr0 represents the CD/DVD ROM device. Now, let’s create a new block device that behaves the same as /dev/sr0.
First, let’s find out the major and minor numbers of the /dev/sr0:

In the above output, we can see that its major and minor numbers are 11 and 0 respectively.
Now, let’s create a new block device with the same major and minor numbers:
$ sudo mknod /tmp/dvd-rom b 11 0 $ ls -l /tmp/dvd-rom

Next, let’s mount the ISO image from the CD/DVD ROM to the /mnt directory and verify that the mount operation succeeds:
$ sudo mount /tmp/dvd-rom /mnt/ $ ls -1 /mnt/
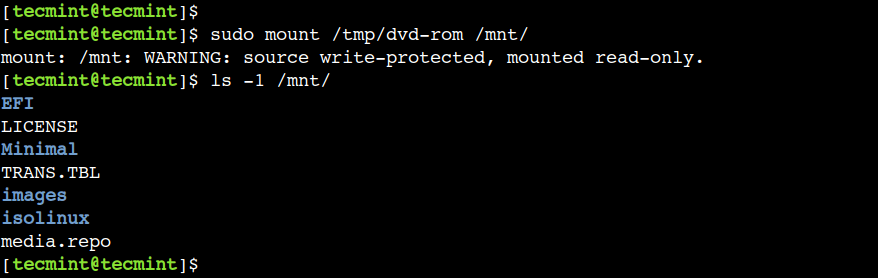
In this example, we can see that the /tmp/dvd-rom block device is able to access the ISO image from the CD/DVD ROM.
5. Create a Device File With Permissions
Sometimes, we need to modify the access permission of the device file before using it. In such cases, we have to use the chmod command. However, we can achieve the same result using the mknod command instead of using two separate commands.
To understand this, let’s use the -m option to set access permissions while creating a named pipe:
$ sudo mknod -m 444 /tmp/pipe-with-permissions p
Now, let’s verify that the permissions have been set properly:
$ ls -l /tmp/pipe-with-permissions

In this example, we used the -m option with the named pipe. However, we can use it with the character and block devices as well.
Do you know of any other best example of the mknod command in Linux? Let us know your views in the comments below.
How do I create a raw (no filesystem) loopback device that passes as a legitimate blockdevice?
How do I create and mount a fake block device (using a large file/disk image) that passes as a legitimate unformatted disk?
Backstory
- Loopback devices have to be formatted with some sort of filesystem in order to be mounted, which will not work with Ceph since Ceph requires an unformatted blockdevice
- Loopback devices do not seem to count as block devices. Ceph docs use lsblk -f to test if a device is eligible for Ceph. The device has to show up in the output AND not have any filesystem formatted on them.
2 Answers 2
Loopback devices have to be formatted with some sort of filesystem in order to be mounted
Every block device must be formatted if you want to mount it. You are in fact mounting the filesystem and not the block device itself so this doesn’t really make sense. You just need a file and then use losetup -f disk.img to create a loop device, that’s all. Loop devices are block devices and are visible in lsblk output so Ceph should be able to use it.
$ dd if=/dev/zero of=disk.img bs=1M count=100 $ sudo losetup -f disk.img $ lsblk -f NAME FSTYPE FSVER LABEL UUID FSAVAIL FSUSE% MOUNTPOINT loop0 . If a loop device cannot be used, you can use targetcli to create a more convincing file backed block device which looks like a normal SCSI drive.
# targetcli /backstores/fileio/ create test disk.img # targetcli /loopback create Created target naa.50014050efbb30e0. # targetcli /loopback/naa.50014050efbb30e0/luns create /backstores/fileio/test Which creates a new (fake) disk backed by the same file I created for the loop device above:
# lsblk NAME MAJ:MIN RM SIZE RO TYPE MOUNTPOINT loop0 7:0 0 100M 0 loop . sdb 8:16 0 100M 0 disk .