- Fixing File ownership and permissions in Linux
- Content
- Understanding File Owner and Users in Linux Operating System
- Listing associated rights of a file
- Changing File and Directory Ownership from Command Line
- Changing File and Directory Permissions from command Line
- Changing File and Directory Permissions Using Graphical User Interface (GUI)
- Changing File and directory permissions using SFTP and FTP Client (Filzilla and Online Tools)
Fixing File ownership and permissions in Linux
A crucial part of Linux Security is file ownership and Permissions. Several server faults may results from file ownership error. Few possible scenarios from permission error is described below.
- You’ve opened a website and found “403 forbidden”, which results when web server doesn’t have permission to access the desired webpage content.
- Failure to upload a file while php is running as an user without write permission
- WordPress error – Unable to install themes or plugins etc.
- Unauthorized access to configuration files may results to serious server damage including unwanted server reboot, hacking of user account and anything else.
Disclaimer: This tutorial will explain changing file permissions in Linux from scratch to full depth with various methods as summarized below. It contains more than 2000 words, you are free to jump at any part as per your required method highlighted using bold colored headings.
Content
- Understanding File Owner and Users in Linux Operating System
- Listing associated rights of a files
- Changing File and Directory Ownership from Command Line
- Changing File and Directory Permissions using
- Linux command Line
- Graphical User Interface (GUI)
- SFTP and FTP Client Filzilla
- Online Tools
Understanding File Owner and Users in Linux Operating System
- Owner (u): Owner of a file in Linux is a local user who have created the file (unless the owner is changed, as discuss below). By default owner has full rights to perform all operations on a owned file. Being most powerful user root has owner right to all file in a Linux System even if root is not direct owner of the file or directory concerned.
- Group User (g): Group users are a group of users selected by the file owner and are assigned with certain rights on the file. A group of user for a file must be a common group name. A single user may take part in several groups assigned to him by other user with higher permission. By default owner of a newly created file is the only group user for it and a newly added Group user have only read right unless assigned otherwise by the owner.
- Others (o): Other user for a file is designed as a local user who is neither owner nor group user with respect to that file.
- Any (a): Any imply to all users in the system. This category of user is used to provide a certain file right to all users in a system.
Summary: In a Linux System, a file have four category of user namely Owner, Group User, Others and Any designed as w, g, o and a respectively.
Understanding Different types of Permissions in Linux Operating System: A file or directory may have three different type of basic permission assigned for a category of user.
Listing associated rights of a file
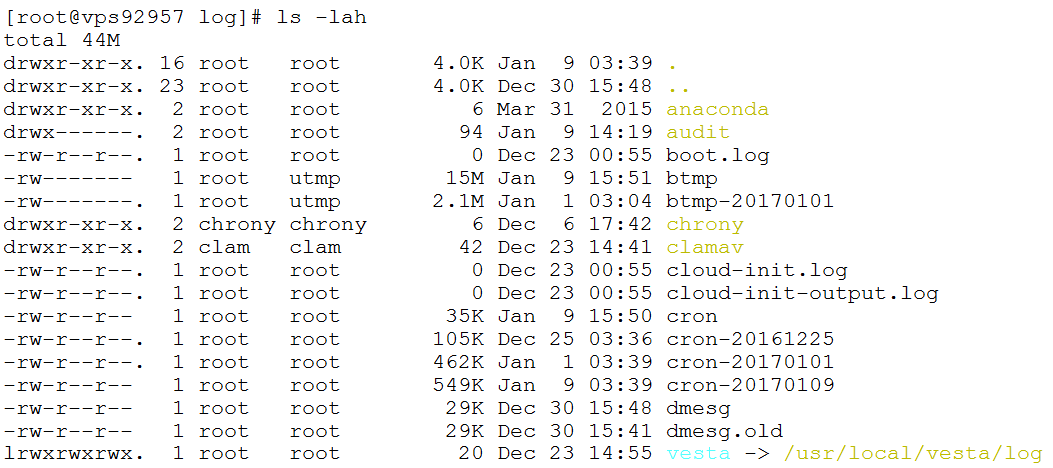
Let us run ls -lah as root from command line in a folder say “/tmp” with a mixture of different file and analyse it. [Other methods will be shown while changing file permission and ownership using GUI and File Manager]
It’s worth to explain the ls command first.
- ls display name of all files in current directory if run without any suffix.
- -l indicates to list all files with their details in the current directory
- -a indicates to list all files with all details in current directory including hidden files
- -h indicates to list file sizes in human readable format (i.e. KB, MB, GB) rather than blocks.
You’ll get something like following if you have a heterogeneous mixture of file and directory in “/tmp”

Now let’s pick a small chunk from this and analyse column wise

- d/l/- : d indicate a directory, l indicate a link, – indicate a file. So here row 1 is a Directory and row 2 is a Link.
- Owner’s Right: Column 2 indicate Owner’s right. “rwx” indicate owner has right of reading, writing and executing the file. Off course both Owner and root can change this right for himself but this indicates the current state. In above example both the file in row 1 & 2 has all 3 right for it’s owner. Now compare other file or directory in the previous detailed result. Remember ‘r’, ‘w’ and ‘x’ always comes at first 2nd and 3rd positions.
- Group User’s Right: Indicate the rights for group users. “rwx” have same meaning as previous. Notice file in row 1 is not writable by Group users, although this has no special effect for this file as both owner and group user is root.
- Other’s right: Indicate rights for other user same way as 2 and 3 before.
- A Dot (‘.’): A dot in this place indicate the file or directory is under ACL (access control lists) of SELinux ( A Linux Kernel Feature to control users, processes and files). Read this two external link for a little more (Link 1, Link 2)
- Number of file:
- In case of Directory Number of file and directory the directory contains
- For file the number may be 1 or 2. 2 indicates the file has a link pointed to somewhere else.
- For Link possible value is 1 or 2. 1 indicates a link only and the link has no file in the current directory, whereas 2 indicates a file in current directory and that is linked to another file
Changing File and Directory Ownership from Command Line
Users with ‘sudo’ access i.e. super user privilege and root by default can only change ownership of a file. Otherwise Linux Kernel doesn’t allow even Owner’s to give away a file to someone else. (Stackexchange.com Link). Use the following command as root or with sudo to change ownership of a file
chown newusername:newgroupname filename
chown abhik:apache /var/log/httpd/httpd.log
running “chown abhik:apache /var/log/httpd/httpd.log” as root will make user “abhik” as owner and user group “apache” as group owner of the file “/var/log/httpd.log”. If you are in “/var/log/httpd” then you can omit full path and type “httpd.log” instead “/var/log/httpd/httpd.log”.
Q. How to change ownership of all file and directory in a directory?
A: You’ve to run the above command recursively by adding a -R after ‘chown’ as follows. Don’t forget to write it in capital letter only.
chown -R abhik:apache /var/log/httpd This will make user ‘abhik’ as Owner and user group ‘apache’ as group owner of the folder “/var/log/httpd” and all file and directory in this.
Q. How to change ownership of all files only inside a directory?
A. Run the following. This will change ownership of all files only in the directory “/var/log/httpd/”
chown abhik:apache /var/log/httpd/*.* Changing File and Directory Permissions from command Line
This can be achieved using ‘chmod’ command with explicit declaration and using binary value. I’ve found binary one is more handy.
- Changing file Permissions using explicit declaration form command line: Consider the following example first
chmod ugo+rwx /var/log/httpd/httpd.log This will grant Reading, Writing and executing right on the file for all user, group and others. Let’s explain this. “ugo” indicates Owner, Group Users and Others. ‘+’ (plus) sign indicates we are adding rights indicted by ‘rwx’ i.e. reading, writing and executing. A ‘-‘ (minus) sign indicates removal of rights written next to it. Now this method is tedious and following are noteworthy.
- You can’t add permission for some user and remove some other users in single command. Addition of rights and removal of rights must be carried separately.
- If you add “+rwx” for all user as in the example issuing a second command like the following will not remove any right for other users
chmod ug+rwx /var/log/httpd/httpd.log Other users will continue to retain all it’s rights as it already have. To remove other user’s rights command like following has to be issued explicitly.
chmod o-rwx /var/log/httpd/httpd.log - Note “ugo” indicates User, Group Users and Other which is same as all user i.e. ‘a’ and the first command in (ii) may also be written as follows
chmod a+rwx /var/log/httpd/httpd.log - You’re free to change the order of ‘u’, ‘g’, ‘o’ in ‘ugo’ i.e ‘ugo’, ‘guo’, ‘oug’ etc all have same result. You can change order between ‘rwx’ also but users block must precede permissions block, that order can’t be altered.
- To add a specific order to a specific category of user say writing permission to group users issue commands like this
chmod g+w /var/log/httpd/httpd.log Again remember this will add writing right to group users only, if group users already don’t have this right, and will not alter any other right.
Changing File and Directory Permissions Using Graphical User Interface (GUI)
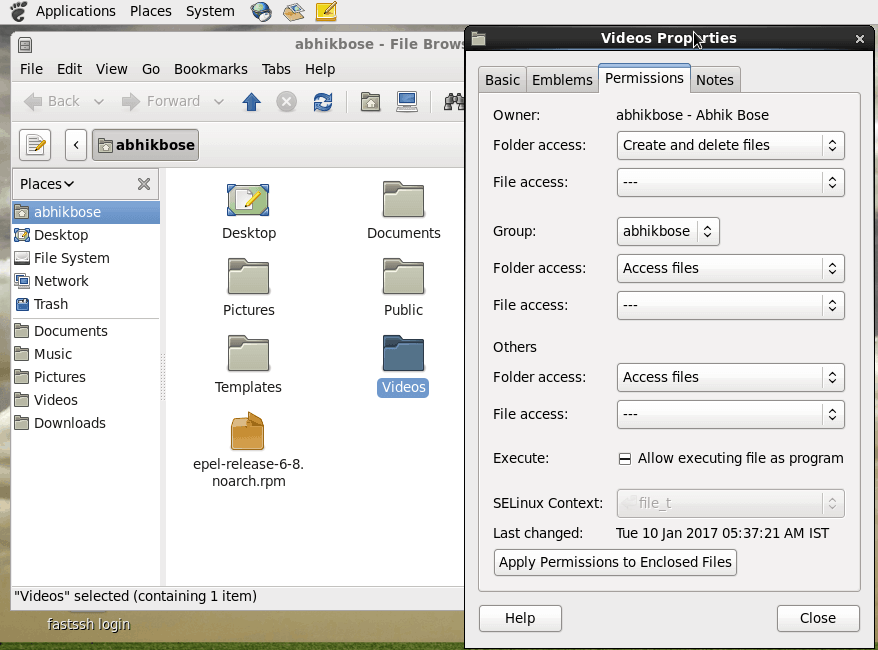
I’m demonstrating this using GNU Genome in a CentOS 6.8 system. Again you can’t change ownership without root. Remember logging into GUI with root is not safe.

- Open your file browser –> Right click on a file or folder –> Select ‘Properties’ from the last. Now go to ‘Permissions’.
Now you can see options to change permissions for Owner, Group users and Others. For my case the directory has no file, so file options is inactive for all. To apply the same permission to all files and sub-directories click “Apply Permissions to Enclosed Files”. Close the window. Now settings are applied. Again you can’t change permissions of a file or directory which you don’t own
Changing File and directory permissions using SFTP and FTP Client (Filzilla and Online Tools)
I’ll demonstrate this using two ways. 1) Filezilla over SFTP form Windows 8.1 to a CentOS 7.2 Virtual Box 2)Online net2ftp.com over FTP to change permissions of file and folders.
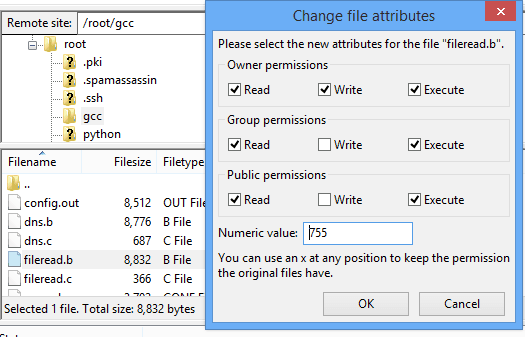
- Filezilla over SFTP or FTP: Connect Using Filezilla to Remote server as usual over either SFTP or FTP. Right click on any file of the remote server and select “File Permissions” (last option). Following window will open
 Options are self explanatory. You may either tick options under ‘Owner Permissions’, ‘Group Permissions’ and ‘Public Permissions’ or enter Numeric values as discussed above. In case of Directory you’ll get options to apply change recursively i.e. to apply change to all sub-folders and file. Select appropriate, Click OK and allow enough time for recursive permission changing depending on number of files in your selected directory. Filezilla connect to remote server and apply changes to files and folders one by one and so takes a quite longer time. This is same for any other FTP and SFTP Client.
 - Online FTP Tools: In this last part of the tutorial I’ll show to achieve the above discussed using online FTP. [In several academic institute like IIT Bombay, IIT Delhi etc destination port 21 is blocked, so if you have only FTP access to remove server and want to change certain file permissions from those institutes this is the only possible way.]. This is the least preferred method, because you need to share your FTP UserID and password with 3rd party website and most of them even don’t encrypt the connection over sftp.
- Open “http://net2ftp.com” or “http://www.surftp.com” (I’m using net2ftp.com here). Login using your host name or Host IP, FTP Username and FTP Password.

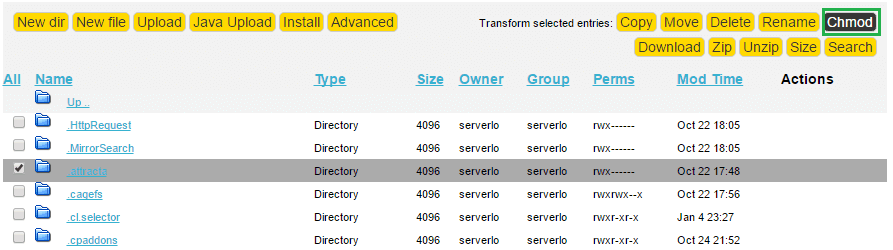
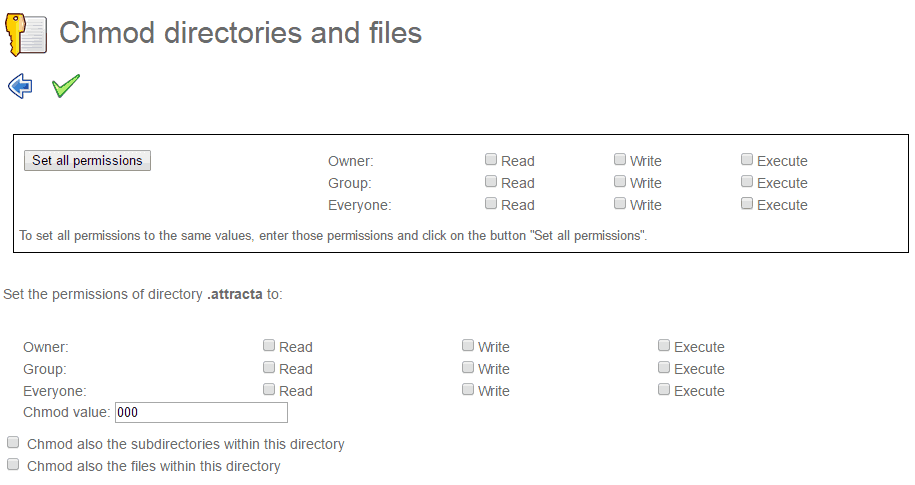
- Click “chmod” and select options from next Screen as follows
 Now here is two panel for selecting file ownership. Those are basically same. In upper panel you can chose values and then press ‘Set all permissions’ button to bring them in down panel or directly select them from button panel. When the values are in button panel corresponding ‘Three Digit Numeric Value’ will be displayed in ‘chmod value’. It’s also possible to enter value directly. You may also chose to tick ‘Chmod also the sub-directories within this directory’ and ‘Chmod also the files within this directory’ option as per your requirement. Click on Green Right sign to apply changes. Note: Don’t apply this method for directory containing large number of files and sub-directories in either ‘Chmod also the sub-directories within this directory’ or ‘Chmod also the files within this directory’ mode. This will take long time and the action will be timed out and you’ll not know which files are done and which not. Better manually open folders and apply this for small number of files maximum 50.
- Open “http://net2ftp.com” or “http://www.surftp.com” (I’m using net2ftp.com here). Login using your host name or Host IP, FTP Username and FTP Password.
This completes the discussion Regarding Changing file ownership in Linux in full depth. Please feel free to post command and ask question to ‘admin’@’serverlog.net’ over email. Thank you for reading us.