- How to edit read-only file in /etc? [duplicate]
- 6 Answers 6
- How to Overwrite a Read-Only File in Linux
- How to Overwrite a Read-Only File in Linux?
- Using the chmod Command
- Conclusion
- About the author
- Prateek Jangid
- Исправление Read-Only File System в Linux
- Ошибки файловой системы и опция remount-ro
- Read-only файловая система в виртуальных машинах
- How to modify a read-only file system in linux?
- 1 Answer 1
How to edit read-only file in /etc? [duplicate]
I’m a brand new user so I’m not sure of my way around the system yet. I want to change my computer’s name, so I tried to edit the name in /etc/hostname , but it is a read-only file. Adding the ! character didn’t help. I’m using vim to edit the file.
How is tagMatcher’s answer any better than askubuntu.com/a/92382/158442? There is literally nothing new. You can accept it if you want, but merging it is not needed.
Set the default output in the config file sudo nano /etc/ansible/ansible.cfg and paste the following line [defaults] # Human-readable output stdout_callback = yaml shellhacks.com/ansible-human-readable-output-format
6 Answers 6
Changing system settings requires superuser permissions. From a terminal, do
where could be vim or nano or any other editor command, and is the one you need to edit.
You could also use gksudo gedit .
In either case you will be prompted for password of a user with superuser permissions — in a normal Ubuntu installation this would be the first user created during installation.
If you are editing a file without sudo , and you need sudo in order to save, simply use this vim command:
Credit to Dr Beco. Note that vim will notice the file change and ask you if you want to (L)oad the changes, press L .
thanks! this works even when the file’s permissions are 400 or 440, with no one having write permission!
This doesn’t work for me, running as sudo or even logged in as root. I get a message «Read-only file system» when I try this, and «Shel returned 1», with no change and no ability to save the file. ——EDIT: indeed, this can’t be done when you’re in a read-only filesystem (my example was an app installed with snap; I was trying to modify the .desktop file). However, there are alternative locations for the .desktop files, e.g: /var/lib/snap/desktop/applications
How to Overwrite a Read-Only File in Linux
![]()
A read-only file implies that the user doesn’t have permission to edit or write. Specifically, the “w” permission would have been disabled for the file. When the file’s property has been set as read-only, the user would neither have permission to write(w) the file nor execute(x) the file and be represented as read-only(r).
Sometimes, it becomes tough for the user to overwrite a read-only file. That’s why we gathered and explained the different methods of overwriting a read-only file in Linux.
How to Overwrite a Read-Only File in Linux?
There are two conditions for overwriting any file – when you are the file owner and when you do not have any ownership access to the file’s properties. Let’s look at the following methods to resolve the issue:
Using the chmod Command
The chmod command is used to modify the properties of a file in Linux, and it has a simple command:
You can alter this permission if you are the file owner by adding the following command:
Let’s take an example where we want to change and overwrite a read-only file located in the Documents directory. Either we can use the directory path in the command or change the current directory of the file:
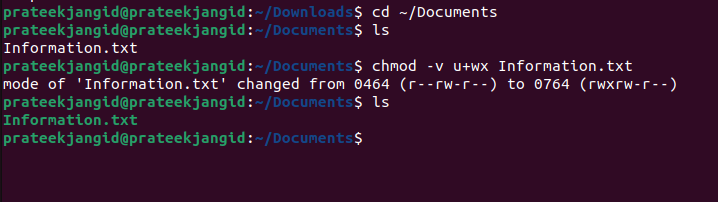
Note: As you can see in the previous image, we used the -v option or the verbose option to show the resultant changes in the output.
While using this command, it is essential to recollect if you are the only current file user. This command only works if you are a part of the directory in the /etc/sudoers. This step indicates the configuration of the sudo properties of the file using the visudo command.

This command requires a password to gain superuser access to the file. If you want to get the root privileges, please add the “sudo” with the above command:

To give yourself all the permissions related to the file, you can use edit sudoers through the following command:

The following image illustrates that you have the admin privileges as a sudoer, root, and admin access:
admin ALL = ( ALL : ALL ) ALL
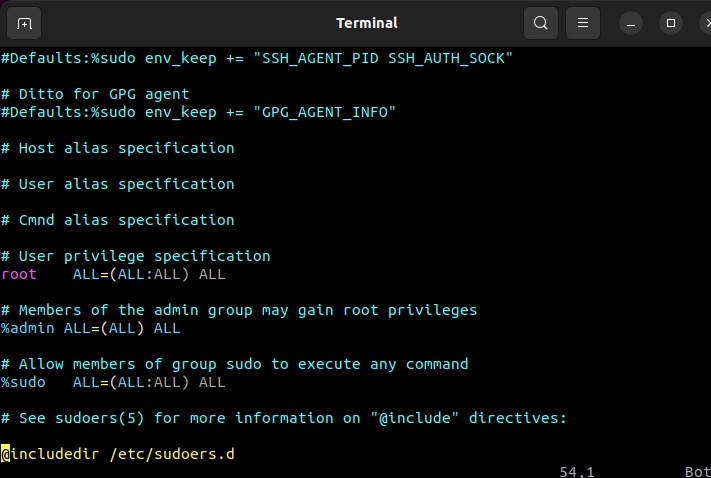
If you do not have “ALL” access, please change it accordingly. Now, you have complete access to all the properties related to the file. And you can either read, write or execute the file without encountering any issues.
Conclusion
You can edit and overwrite a read-only file in Linux using multiple commands and sudo privileges. Even if you don’t have the sudo privileges, you can easily access the superuser benefits using sudo by accessing the root directories. We hope this article improved your knowledge of the comprehensiveness of overwriting a read-only file in Linux.
About the author
Prateek Jangid
A passionate Linux user for personal and professional reasons, always exploring what is new in the world of Linux and sharing with my readers.
Исправление Read-Only File System в Linux

21.10.2022

itpro

CentOS, Linux, Ubuntu

Один комментарий
В некоторый случаях файловая система в Linux может перейти в состояние read-only, при котором вы можете только читать данные с диска, а при попытке записи любых изменение или создании нового файла появдляется ошибка Read-only file system.
Ошибки файловой системы и опция remount-ro
Проверьте параметры монтирования дисков при загрузке Linux. Настройки монтирования файловых систем при загрузке задаются в файле /etc/fstab.
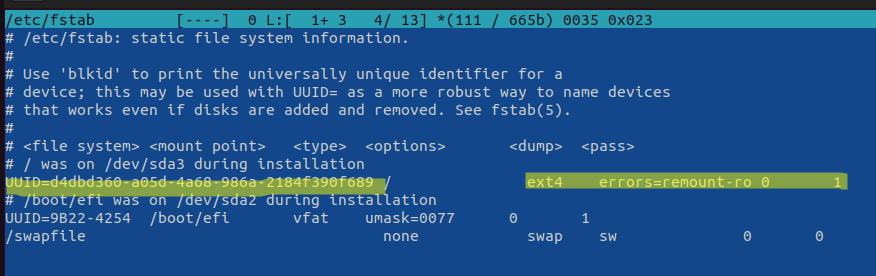
Обратите что в fstab есть строка монтирования корневой директории вида:
UUID=aaaaaaaaa-aaaa-aaaa-aaaa-aaaaaaaaa / ext4 errors=remount-ro 0 1
Параметр errors=remount-ro означает, что данная директория будет смонтирована в режиме чтения, если на файловой системе устройства обнаружены проблемы. В этом случае нужно выполнить проверку диска с помощью FSCK.
Обычные файловые системы такие как EXT4/BTRFS/XFS можно монтировать как в режиме записи, так и только для чтения (в отличии от файловых систем ISO или SquashFS, которые доступны только для чтения).
В случае обнаружения ошибок на диске вы можете использовать одну из трех опций errors=[continue|remount-ro|panic]
- continue – игнорировать ошибки,
- remount-ro – перемонтировать диск в режиме только для чтения
- panic – остановить загрузку системы
Вы можете вывести соответствие между UUID диска и именем устройства:
В данном примере вы получили, что вашему UUID соответствует устройство /dev/sda3.

Также можно имена устройства и точки монтирования с помощью команды:
Т.к. в данном примере ошибки обнаружены в корневой директории которая является точкой монтирования, вы сможете выполнить ее проверку только загрузившись с LiveCD. Для исправления ошибок файловой системы используется команда:
$ sudo fsck –y UUID=aaaaaaaaa-aaaa-aaaa-aaaa-aaaaaaaaa
Если вы не можете прямо сейчас выполнить проверку диска, и вы хотите немедленно вывести файловую систему из режима read-only, нужно выполниться команду:
Read-only файловая система в виртуальных машинах
Файловая система раздела Linux на виртуальной машине можете перейти в read-only в случае недоступность системы хранения данных (СХД). Самый простой способ восстановить работу ОС – выполнить сброс виртуальной машины (фактически перезапуск с параметрами по умолчанию).
Может оказаться, что ВМ с Linux вообще не загружается и вам доступна только командная строка initramfs с предупреждениями:
UNEXPECTED INCONSISTENCY: RUN fsck MANUALLY. Fsck exitrd with code 4. The root file system of /dev/sdx requires a manual fsck.
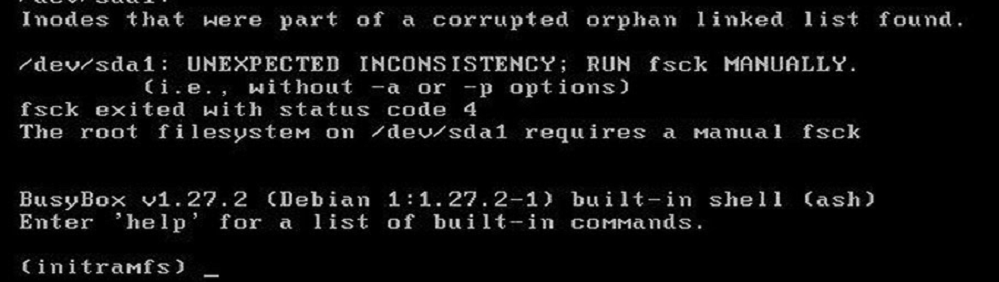
Initramfs это начальная файловая система в оперативной памяти, которая основана на tmpfs, которая содержит утилиты и скрипты, необходимые для работы с дисками, файловыми системами и тд. После запуска initramfs отобразится проблемная ситуация.
Если же ошибок нет – просто вводим exit. Иначе выполняем проверку диска:
Здесь указан том (в данной случае /dev/sda1), для которого требуется выполнить ручную проверку. С помощью следующей команды можно проверить все подключенные файловые системы:
После этого перезагрузите ВМ.
![]() Предыдущая статья Следующая статья
Предыдущая статья Следующая статья ![]()
How to modify a read-only file system in linux?
I also have Windows 10 installed in my system (dual boot) and I want to make some changes in the source code, but I keep getting this error:
chmod: changing permissions of 'filename': Read-only file system - chmod 777 file
- mount -o remount,rw ‘/myfile/directory’ : which returns no error
- chown -R root:root /mydir
- disabling fast boot on Windows (that breaks my OS, I don’t know why)
- I tried this
And none of them work. It looks like the product locks its own source files (that’s my best guess).
So how can I solve this?
Here is some actual terminal output:
root@qwxp# chmod g+rw current chmod: changing permissions of ‘current’: Read-only file system
root@qwxp# mount -o remount,rw /snap/pycharm-professional/current /` The mount command has no output, only if I don’t give it a mount point it will return:
mount: /snap/pycharm-professional/271: cannot remount /dev/loop6 read-write, is write-protected.
root@qwxp# chmod g+rw current chmod: changing permissions of ‘current’: Read-only file system
root@qwxp# ls -al total 8 drwxrwxrwx 3 root root 4096 Mar 5 05:46 . drwxr-xr-x 13 root root 4096 Mar 5 06:24 .. drwxr-xr-x 11 root root 239 Jan 27 18:52 271 lrwxrwxrwx 1 root root 3 Mar 5 05:11 **current -> 271** -rw-r--r-- 1 root root 0 Mar 5 05:46 hi.txt can you add the actual output of the command mount? The line related to the filesystem you’re having problems with. Before and after the remount. Ideally you should add that to the body of the question.
@HosseinKurd install your app from a different source, anywhere but the damn snap. then you can modify it.thats the solution.
1 Answer 1
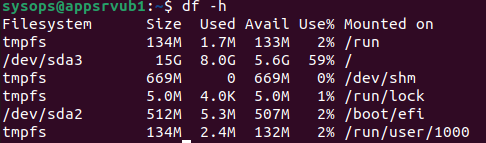
If you run df -hT /snap/pycharm-professional/current you will probably find that this is a filesystem of type squashfs .
Squashfs filesystems are read only by design and do not have a built in method to modify any part of the filesystem.
This appears to be a snap installed application. It is unclear from your question why you would want to modify part of an application. There is probably an easier way to do what you are attempting, but you haven’t given enough details to determine that.