- How to Mount and Unmount Filesystem in Linux
- 1. Understanding Mounting and Unmounting
- 2. Identifying Storage Devices
- 3. Creating a Mount Point
- 4. Mounting a Filesystem
- 5. Unmounting a Filesystem
- 6. Automounting Filesystems
- Conclusion
- Related Posts
- How to Install GPart on Ubuntu & Debian
- Understanding the Linux File System: A Comprehensive Guide
- dd Command in Linux (Syntax, Options and Use Cases)
- 4 Comments
- How to Mount and Unmount Filesystems in Linux
- Listing Mounted Filesystems in Linux
- Mounting Filesystems in Linux
- Mounting USB Drive/Stick in Linux
- Mounting ISO Files in Linux
- Mount File System Automatically in Linux
- Unmounting a Filesystem in Linux
How to Mount and Unmount Filesystem in Linux
Managing storage devices and filesystems is a fundamental skill for Linux users and administrators. As you work with Linux, you’ll frequently need to mount and unmount filesystems to access and manage data stored on various storage devices. This article will provide a comprehensive guide on mounting and unmounting filesystems in Linux, helping you master storage management and enhance your Linux experience.
1. Understanding Mounting and Unmounting
In Linux, before you can access the files and directories stored on a device, you must first “mount” the filesystem. Mounting a filesystem involves attaching it to a specific directory in the existing filesystem hierarchy. This designated directory, known as the mount point, serves as an access point to the mounted filesystem.
Unmounting, on the other hand, is the process of detaching a filesystem from its mount point, making it inaccessible to the user.
2. Identifying Storage Devices
Before you can mount a filesystem, you need to identify the storage device you want to access. You can use the “lsblk” command to list all available block devices and their associated partitions:
Another useful command is “fdisk”, which displays detailed information about your storage devices and their partitions:
3. Creating a Mount Point
To create a mount point, you need to choose or create a directory that will serve as the access point for the mounted filesystem. You can create a new directory using the “mkdir” command:
4. Mounting a Filesystem
To mount a filesystem, use the “mount” command followed by the device name and the mount point:
sudo mount /dev/sdb1 /mnt/my-storage The filesystem on the specified device will now be accessible through the mount point directory.
5. Unmounting a Filesystem
To unmount a filesystem, use the “umount” command followed by the mount point:
The filesystem will now be detached from the mount point and become inaccessible.
6. Automounting Filesystems
If you want a filesystem to be mounted automatically at system startup, you can configure the “/etc/fstab” file. The “fstab” file contains a list of filesystems and their corresponding mount points, options, and other parameters.
To edit the “fstab” file, open it with a text editor such as “nano” or “vim”:
Add a new line with the following format:
Save the file and exit the text editor. The specified filesystem will now be mounted automatically at startup.
Conclusion
Mounting and unmounting filesystems in Linux is a fundamental skill that is essential for effective storage management. By understanding the process and its related commands, you can easily access, manage, and configure storage devices and their filesystems. This comprehensive guide has provided you with the tools and knowledge necessary to master storage management in Linux, enabling you to manage your data efficiently and enhance your overall Linux experience.
Related Posts
How to Install GPart on Ubuntu & Debian
Understanding the Linux File System: A Comprehensive Guide
dd Command in Linux (Syntax, Options and Use Cases)
4 Comments
I have a dedicated server provided to me by 1and1. I started migrating websites to the server only to realise that I am running out of disk space. I had to clear my backups in order to continue migrating my sites. I thought this to be weird as the server comes with 4T of disk space. On accessing the system via ssh. I see the following setup by 1and1: #vgdisplay — Volume group —
VG Name vg00
System ID
Format lvm2
Metadata Areas 1
Metadata Sequence No 8
VG Access read/write
VG Status resizable
MAX LV 0
Cur LV 3
Open LV 3
Max PV 0
Cur PV 1
Act PV 1
VG Size PE Size 4.00 MiB
Total PE 13823
Alloc PE / Size 11520 / 45.00 GiB
Free PE / Size 2303 / VG UUID CmLv2a-xKAn-cFQQ-K4TU-f5y2-UK8K-Uv1PO9 — Volume group —
VG Name hdd
System ID
Format lvm2
Metadata Areas 1
Metadata Sequence No 2
VG Access read/write
VG Status resizable
MAX LV 0
Cur LV 1
Open LV 1
Max PV 0
Cur PV 1
Act PV 1
VG Size PE Size 4.00 MiB
Total PE 938308
Alloc PE / Size 1024 / 4.00 GiB
Free PE / Size 937284 / VG UUID Pv2xfH-zkE1-hgH0-dOzZ-FgKp-IobS-5C2zea Also #pvscan reveals this:
PV /dev/sda3 VG vg00 lvm2 [ PV /dev/sdb1 VG hdd lvm2 [ — Physical volume —
PV Name /dev/sda3
VG Name vg00
PV Size Allocatable yes
PE Size 4.00 MiB
Total PE 13823
Free PE 767
Allocated PE 13056
PV UUID 6J06IE-52et-s8aV-bXk0-alud-0N1v-NEwHHr — Physical volume —
PV Name /dev/sdb1
VG Name hdd
PV Size Allocatable yes
PE Size 4.00 MiB
Total PE 938308
Free PE 937284
Allocated PE 1024
PV UUID bGlBQQ-gnmF-gOav-VTfj-np5R-sAKs-YNxemq I would like to reduce the physical volume in /dev/sdb1 by 2 or 3TB and increase /dev/sda3 by the same amount. Can this be done? If so what process would I need to follow? If not I noticed mentioned in the replies «Migrating the websites to hdd» What process would I have to follow and what are the implications of doing this? Logical Volumes: — Logical volume —
LV Path /dev/vg00/usr
LV Name usr
VG Name vg00
LV UUID sRvgQ3-W80K-AJQD-lZid-fqF3-1KTY-JH2Ul0
LV Write Access read/write
LV Creation host, time ,
LV Status available
# open 1
LV Size 15.00 GiB
Current LE 3840
Segments 2
Allocation inherit
Read ahead sectors auto
– currently set to 8192
Block device 253:0 — Logical volume —
LV Path /dev/vg00/var
LV Name var
VG Name vg00
LV UUID xWSCRG-vBPH-JLha-yJ8X-3zMP-WgRG-AOoJqO
LV Write Access read/write
LV Creation host, time ,
LV Status available
# open 1
LV Size 31.00 GiB
Current LE 7936
Segments 3
Allocation inherit
Read ahead sectors auto
– currently set to 8192
Block device 253:1 — Logical volume —
LV Path /dev/vg00/home
LV Name home
VG Name vg00
LV UUID 2foQrE-Wy3C-Ig1Z-zIDy-tTFQ-YyO5-ayHBZl
LV Write Access read/write
LV Creation host, time ,
LV Status available
# open 1
LV Size 5.00 GiB
Current LE 1280
Segments 1
Allocation inherit
Read ahead sectors auto
– currently set to 8192
Block device 253:2 — Logical volume —
LV Path /dev/hdd/data
LV Name data
VG Name hdd
LV UUID GwJgTL-LC8r-jn0a-yQ5H-mTX3-dARL-Xz0eOU
LV Write Access read/write
LV Creation host, time ,
LV Status available
# open 1
LV Size 4.00 GiB
Current LE 1024
Segments 1
Allocation inherit
Read ahead sectors auto
– currently set to 8192
Block device 253:3 I increased the LV on /dev/vg00/var by 100% (This is where the websites are stored). but this will quickly be used up once I continue to migrate more sites over! This may also help. This is from running the mount command I have removed additional lines: /dev/sda1 on / type ext3 (rw,noatime,data=ordered)
/dev/mapper/vg00-usr on /usr type ext4 (rw,noatime,data=ordered)
/dev/mapper/hdd-data on /data type ext4 (rw,noatime,quota,usrquota,data=ordered)
/dev/mapper/vg00-home on /home type ext4 (rw,noatime,quota,usrquota,data=ordered)
/dev/mapper/vg00-var on /var type ext4 (rw,noatime,quota,usrquota,data=ordered) Thank you for your responses much appreciated!
which one of the following system that you cannot mount with the mount command .
a) iso9660 b)swap c)FAT d)root e)VFAT
How to Mount and Unmount Filesystems in Linux
The Linux operating system is basically a file system and without these files’ formats and structures, the definition of this operating system environment would be incomplete.
In other words, files are the central units of the Linux operating system architecture. The Linux filesystem stores OS-associated files and directories. Filesystems are also evident in USB and hard disk drives and a properly configured network can also permit the sharing of these filesystems among different machines.
This article seeks to expose us to the mount and umount commands primarily used in attaching and detaching file systems from various mount points.
Listing Mounted Filesystems in Linux
Linux makes it possible for a filesystem to be mounted on any directory location. A successfully mounted filesystem makes it possible for its associated/stored files and directories to be accessible from that mount directory. The directories are also referred to as the filesystem mount points.
By default, your Linux operating system already has some filesystems mounted. To get a preview of these mounted filesystems, execute the Linux mount command without any flags or arguments.
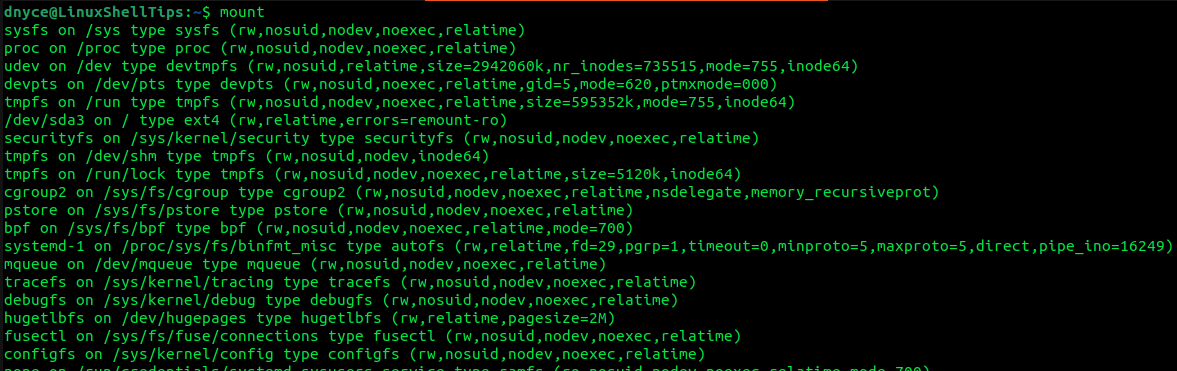
Consider the following last entry from the execution of the above mount command.
/dev/sdb5 on /media/dnyce/117137A85FFD287C type fuseblk (rw,nosuid,nodev,relatime,user_id=0)
- /dev/sdb5 is the mounted filesystem/device name.
- /media/dnyce/117137A85FFD287C is the mount point.
- fuseblk is the filesystem type.
- (rw,nosuid,nodev,relatime,user_id=0) is the mount options.
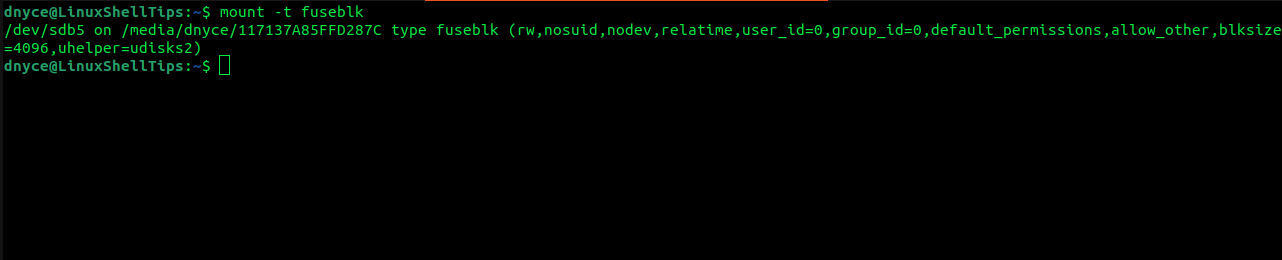
To review the mounting information associated with a specific filesystem type like fuseblk, vfat, ext4, fuseblk, etc., we can implement a mount command (with a -t flag) similar to the following:
Mounting Filesystems in Linux
To successfully mount a filesystem, we have to adhere to the following two rules:
- Make sure a mount point exists or create one using the Linux mkdir command.
- Reference the following command syntax to successfully mount the filesystem.
$ sudo mount -t Type Device MountPoint
A Linux operating system can automatically detect the type of filesystem associated with a device hence the use of the -t option is not explicitly needed.
However, in cases where a partition is not formatted or is corrupted and/or mandatory filesystem tools like the ntfs-3g package (needed for read and write access for NTFS partitions) are not installed, the inclusion of the -t option is necessary to successfully mount that filesystem.
For security reasons, Linux only allows sudoer/root users to perform mounting operations. Other users will be able to have directory access after the mounting point directories are set with the needed permissions (by root/sudoer users).
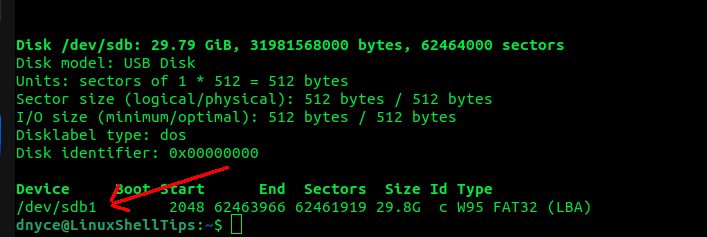
Mounting USB Drive/Stick in Linux
First, identify the USB block device with the Linux fdisk command.
Create a mount point if you do not have one yet.
$ sudo mount /dev/sdb1 /mnt/usb32G
The USB drive should now be accessible from the /mnt/usb32G directory.

Mounting ISO Files in Linux
A pseudo-device known as a loop device is effective in mounting an ISO image since it is not restricted to a physical device. This loop device makes the ISO image files accessible.
Create a mount point directory:
$ sudo mkdir /mnt/CorePlusIso
Mount the ISO image and make sure to check the absolute path to the ISO file.
$ sudo mount $HOME/Downloads/CorePlus-current.iso /mnt/CorePlusIso -o loop
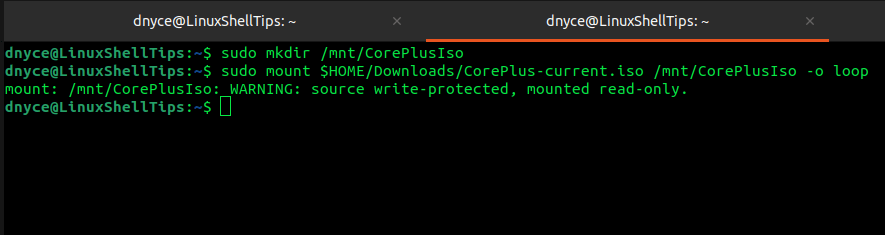
You will notice that ISO images have read-only permission access. To make modifications, you will need to duplicate the ISO files from the mount directory to another directory location before making your needed changes.
$ ls -l /mnt/CorePlusIso $ sudo mount | grep CorePlusIso

Useful Mount -o Options
The -loop is for mounting loop devices.
$ sudo mount -t Type Device MountPoint -o loop
The -rw enables read-write on the mounted filesystem.
$ sudo mount -t Type Device MountPoint -o rw
The -ro enables read-only on the mounted filesystem.
$ sudo mount -t Type Device MountPoint -o ro
The -noauto disables automatic mounting of the filesystem during system reboot.
$ sudo mount -t Type Device MountPoint -o noauto
Mount File System Automatically in Linux
Use the /etc/fstab file when you want your filesystem to automatically mount after a successful system reboot.
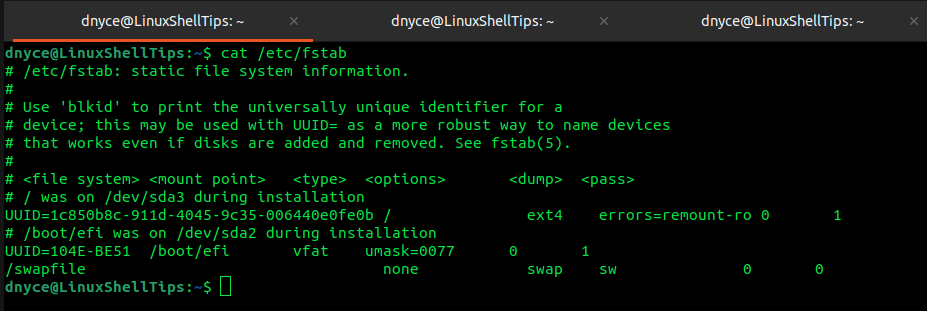
For instance, to make the CorePlus-current.iso file mount automatically after mounting it in the /mnt/CorePlusIso directory, first run the command:
$ sudo mount | grep CorePlusIso
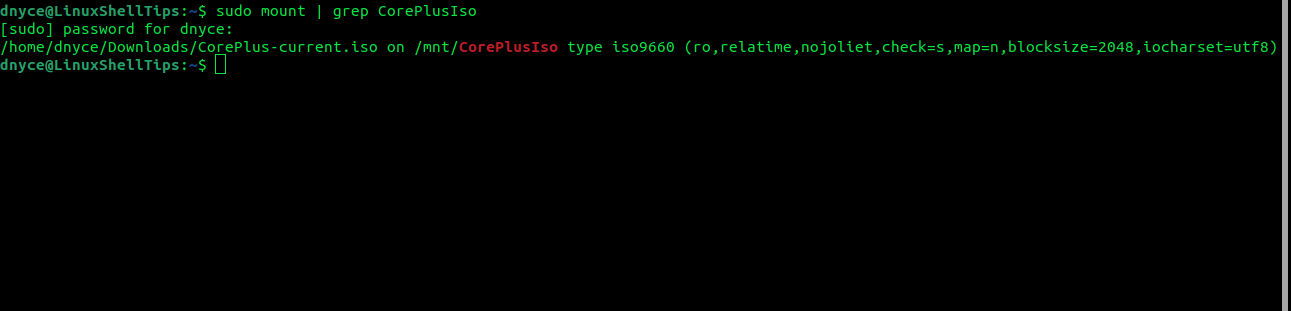
The above command execution produces an output like:
/home/dnyce/Downloads/CorePlus-current.iso on /mnt/CorePlusIso type iso9660 (ro,relatime,nojoliet,check=s,map=n,blocksize=2048,iocharset=utf8)
Edit the above output to be something like:
/home/dnyce/Downloads/CorePlus-current.iso /mnt/CorePlusIso iso9660 ro,relatime,utf8
The above line can then be added as an entry in the /etc/fstab file.
Once the Linux system reboots, mounting the above file will be as easy as pointing to its file system directory.
$ sudo mount /home/dnyce/Downloads
Unmounting a Filesystem in Linux
If it is a USB device labeled /dev/sdb1, we can unmount it with the command:
For an iso image, unmount it from its mount point directory:
$ sudo umount /mnt/CorePlusIso
To unmount multiple filesystems adhere to the command:
$ sudo umount /dev/sdb1 /mnt/CorePlusIso
When wanting to unmount a filesystem and still unsure whether it is operational, use the -l flag which will make sure the pending read and write operation completes before successfully unmounting the filesystem.
If you want to force a filesystem to unmount, implement the command:
We have successfully covered how to mount various filesystems in Linux both temporarily and permanently. We have also demonstrated to effectively unmount the same filesystems. Hope this article guide was useful. Feel free to leave a comment or feedback.