An introduction to the Linux /etc/fstab file

Operating systems have come a long way in recent years. They have a smaller footprint, are more efficient with resource management, and have become much faster than early computing systems. For all of the improvements made, there are still «old school» pieces of the puzzle that we simply can’t live without. Filesystems, and by necessity, filesystem tables, are one of these constants. These can be a bit tricky for a lot of users, so we will look at /etc/fstab ( fstab ) a little closer.
Your Linux system’s filesystem table, aka fstab , is a configuration table designed to ease the burden of mounting and unmounting file systems to a machine. It is a set of rules used to control how different filesystems are treated each time they are introduced to a system. Consider USB drives, for example. Today, we are so used to the plug and play nature of our favorite external drives that we may completely forget that operations are going on behind the scenes to mount the drive and read/write data.
In the time of the ancients, users had to manually mount these drives to a file location using the mount command. The fstab file became an attractive option because of challenges like this. It is designed to configure a rule where specific file systems are detected, then automatically mounted in the user’s desired order every time the system boots. Not only is it less work over time, but it also allows the user to avoid load order errors that could eat up valuable time and energy.
The table itself is a 6 column structure, where each column designates a specific parameter and must be set up in the correct order. The columns of the table are as follows from left to right:
- Device: usually the given name or UUID of the mounted device (sda1/sda2/etc).
- Mount Point: designates the directory where the device is/will be mounted.
- File System Type: nothing trick here, shows the type of filesystem in use.
- Options: lists any active mount options. If using multiple options they must be separated by commas.
- Backup Operation: (the first digit) this is a binary system where 1 = dump utility backup of a partition. 0 = no backup. This is an outdated backup method and should NOT be used.
- File System Check Order: (second digit) Here we can see three possible outcomes. 0 means that fsck will not check the filesystem. Numbers higher than this represent the check order. The root filesystem should be set to 1 and other partitions set to 2 .
Obviously your table will be different depending on your environment, however, I want to look at an example using a virtual machine so that we can see what information is provided and break down what we are seeing. You will see my fstab below:
[tcarrigan@rhel ~]$ vi /etc/fstab # # /etc/fstab # Created by anaconda on Mon Jan 27 10:04:34 2020 # # Accessible filesystems, by reference, are maintained under '/dev/disk/'. # See man pages fstab(5), findfs(8), mount(8) and/or blkid(8) for more info. # # After editing this file, run 'systemctl daemon-reload' to update systemd # units generated from this file. # /dev/mapper/rhel-root / xfs defaults 0 0 UUID=64351209-b3d4-421d-8900-7d940ca56fea /boot xfs defaults 0 0 /dev/mapper/rhel-swap swap swap defaults 0 0 ~ ~ ~ "/etc/fstab" [readonly] 14L, 579C 1,0-1 AllThis table consists of six columns defining certain parameters around a given filesystem. The first thing that pops out at you is the comments in the header. For now, ignore the Created by section and move to the Accessible filesystems portion. These directories and man pages are worth noting and can provide valuable information should you need it. Next, skip down to the After editing section and note the systemctl daemon-reload command used to update the systemd components after making changes to this file.
Now that we have looked at the comments, let’s break down the actual configuration that is present and look at the various bits of info that a user needs to note.
The first (and only, in this case) filesystem that you see is the root filesystem for this VM /dev/mapper/rhel-root . You also see that it is an xfs filesystem. You may see any number of options here, such as ext3, ext4, fat file systems, etc. Directly below the root filesystem, you find the Universally Unique Identifier (UUID). The UUID remains persistently assigned to the filesystem. UUIDs are a great way to label filesystems, especially in smaller environments. However, they can lead to issues in larger environments where network-based drives are in use. I digress the UUID of my filesystem here is: UUID=64351209-b3d4-421d-8900-7d940ca56fea
You also see that there is a swap partition present at this location, as well as the mount point for the root filesystem / . Moving to the right, you see a pair of zero’s. The first zero is a binary option (0=false and 1=true) for «dumping.» This is an outdated backup method and should be set to zero or unused. The next number to the right tells the system to run a filesystem check or fsck. Here, an option of 0 = skip. The root filesystem should be set to 1 and any others you want to be checked assigned after that.
NOTE: These options must be listed in order if the configuration is to work correctly.
Career advice
There are other options for more advanced users that I do not have configured here (therefore, there are no examples shown). However, there are some great resources on the web to explain these options. The ones that I would check out are as follows:
- auto/noauto: controls whether the partition is mounted automatically on boot (or not).
- exec/noexec: controls whether or not the partition can execute binaries. In the name of security, this is usually set to noexec.
- ro/rw: controls read and write privileges — ro = read-only, where rw= read-write.
- nouser/user: controls whether or not the user has mounting privileges. This defaults to noexec for all user accounts.
Hopefully, you now have a better grasp of the purpose of /etc/fstab and can make sense of what is shown on your system. Many casual users do not use this file. However, if you find yourself curious or in need of making changes, you are now better equipped to do so!
How to Write or Edit /etc/fstab
![]()
In Linux, there are multiple system configuration files that regulate system behavior. The fstab file is such a configuration file that stores all the information about various partitions and storage devices on the computer. At the time of boot, the fstab file describes how each partition and device will mount.
Let’s dive deep into the “/etc/fstab” file.
The fstab file
As described earlier, it’s a configuration file holding information about partitions, devices, and mount configurations. It’s located at the following location.

It’s a plain text file, so we can use any text editor of our choice to work with it. However, it requires root permission to write changes to it.
Basics
First, have a look at the fstab file in your system. Note that each system will have different entries because of the partition and hardware differences. However, all fstab files will share the same fundamental structure.
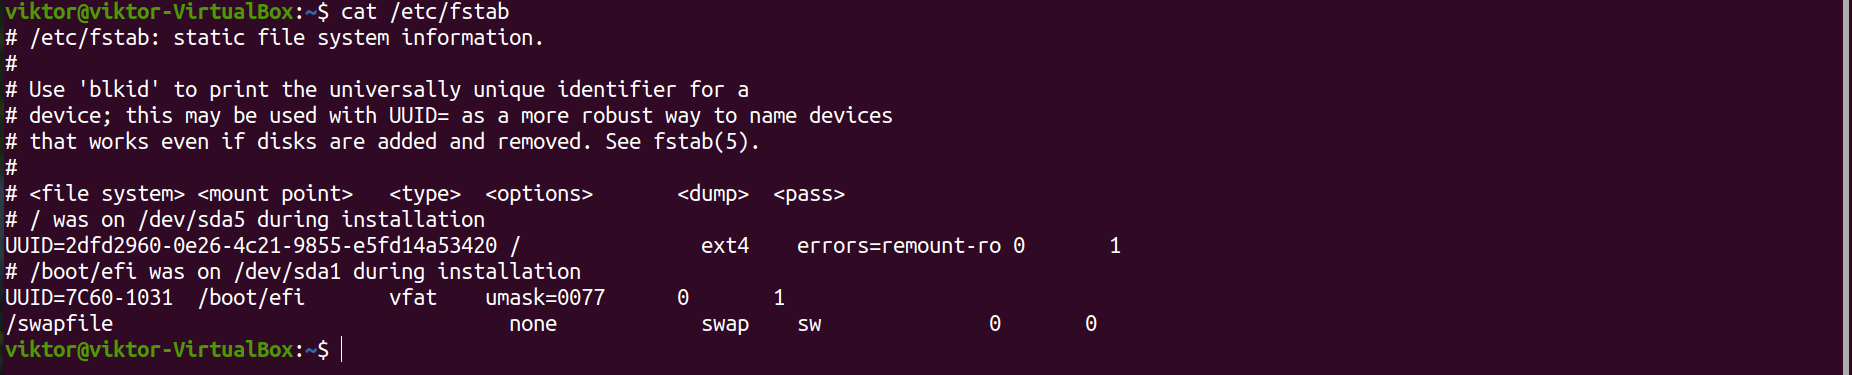
Each line of the file is dedicated to a unique device/partition. It’s divided into six columns. Here’s a brief description of each of the columns.
- Column 1: Device name.
- Column 2: Default mount point.
- Column 3: Filesystem type.
- Column 4: Mount options.
- Column 5: Dump options.
- Column 6: Filesystem check options.
Device name
It’s the label of the particular device/partition. Each device and partition gets its unique device name. The device name is essential for mounting devices, partitions, and filesystems.
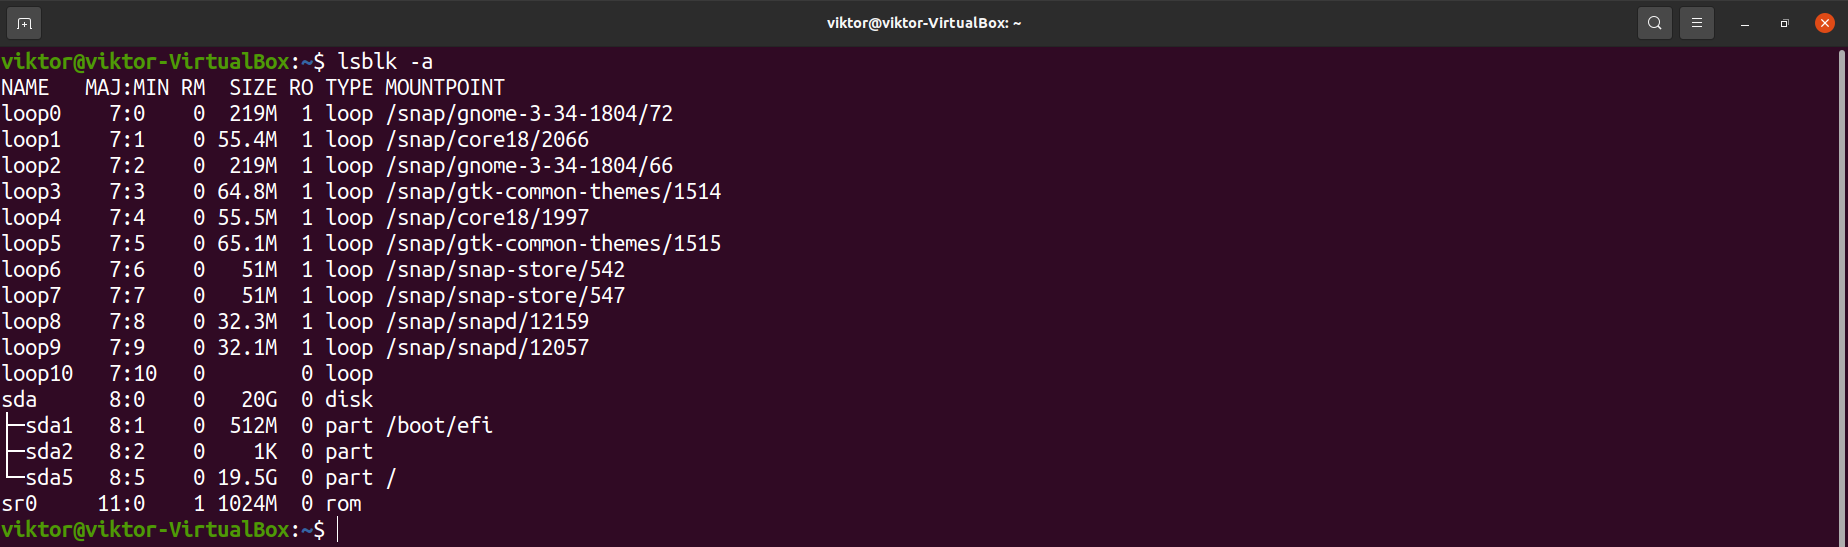
We can use the lsblk command to get a report on all the block devices. It practically reports all the gadgets and partitions with their device names.
Default mount point
In Linux, a device, partition, or filesystem must be mounted on a location before the system can use it. Mounting makes the filesystem accessible through the computer’s filesystem. The mount point is the directory access to the device, partition, or filesystem.
We can get a list of all the mounted partitions on the system.

In the context of the fstab file, the mount point described for the specific device name will be used as the default mount point. When the computer boots, the system will mount all the devices to the mount points described in this file.
Filesystem type
A filesystem can be described as an index of the database with all the physical location of data on the storage. There are numerous filesystems used widely. Linux supports several filesystems by default. Here’s a shortlist of the popular filesystems.
Another option is “auto,” which lets the system auto-detect the filesystem type of the device or partition. Use this option if you’re not confident about the specific filesystem.
Mount options
The mount options determine the mounting behavior of the device/partition. It’s considered the most confusing part of the fstab file.
Here’s a shortlist of some of the common mount options you’ll come across when working with the fstab file.
- auto and noauto: This option determines if the system will mount the filesystem during boot. By default, the value is “auto,” meaning it’ll be mounted during boot. However, in specific scenarios, the “noauto” option may be applicable.
- user and nouser: It describes which user can mount the filesystem. If the value is “user,” then normal users can mount the filesystem. If the value is “nouser,” then only the root can mount it. By default, the value is “user.” For specific and critical filesystems, “nouser” can be helpful.
- exec and noexec: It describes whether binaries can be executed from the filesystem. The value “exec” allows binary execution, whereas “noexec” does not. The default value is “exec” for all partitions.
- sync and async: It determines how the input and output to the device/partition will be performed. If the value is “sync,” then input and output are done synchronously. If the value is “async,” then it’s done asynchronously. It affects how data is read and written.
- ro: It describes that the partition is to be treated as read-only. Data on the filesystem can’t be changed.
- rw: It describes that the partition is available for reading and writing data.
Dump
It describes whether the filesystem is to be backed up. If the value is 0, then the dump will ignore the filesystem. In most cases, it’s assigned 0. For backup, it’s more convenient to use various third-party tools.
Fsck options
The fsck tool checks the filesystem. The value assigned in this column determines in which order fsck will check the listed filesystems.
Editing fstab file
Before editing the fstab file, it’s always recommended to have a backup.
Before making any changes to the fstab file, it’s recommended to make a backup first. It contains critical configuration details, so wrong entries may cause unwanted results.

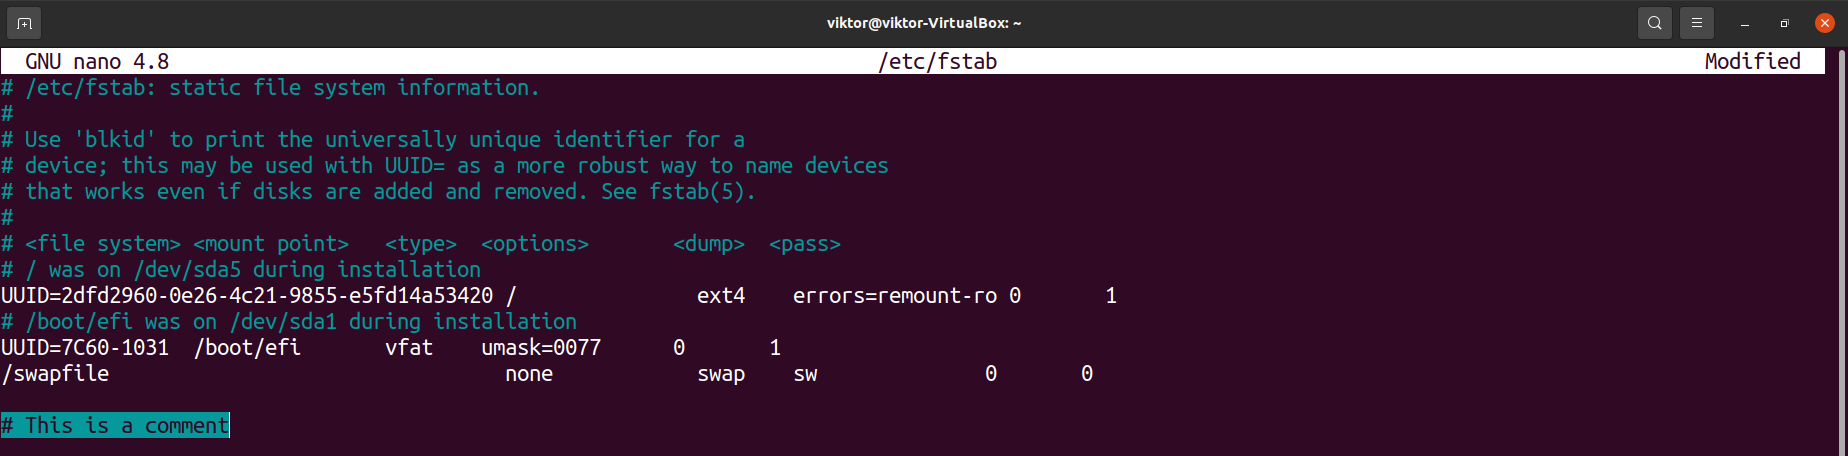
To edit the fstab file, launch your text editor of choice with sudo.

To write a comment, use “#” at the start.
Note that some entries may use the device UUID instead of a device name. To get the UUID of a device, use blkid.

After all the changes are made, save the file and close the editor. These changes won’t be effective unless the system restarts.
Final thoughts
The fstab file is a simple yet powerful solution to many situations. It can also automate mounting remote filesystems. It just requires understanding the code structure and supported options to take the full benefit of it.
For more in-depth info, check the man page.