- Команда file в Linux
- Синтаксис и опции file
- Примеры использования file
- Выводы
- How to Find Out File Types in Linux
- Linux file Command Examples
- How to see the file type?
- The unknown file
- The file command
- How does file work?
- Stage 1: File system tests
- Stage 2: Magic discovery
- Stage 3: Text files
- File Command and Parameters
- Continue reading
- 2 comments
- Leave a Reply Cancel reply
- About Linux Audit
- Linux and UNIX security automation
- Recent Posts
- Contact
Команда file в Linux
Команда file — одна из самых полезных, поскольку позволяет узнать тип данных, которые на самом деле содержатся внутри документа. Если у вас есть какой-либо файл, взятый из ненадёжного источника, не поленитесь проверить его с помощью этой команды, прежде чем нажать кнопку Открыть. Возможно, такая предосторожность покажется лишней, но она оградит вас от «встречи» с нежелательным контентом.
В большинстве дистрибутивов Linux утилита file (работу которой и запускает одноимённая команда) входит в стандартный набор программного обеспечения.
Синтаксис и опции file
Синтаксис команды file достаточно простой. Записывать её в эмуляторе терминала или консоли следует так:
file опции название_документа
Что же касается опций, то их у этой команды несколько десятков. Мы рассмотрим лишь основные:
- -b, —brief — запрет на демонстрацию имен и адресов файлов в выводе команды;
- -i, —mime — определение MIME-типа документа по его заголовку;
- —mime-type, —mime-encoding — определение конкретного элемента MIME;
- -f, —files-from — анализ документов, адреса которых указаны в простом текстовом файле;
- -l, —list — список паттернов и их длина;
- -s, —special-files — предотвращение проблем, которые могут возникнуть при чтении утилитой специальных файлов;
- -P — анализ определенной части файла, которая обозначается различными параметрами;
- -r, —raw — отказ от вывода /ooo вместо непечатных символов;
- -z — анализ содержимого сжатых документов.
Для того, чтобы ознакомиться с полным списком опций, выполните в терминале команду:
Примеры использования file
Если вам нужно всего лишь посмотреть тип файла, использовать опции не обязательно. Достаточно прописать имя команды, а также название файла и путь к нему, при условии, что он находится не в корневой папке:
Случается, что нужно проверить не один, а несколько файлов. Чтобы не выполнять команду много раз подряд, перечисляйте названия всех файлов через пробел:
file /home/main-user/losst/test-file1.zip /home/main-user/losst/test-file2.tiff

Как видно на примере, картинки с расширениями gif и tiff в действительности оказались текстовыми документами, а архив с расширением zip — PDF документом. Кстати, команда file даёт возможность не только проверить, является ли архив архивом, но и заглянуть внутрь, чтобы узнать, что в нём содержится. Для этой цели используется опция -z:
file -z /home/main-user/losst/testarchive.zip

Как вы успели заметить, команда, возвращая ответ, постоянно выводит названия файлов, что в некоторых случаях бывает удобно, но зачастую только усложняет чтение результатов. Отключить эту функцию легко — воспользуйтесь опцией -b:
file -b /home/main-user/losst/test-file.gif /home/main-user/losst/test-file1.zip /home/main-user/losst/test-file2.tiff

Иногда нужно узнать не просто тип файла, а его MIME-тип. В таком случае на помощь приходит опция -i:
file -i -b /home/main-user/losst/fileA.sbin /home/main-user/losst/fileG.aspx /home/main-user/losst/fileH.lua

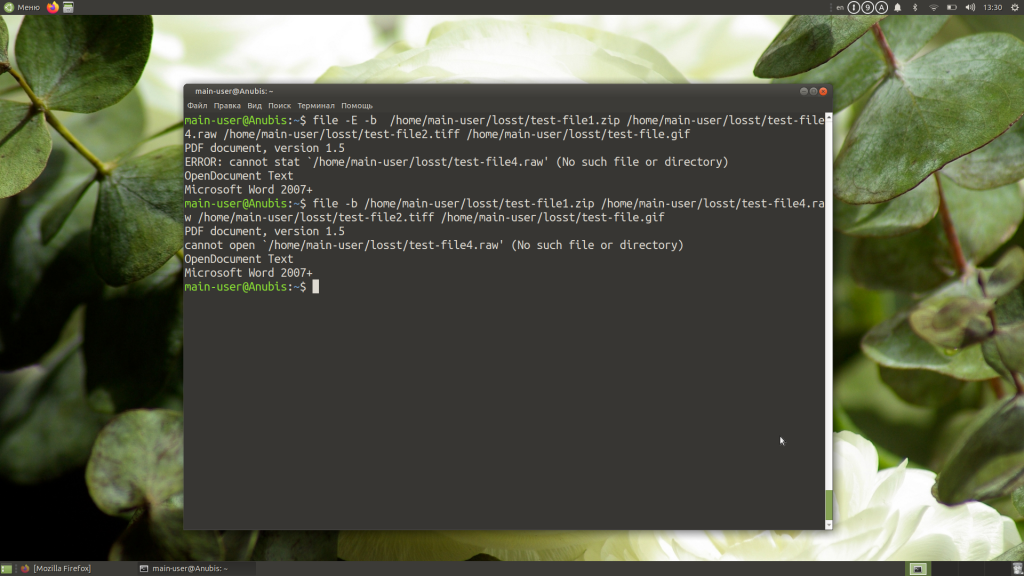
Нередко по каким-либо причинам утилита не может найти указанный файл: например, вы ошиблись буквой в его названии или неверно указали папку, в которой он находится. Тогда вывод информации об этом файле предваряет фраза cannot open. Впрочем, есть возможность видоизменить результат, добавив в него сообщение об ошибке. Для этого используйте опцию -E.
Сравните вывод команды с опцией -E и без неё:
file -E -b /home/main-user/losst/test-file1.zip /home/main-user/losst/test-file4.raw /home/main-user/losst/test-file.gif
file -b /home/main-user/losst/test-file1.zip /home/main-user/losst/test-file4.raw /home/main-user/losst/test-file.gif
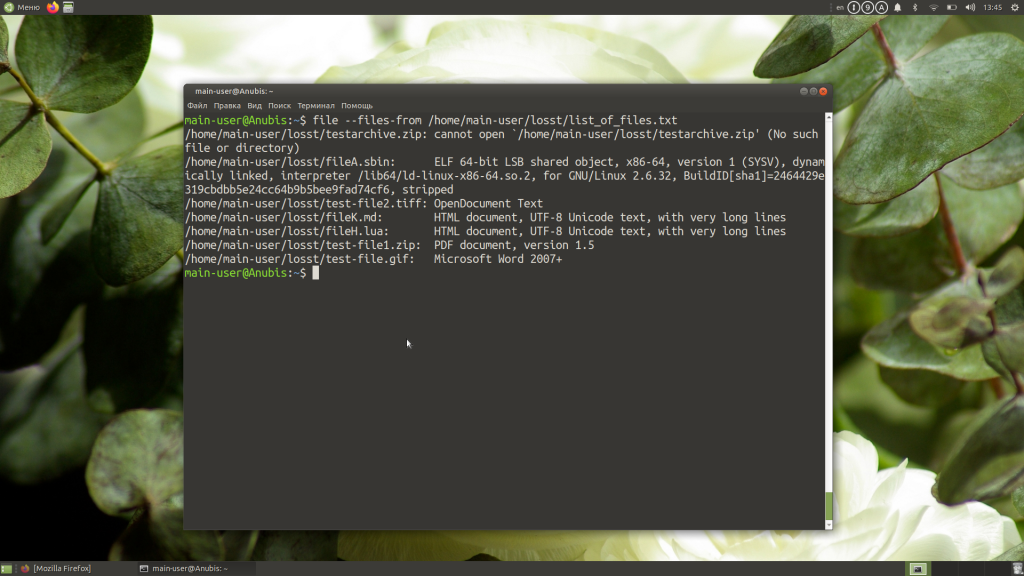
Еще один способ работы с утилитой file — запись названий и адресов документов в простой текстовый файл. Применяя этот способ на практике, не забывайте добавлять к команде опцию —files-from, после которой указывайте имя файла, содержащего список документов, и путь к нему.
file —files-from /home/main-user/losst/list_of_files.txt
Выводы
Команда file помогает избежать ситуаций, когда вам приходится открывать подозрительные файлы, не будучи уверенными в их содержимом. Также вы можете использовать её для проверки содержимого нескольких архивов, если есть необходимость найти потерявшийся в большом массиве файлов документ, но нет желания просматривать все архивы вручную.
Обнаружили ошибку в тексте? Сообщите мне об этом. Выделите текст с ошибкой и нажмите Ctrl+Enter.
How to Find Out File Types in Linux
The easiest way to determine the type of a file on any operating system is usually to look at its extension (for instance .xml, .sh, .c, .tar etc..). What if a file doesn’t have an extension, how can you determine its type?
Linux has a useful utility called file which carry out some tests on a specified file and prints the file type once a test is successful. In this short article, we will explain useful file command examples to determine a file type in Linux.
Note: To have all the options described in this article, you should be running file version 5.25 (available in Ubuntu repositories) or newer. CentOS repositories have an older version of file command (file-5.11) which lacks some options.
You can run following command to verify the version of file utility as shown.
$ file -v file-5.33 magic file from /etc/magic:/usr/share/misc/magic
Linux file Command Examples
1. The simplest file command is as follows where you just provide a file whose type you want to find out.

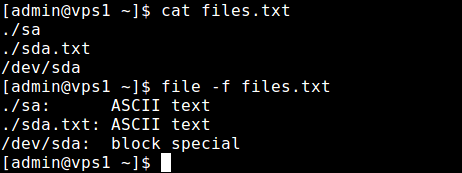
2. You can also pass the names of the files to be examined from a file (one per line), which you can specify using the -f flag as shown.
3. To make file work faster you can exclude a test (valid tests include apptype, ascii, encoding, tokens, cdf, compress, elf, soft and tar) from the list of tests made to determine the file type, use the -e flag as shown.
$ file -e ascii -e compress -e elf etc
4. The -s option causes file to also read block or character special files, for example.
$ file -s /dev/sda /dev/sda: DOS/MBR boot sector, extended partition table (last)
5. Adding the -z options instructs file to look inside compressed files.

6. If you want to report information about the contents only not the compression, of a compressed file, use the -Z flag.
7. You can tell file command to output mime type strings instead of the more traditional human readable ones, using the -i option.
$ file -i -s /dev/sda /dev/sda: application/octet-stream; charset=binary
8. In addition, you can get a slash-separated list of valid extensions for the file type found by adding the –extension switch.
For more information and usage options, consult the file command man page.
That’s all! file command is a useful Linux utility to determine the type of a file without an extension. In this article, we shared some useful file command examples. If you have any questions or thoughts to share, use the feedback form below to reach us.
How to see the file type?
Did you come across a file, but don’t know what type it is? Let’s learn how to analyze it.
The unknown file
You may encounter a file on your system with known contents or goal. Usually, the first thing we do is then use cat to show the contents, or execute it. While that makes sense, it may be dangerous to do. It might be a piece of malware, disrupt your screen output or even hang the terminal. Here is a better way to do it, using the file command. Great for forensics, malware analysis, intrusion detection, and normal day-to-day system administration.
The file command
Most systems will have the file command available. It is a nifty small tool which helps you quickly determine what the purpose of a file is. Besides just telling if it is binary code or data, it will include additional details. For binaries, it may share that it is an ELF binary, for 64 bits systems, how it is linked and if it depends on external function libraries.
How does file work?
Even veteran administrators might never have looked into the details of the file command, but taken its power for granted. The tool is pretty nifty, because it uses a staged set of tests, working towards a final answer. Depending on the outcome of each test it continues, till it finds useful details to share.
Stage 1: File system tests
The file command starts with determining if a file is a “simple” file. It can be a symbolic link to another file, or a directory. Yes, directories are files as well. To help with this, file uses the stat(2) system call, which is also a standalone utility.

Regular file is shown by stat utility
From this output, we can see that the stat command does not reveal much. It is considered to be a regular file, which might hold any type of data. So time to go the next phase.
Stage 2: Magic discovery
When the file command knows the type of file we are dealing with, it can test more in-depth. This is done via a magic file, which represents many text strings, or character combinations. For example, a file starting with PK might be a compressed file.

Output of file -l displaying magic strings
With this predefined list of strings and regular expressions, most file types can be discovered.
Stage 3: Text files
The last stage is determining if the file is a text file. If it didn’t find a match by using tips from the magic dataset, it will assume it is a normal file with text in it. To be sure, it will check the character set used (ASCII, UTF-8). Also if line breaks are used and what type, like applied line feed and carriage returns, which differ between files created in MS-DOS/Windows, Mac OS and Linux systems.
Common types of output are:
- ASCII text
- ASCII text, with very long lines
- gzip compressed data, from Unix, last modified:
File Command and Parameters
The file utility is very easy to use, as it actually does not require any parameter, except the file you want to analyze. While there are parameters available, most of them cover very specific cases. An example is changing the behavior of the tool, or the output itself.
- brief (-b) – Do not show the file name
- uncompress (-z) – Uncompress the data file for further inspection
See the man page for more specific use cases.
One more thing.
Keep learning
So you are interested in Linux security? Join the Linux Security Expert training program, a practical and lab-based training ground. For those who want to become (or stay) a Linux security expert.

Security scanning with Lynis and Lynis Enterprise
Run automated security scans and increase your defenses. Lynis is an open source security tool to perform in-depth audits. It helps with system hardening, vulnerability discovery, and compliance.
Continue reading
2 comments
Q. What can be determine by the “file” command? 1. File type
2. File contents
3. File permissions
4. File supper block. I have confused that choice answer. Please answer me Reply
Leave a Reply Cancel reply
This site uses Akismet to reduce spam. Learn how your comment data is processed.
About Linux Audit
This blog is part of our mission: help individuals and companies, to scan and secure their systems. We simply love Linux security, system hardening, and questions regarding compliance.
Besides the blog, we have our security auditing tool Lynis. Open source, GPL, and free to use.
For those with enterprise needs, or want to audit multiple systems, there is an Enterprise version.
«One security solution to audit, harden, and secure your Linux/UNIX systems.»
- Perform audits within a few minutes
- Central management
- Powerful reporting
- Compliance checks (e.g. PCI DSS)
- Additional plugins and more tests
Linux and UNIX security automation
Lynis is a free and open source security scanner. It helps with testing the defenses of your Linux, macOS, and Unix systems. Typical use-cases for this software include system hardening, vulnerability scanning, and checking compliance with security standards (PCI-DSS, ISO27001, etc).
Recent Posts
Contact
This blog is part of our mission to share valuable tips about Linux security. We are reachable via @linuxaudit
Company details
CISOfy
De Klok 28,
5251 DN, Vlijmen, The Netherlands
+31-20-2260055