- How to Manage File and Folder Permissions in Linux
- Command line: File permissions
- Command line: File ownership
- GUI: File permissions
- GUI: Change ownership
- File Permissions in Linux – How to Use the chmod Command
- What are File Permissions in Linux?
- Actions you can perform on a file
- What is the chmod Command?
- How to Remove Permissions from a File in Linux
- Another Way to Handle File Permissions in Linux
- Conclusion
How to Manage File and Folder Permissions in Linux
For many users of Linux, getting used to file permissions and ownership can be a bit of a challenge. It is commonly assumed, to get into this level of usage, the command line is a must. Although there is always far more power and flexibility to be had, running seemingly complicated command isn’t alwaysa necessity. With the help of some of the most user-friendly desktop interfaces available, you can get away with little to no command line usage. Even with file permission and ownership.
That’s right, much to the surprise of many a new user, managing files and folders can be done from within the file managers. But before we get to the GUI, it’s always best to have a solid understanding of what it’s doing. So, we’ll start with the command line first.
Command line: File permissions
The commands for modifying file permissions and ownership are:
Neither command is difficult to use. It is important, however, that you understand the only user that can actually modify the permissions or ownership of a file is either the current owner or the root user. So, if you are user Bethany, you cannot make changes to files and folders owned by Jacob without the help of root (or sudo). For example:
A new folder was created on a data partition called /DATA/SHARE. Both users Bethany and Jacob need read and write access to this folder. There are a number of ways this can be done (one of which would be to join the users to a special group – we’ll go over managing groups in another post). If Bethany and Jacob are the only users on the system (and you know your network is safe – very important), you can change the permissions of the folder to give them access. One way to do this would be to issue the command:
sudo chmod -R ugo+rw /DATA/SHARE
The breakdown of the above command looks like:
- sudo – this is used to gain admin rights for the command on any system that makes use of sudo (otherwise you’d have to ‘su’ to root and run the above command without ‘sudo’)
- chmod – the command to modify permissions
- -R – this modifies the permission of the parent folder and the child objects within
- ugo+rw – this gives User, Group, and Other read and write access.
As you can probably surmise, this command opens wide the SHARE folder such that anyone on the system can have access to that folder. As I mentioned earlier, a more secure method would be to use groups. But we’re just using this for the purpose of demonstration.
The breakdown of permissions looks like this:
The ‘other’ entry is the dangerous one, as it effectively gives everyone permission for the folder/file. The permissions you can give to a file or folder are:
Using the -R switch is important. If you have a number of sub-folders and files within the SHARE directory, and you want the permissions to apply from the parent object (the containing folder) to the child objects (the sub-folders and files), you must use the -R (recursive) switch so the same permissions are applied all the way to the deepest folder, contained within the parent.
Command line: File ownership
Changing the ownership of a file or folder is equally as simple. Say Jacob moved a folder for Bethany into the SHARE directory – but Jacob still has ownership. This can be changed with a simple command:
sudo chown -R bethany /DATA/SHARE
- sudo – admin rights must be used since we are dealing with a folder that belongs to another user
- chown – the command for changing ownership
- -R – the recursive switch to make sure all child objects get the same ownership changes
- bethany – the new owner of the folder
- /DATA/SHARE – the directory to be modified
Should Bethany send the folder back to Jacob, the ownership would need to again be changed (again, this will be simplified with the use of groups).
GUI: File permissions
I’m going to demonstrate changing file permissions using the Nautilus file manager on an Ubuntu 13.10 system.
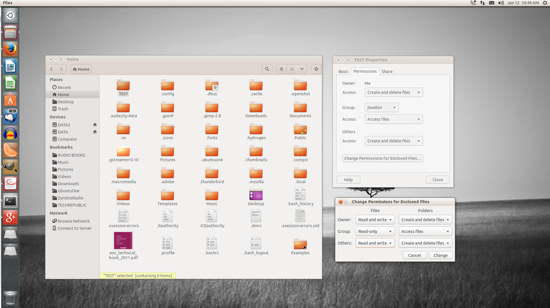
Let’s say you need to allow everyone to gain read/write permissions to the folder TEST. To do this, within the Nautilus file manager, follow these steps:
- Open Nautilus
- Navigate to the target file or folder
- Right click the file or folder
- Select Properties
- Click on the Permissions tab
- Click on the Access files in the Others section
- Select “Create and delete files”
- Click Change Permissions for Enclosed Files
- In the resulting window, Select Read and Write under Files and Create and delete files under Folders (Figure A)
- Click Change
- Click Close.
The trick comes when you need to change the permissions of a folder which does not belong to you. It can be done, but Nautilus must be started with admin access. To do this, follow these steps:
- Open up a terminal window
- Issue the command sudo -i
- Issue the command nautilus
The sudo -i command gives you persistent access to sudo, until you enter the exit command to remove that access. Once Nautilus is open, you can change the permissions of the folder or file as described above – even if you are not the owner of the folder or file.
NOTE: If you’re using a distribution that doesn’t use sudo, alter the above instructions to:
- Open up a terminal window
- Issue the command su
- Type your root password and hit Enter
- Issue the command nautilus.
After you’ve completed the task, close the Nautilus window and then the terminal window.
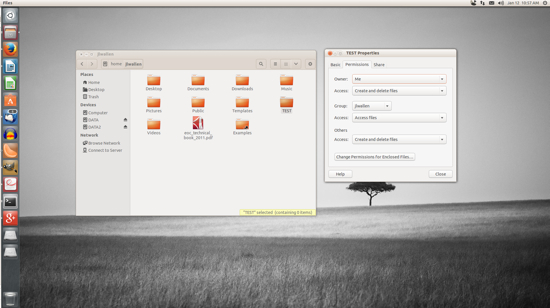
GUI: Change ownership
Changing the ownership of a file or folder will most often require the use of admin rights. So for this, you’ll need to start Nautilus in the method described above.
For changing ownership of a folder or file through Nautilus, do the following:
- In the Nautilus window (opened with admin rights), locate the folder or file in question
- Right click the folder (or file)
- Click on the Permissions tab
- Select the new owner from the Owner drop-down (below)
- Click Close.
That’s all there is to it. At this point you shouldn’t have any problems changing permissions or ownership for a file or folder with either the command line or the GUI. The use of groups will empower you to alter permission and ownership with more power and security – we’ll cover that soon. Until then, enjoy modifying your files and folders!
File Permissions in Linux – How to Use the chmod Command

Arunachalam B
Just as with other operating systems, multiple users can create user accounts and share the same machine running Linux OS.
But whenever different users share a system, problems of privacy can easily arise. The first user may not wish the next user to view, edit, or delete their files, for example.
The Linux Terminal possesses some superpowers when it comes to handling file permissions. You can grant or revoke permissions for every file and directory from your Linux Terminal.
What are File Permissions in Linux?
File permissions control which actions can be performed by which users. Read, Write, and Execute are the three actions possible for every file.
Users are classified under three broad categories: Normal users, Groups, and Others. Linux allows users to set permissions at a very granular level. You can secure your file or directory in every possible location of a file system.
There are three important commands you’ll use when managing file permissions:
Among these, chmod is one of the most important commands. We’ll discuss the chmod command in this tutorial, and I’ll get into the others in upcoming articles.
Let’s deep dive into the chmod command 🏊.
Actions you can perform on a file
Before we proceed further, I want to make sure you’re clear about how the Read, Write, and Execute actions of a file work. Read and write are pretty are self-explanatory – they determine whether a user can read or write to a file.
But, what’s an executable file?
A file is said to be executable if it has a sequence of instructions to achieve something. A good example is scripting files (Shell Scripts).
What is the chmod Command?
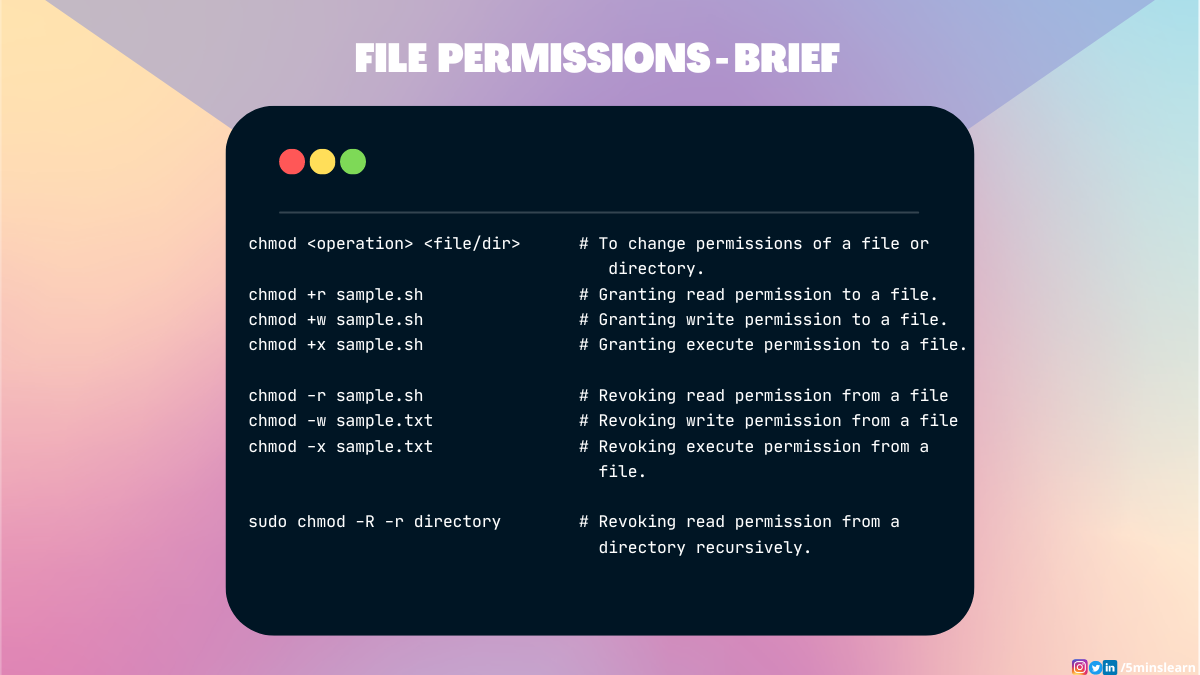
chmod is a command that lets you change the permissions of a file or directory to all types of users.
Here’s the syntax of the chmod command:

Now it is executable. He stared at me as if I was a hacker 😂. But really, it’s a pretty simple and basic concept.
How to Remove Permissions from a File in Linux
I work with my colleague Divad on lots of projects, and he likes to try to fool me. We work together on many hobby projects and we often write shell scripts for quick deployment.
Whenever he writes shell scripts, he always removes all the permissions from the file and pushes the changes to the remote repo. So every time I have to grant permissions using the above commands for whatever action I have to do.
Let’s have a quick look at the command he uses to remove file permissions.
Here we have a file named install.sh which has all permissions (Read, Write, Execute). Let’s remove the execute permission for this script file.

You’ll not be able to execute this file now. Trying so will give you an error as shown in the above screenshot.
Let’s remove the read permission from the file.


The same applies to removing write permission from the file:

You can achieve all the above together using the below command:

But, did you know that I can create another directory inside locked_directory named dir1 and read the files and folders in dir1 ?

Then what’s the purpose of the command we just ran before? Removing the read permission on the parent should remove the same on child directories too, right?
Well. That’s the exact thing I told you earlier. Linux manages a very granular level of file permissions.
If you want to apply the permissions to the parent directory and all its child directories, you need to pass an exclusive flag with the chmod command.
That flag is -R . It basically means applying the same permissions recursively to all sub-directories (child directories). So this permission will apply to the end child of a file/directory.
Here’s the syntax for that:

From the above screenshot, you can see that trying to view the child directory files has failed after removing the read permission recursively from the parent directory.
Another Way to Handle File Permissions in Linux
Alternatively, you can use Octal representation to control the file permissions.
We can use numbers to represent file permissions (the method most commonly used to set permissions). When you change permissions using the Octal mode, you represent permissions for each triplet using a number (4, 2, 1, or combination of 4, 2, and 1).
Let’s see the syntax for using octal mode:

Look at the first part of the output ( -rwxrwxrwx ) from the above screenshot. Let’s explore what it means:
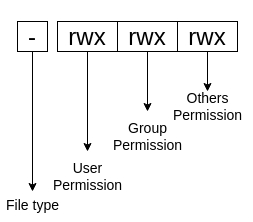
The first character indicates the type of input.
- «-» indicates a file
- «d» indicates a directory
- «i» indicates a link (a symlink, which is a shortcut to a file/directory)
You group the next set of letters, at a maximum of 3 for each group. These groups represents corresponding permissions for user, group, and others.
Conclusion
In this article, you have learned about handling basic file and folder permissions.
I hope you enjoyed reading this tutorial. I have one request to all: give it a try on your own with some complicated scenarios like having permutations and combinations of permissions 😂. It’ll definitely be helpful in your entire career.
Subscribe to my newsletter by visiting my site and also have a look at the consolidated list of all my blogs.