- How to use the Linux find command
- An overview of the Linux find command
- Limiting your search to a specific directory
- Customize search results output
- Finding files with Linux: simple use cases
- Using the Linux file command to filter by file name
- Using the Linux file command to filter by file type
- How to Change File Permissions Recursively with chmod in Linux
- Check File Permission
- Change Permission Recursively
- Change Permission With the find Command
- Change Permission of Specific Files Recursively
How to use the Linux find command
Linux is an open-source operating system that was created as a free alternative to UNIX. As with UNIX, the command line is a fundamental tool to work in Linux. Here, the user enters a command on the command line which is then executed.
To find a file in Linux, you can use the Linux find command. This starts a recursive search, where a directory hierarchy is searched following certain criteria. The Linux find command is a precise tool for finding files and directories and is supported across pretty much all Linux distributions.
- An overview of the Linux find command
- Limiting your search to a specific directory
- Customize search results output
- Using the Linux file command to filter by file name
- Using the Linux file command to filter by file type
- Using the Linux file command to filter by size
- Using the Linux file command to filter by timestamp
- Using the Linux file command to filter by owner, group, and access rights
- Limiting the recursion depth of the Linux find command
- Using the Linux file command to adjust the user and groups
- Using the Linux file command to adjust file rights
- Using the Linux file command to delete empty directories and files
Register great TLDs for less than $1 for the first year.
Why wait? Grab your favorite domain name today!
An overview of the Linux find command
To use the find command in Linux, you’ll need to open the command line. Let’s have a look at the general structure of the Linux find command:
Attention: Be careful with commands on the command line. If you carelessly execute the wrong command, you may damage your system!
First, the command itself is written, followed by a directory path, and a variable number of search parameters. A search parameter consists of a hyphen that is immediately followed by the name of the parameter. This is followed by a space and the value of the parameter. Below, you’ll find an overview of the most commonly used search parameters:
Search parameter
Explanation
Filter by owner and group
Several search parameters can also be combined. Here, a logical AND operation is implicitly assumed. This can be written out explicitly. Furthermore, an OR link can be used or a condition can be negated:
Search parameter
Explanation
Search results must meet both conditions
Search results must meet at least one of the two conditions
Negate subsequent condition
Note that you must replace the with actual values in the following code examples to run the examples.
Limiting your search to a specific directory
Let’s see how we can limit the search to a specific directory. To search the current directory, we use the “.” item as the directory path:
To search through your own user folder, use the tilde “~” as the directory path:
You can also search the entire system with the Linux find command. However, due to the large number of files and the possibly deep hierarchy of directories, this can take a long time. To search the entire system, we use a forward slash “/” as the directory path:
Attention: Be extremely careful when applying the Linux find command in combination with the “-exec” parameter to the entire system!
Customize search results output
The search results of the Linux find command may be extensive. That’s why it can be useful to influence how results are displayed. Here, it’s important not to use the command’s own parameters, but make use of so-called pipes. In Linux, they’re useful to use the output of one command as the input of another command.
To output the results page by page, we pass the output of the find command to the less command:
To count the number of results, we pass the output of the find command to the wc command with the “-l” parameter:
To look at only the first or last n search results, we pass the output of the find command to the “head” and “tail” commands. In each case, we specify the parameter “-n” followed by the desired number of search results:
Finding files with Linux: simple use cases
The following examples limit the search to the current directory and any subdirectories. Use the cd command on the command line to change to any directory. To test these examples, first change to your user folder:
Using the Linux file command to filter by file name
To filter for file names, use the “-name” parameter. This requires an exact file name and is case sensitive:
Here we are looking for a file with the exact file name “.gitignore”.
To not differentiate between lowercase and uppercase letters we use the “-iname” parameter. The “I” here stands for “insensitive”, from “case-insensitive”:
Usually, it’s more practical to search case-insensitive first and use the “-name” parameter only if the search with “-iname” returns too many results.
If we don’t want to search for an exact file name, but want to use a pattern, we use the asterisk as a “wildcard” placeholder and write the search pattern in quotes (the asterisk is internally interpreted as “zero until additional characters have been added”). In our example, we search for files and directories whose names contain the text “git”:
Using the Linux file command to filter by file type
A famous aspect of UNIX philosophy is the principle that “everything is a file” – and the same applies under Linux. The term “file” refers to files in a broader sense. In other words, directories are also mapped as files under Linux. But to avoid confusion, the more precise term “file descriptor” is sometimes used.
When we speak of the “file type” under Linux, we’re not talking about whether a document is an Excel file or a JPEG image. Instead, we distinguish between the different file descriptor types that exist under Linux. The Linux find command provides us with the search parameter “-type” to filter by file type. For example, we can distinguish between files and directories when searching. Below, we’ve put together an overview of the most commonly used file types:
Explanation
How to Change File Permissions Recursively with chmod in Linux
Multi-user systems, such as Linux, require setting up and managing file permissions that ensure only authorized users have access to files they are supposed to.
If you need to change a file permission, use the chmod command. It also allows to change the file permission recursively to configure multiple files and sub-directories using a single command.
In this tutorial, you will learn how to use chmod recursively and change file permission on Linux.

Note: The user who creates a file (or directory) has ownership of it. The file-owner has read, write, and execute privileges. Other users only have as much access as given to them when configuring permissions, while the root user has all privileges for all files.
Check File Permission
If you need to check the file permissions in the working directory, use the command:
The output lists the permissions of all the files in the directory.
For instance, the Example directory contains three files (test1.txt, test2.txt, and test3.txt) with the same permissions (-rw-rw-r–).

The file permissions listed above tells us the following:
- The owner has read and write privileges
- The owner’s group has read and write privileges
- Other users have read privileges
Note: Do you want to learn more about file permissions and how they are defined? Refer to the Linux File Permission Tutorial.
Change Permission Recursively
It is common to use the basic chmod command to change the permission of a single file. However, you may need to modify the permission recursively for all files within a directory.
In such cases, the chmod recursive option ( -R or —recursive ) sets the permission for a directory (and the files it contains).
The syntax for changing the file permission recursively is:
chmod -R [permission] [directory]Therefore, to set the 755 permission for all files in the Example directory, you would type:
The command gives read, write, and execute privileges to the owner (7) and read and execute access to everyone else (55).

Note: In the example above, the permission is defined using the octal/numerical mode ( 755 ). Alternatively, you can utilize the symbolic mode (using alphanumerical characters) and use the command: chmod -R u=rwx,go=rx Example .
Change Permission With the find Command
To assign separate permissions to directories and files, you can use the find command.
The basic syntax includes using the find command to locate files/directories and then passing it on to chmod to set the permission:
sudo find [directory] -type [d/f] -exec chmod [privilege] <> \;- Replace [directory] with the directory path that holds the files and subdirectories you want to configure.
- Specify whether it is searching for a directory -type d or a file -type f .
- Set the file [privilege] with the chmod command using the numerical or symbolic mode.
Avoid assigning execute privileges to files. A common setup would include running the following commands:
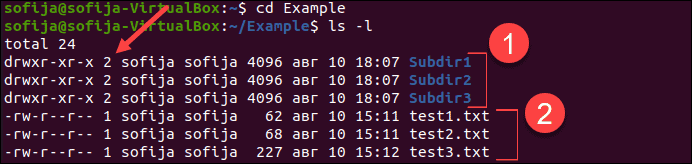
sudo find Example -type d -exec chmod 755 <> \;sudo find Example -type f -exec chmod 644 <> \;In this example, the directories have 755 (u=rwx,go=rx) privileges, while the files have 644 (u=rw,go=r) privileges.

You can check to verify directories and files have different permission settings by moving into the Example directory ( cd Example ) and listing the content ( ls -l ). The output should be similar to the one below:

Note: Learn more about the Linux find command.
Change Permission of Specific Files Recursively
Combining the find command with chmod can also be used for changing the permission of files that are a specific type.
The command syntax for changing the permission of a specific file type in a directory is:
find [directory] -name "*.[filename_extension]" -exec chmod [privilege] <> \;For example, to make all .sh files in the current directory executable, you would use:
find . -name "*.sh" -exec chmod +x <> \;You should now know how to recursively change the file permission on your Linux system with chmod -R or the find command.
Alternatively. you can also use the umask command which lets you change the default permissions.