- Команда find в Linux
- Основная информация о Find
- Основные параметры команды find
- Критерии
- Примеры использования
- 1. Поиск всех файлов
- 2. Поиск файлов в определенной папке
- 3. Ограничение глубины поиска
- 4. Инвертирование шаблона
- 5. Несколько критериев
- 6. Тип файла
- 6. Несколько каталогов
- 7. Поиск скрытых файлов
- 8. Поиск по разрешениям
- 9. Поиск файлов в группах и пользователях
- 10. Поиск по дате модификации
- 11. Поиск файлов по размеру
- 12. Поиск пустых файлов и папок
- 13. Действия с найденными файлами
- Выводы
- How to Find Text in Files in Linux
- Finding text in files
- Find text in files using grep
- Basic search
- Regular expression
- Extended regular expression
- Finding text in files
- Grep GUI
- Find text in files using nano
- Find text in files using Vim
- Find text in files using GNOME Text Editor
- Find text in files using VS Code
- Final thoughts
- About the author
- Sidratul Muntaha
Команда find в Linux
Очень важно уметь вовремя найти нужную информацию в системе. Конечно, все современные файловые менеджеры предлагают отличные функции поиска, но им не сравнится с поиском в терминале Linux. Он намного эффективнее и гибче обычного поиска, вы можете искать файлы не только по имени, но и по дате добавления, содержимому, а также использовать для поиска регулярные выражения.
Кроме того, с найденными файлами можно сразу же выполнять необходимые действия. В этой статье мы поговорим о поиске с помощью очень мощной команды find Linux, подробно разберем её синтаксис, опции и рассмотрим несколько примеров.
Основная информация о Find
Команда find — это одна из наиболее важных и часто используемых утилит системы Linux. Это команда для поиска файлов и каталогов на основе специальных условий. Ее можно использовать в различных обстоятельствах, например, для поиска файлов по разрешениям, владельцам, группам, типу, размеру и другим подобным критериям.
Утилита find предустановлена по умолчанию во всех Linux дистрибутивах, поэтому вам не нужно будет устанавливать никаких дополнительных пакетов. Это очень важная находка для тех, кто хочет использовать командную строку наиболее эффективно.
Команда find имеет такой синтаксис:
find [ папка] [ параметры] критерий шаблон [действие]
Папка — каталог в котором будем искать
Параметры — дополнительные параметры, например, глубина поиска, и т д
Критерий — по какому критерию будем искать: имя, дата создания, права, владелец и т д.
Шаблон — непосредственно значение по которому будем отбирать файлы.
Основные параметры команды find
Я не буду перечислять здесь все параметры, рассмотрим только самые полезные.
- -P — никогда не открывать символические ссылки.
- -L — получает информацию о файлах по символическим ссылкам. Важно для дальнейшей обработки, чтобы обрабатывалась не ссылка, а сам файл.
- -maxdepth — максимальная глубина поиска по подкаталогам, для поиска только в текущем каталоге установите 1.
- -depth — искать сначала в текущем каталоге, а потом в подкаталогах.
- -mount искать файлы только в этой файловой системе.
- -version — показать версию утилиты find.
- -print — выводить полные имена файлов.
- -type f — искать только файлы.
- -type d — поиск папки в Linux.
Критерии
Критериев у команды find в Linux очень много, и мы опять же рассмотрим только основные.
- -name — поиск файлов по имени.
- -perm — поиск файлов в Linux по режиму доступа.
- -user — поиск файлов по владельцу.
- -group — поиск по группе.
- -mtime — поиск по времени модификации файла.
- -atime — поиск файлов по дате последнего чтения.
- -nogroup — поиск файлов, не принадлежащих ни одной группе.
- -nouser — поиск файлов без владельцев.
- -newer — найти файлы новее чем указанный.
- -size — поиск файлов в Linux по их размеру.
Примеры использования
А теперь давайте рассмотрим примеры find, чтобы вы лучше поняли, как использовать эту утилиту.
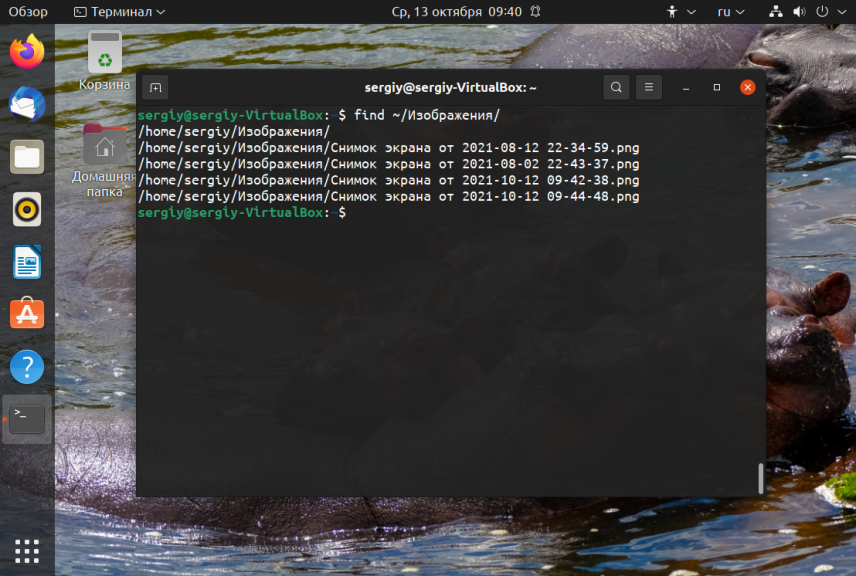
1. Поиск всех файлов
Показать все файлы в текущей директории:
Все три команды покажут одинаковый результат. Точка здесь означает текущую папку. Вместо неё можно указать любую другую.
2. Поиск файлов в определенной папке
Показать все файлы в указанной директории:
Искать файлы по имени в текущей папке:
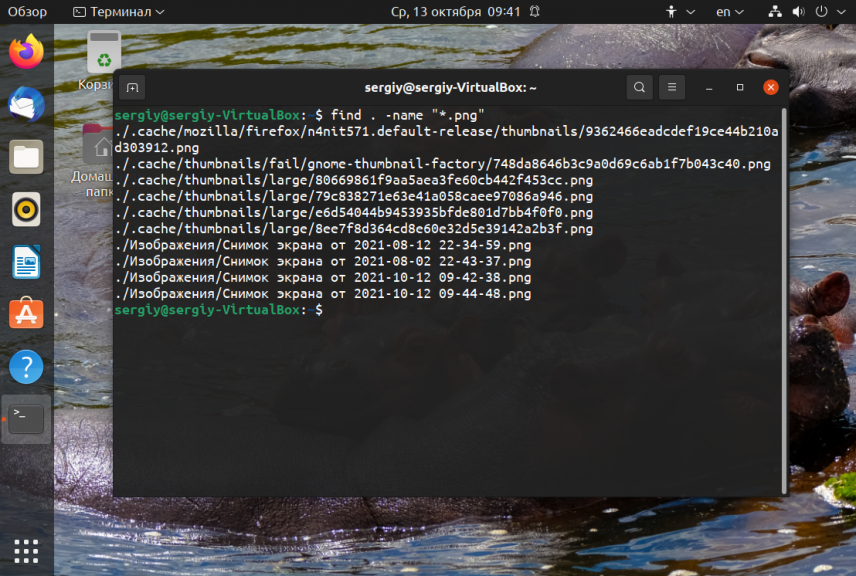
Поиск по имени в текущей папке:
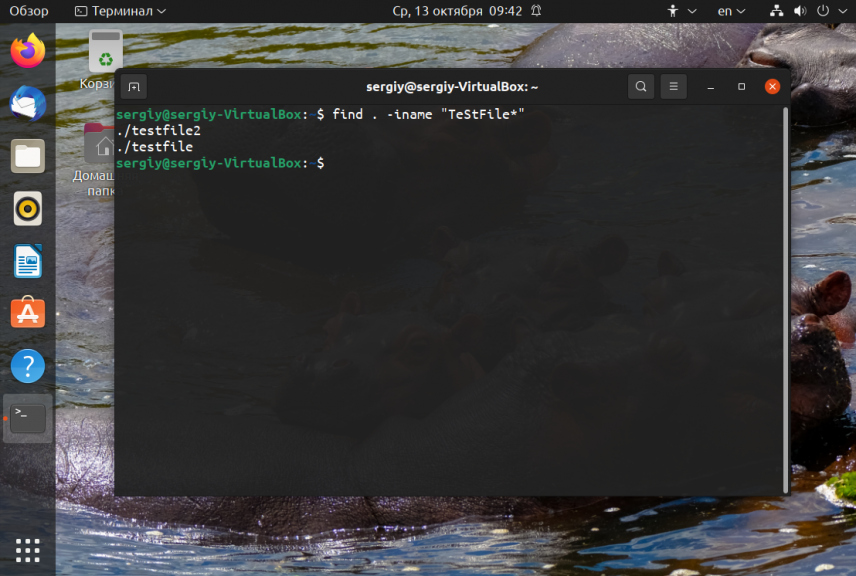
Не учитывать регистр при поиске по имени:
3. Ограничение глубины поиска
Поиска файлов по имени в Linux только в этой папке:
find . -maxdepth 1 -name «*.php»
4. Инвертирование шаблона
Найти файлы, которые не соответствуют шаблону:
5. Несколько критериев
Поиск командой find в Linux по нескольким критериям, с оператором исключения:
find . -name «test» -not -name «*.php»
Найдет все файлы, начинающиеся на test, но без расширения php. А теперь рассмотрим оператор ИЛИ:
find -name «*.html» -o -name «*.php»
Эта команда найдёт как php, так и html файлы.
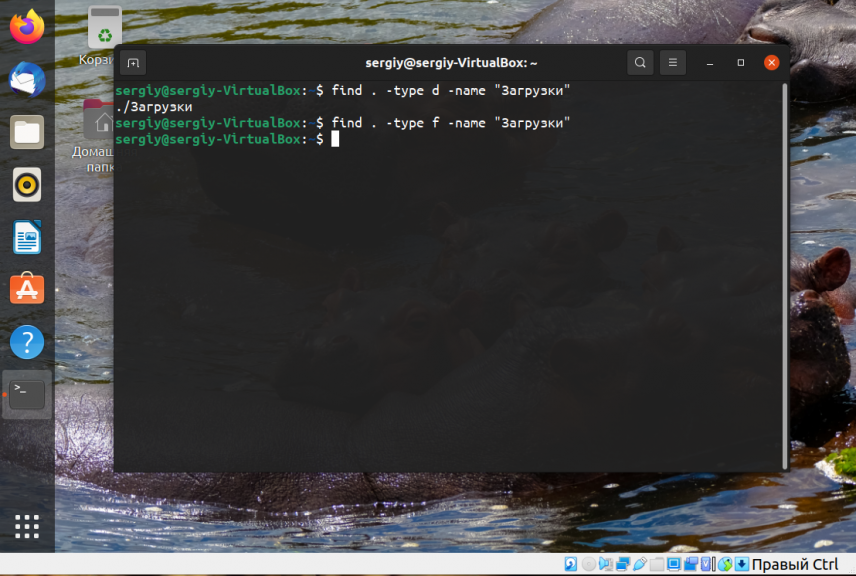
6. Тип файла
По умолчанию find ищет как каталоги, так и файлы. Если вам необходимо найти только каталоги используйте критерий type с параметром d. Например:
find . -type d -name «Загрузки»
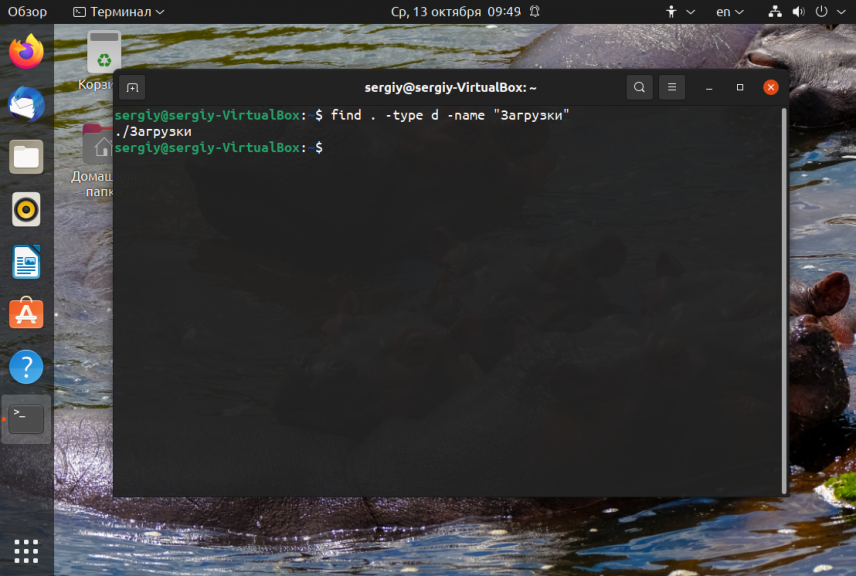
Для поиска только файлов необходимо использовать параметр f:
find . -type f -name «Загрузки»
6. Несколько каталогов
Искать в двух каталогах одновременно:
find ./test ./test2 -type f -name «*.c»
7. Поиск скрытых файлов
Найти скрытые файлы только в текущей папке. Имена скрытых файлов в Linux начинаются с точки:
find . -maxdepth 1 -type f -name «.*»

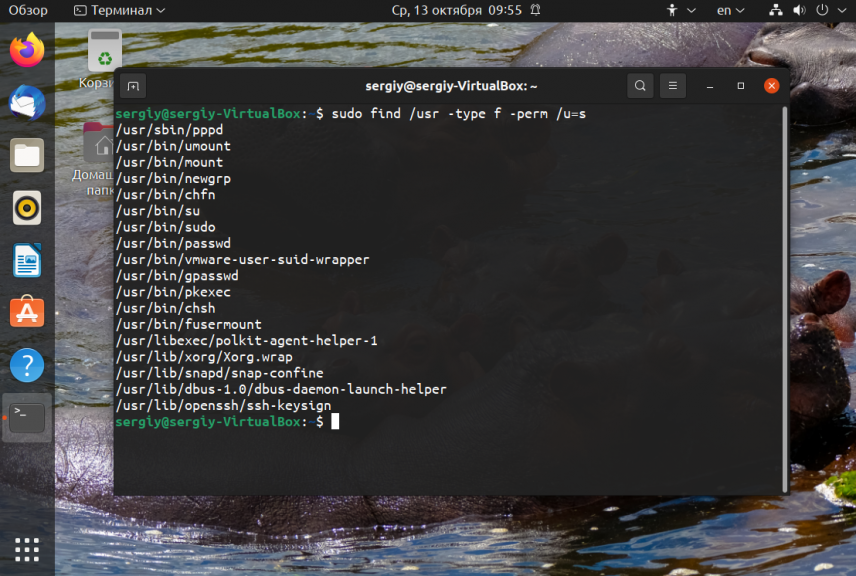
8. Поиск по разрешениям
Найти файлы с определенной маской прав, например, 0664:
Права также можно задавать буквами для u (user) g (group) и o (other). Например, для того чтобы найти все файлы с установленным флагом Suid в каталоге /usr выполните:
sudo find /usr -type f -perm /u=s
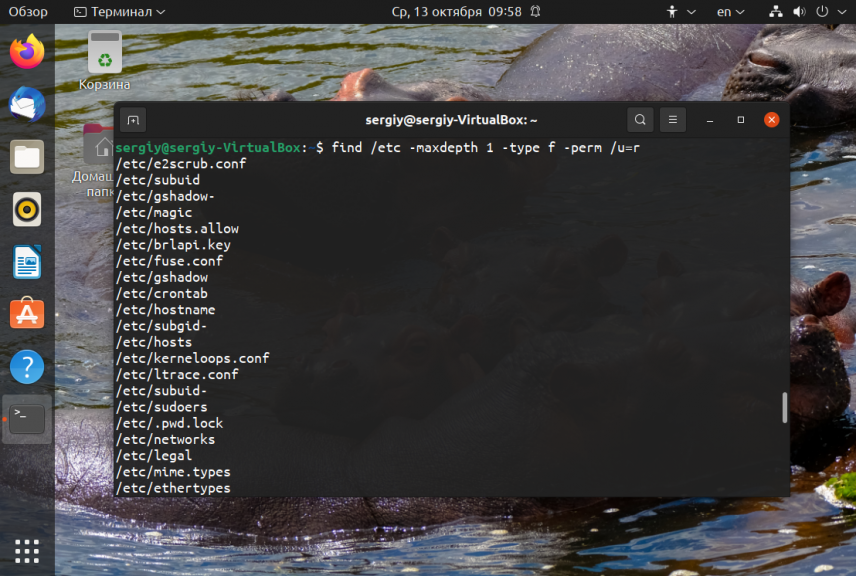
Поиск файлов доступных владельцу только для чтения только в каталоге /etc:
find /etc -maxdepth 1 -perm /u=r
Найти только исполняемые файлы:
find /bin -maxdepth 2 -perm /a=x
9. Поиск файлов в группах и пользователях
Найти все файлы, принадлежащие пользователю:
Поиск файлов в Linux принадлежащих группе:
find /var/www -group www-data
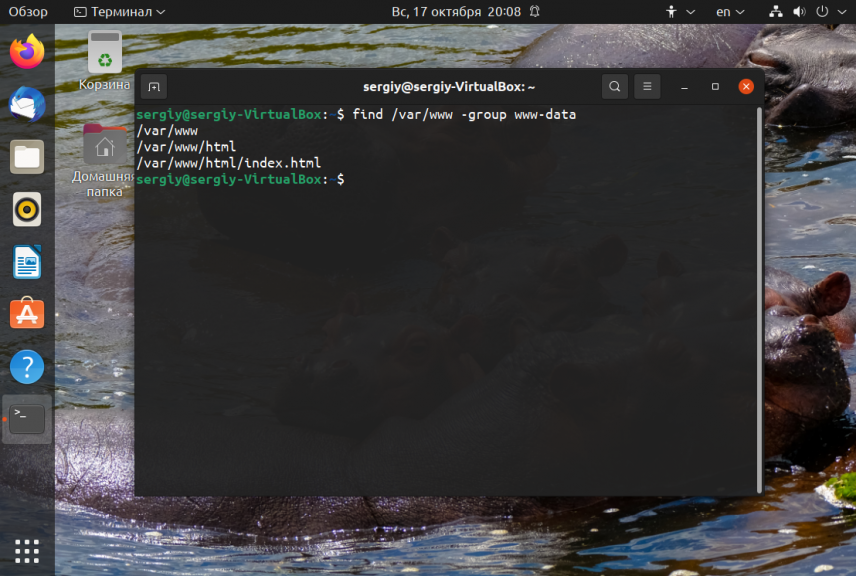
10. Поиск по дате модификации
Поиск файлов по дате в Linux осуществляется с помощью параметра mtime. Найти все файлы модифицированные 50 дней назад:
Поиск файлов в Linux открытых N дней назад:
Найти все файлы, модифицированные между 50 и 100 дней назад:
Найти файлы измененные в течении часа:
11. Поиск файлов по размеру
Найти все файлы размером 50 мегабайт:
От пятидесяти до ста мегабайт:
Найти самые маленькие файлы:
find . -type f -exec ls -s <> \; | sort -n -r | head -5
find . -type f -exec ls -s <> \; | sort -n | head -5
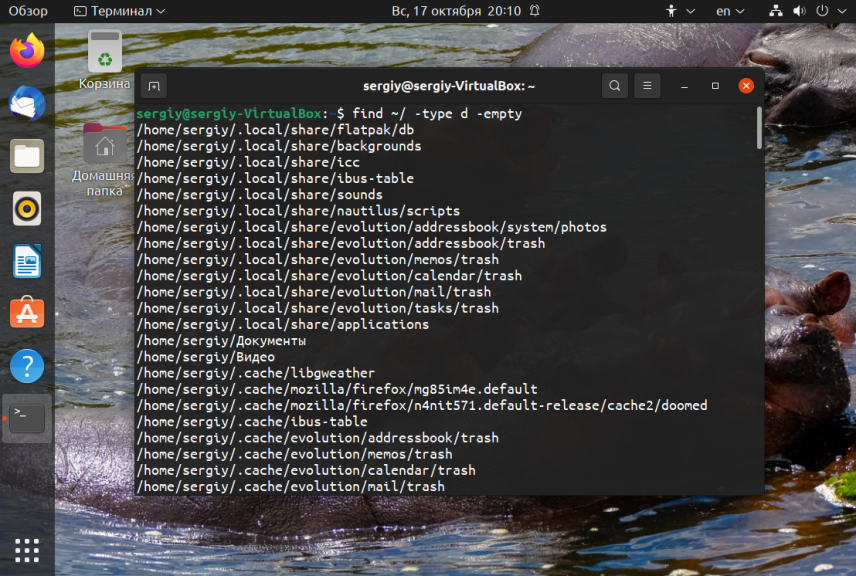
12. Поиск пустых файлов и папок
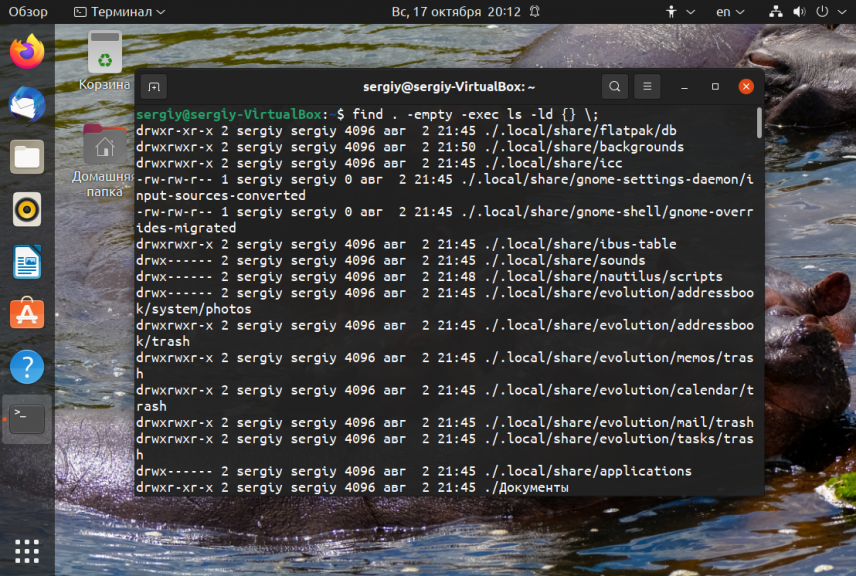
13. Действия с найденными файлами
Для выполнения произвольных команд для найденных файлов используется опция -exec. Например, для того чтобы найти все пустые папки и файлы, а затем выполнить ls для получения подробной информации о каждом файле используйте:
Удалить все текстовые файлы в tmp
find /tmp -type f -name «*.txt» -exec rm -f <> \;
Удалить все файлы больше 100 мегабайт:
find /home/bob/dir -type f -name *.log -size +100M -exec rm -f <> \;
Выводы
Вот и подошла к концу эта небольшая статья, в которой была рассмотрена команда find. Как видите, это одна из наиболее важных команд терминала Linux, позволяющая очень легко получить список нужных файлов. Ее желательно знать всем системным администраторам. Если вам нужно искать именно по содержимому файлов, то лучше использовать команду grep.
Обнаружили ошибку в тексте? Сообщите мне об этом. Выделите текст с ошибкой и нажмите Ctrl+Enter.
How to Find Text in Files in Linux
![]()
For a system administrator, working with text files is a common phenomenon. Maybe need to find a specific section from piles of log files for troubleshooting something? Or, need to find the document that contains essential information quickly?
In the case of Linux, there are numerous methods to find texts in files. It’s possible using both built-in tools and 3rd-party apps. Check out how to find texts in files in Linux.
Finding text in files
Depending on the number of files you have to perform a search on, there are two ways to perform the text search: automated or manual. If you have to work with a couple of text files, the manual search is more suitable. However, if there are hundreds of text files, then the automated search is the most efficient.
For automated search, we’ll be using grep. Grep comes pre-installed on any Linux distro. As for manual search, any modern text editor will do the job.
Find text in files using grep
In Linux, grep is the default tool for searching texts. Its name is derived from the ed command g/re/p that stands for “globally search for a regular expression and print matching lines.” It’s available on any modern Linux distro.
Grep is a command-line tool. Its command structure is as follows.
As the name of grep suggests, the pattern to search for is described using a regular expression. The regular expression is a special type of string that describes a pattern to match, locate, and manage. To learn more about grep and regular expression, check out using grep and egrep with regular expression.
For demonstration purposes, grab a sample text file. In this example, download the GNU General Public License v3.0 text file.
Basic search
The fundamental way of using grep is to search for a basic string.
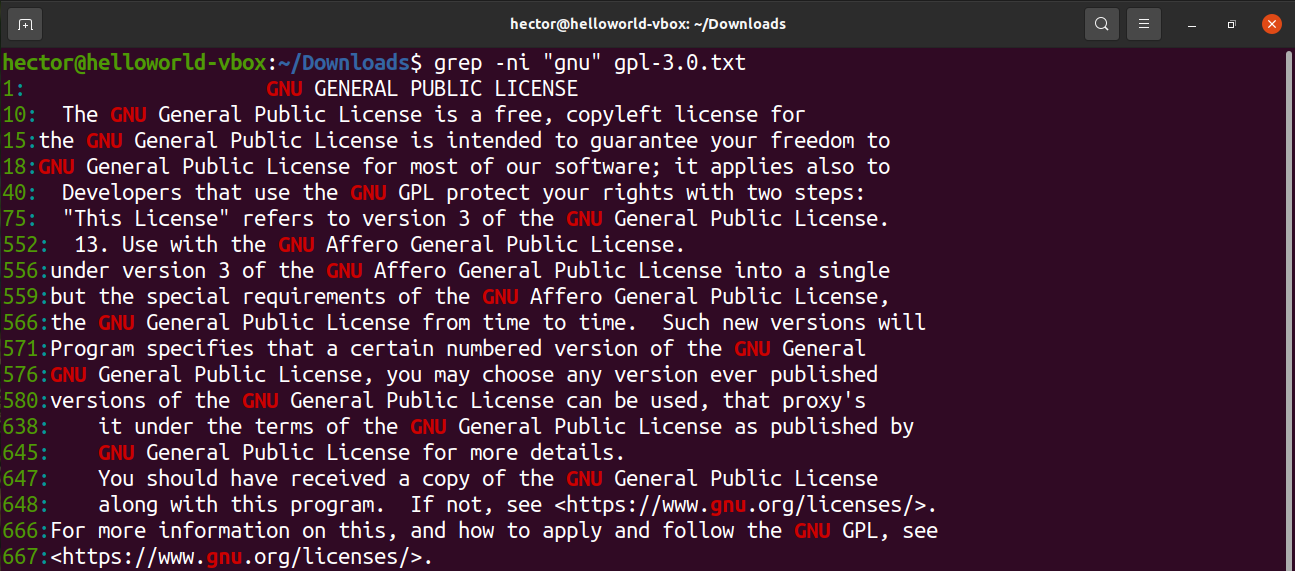
Take a look at the following grep command. It’ll search for the word “GNU” in the text file.
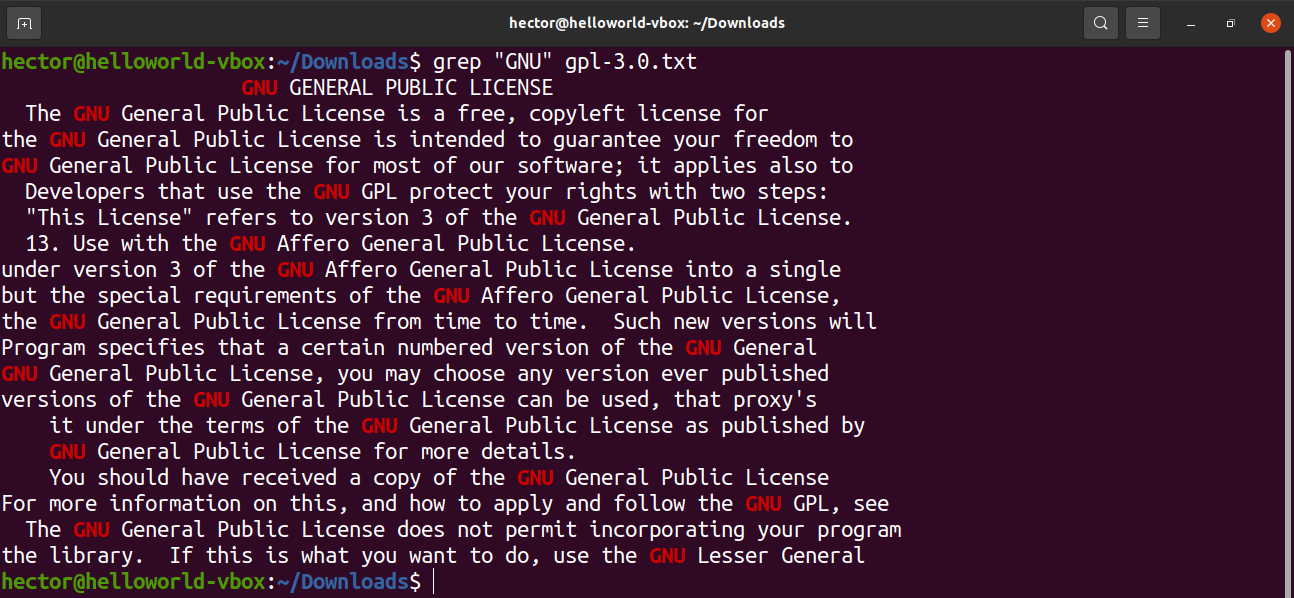
To show the line number, use the “-n” flag.

To perform a case-insensitive search using grep, use the “-i” flag.
You may not want to see the search matches but only the file name where the match happened in some situations. To print only the filename, use the “-l” flag. Here, the asterisk denotes to use all the text files in the current directory.

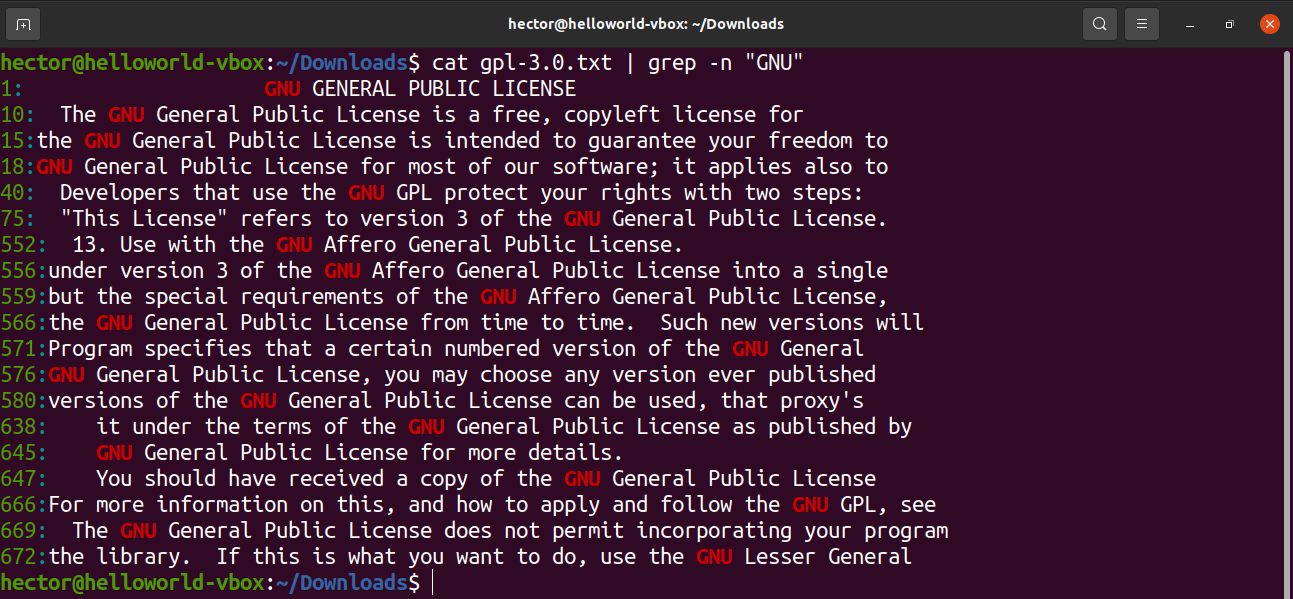
We can also pipe the output of other commands to grep.
Regular expression
Regex offers a smart way of fine-tuning the search. It has its own rules. However, different applications and programming languages implement regular expression differently. Here are a couple of examples that you can use with grep.
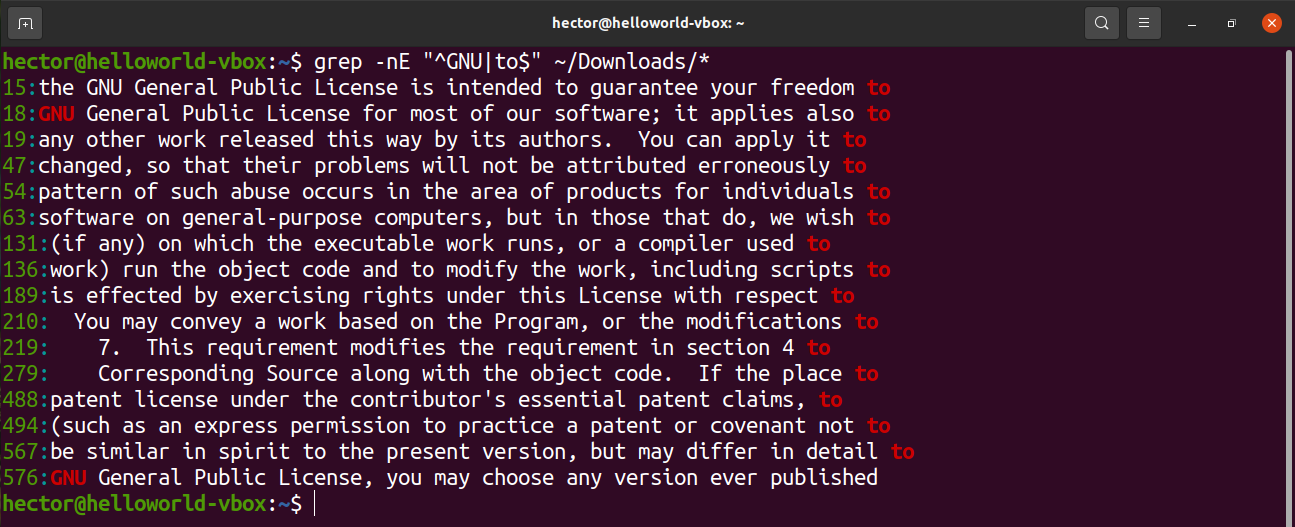
To define that the string is to be found at starting a line, use the caret (^) symbol.

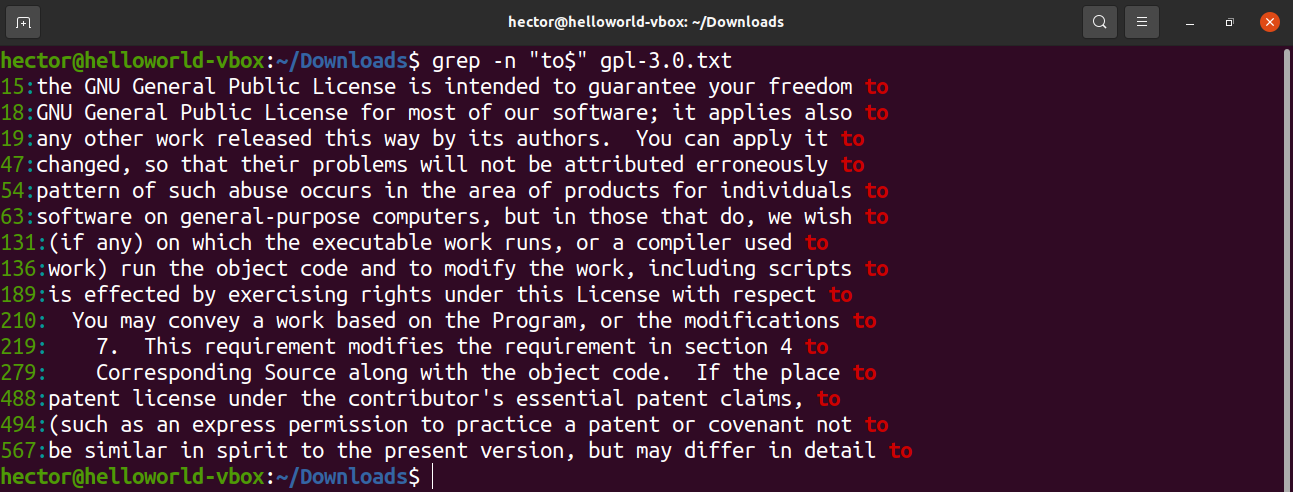
To define that the string is to be found at the end of a line, use the dollar sign ($).
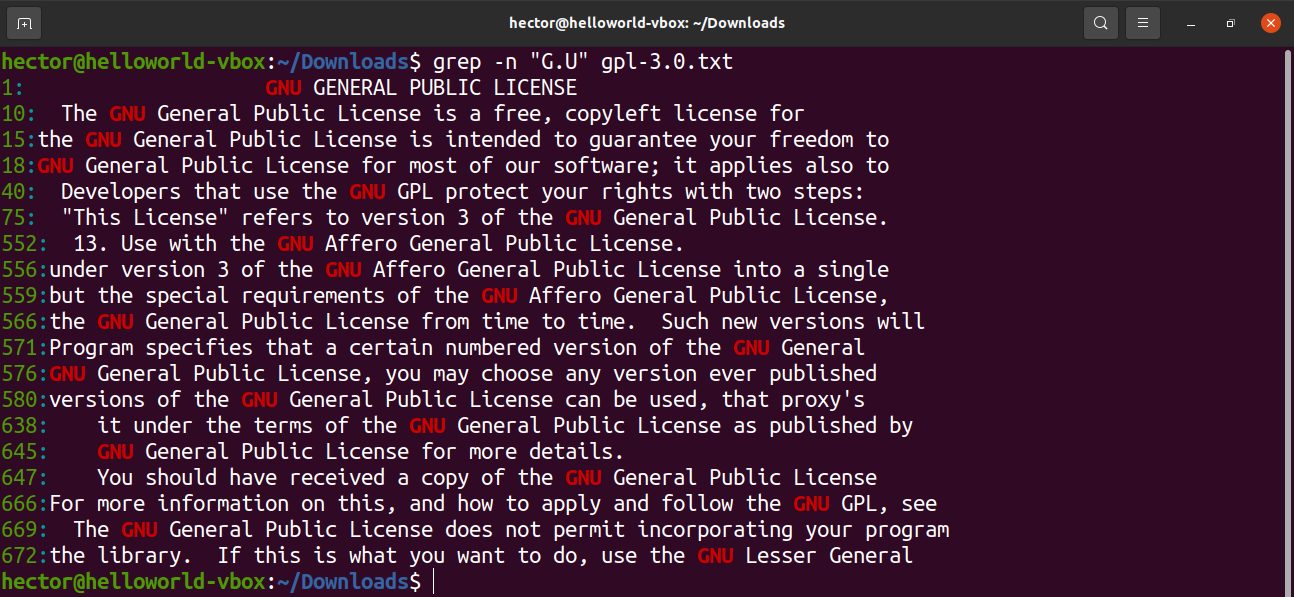
To describe that there can be any character at a certain location of the pattern, use the period character (.). For example, the expression “G.U” is valid if there’s any character between “G” and “U”.
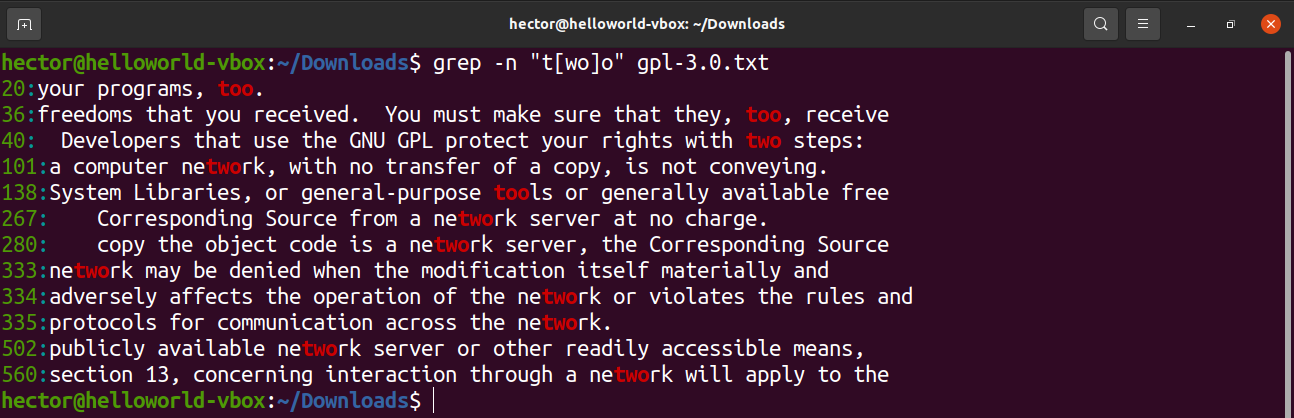
To describe that there can be a subset of characters at a particular location of the pattern, use the brackets ([]). For example, the expression “t[wo]o” tells that the match is valid for “two” and “too” only.
Extended regular expression
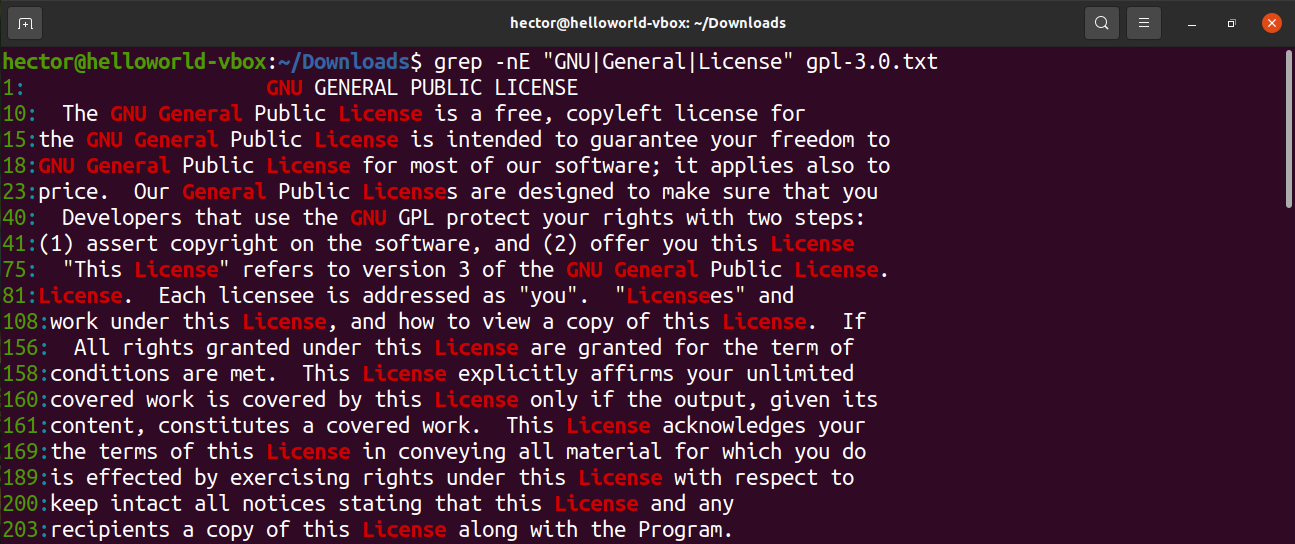
As the name suggests, an extended regular expression can do more complex things than basic regular expressions. To use extended regular expression with grep, you have to use the “-E” flag.
To search for two different strings, use the OR operators (|).
Finding text in files
Now comes the main part. Instead of manually telling grep the file to perform the search on, grep can do it automatically. In the following command, grep will use all the available text files in the current directory for searching the pattern.
If you want to grep to perform the search on a different directory, then you have to specify the location.
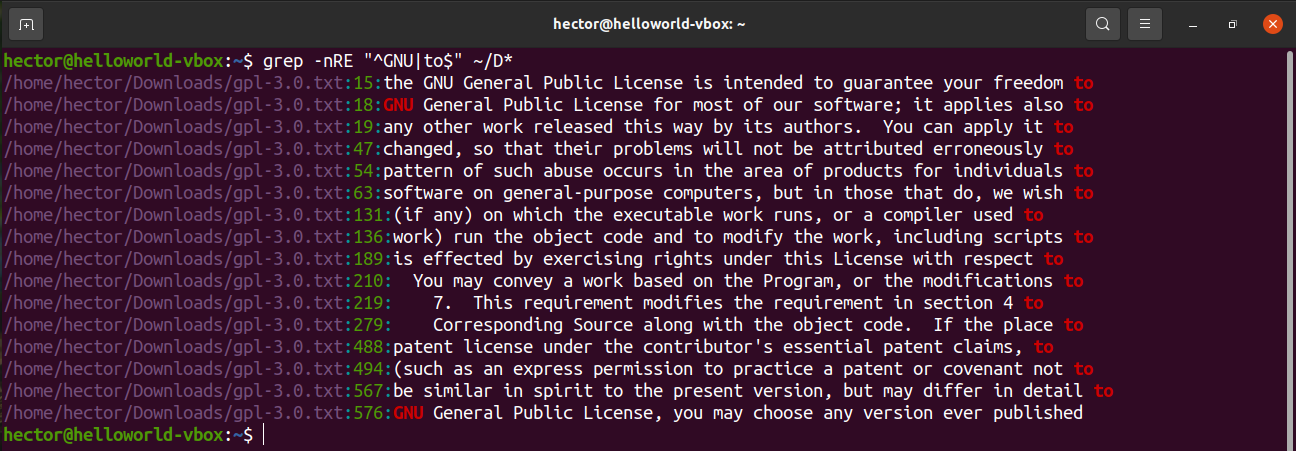
If there are folders, grep doesn’t explore them by default. To tell grep to search recursively, use the “-R” flag.
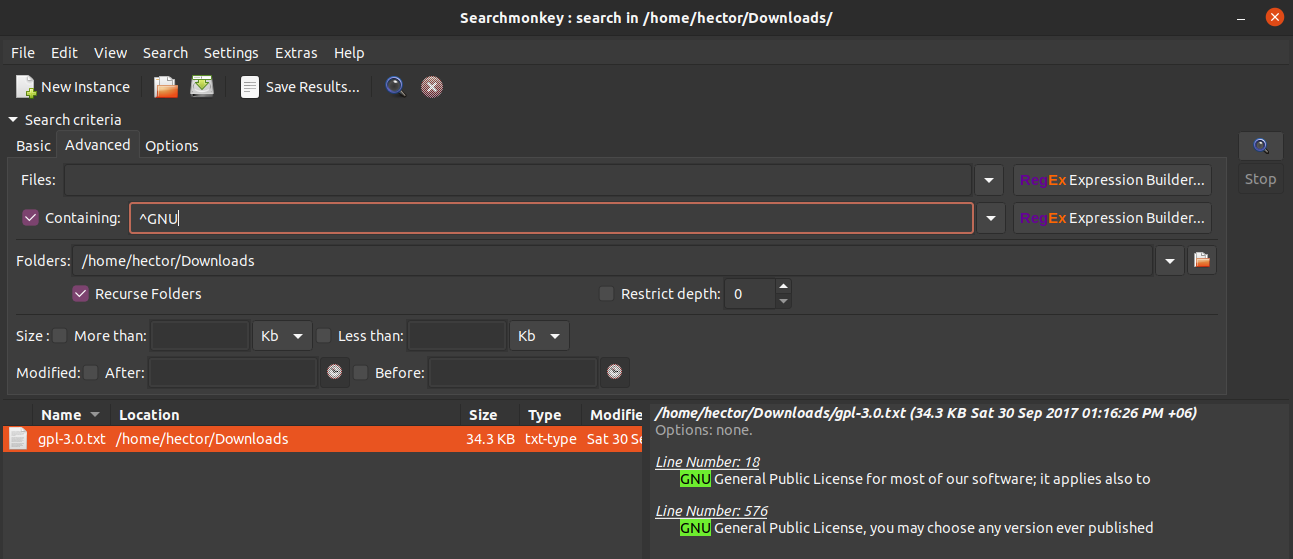
Grep GUI
If you prefer to work with GUI but still want to enjoy grep’s features, then check out searchmonkey. It’s a front-end solution for grep. The package is available on almost all the major Linux distros.
Find text in files using nano
GNU Nano is a simple and powerful text editor that comes with any Linux distro. It has built-in features to search for text in a text file.
Note that in this method, you have to open the text file, and search manually. It’s doable if there’s only a handful of text files to work with. If there’s more, then using grep is the most optimal choice.
Open the text file in nano.
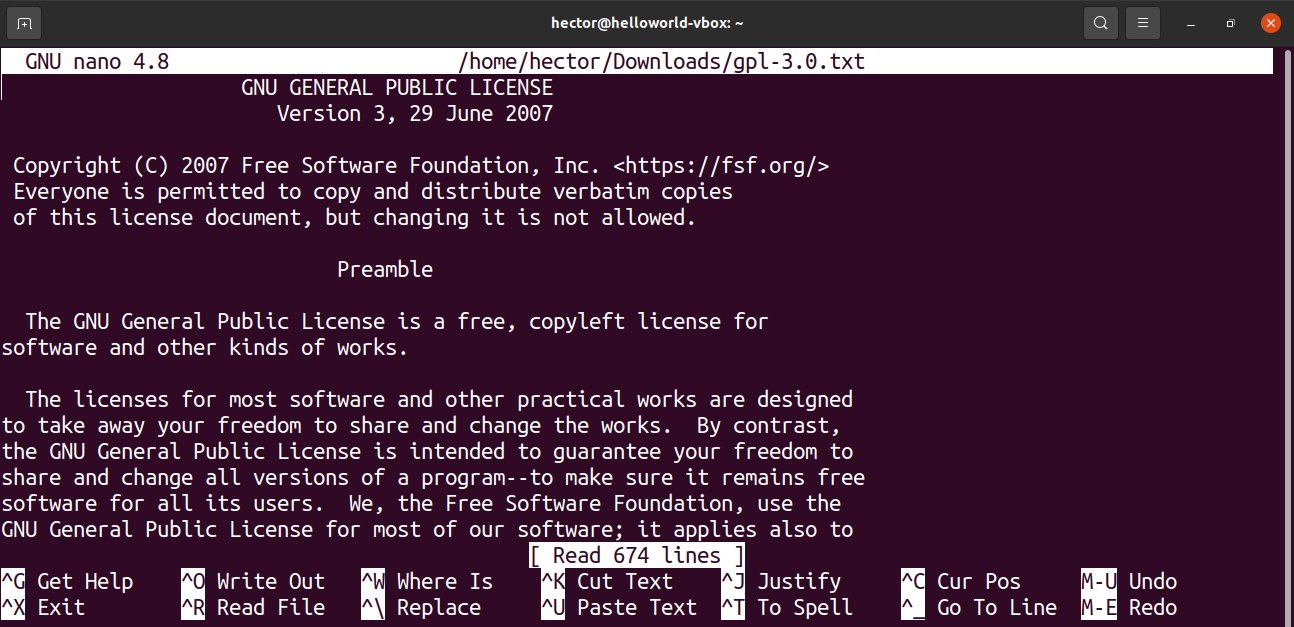
To search for a string match, press “Ctrl + W”. After typing the string to search for, press “Enter”.

Find text in files using Vim
Vim is a well-known and reputed text editor. It’s the command-line equivalent of a modern text editor. Vim comes with numerous advanced features like plugins, macros, auto-completion, filters, etc.
Similar to nano, Vim works with a single file at a time. If you have multiple text files, then using grep is the most optimal way to go.
To search in a text file, first, open it in Vim.
Enter the following Vim command and hit “Enter”.

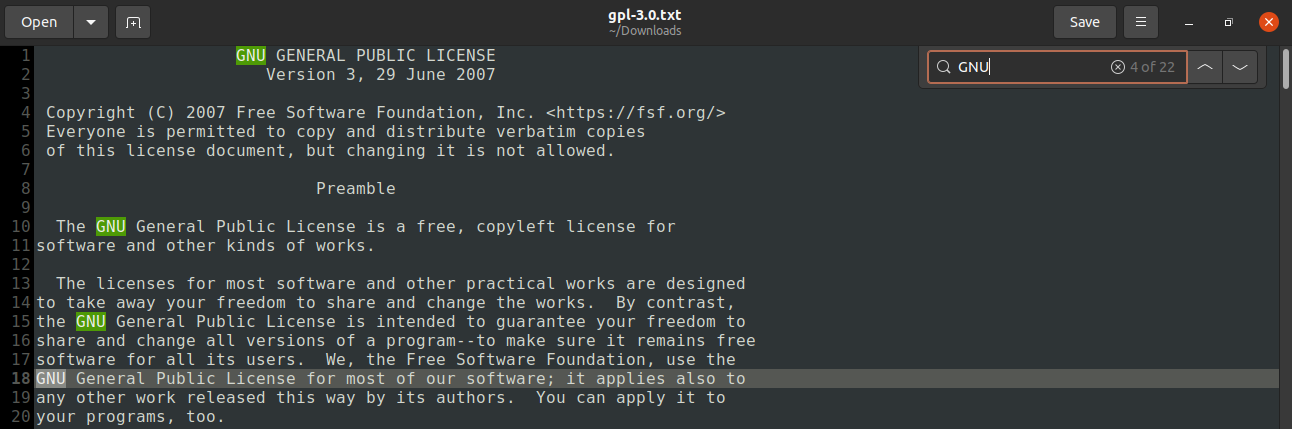
Find text in files using GNOME Text Editor
The GNOME Text Editor is the text editor that comes with the GNOME desktop. It’s a simplistic text editor with all the basic features you’d expect. It’s a nice alternative to the command-line text editors.
Similar to nano and vim, the same caution applies to this method. If the number of text files is large, then you better stick with grep.
Open the text file in Text Editor. Press “Ctrl + F” to bring up the search bar.
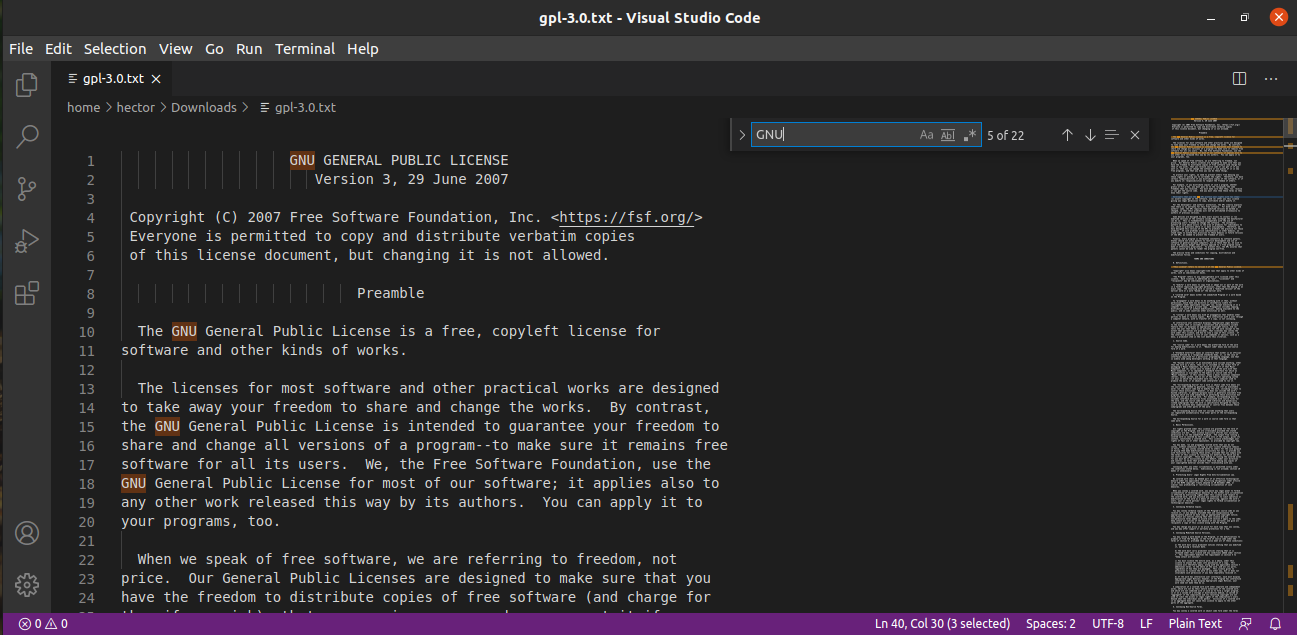
Find text in files using VS Code
Visual Studio Code is a powerful text editor with tons of features. It’s optimized for programmers to be used as if it’s a full-fledged IDE. It’s available on almost all the major Linux distros.
Install the Visual Studio Code snap package.

Open the text file in VS Code. Press “Ctrl + F” to start searching.
Final thoughts
There are numerous ways to search text in files. It’s an easy task to master. It’s strongly recommended to master the grep command because it offers the most value in terms of efficiency and ease-of-use.
If you prefer GUI, then there are numerous text editors to choose from. Any modern text editor will provide the text search option.
About the author
Sidratul Muntaha
Student of CSE. I love Linux and playing with tech and gadgets. I use both Ubuntu and Linux Mint.