- 2 Ways to Create an ISO Image File in Linux
- How to Create an ISO Image File in Linux
- Prerequisite
- Using the dd command
- Using the mkisofs command
- How to Create an ISO File in Linux
- From Files
- From a CD
- Community Q&A
- You Might Also Like
- How to Create an ISO File in Ubuntu 18.04 LTS
- Using Mkisofs utility
- Using dd command in Terminal to build an ISO file
- Using Brasero utility to make an ISO file
2 Ways to Create an ISO Image File in Linux
An ISO image file is an archive of files and directories compressed using the ISO 9660 format. It is suitable for writing CD or DVD discs, sector by sector.
When you download an operating system or even some games, they give you their ISO image file. Either you can uncompress/mount them on your system or burn a CD/DVD disc using the ISO image file.
However, we have already written a detailed guide on how to mount and unmount an ISO image on Linux. Therefore, today’s focus will be on creating an ISO image file from a collection of files or media devices in Linux.
How to Create an ISO Image File in Linux
In Linux, you will get two commands to create an ISO image file: dd (abbreviation of Data Definition) and the mkisofs command.
Does dd create an ISO image? The dd command is commonly used for copying or converting files. However, you can use the same command to create an ISO image from a media device connected to your system, like CD/DVD discs.
What are mkisofs used for? It is used to create an ISO image file from a bunch of files located in your system for writing to CDs or DVDs.
Prerequisite
First, you need to insert the media devices like CDs or DVDs and find the full path to these devices using the df command.
[email protected]:~$ df Filesystem 1K-blocks Used Available Use% Mounted on tmpfs 810756 2028 808728 1% /run /dev/sda3 102106072 10405360 86467868 11% / tmpfs 4053768 0 4053768 0% /dev/shm tmpfs 5120 4 5116 1% /run/lock /dev/sda2 524252 5364 518888 2% /boot/efi tmpfs 810752 116 810636 1% /run/user/1001 /dev/sdb1 iso9660 2.2G 2.2G 0 100% /media/trendoceans/UbuntuHowever, if you want to create an ISO image file from a group of files and directories stored on your machine, find the path to that directory using the pwd command.
Once you have the location of the file, you can continue to perform any of the below steps to create an ISO image file from a bunch of files or directories in Linux.
Using the dd command
The dd command is a utility for Linux systems that provides you with features like converting and copying files from two different sources.
On the Linux system, hardware devices or special device files (like /dev/zero and /dev/random ) are usually mapped as system files.
The dd command has the capability to read or write these files and perform tasks such as backing up the boot sector of a hard drive.
It can also perform conversions on the data as it is copied, including byte order swapping and conversion to and from the ASCII and EBCDIC text encodings.
The same command can easily create an ISO image file from the inserted disc on your machine. Just use the following command and do not forget to replace the mount location with your own.
$ sudo dd if=/dev/sdb1 of=/home/trendoceans/Documents/ubuntu.iso

- if requires the mount location of the media devices (CD or DVD) instead of stdin.
- of requires the location to save the ISO image file instead of stdout.
Using the mkisofs command
The mkisofs command is used to create an ISO file from a directory containing a bunch of files that can be used to burn CDs or DVDs later.
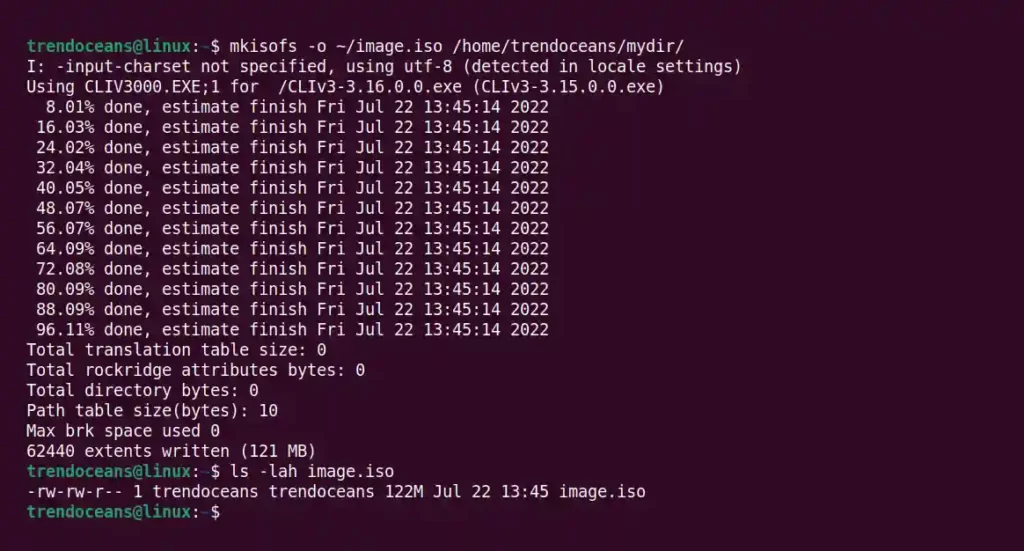
For example, you have a directory located at /home/trendoceans/mydir/ which contains a lot of files, and you want to create an ISO image file of that directory.
For that, you can use the mkisofs command with the -o option, specifying the location to save the ISO file and the path of the directory containing the bunch of files, as shown below.
$ mkisofs -o ~/image.iso /home/trendoceans/mydir/ $ ls -lah image.isoBelow is the output of the above command.
These are the two methods used to create an ISO image file from the command line. However, if you have any queries regarding the topic, feel free to comment.
Innovative tech mind with 12 years of experience working as a computer programmer, web developer, and security researcher. Capable of working with a variety of technology and software solutions, and managing databases.
How to Create an ISO File in Linux
This article was co-authored by wikiHow staff writer, Jack Lloyd. Jack Lloyd is a Technology Writer and Editor for wikiHow. He has over two years of experience writing and editing technology-related articles. He is technology enthusiast and an English teacher.
The wikiHow Tech Team also followed the article's instructions and verified that they work.
This article has been viewed 1,068,385 times.
This wikiHow teaches you how to turn a group of files into an ISO file on a Linux computer. You'll use the Linux command line to do this.
From Files

Gather your ISO files in the home directory. Place any files that you want to turn into an ISO file in a folder inside of the home folder.

- Linux distributions vary in appearance, so you may have to look for the Terminal app inside of a folder in the Menu section.
- You might also find Terminal on the desktop, or in a toolbar on the top or bottom of the screen.


- For example: to create an ISO file named "blueberry" from files in a folder called "pie", you would type in mkisofs -o blueberry.iso /home/username/pie .
- File names and folder names are case-sensitive, so make sure you capitalize anything that needs to be capitalized.
- To create a multiple-word name, place underscores between words (e.g., "blueberry pie" becomes "blueberry_pie").

- You may be prompted to enter your password before the ISO file is created. If so, type in your password and press ↵ Enter .
From a CD

Insert the CD-RW that you want to rip. You cannot rip an ISO file from CDs with read/write protection (e.g., audio CDs or movie DVDs).

- Linux distributions vary in appearance, so you may have to look for the Terminal app inside of a folder in the Menu section.
- You might also find Terminal on the desktop, or in a toolbar on the top or bottom of the screen.


- For example, you would type of=/home/username/pudding.iso to create an ISO file called "pudding" in the home directory.
- If you have multiple CD drives attached to the computer, your CD drives will be labelled from 0 up (e.g., the first drive will be labelled something like "cd0", the second will be "cd1", and so on).

- You may be prompted to enter your password before the ISO file is created. If so, type in your password and press ↵ Enter .
Community Q&A
Thanks! We're glad this was helpful.
Thank you for your feedback.
As a small thank you, we’d like to offer you a $30 gift card (valid at GoNift.com). Use it to try out great new products and services nationwide without paying full price—wine, food delivery, clothing and more. Enjoy! Claim Your Gift If wikiHow has helped you, please consider a small contribution to support us in helping more readers like you. We’re committed to providing the world with free how-to resources, and even $1 helps us in our mission. Support wikiHow
Most Linux distributions have a file manager that will allow you to create an ISO file using the right-click menu as well.

Not all versions of Linux function identically to one another. If you're unable to find your CD's path or the ISO command isn't working, you can check your distribution's manual online.
You Might Also Like


Can Linux Run .exe Files? How to Run Windows Software on Linux


How to Open Linux Firewall Ports: Ubuntu, Debian, & More


How to Run an INSTALL.sh Script on Linux in 4 Easy Steps

Use Ping in Linux: Tutorial, Examples, & Interpreting Results
How to Create an ISO File in Ubuntu 18.04 LTS

Most operating system and programs especially large one comes in an ISO format containing all required installation files. An ISO file or an ISO image is a perfect representation of all file and folders contained in a CD /DVD. Alternatively, you can say that it is a package all installation files and folder in one single file in an ISO format.
You can easily back up or archive the files and folders into an ISO file. You can make that ISO file to act it as an external drive, make bootable USBs or CD/DVD to later use for installation, save as a backup or distributing it over to someone.
- Create an installation disc by Burning to USB or CD/DVD.
- Mount as a virtual drive.
- Use for installation of OS or software programs.
In this article, I will describe some ways to create an ISO file in Ubuntu 18.04 LTS.
Using Mkisofs utility
Under Linux, you can create an ISO image from a folder using a command line argument with the Mkisofs utility. You can use Mkisofs to automatically backup the data with the option to exclude some individual files if necessary. It supports wildcards as well.
The basic syntax of the command is:
$ mkisofs -o [filename.iso] [ directory_path]
-o defines the file name of the ISO you want to create followed by the directory you want to backup or store an ISO file.
For instance, I want to create an ISO file from the directory /home/tin/Documents/backup and save it as backup.iso file:
$ mkisofs –o backup.iso /home/tin/Documents/backup

It will create the backup.iso file and save it in the current directory.
Using dd command in Terminal to build an ISO file
Basically using dd command, we can create copies of data whether they are file or folders, partitions, or CD/DVDs. We can also make use of dd command to create ISO files.
The basic syntax of dd command is:
If= Tells command from where to input the source data.
Of= Tells command where to define the output.
For instance, I will type the following command to copy and save the contents of the drive as an ISO file named diskimage.iso:
$ sudo dd if= /dev/sdb of= diskimage.iso

The ISO image named diskimage.iso will be created in the current directory.
Using Brasero utility to make an ISO file
You can use Linux disk burning utility Brasero to create an ISO file. Older versions of Ubuntu include built-in Brasero utility. However, in 16.04 and the newer version, you have to manually install this utility.
To install Brasero, press Ctrl+Alt+T to launch Terminal.
Enter the following command in Terminal:
$ sudo apt-get install brasero

Once you have done with the installation, open the application.
To open the Brasero application, Press windows key or click on dash icon in the bottom left corner of the desktop to open Dash menu.

Then search for Brasero application by typing its name in the search bar. When the application appears, click on it to open it.

In the Brasero application window, click on the Data project option.

Then click on the + icon to start adding files to the new project.

From the window that appears, select the individual files or directories then click on Add.

You will notice that files are added in the application. Click on Burn.

Choose the location to save the ISO file. Specify the name for the ISO file with .iso extension and click on Create Image.

Once finished, you will be notified that the image has been successfully created.

Hence all above were the different ways using which you can create ISO files. Once you have ISO file, you can save it as a backup, use it as virtual CD/DVD, burn it on USB or CD/DVD and share it with someone.