- How to Format a Drive in Linux
- Formatting a Drive in Linux
- Formatting a Partition using the GUI Method
- Formatting a Partition Using the CLI method
- How to Partition and Format Disk Drives on Linux
- #What is disk formatting in Linux?
- #What is partitioning in Linux?
- #How to Partition and Format Disk Drives on Linux
- #Prerequisites
- #How to view disks in Linux
- #How to view existing partitions in Linux
- #How to Partition a Disk in Linux
- #How to format a disk in Linux
- #How to mount a disk in Linux
- #Conclusion
- Mantas Levinas
- Join Cherry Servers Community
How to Format a Drive in Linux
![]()
Formatting a drive is necessary whenever you are trying to erase data on a drive or partition or to create a new partition. Before formatting a partition or drive, it is strongly recommended to make sure that there is nothing important there, as formatting may erase the data for good.
This guide shows you how to format a drive in Linux.
Formatting a Drive in Linux
There are two primary ways of formatting a drive in Linux: using the CLI and using the GUI. For general users, using a GUI tool may be more comfortable, whereas advanced or professional users may find the CLI method better suits them.
Either way, performing a disk format requires root access or sudo privileges. However, in certain situations, a different user can perform drive format if there is write permission for that drive. This article was written with the assumption that you have root access to your system.
The drive formatting process can be a bit tricky. To use the device storage, a drive must have a partition table with or without partitions. The partitions will allow the OS to access the storage. By formatting the drive, we are formatting the partition. If there are multiple partitions, then you have to perform the formatting process for all of them.
Formatting a Partition using the GUI Method
For managing disks and partitions (and related functions), GParted is the best option. GParted is a free and open-source tool used for managing disk partitions. This tool comes with tons of features and support for numerous file systems.
There are two ways to use GParted. You can install GParted on the running system or use the bootable image to perform the disk format. Both methods come with their own pros and cons. The good part is, whichever method you follow, the UI of GParted works the same.
First, we will show you how to install GParted onto your system. Depending on the Linux distro that you are running on your system, use the appropriate one.
For Debian/Ubuntu and derivatives:
For Fedora and derivatives:
For openSUSE and derivatives:
To use GParted from the boot, download the GParted bootable ISO here. You can also make a bootable CD, DVD, or USB flash drive. Check out how to make a bootable USB flash drive on Linux here. Once you have prepared the system, boot into the CD, DVD, or USB flash drive.
From this point on, GParted behaves the same. For convenience, I will be demonstrating using GParted installed on Ubuntu.
Launch GParted, and it will ask for the root password.

From the top-right corner, select the device on which the operation is to be performed.
Next, you must decide the target partition. For an in-depth guide on how to create and manage partitions using GParted, check out how to use GParted here. In this case, the target partition is the /dev/sda5 partition.
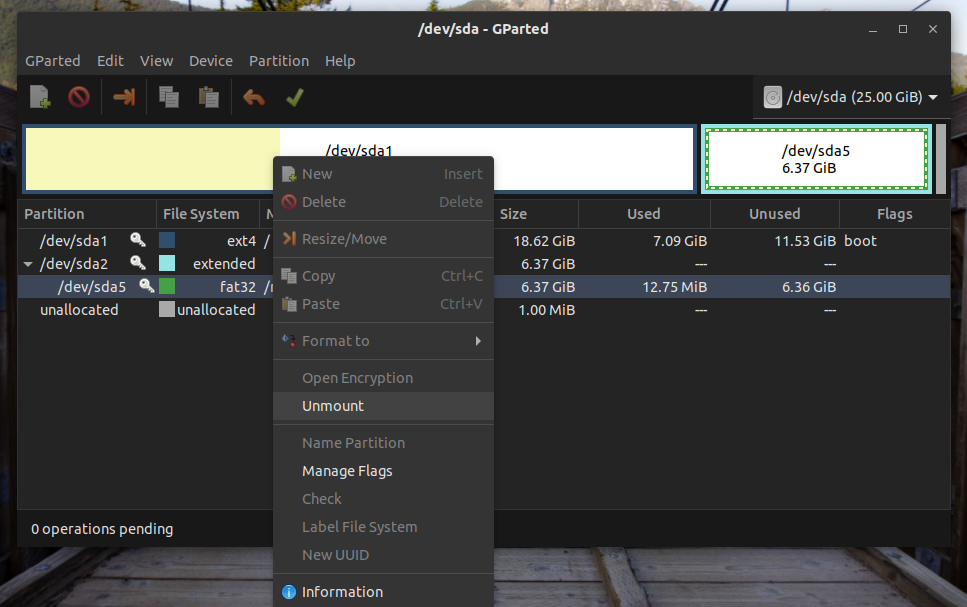
As you can see, the partition is currently mounted. Before performing any action, the partition must be unmounted. Right-click and select “Unmount.”
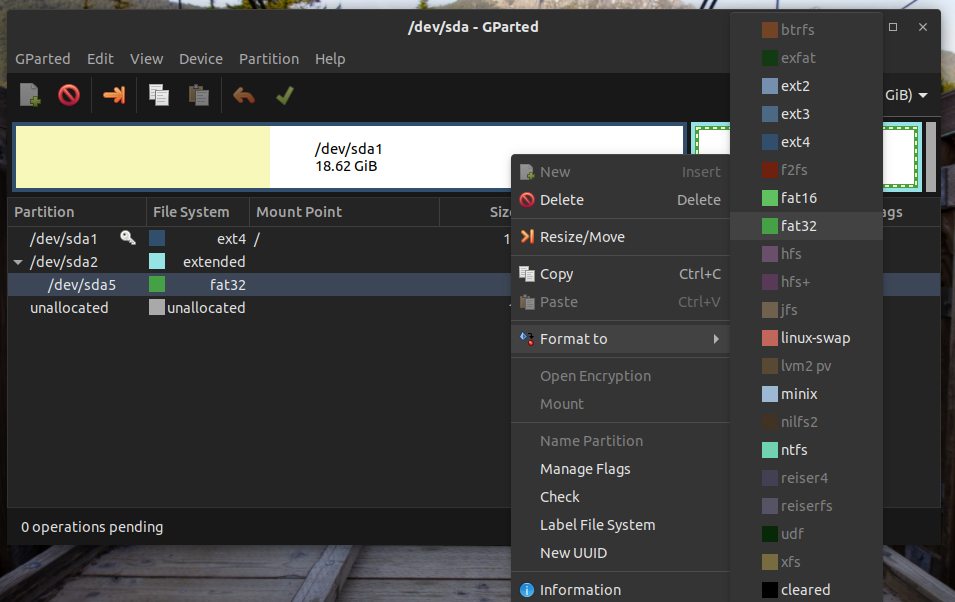
Now, the partition is ready to be formatted. If the device is a USB flash drive, then file systems like FAT32, NTFS, and EXT4 are generally the best option. If the device is an HDD, then it is better to go for EXT4. You can also go for a different format if there is a need for a specific file system. In my case, I will right-click and select “Format to” >> “fat32.”
An interesting feature of GParted is that it does not write the changes to the drive instantly. This way, even if you misconfigure the drive, you can easily discard the changes. To make the changes permanent, click “Apply All Operations.”

GParted will now ask you for confirmation. In this example, after performing the formatting, the partition will lose all its data. Click “Apply” to confirm.
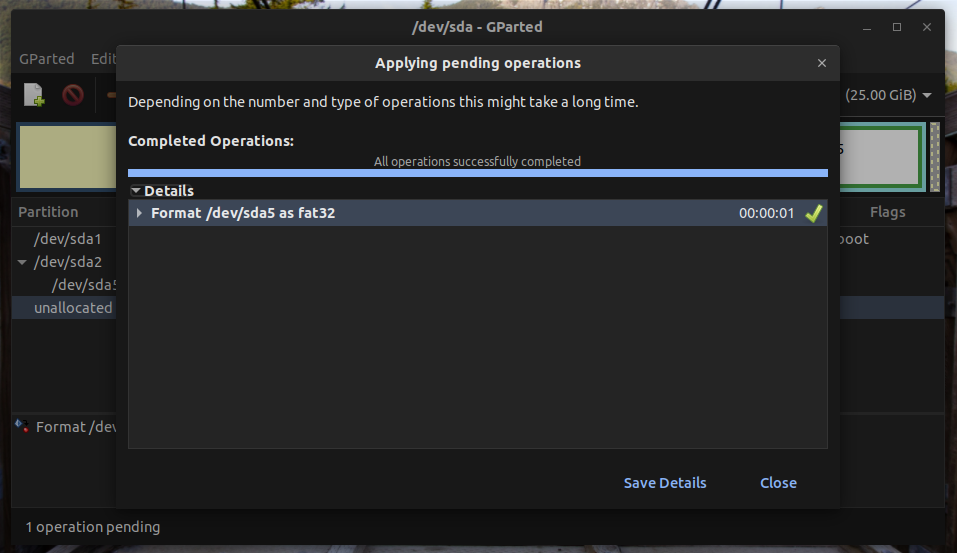
Voila! The partition has been formatted successfully!
Formatting a Partition Using the CLI method
This method is relatively shorter than the previous one. However, this method is only recommended for advanced users, as it comes with a higher chance of damage to the system. This method is less failsafe than GParted, so you must be super careful.
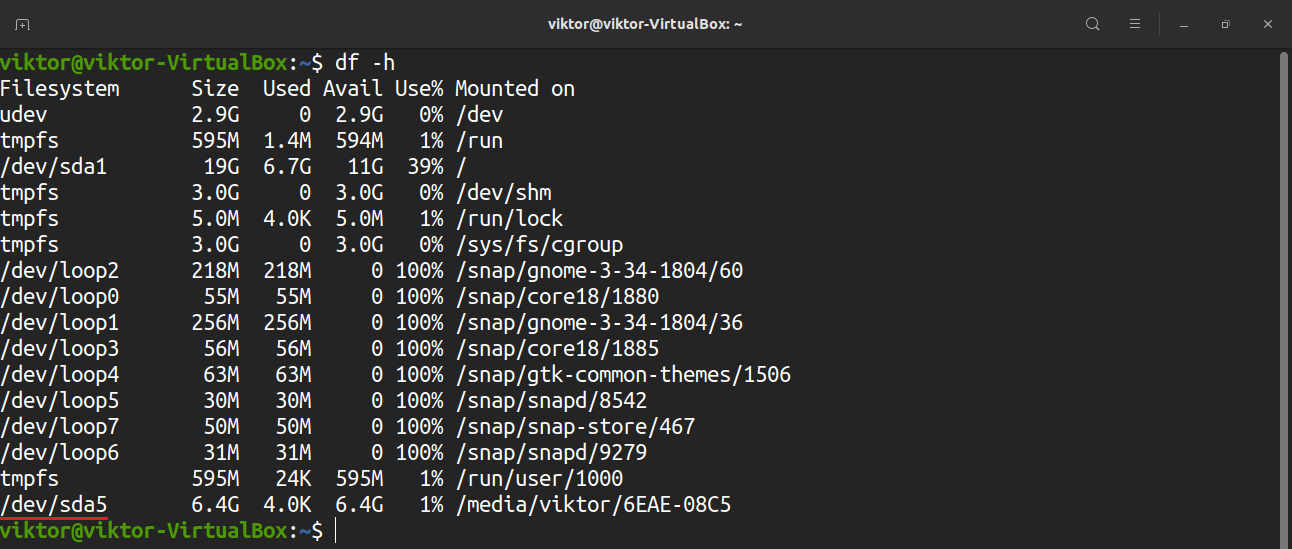
Connect the device to the computer. By default, most Linux distros will mount all the partitions of the device. Assuming it hosts a single partition, it will be mounted automatically. Check out the list of mounted filesystems below.
It is not allowed to format a partition that is currently mounted. To unmount the partition, run the following command.

Now, you can format the partition with your desired filesystem. Run the command that suits your needs.
How to Partition and Format Disk Drives on Linux
Formatting and partitioning disks is a key aspect of Linux administration. You can use formatting and partitioning to address use cases like prepping storage media for use, addressing space issues with existing disks, or wiping a filesystem.
This article will walk you through how you can partition and format disks to complete common Linux administration tasks.
#What is disk formatting in Linux?
Disk formatting is the process that prepares a storage partition for use. Formatting deletes the existing data on the partition and sets up a filesystem.
Some of the most popular filesystems for Linux include:
- Ext4 — Ext4 is a common default filesystem on many modern Linux distributions. It supports file sizes up to 16TB and volumes up to 1EB. It is not supported on Windows by default.
- NTFS — NTFS is a popular filesystem developed by Microsoft. It supports 8PB max volume and file sizes. The Linux kernel added full support for NTFS in version 5.15.
- FAT32 — Is an older filesystem, but you may still see it used in the wild. It supports a 4GB max file size and a 2TB max volume size. Many *nix and Windows operating systems support FAT32.
#What is partitioning in Linux?
Partitioning is the process of creating logical boundaries on a storage device. Common examples of storage devices include hard disk drives (HDDs), solid-state drives (SSDs), USB flash drives, and SD cards. Creating a partition on a drive logically separates it from other partitions. This logical separation can be useful for a variety of scenarios, including limiting the growth of a filesystem and installing multiple operating systems on a single drive.
#How to Partition and Format Disk Drives on Linux
Now let’s dive into partitioning and formatting disks on a Linux system.
#Prerequisites
Before we begin, you’ll need:
- Access to the terminal of a Linux system. We’ll use Ubuntu 22.04 LTS.
- sudo/root privileges
- An available disk you want to format and partition. We are going to use a server with custom partitioning layout from Cherry Servers.
- Backups of any data you don’t want to lose (optional)
#How to view disks in Linux
To view available disks in Linux, run this command:
Output should look similar to:
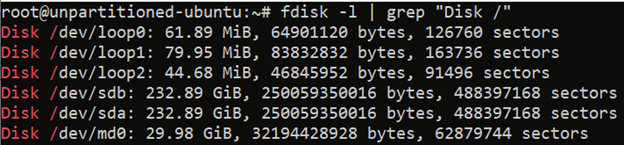
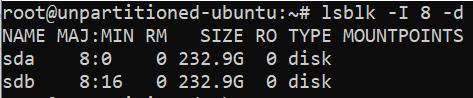
The fsdisk output above included loop devices which are logical pseudo-devices, but not real disks. If you need a more refined view of your disks, use the lsblk -I 8 -d command. «-I 8» specifies a the kernel device number for block devices and the -d excludes partitions.
The output should look similar to:
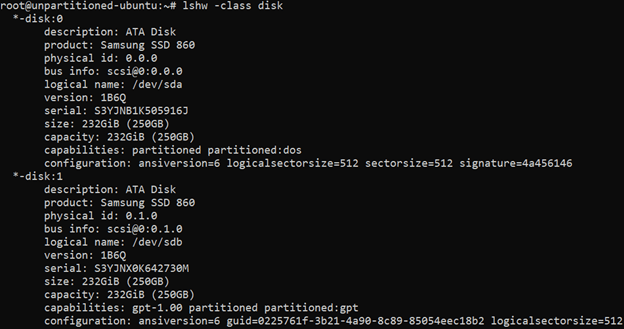
If you need more information to properly identify your drives, use lshw -class disk . The output will include additional identifying information such as the product, size, vendor, bus, and logical name (the device’s path), similar to this:
#How to view existing partitions in Linux
Before you create a new partition, you may want to view your existing partitions. To view existing partitions in Linux, use the lsblk command. The output should look similar to:
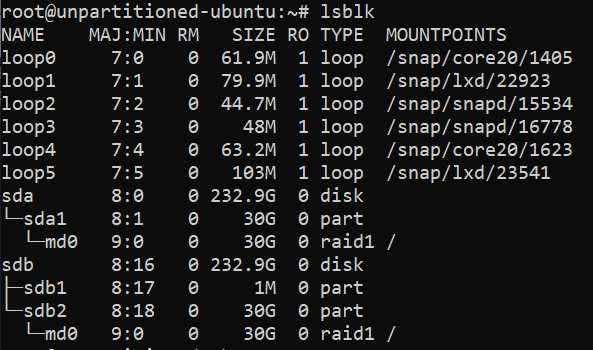
Partitions have a TYPE of part and are nested under their disks in the output like sda1 in our example.
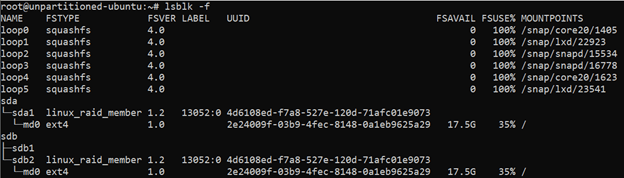
If you want to see information like file system types, disk labels and UUIDs, use the command lsblk -f . The output should look similar to:
#How to Partition a Disk in Linux
There are several ways to partition disks in Linux, including parted and gparted , but we’ll focus on the popular fdisk utility here. For our case, we’ll assume our disk is mounted on /dev/sda . We will create a primary partition and use the default partition number, first sector, and last sector that fdisk selects. You can modify these options based on your requirements.
Note: If you’re partitioning a disk that is currently mounted, first unmount it with the command `umount .
To begin, we’ll open our drive in fdisk with this command:
That will launch the interactive fdisk utility and you should see output similar to:

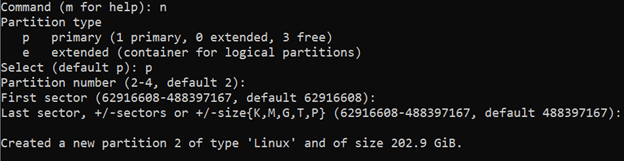
At the Command (m for help): prompt, type n to create a new partition. The output should look similar to:
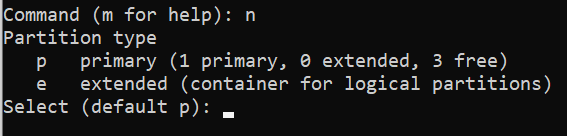
It shows that the disk that is mounted on /dev/sda directory has one primary partition that is formatted and being used at the moment.
We’ll press enter to select the default and create a new primary partition. Then, we’ll be prompted to give a partition number.

We’ll use the default of 2 and then get prompted for a sector number.

We’ll press enter to accept the default first sector, and then get prompted for a last sector.

Again, we’ll press enter to accept the default and fdisk will create the partition. Note that if we wanted to create a smaller partition, we could use a smaller gap between our first and last block. This would enable us to create multiple partitions on the drive.
The full output looks like this:
You may enter p to see a partition table and make sure your changes are correct:
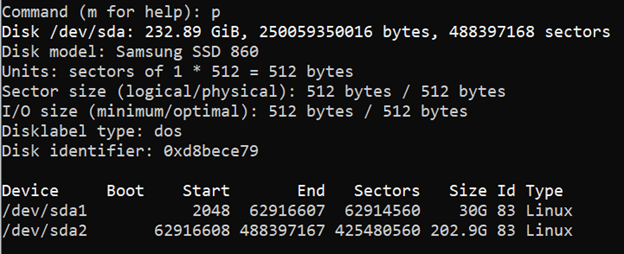
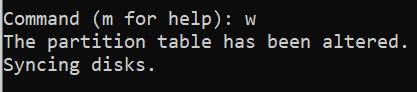
As you can see, we now have two partitions on the /dev/sda disk. At the Command (m for help): prompt, input a w to write the changes to the Linux system. The output should look similar to:
fdisk will then exit and you’ll be back at Linux shell. We can see our newly created partition sda by running the command lsblk /dev/sda . The output should look similar to:

#How to format a disk in Linux
Now that our disk is fully partitioned, we can format the newly created sda2 partition. The general syntax for formatting a disk partition in Linux is:
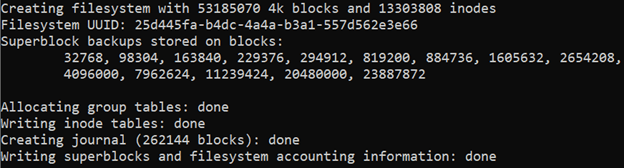
For example, to format our newly created /dev/sda2 partition, we can use this command:
The output should look similar to:
To use an NTFS filesystem instead, the command is:
To use a FAT32 filesystem instead, the command is:
The -F parameter specifies the FAT-TYPE , which determines if the file allocation tables are 12, 16, or 32-bit.
#How to mount a disk in Linux
Once a disk is partitioned and formatted, we can mount the filesystem in Linux.
First, if your mount point doesn’t already exist, created it with the mkdir command. The general command syntax is:
For example, to make our mount point /var/cherry , use this command:
Next, we mount our partition using the mount command. The general command structure to mount a disk partition in Linux is:
Note: If you omit the -t option, the mount command will default to auto and attempt to guess the correct filesystem type.
For example, to mount our /dev/sda2 (which has an Ext4 filesystem) to /var/cherry in read/write mode, we can use this command»
mount -t ext4 -o rw /dev/sda2 /var/cherry If there are no errors, the command will not return any output.
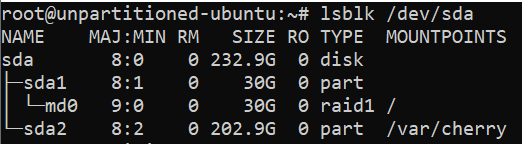
You can confirm your partitions mount point is correct with the lsblk /dev/sda command. The output should include a new mountpoint /var/cherry for your newly formatted /dev/sda2 device:
Finally, to ensure the disk automatically mounts when your Linux system boots, you need to add it to /etc/fstab .
⚠️ Warning: Be careful! Errors in /etc/fstab can cause your system not to boot!
The general format for an /etc/fstab partition entry is
Paraphrasing Ubuntu’s Fstab File Configuration, enables or disables backups using the command dump. It can be set to 1 (enabled) or 0 (disabled) and is generally disabled. determines the order fsck checks the partition for errors when the system boots. Generally, a system’s root device is 1 and other partitions are 2. 0 disables the fsck check on boot.
To edit /etc/fstab , open it in a text editor like nano or vim and make the changes. For our /dev/sda2 partition mounted at /var/cherry , we’ll use this configuration:
/dev/sda2 /var/cherry ext4 rw 0 0 Save the changes and close your text editor when you’re done.
#Conclusion
That’s it! Now you know the basics of how to partition and format disks on Linux. For a deeper dive on the topic of partitioning, formatting, and mounting drives, we recommend reading the man pages for the specific tools we used here like the mkfs. utilities (e.g. mkfs.ext4), fdisk, mount, and fstab.

Mantas Levinas
Helping engineers learn 💡 about new technologies and ingenious IT automation use cases to build better systems 💻
Join Cherry Servers Community
Get monthly practical guides about building more secure, efficient and easier to scale systems on an open cloud ecosystem.