- Команда fdisk. Управление разделами жёсткого диска
- Просмотр всех разделов диска
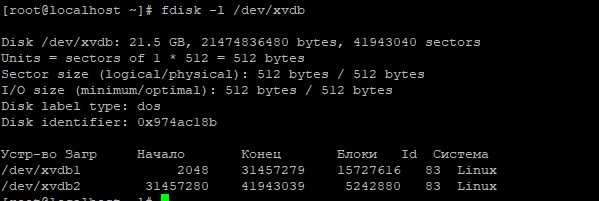
- Просмотр разделов заданного диска
- Командный режим
- Удаление раздела
- Создание нового раздела
- Форматирование раздела
- Проверка размера раздела
- Исправление нумерации в таблице разделов
- Флаг загрузочного раздела
- Заключение
- Похожие записи:
- Use fdisk Format Partition
- Format partition using fdisk
- Using fdisk to format partition
- Using the partition
- Final thoughts
- About the author
- Sidratul Muntaha
Команда fdisk. Управление разделами жёсткого диска
fdisk (сокращение от “format disk“, форматировать диск) — это наиболее распространенная утилита командной строки для работы с дисками в Linux/Unix системах. При помощи этой команды можно просматривать, создавать, удалять, изменять, копировать и перемещать разделы на жёстком диске, используя простой интерфейс текстовых меню.
Это очень полезный инструмент для выделения пространства для новых разделов, организации пространства на новых дисках, реорганизации старых дисков, а также копирования или перемещения данных на новых дисков. Он позволяет создавать до четырех первичных разделов и некоторое количество логических (расширенных) разделов в зависимости от размера жесткого диска в вашей системе.
Мы рассмотрим ряд базовых команд fdisk для управления таблицей разделов в Linux. Для запуска команды fdisk нужно обладать root-привилегиями (или использовать sudo), иначе будет выведена ошибка “command not found”.
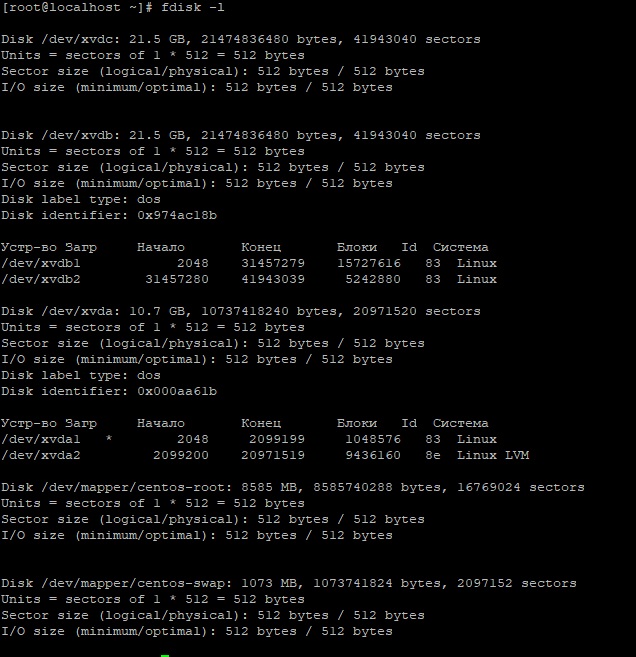
Просмотр всех разделов диска
Для просмотра всех доступных разделов используется опция -l (listing — перечисление). Разделы перечисляются по именам, например, /dev/sda , /dev/sdb или /dev/sdc .
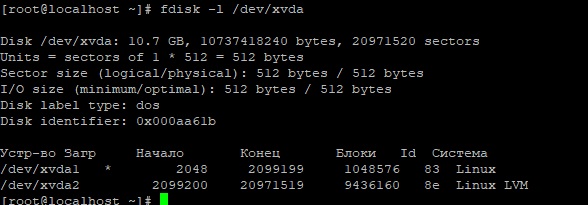
Просмотр разделов заданного диска
Для просмотра всех разделов заданного жесткого диска укажите опцию -l с именем устройства. Например, следующая команда отобразит все разделы диска /dev/sda :
Командный режим
Чтобы войти в командный режим, просто введите fdisk с именем жёсткого диска, например, /dev/sda , как показано ниже:

Для получения списка команд, которые fdisk может выполнить на диске, введите “m”. Рассмотрим значение этих команд.
a toggle a bootable flag — сделать диск загрузочным
b edit bsd disklabel — редактировать bsd-метку диска
c toggle the dos compatibility flag — установить флаг совместимости с DOS
d delete a partition — удалить раздел
l list known partition types — перечислить известные типы разделов
m print this menu — вывести это меню
n add a new partition — создать новый раздел
o create a new empty DOS partition table — создать новую пустую таблицу разделов DOS
p print the partition table — вывести таблицу разделов (аналогична fdisk -l)
q quit without saving changes — выйти без сохранения
s create a new empty Sun disklabel — создать новую метку диска Sun
t change a partition’s system id — изменить системный идентификатор раздела
u change display/entry units — изменить единицы отображения/ввода
v verify the partition table — проверить таблицу разделов
w write table to disk and exit — записать таблицу на диск и выйти
x extra functionality (experts only) — дополнительные функции (только для экспертов)
Удаление раздела
Допустим, нам нужно удалить определенный раздел, например, /dev/sda4, с определенного жёсткого диска, например, /dev/sda. Сначала нужно зайти в командный режим:
Затем введите d для удаления раздела. После этого у вас будет запрошен номер раздела для удаления с диска /dev/xvdb. Для удаления раздела номер 2 (то есть, /dev/xvdb2) нужно ввести соответствующую цифру, 2. Затем нужно ввести команду w, чтобы записать таблицу на диск и выйти.

Как мы видим раздел /dev/xvdb2 был удален.
Внимание : будьте осторожны с этой командой, потому что удаление раздела полностью уничтожит все данные на нем.
Создание нового раздела
Войдите в командный режим и введите “n”:
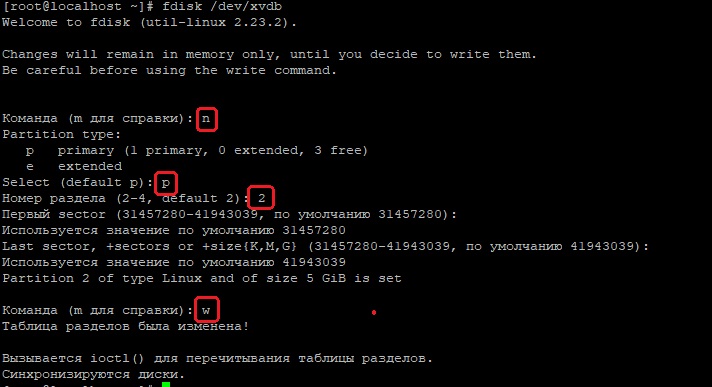
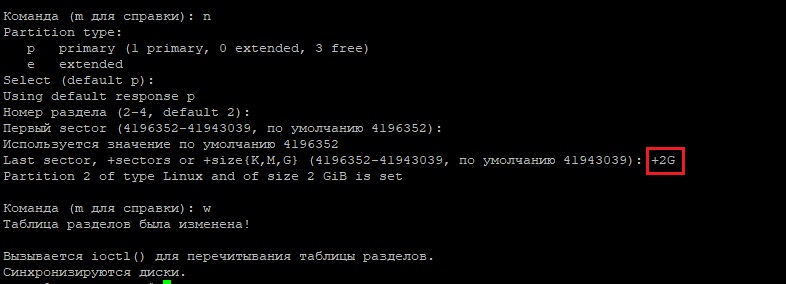
При создании нового раздела нужно выбрать одну из двух опций: extended для логического раздела или primary для первичного и нажать, соответственно, e или p . Затем потребуется ввести номера первого и последнего цилиндра раздела (либо смещение в цилиндрах или размер). Лучше всего оставить заданное по умолчанию значение первого цилиндра и ввести нужный размер раздела, например, “+5000M”, что означает размер 5000 мегабайт. После создания раздела нужно нажать w для сохранения изменений в таблице разделов.
Теперь мы видим на диске /dev/xvdb два раздела.
Также при создании раздела можно указать размер раздела с помощью опции +size. Т.е если нужно создать раздел размером 2 Гб, в качестве последнего сектора можно указать +2G
Форматирование раздела
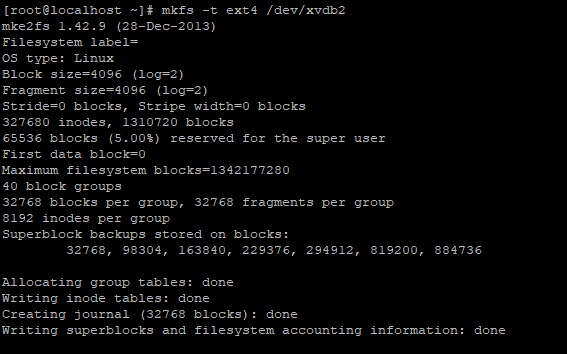
После создания нового раздела не забудьте отформатировать его командой mkfs. Для этого выполните следующую команду:
где в ключе -t указываем тип файловой системы в которую мы хотим отформатировать наш раздел.
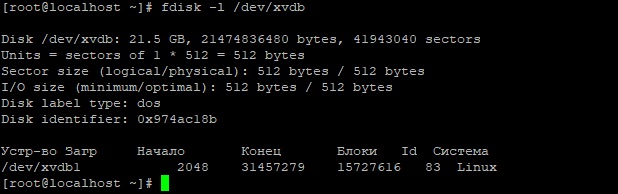
Проверка размера раздела
Когда раздел отформатирован, проверьте его размер при помощи опции -s (размер отображается в блоках). Так можно узнать размер любого заданного устройства:

Исправление нумерации в таблице разделов
Если вы удалили логический раздел, возможны ошибки вида ‘partition out of order‘ (нарушение порядка разделов) или ‘Partition table entries are not in disk order‘ (записи таблицы разделов не соответствуют порядку дисков). Допустим у нас диск со следующими разделами

Например, при удалении трёх логических разделов xvdb2, xvdb3 и xvdb4 и создании нового раздела можно предположить, что его имя будет xvdb2. Однако, система создаст раздел xvdb3. Это происходит потому, что после удаления раздела xvdb5 будет перемещена на место xvdb2, а свободное пространство — перераспределено в конец.
Для исправления подобных проблем и назначения вновь созданному разделу имени xvdb2 нужно перейти в режим дополнительных функций ( x ) и выполнить экспертную команду ( f) :
fdisk /dev/xvdb WARNING: DOS-compatible mode is deprecated. It's strongly recommended to switch off the mode (command 'c') and change display units to sectors (command 'u'). Command (m for help): x Expert command (m for help): f Done. Expert command (m for help): w The partition table has been altered!
Естественно, после выполнения команды ( f) нужно сохранить изменения командой ( w) . После исправления порядка разделов сообщения об ошибках должны прекратиться.
Флаг загрузочного раздела
Чтобы включить или отключить на заданном разделе флаг загрузочного раздела (отображается символом ‘*’ в таблице разделов), нужно выполнить следующие действия.
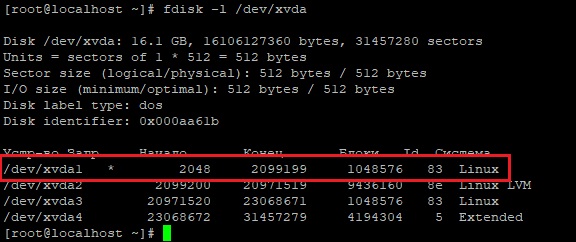
fdisk -l /dev/xvda
Вы увидите на диске /dev/sda1 флаг загрузочного раздела (звёздочка ‘*’)
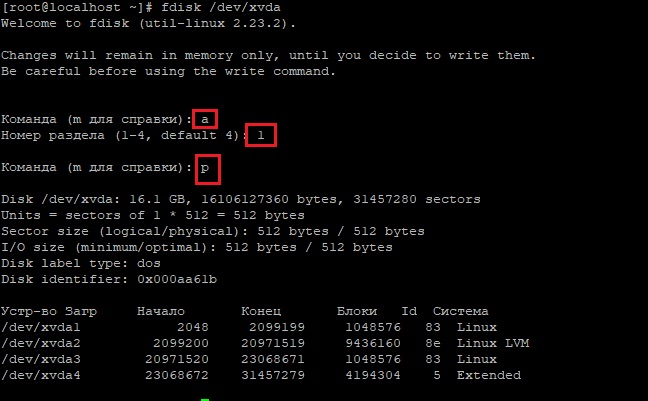
Далее введите команду « a» для снятия флага загрузочного раздела, а затем введите номер раздела (в данном случае 1 для /dev/sda1). Флаг загрузочного раздела будет снят, символ звёздочки (*) пропадет.
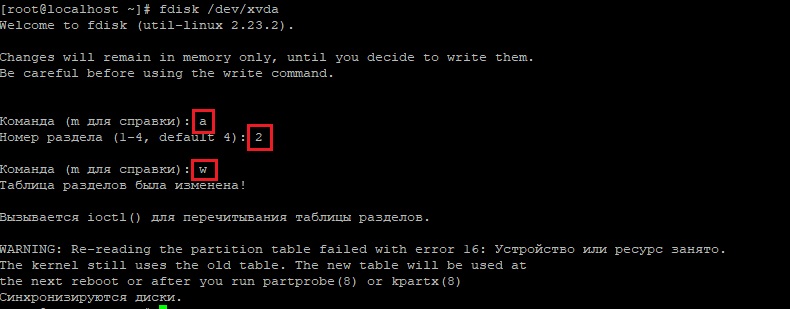
Для назначения загрузочного диска нужно также использовать опцию «a». Например назначим загрузочным диск xvda2
Заключение
Мы рассмотрели базовые возможности команды fdisk, необходимые для работы с разделами. Более подробную информацию, в том числе об экспертных командах, доступ к которым осуществляется командой x , можно получить на соответствующей man-странице ( man fdisk ).
Если вы нашли ошибку, пожалуйста, выделите фрагмент текста и нажмите Ctrl+Enter.
Похожие записи:
Use fdisk Format Partition
![]()
For managing disk partitions, fdisk is a command-line partition editor. It can create, edit, delete, and format almost any partition. It supports all the major partition tables, including GPT, MBR, Sun, SGI, and BSD. It makes fdisk compatible with almost all the standard partition formats.
In this guide, check out how to use fdisk to format a partition.
Format partition using fdisk
The fdisk tool will come pre-installed on almost all the Linux distros. This guide will demonstrate the usage of fdisk on an Ubuntu system.
To confirm that fdisk exists in the system, launch a terminal, and run the following commands.


An interesting feature fdisk offers the interactive mode. It offers far more control and safety over the partition formatting operation. That’s why this will be the primary method demonstrated in this guide.
Using fdisk to format partition
Listing disks
For the interactive mode, fdisk requires the device label in the system. In the case of the Linux filesystem, devices are labeled as “/dev/sd*” or “/dev/hd*” where the asterisk (*) is replaced by an alphabet.
For example, a device labeled as “/dev/sda” will have partitions labeled as “/dev/sda1”, “/dev/sda5” etc.
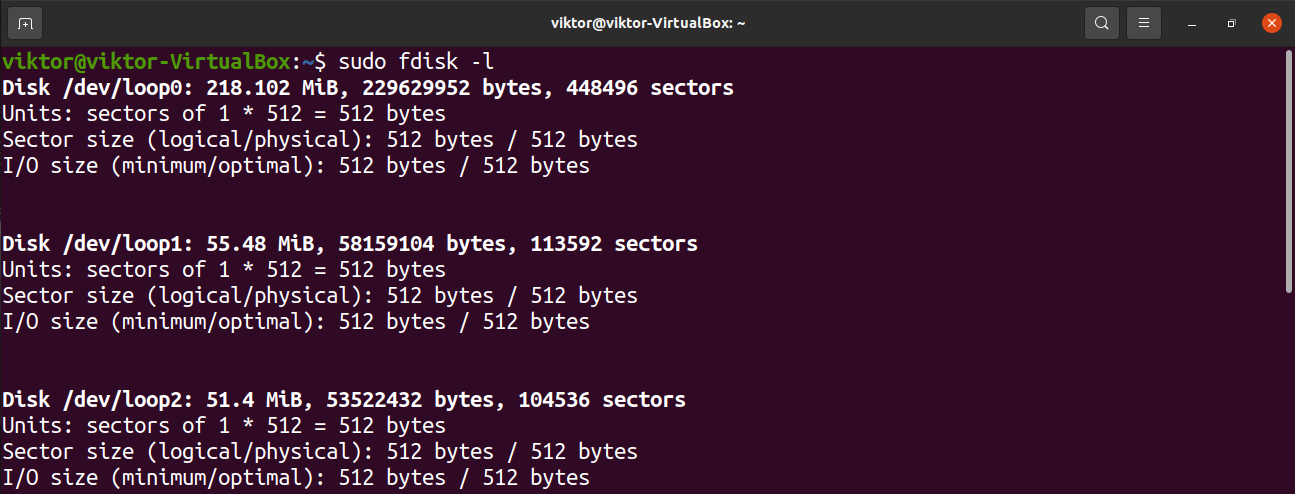
To list all the disks and their respective partitions, run the following command.

The fdisk tool can also list disks and partitions with a more in-depth report.
To check the partitions of a specific disk, use the following structure.

Launching fdisk interactive mode
Now that we’ve determined the target device, label launch fdisk in the interactive mode.

Any changes made will remain in the memory only. It offers protection from unwanted actions.
To print all the available options, enter “m”.

Creating a partition
It’s an optional step and only applicable if there’s free unpartitioned space on the disk. To verify if there’s any, enter “F”.

To create a partition, enter “n”.

It’s recommended to use the default value for the first sector of the new partition.
The last sector will determine the amount of space the new partition will take. In this step, fdisk accepts various formats of values. For example, if the partition size is to be 2GB, then enter “+2G”. If no unit is specified, then fdisk will use sectors as the unit.
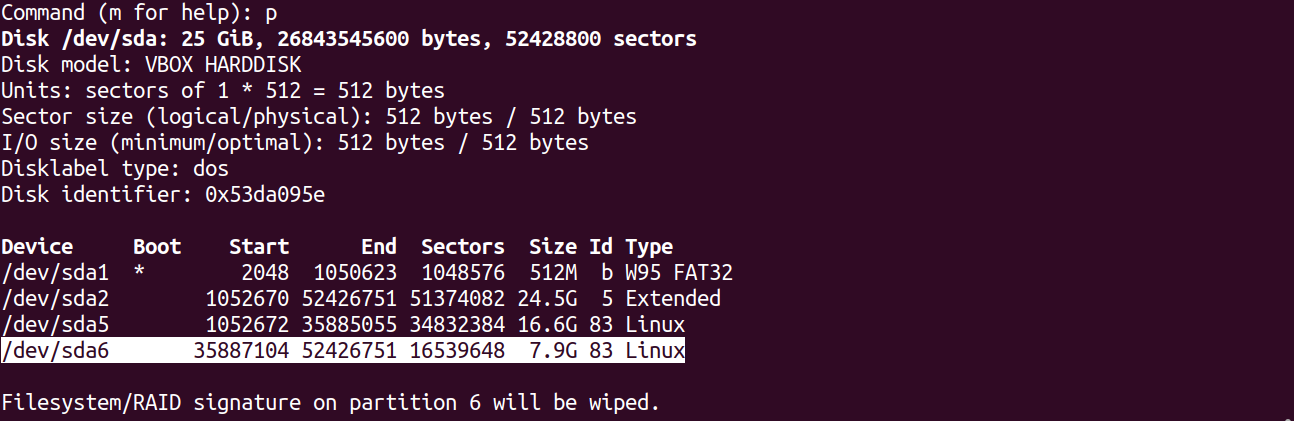
If there were any previous partition in the location, fdisk would prompt the warning that it contains a previous filesystem signature. It’s recommended to remove the signature. Enter “Y” to confirm the action.

Issuing the write command will mark the changes permanent.
Changing partition type
Any partition will have a value assigned for a certain kind of file system. There are various partition types available, for example, FAT12, AIX, SFS, OPUS, BSD/OS, OpenBSD, Linux, etc.
To change the partition type, enter “t”.

Fdisk will ask for the target partition number. If the partition is “/dev/sdb1”, then the partition number is “1”.
In the case of Linux, there’s a big set of supported partition types. To print all the available options, enter “L”. Each partition type has a unique hex code. For this example, we’ll be using “Linux” (hex value 83).


Writing the changes
Assuming everything was configured properly, it’s safe to make the changes permanent. If there’s any issue or you want to discard the current configuration, enter “q”. Fdisk will discard all the changes without writing them to the disk and exit.
Assuming everything was configured properly, enter “w” to write all the changes.


Formatting the partition
There are multiple reasons you may want to format a partition.
- For a new partition, formatting it will make the available storage usable by the operating system.
- If the partition contained any previous data, the formatting would erase the data.
- If a partition is corrupted, then formatting is the way to make it usable again. Of course, the data on the partition will be lost.
- If the partition contains a filesystem that’s not accessible by the operating system, formatting it with a suitable filesystem will allow the operating system access to the storage.
Note that if the partition is mounted, then it’s not possible to perform actions like partition formatting. Unmount the partition using the umount command.
Assuming we have the target partition label, let’s get into formatting it. Unfortunately, the fdisk itself doesn’t incorporate any partition formatting functions. We’ll have to use the mkfs tool for this purpose.
The mkfs tool supports multiple filesystems. For each supported filesystem, mkfs has a different command tool. To list all the supported filesystems and their respective command tools, run the following command.
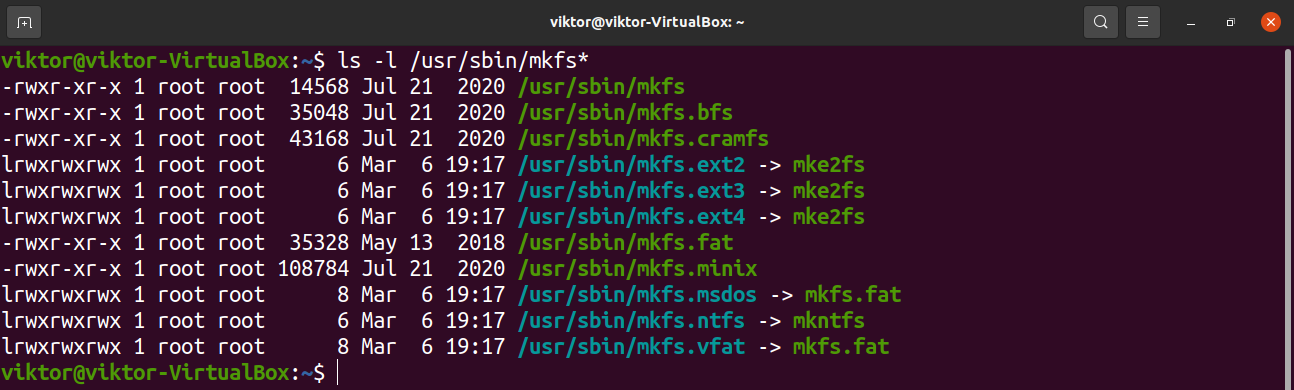
It’s easy to understand which tool is for what filesystem. For example, “mkfs.ext4” will create an ext4 filesystem on the target partition.
To format the partition in the ext4 format, run the following command.
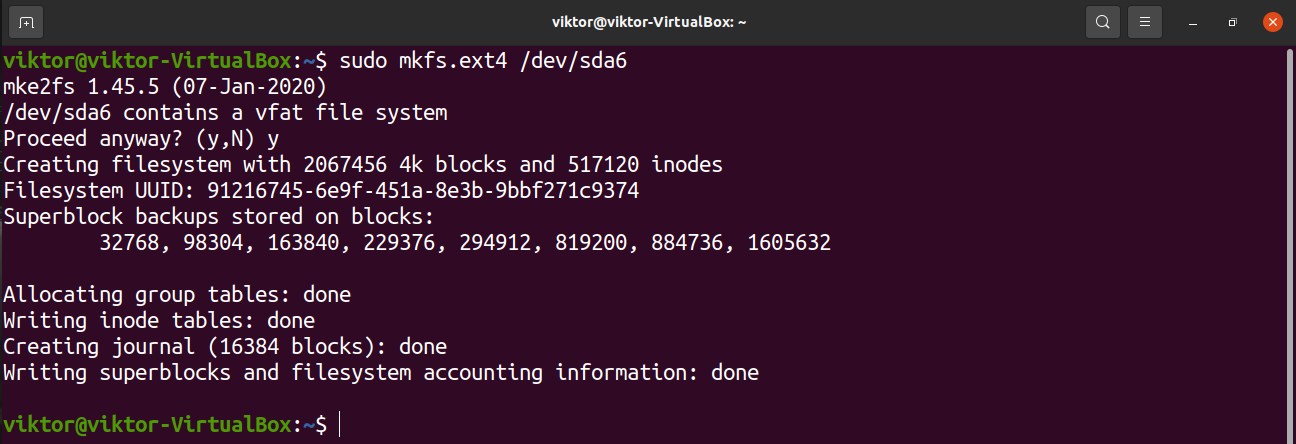
If there’s already a pre-existing filesystem, mkfs will prompt a warning message. Enter “y” to confirm the action.
Voila! The partition is formatted successfully!
Using the partition
To use a partition, it has to be mounted. Linux comes with a dedicated tool for mounting partitions and disk files. Learn how to mount using the mount command.
In short, mounting a partition requires a mount point where the partition is attached to the operating system. Create a mount point.

To mount the partition on the mount point, run the following command.

Voila! The partition now should be accessible from the mount point.
Final thoughts
Formatting a partition is a simple yet important task. For the command-line interface, fdisk is a great solution.
Not a fan of fdisk? Worry not. There are numerous tools available to manage partitions on Linux. Learn how to format disk partitions.
About the author
Sidratul Muntaha
Student of CSE. I love Linux and playing with tech and gadgets. I use both Ubuntu and Linux Mint.