- how to easily format USB drives (flash drive) from linux command line
- Using fdisk and mkfs commands
- Using dd
- Using parted
- Using gparted
- Как отформатировать USB-накопитель в Linux?
- Как отформатировать USB в Linux?
- Использование GParted
- GNOME Disks
- Создать файловую систему (mkfs)
- Использование «dd»
- Использование уничтожения
- Проблемы при форматировании USB
This post and this website contains affiliate links. See my disclosure about affiliate links.
how to easily format USB drives (flash drive) from linux command line
USB Drives or Flash drives are mostly just like any other drive like a hard drive. Occasionally you will want to format USB drives just as any other drive. Most commercially available USB drives are PC and Mac compliant, in that it is easy enough to reformat them on those operating systems, usually with a graphical interface with interactivity.
There are several reasons why you may want to re-format or format USB drives. Sometimes, a previous outdated formatting may require you to reformat the disk. If you had used the flash drive as a boot-able drive before, then the drive may be improperly formatted for normal usage. Also, if you used dd command to copy a smaller size image into the drive then you will need to reformat so as to restore the original size of the drive.
Theoretically, you can format USB drives using any of the file systems. But, it may not be a wise decision, unless you plan to use the drive exclusively on supported machines. Most systems (thinking Windows and Mac) will identify only FAT, vfat or FAT32 file systems. Fortunately, almost all Linux systems does have the ability to read FAT file systems, so you can use FAT or FAT32 file systems while formatting as well.
There are two main concepts that you should be aware of when you format USB drives: partition table and file system. A typical store bought flash drive will typically have the msdos partition table with the vfat file system on it. Unfortunately it is still a MS world and it is the most commonly used flash disk format which is supported by most operating systems and devices.
Note: All the following commands will need to be executed as the super user or root. You can either use sudo with each of these commands or login as root before executing them.
Using fdisk and mkfs commands
Once you have inserted the drive, you need to first identify the file system or device that you want to format. You can do that by using either the fdisk or mount commands.
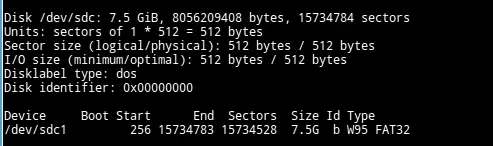
bash$ fdisk -l
Once you have identified the device, unmount it before formatting.
The above command will unmount the file system mounted on /dev/sdc1. Now, you can use the mkfs command to create a new file system on the drive. You will specify the desired file system type as a command line argument to the mkfs command using -t.
The following command will create a ext3 file system in the USB drive. You can format usb drives using any of the supported file systems such as ext3, ext4, vfat etc.
If you plan to use the USB drive, on all different operating systems, then you will need to format it using the FAT32 file system. The following command will re-format the drive using FAT32.
bash$ mkfs -t vfat -L «My USB» /dev/sdc1
The -L command line argument is optional. You can use it to set a label for the drive.
Using dd
Sometimes, just reformatting will not suffice. You might want to recreate the partition table as well. You can use dd command to wipe it clean and start over. The dd command will wipe out the partition table, which will allow you to start afresh.
bash$ dd if=/dev/zero of=/dev/sdc bs=1024
Once you have successfully rewrote everything on the disk, you can start out by creating a new partition table. To create a new partition table, use the fdisk command.
The fdisk command will walk you through the process of creating the new partition table. You can press m for help anytime to see all the available options.
bash$ fdisk /dev/sdc
You can run the fdisk command by specifying the device with no other argument as shown above. Then follow the steps shown below.
- press n to create a new table
- press p for partition table
- press 1 to select the first partition
- press to select the default first sector (which is usually 2048)
- press to select the default last sector
- press t
- press 6
- press w to write and commit the changes to disk
Once you have created the partition table, you can then format the USB drive by creating a file system using the mkfs command as described in the previous section.
Using parted
parted is a command line utility that is used to partition drives and disks. It is a partition editor which helps you with the exact partitions that you need. You can use this instead of the fdisk command.
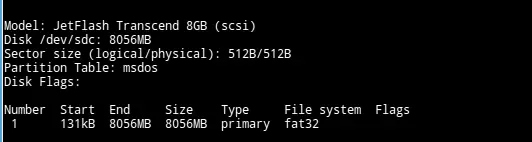
bash$ parted -l
or
bash$ parted /dev/sdc print
So, you can use parted to create a new partition table, format and clean your USB drive just as with the mkfs, dd and fdisk commands. In order to start parted on the device, use the following command which brings you to a parted prompt…

Let’s first see how the utility identifies the drive, which is always a good idea…
The next step is to create a new partition table. You can also skip this step, if you just want to continue to use the current table. You can use the gpt table if you plan to use the drive only on Linux machines. You can also specify the msdos if you plan to use it elsewhere…
Now, we want to create a new partition on the disk. Almost always, you will use a single partition for data unless you have specific requirements.
Choose primary partition for the partition type….
Partition type? primary/extended? primary
Choose the msdos as the file system type. (You can use other file systems such as ext3 or ext4 if you prefer). Now, choose the start as 2048 and the end as -1 which corresponds to a reasonable value for the start and end. You can also use 1 and -1 as start and end.
Now, you can use the mkfs command to format USB drives and the new partition as described in the previous section.
bash$ mkfs -t vfat -L «My USB» /dev/sdc1
There are three different parted commands that you will commonly use that you need to familiar with.
mklabel: This creates a new disk label or partition table on the disk with out creating any partitions itself.
mkpart: This creates a new partition on the disk with out a file system on that partition.
mkpartfs: This creates a new partition with the specified file system, such as fat32 or ext4.
mkfs: This makes a “new” file system on the specified partition by destroying all the data on that partition.
Using gparted
gparted is a user interface built on top of the parted command. This software makes it easy to partition and format USB drives. If you have access to an X interface, then using gparted is a good idea. parted command is still the best option from the command line.
I am not going to go into the details of how to use gparted here, as it is beyond the scope of this post. It is pretty intuitive in how you would use it, once you know how to use parted and how formatting works.
Как отформатировать USB-накопитель в Linux?
Форматирование USB-накопителя в Linux по большей части является простым процессом, но на этом пути вы можете столкнуться с несколькими препятствиями.
Например, пользователи часто не уверены, в какой файловой системе им следует форматировать USB-накопитель.
Как правило, вы должны придерживаться «ext4» для лучшей производительности и стабильности.
Но если вас беспокоит межплатформенная совместимость, вы можете вместо этого использовать «exFAT» или «FAT32».
Пользователи также сообщали о проблемах с невозможностью использования USB после форматирования.
В этой статье мы подробно описали, как правильно отформатировать USB-накопитель и решить все подобные проблемы.
Как отформатировать USB в Linux?
Мы будем использовать «ext4» в качестве примера, но вы можете выбрать предпочтительную файловую систему при форматировании USB-накопителя.
Не забудьте заранее сделать резервную копию всех важных данных.
Кроме того, убедитесь, что вы указали правильное устройство для форматирования при выполнении методов командной строки, так как это легко испортить и отформатировать не тот диск.
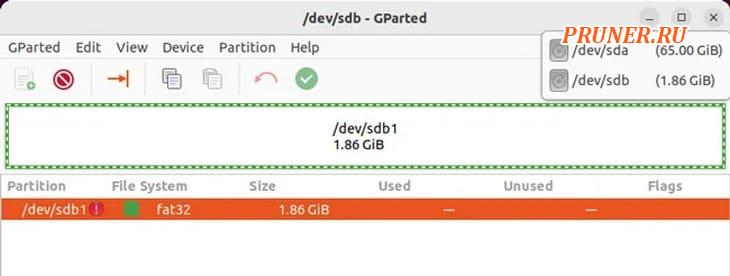
Использование GParted
GParted — это менеджер разделов с графическим интерфейсом.
Использование GParted, как правило, является самым простым способом форматирования USB-накопителей в большинстве дистрибутивов, поэтому, если вы новичок в Linux, это должен быть ваш вариант.
Вот необходимые шаги для этого:
Во-первых, вам нужно установить GParted.
В дистрибутивах на базе Debian это можно сделать с помощью следующей команды:
Откройте GParted и введите свой пароль для аутентификации.
Выберите USB в правом верхнем углу.
Щелкните правой кнопкой мыши USB и выберите «Размонтировать».
Затем щелкните правой кнопкой мыши раздел данных и выберите «Форматировать в — ext4».
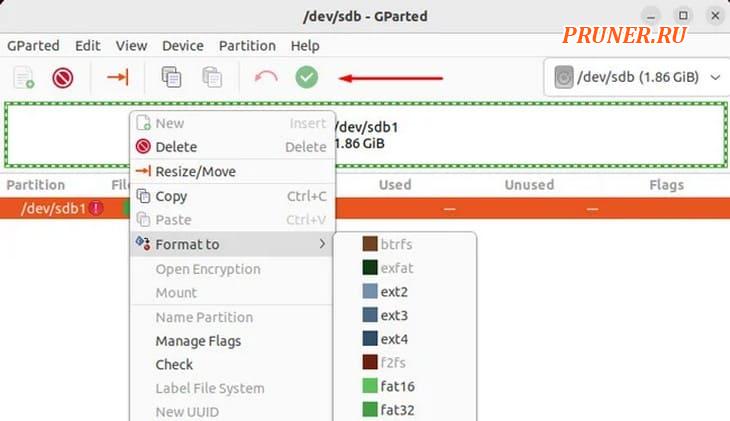
Нажмите «Применить все операции».
После этого щелкните его правой кнопкой мыши еще раз и выберите «Mount».
Если опция «Mount» неактивна, выполните следующие команды в терминале:
GNOME Disks
GNOME Disks — это менеджер разделов по умолчанию для сред рабочего стола GNOME.
Он предустановлен в большинстве популярных дистрибутивов Linux, включая Ubuntu.
Вот шаги для форматирования USB с помощью этой утилиты:
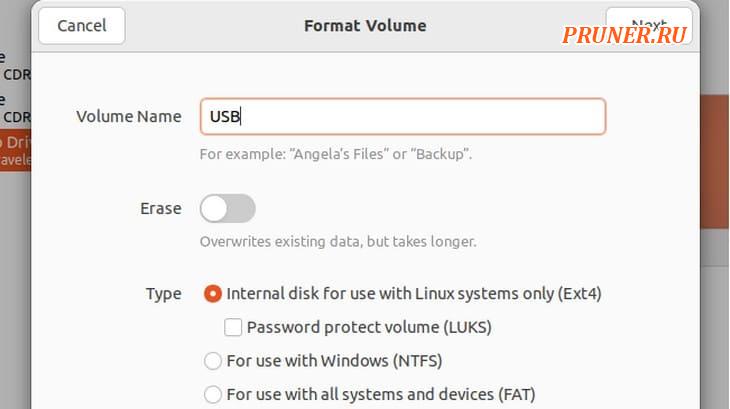
Откройте утилиту «Диски» и выберите USB.
Выберите раздел, который вы хотите отформатировать, и нажмите на шестеренку настроек.
Выберите «Форматировать раздел» и переименуйте том, если хотите.
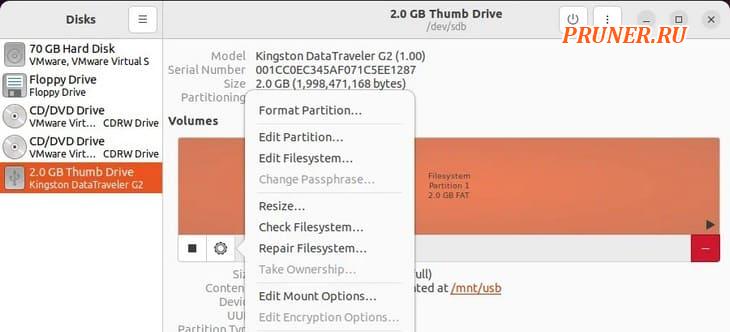
Вы можете включить «Erase», чтобы перезаписать существующие данные, а также выбрать файловую систему.
После этого нажмите «Далее — Форматировать».
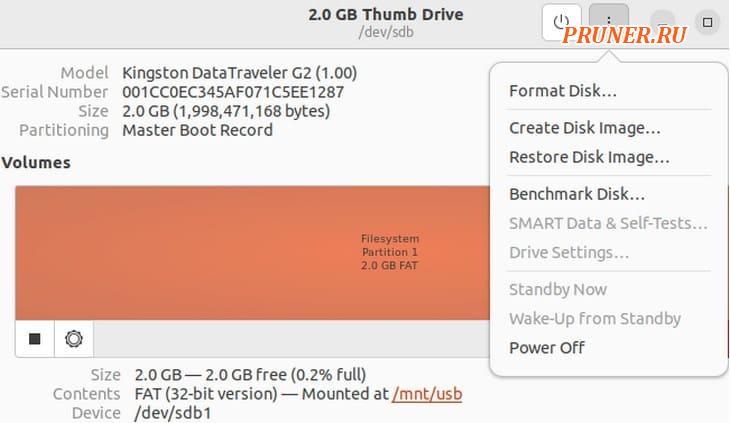
Если вы хотите отформатировать весь диск сразу, нажмите кнопку с тремя точками и выберите «Форматировать диск — Форматировать».
Нажмите кнопку «+», чтобы создать раздел в нераспределенном пространстве.
Отрегулируйте размер раздела и другие значения, как и раньше, и создайте раздел.
Теперь смонтируйте USB, чтобы снова сделать его доступным.
Создать файловую систему (mkfs)
GParted выполняет операции с диском через утилиту «mkfs».
Таким образом, вы можете думать об этом методе как об использовании GParted, но через командную строку, хотя их происхождение на самом деле наоборот.
В любом случае, вот шаги по форматированию USB с помощью mkfs:
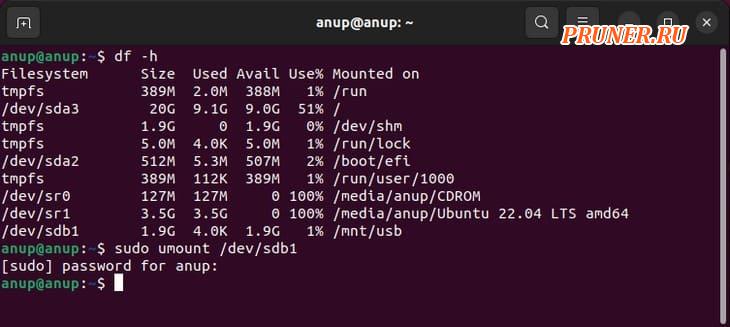
Используйте «df -h» для проверки пути устройства USB.
Размонтируйте USB с помощью «sudo umount ».
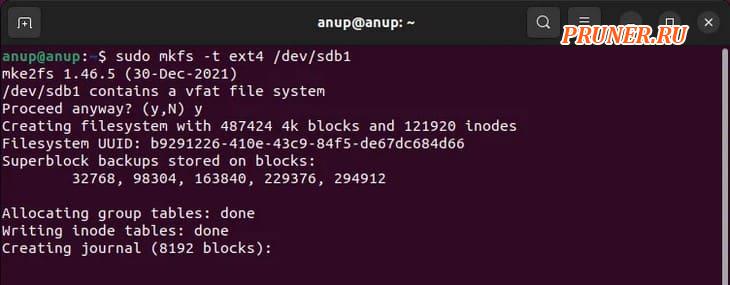
Замените предпочитаемой файловой системой (ext4, vfat, nfts и т. д.) и выполните команду.
После этого смонтируйте USB с помощью следующих команд:
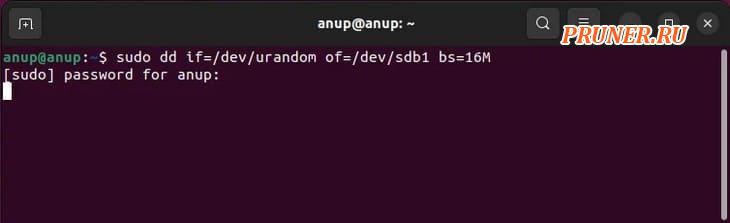
Использование «dd»
Вы можете использовать «dd» либо для заполнения нулями, либо для записи случайных данных на USB-накопитель, по сути, отформатировав его и сделав данные невосстановимыми.
Это хорошая идея, если вы планируете одолжить USB или продать его кому-то.
Использовать «dd» очень просто — базовый синтаксис следующий:
Например, если вы хотите записать случайные данные вместо нулей на USB-накопитель, подключенный к «/dev/sdb1», вы должны использовать следующую команду:
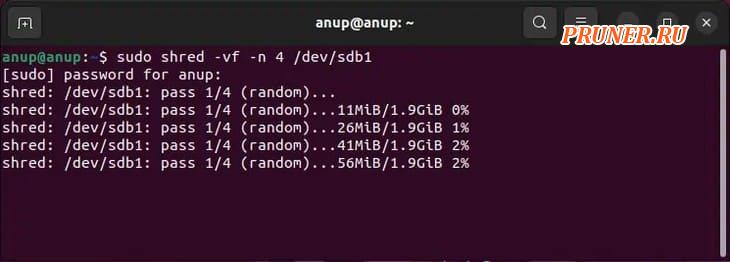
Использование уничтожения
«Shred» по сути является «dd», но более безопасным.
Его шаблоны перезаписи оптимизированы для уничтожения как можно большего количества остаточных данных, поэтому это лучший выбор, если вы пытаетесь полностью стереть USB.
Базовый синтаксис для «Shred»: shred .
В нашем примере мы будем использовать параметр «-f» для принудительной записи, «-n» для указания количества перезаписей и «-v» для отображения текущей операции.
Но полный список опций вы можете найти на справочной странице «shred».
Проблемы при форматировании USB
Часто сообщаемая проблема, связанная с USB, заключается в том, что пользователи установили Linux на USB, и теперь он не может использоваться для передачи данных.
Вернуть загрузочный USB в не загрузочное состояние очень просто — все, что вам нужно сделать, это отформатировать его.
Другой распространенной проблемой является невозможность подключения USB-накопителя после форматирования.
На этот раз это обычно происходит потому, что инструменты форматирования в Linux способны удалить все с диска, включая подписи файловой системы.
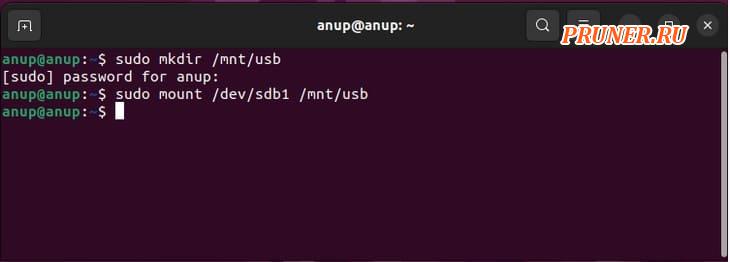
Поскольку разделов для монтирования нет, вам придется сначала их создать.
Если «sudo mount » это не позволяет вам автоматически монтировать, вы должны сначала создать точку монтирования, а затем монтировать устройство вручную как таковое:
Наконец, еще одна проблема, о которой стоит упомянуть, заключается в том, что процесс форматирования прерывается, и после этого USB не определяется.
Пользователи обычно используют «lsusb», и когда они обнаруживают, что система вообще не обнаруживает USB, они предполагают, что заблокировали устройство.
Хотя это, безусловно, возможно, мы обнаружили, что простые исправления, такие как перезагрузка ПК и переустановка USB несколько раз, на удивление эффективны для решения этой проблемы.