- Create and format exFAT partition from Linux
- 10 Answers 10
- How to Format a USB Disk as exFAT on Linux [Graphically and Command Line]
- Prerequisites
- Method 1: Format disk as exFAT using GNOME Disks tool
- Method 2: Format disk as exFAT in Linux command line (for advanced users)
- Did you succeed in creating exFAT disk?
Create and format exFAT partition from Linux
Here’s another good reference: itsfoss.com/format-exfat-linux. It mentions sudo apt install exfat-fuse exfat-utils for Ubuntu 20.04 and older, and sudo apt install exfat-fuse exfatprogs for Ubuntu 22.04 and later.
10 Answers 10
Yes, there is a project implementing exfat and the related utilities at relan/exfat.
To format a partition, use mkexfatfs / mkfs.exfat like with most filesystems, e.g.:
As for creating the partition in the first place, this is the same as for any other filesystem. Create a partition in your favourite partition manager. If you have an MBR partition table, set the partition type to NTFS (that is, code 7 ).
Note, that some distributions only package the fuse module, so you may have to build it yourself.
On Ubuntu I just had to install a couple packages first: sudo apt-get install exfat-utils exfat-fuse . Source: askubuntu.com/a/374627/18665
On modern fdisk the type you want is 11 (Microsoft basic data). Disregard the google.code.com link in the answer and instead use @bmaupin’s command on Debian/Ubuntu.
be careful while doing this, it didnot warn me and completely deleted all the files I had in it. So first backup and then do it
This worked fine for me. I already had the exfat and fuse installed. BUT. the post blow from Billious is misleading. IF you have just formatted a drive, you must supply more information to mkfs.exfat — Like where to put the partition and how big, ya-da-ya-da. I’m just lazy. I used gParted to set-u my USB how I wanted. Leave the partition you want to make exFAT alone. Or format it to FAT32 to process the whole USB. Next ensure the target partition is unmounted. Proceed, e.g.: sudo mkfs.exfat -i DAT -n data /dev/sdc3 . I let gParted deal with alignments and such.
Install exFAT utilities first.
sudo apt install exfat-utils sudo mkfs.exfat -n Volume Name /dev/USB_dev_file
The mkfs.exfat solution above works if a partition already exists on a drive, like a purchased USB pen drive. Use this link if you’re starting from a bare disk:
This should be the accepted answer! That link contains a brilliant explanation that I couldn’t find anywhere else on the internet.
On the command line, the process is as follows:
Use the lsblk command to find out which drive your usb stick is. (for example /dev/sdx)
Then start parted and tell it which drive you want to perform operations on:
In parted interactive mode type:
Now reboot. And after the reboot do:
And in parted interactive mode type:
mkpart primary ext4 0% 100% When the partition is created, press q to exit parted.
Now that the flash drive contains a partition, create an exFAT filesystem on the newly created partition (replacing the ext4 filesystem that only works on Linux):
Personally, I skipped the «reboot» step. Instead, I pulled out the USB stick (sdb went away) and after reinserting it came up as sdd. If it wasn’t obvious, with sdx1 the «x» could be any letter of the alphabet (usually it’s a, b, c, d. ) but it depends on your particular setup.
See guidance below for completely wiping and restoring afresh any USB pen drive from anuy Linux command line/terminal. I often do this when pen drives become corrupted and stop working. In this example, the pen drive is /dev/sdb, but yours may be different,
This lists the disks/partitions. Remember the correct /dev/sdx name for the device. In this example it is /dev/sdb
You may need to unmount any already mounted partitions — e.g sudo umount /dev/sdb1 , etc.
The following wipefs command will remove any existing file systems from the drive. If you do not have wipefs installed, install it using your package manager.
At this point, all file systems have been removed, any data on the drive is technically still recoverable. To permanently wipe all data from the drive :-
sudo dd if=/dev/zero of=/dev/sdb bs=1M This dd command should complete quickly. This writes zeros (the if = input file) to the of (output file), which is the device. The bs (block size) flag sets how many bytes to read/write at a time, the default is 512 bytes, but above it has being set to 1 megabyte (or 1,000,000 bytes).
OR, for a more secure version which writes random data instead of zeros :-
This one can take a while.
The pen drive is completely wiped now. and all data is unrecoverable.
If you want to now create a bootable USB drive now in Linux from an OS ISO file, use the dd command again here, e.g.
dd bs=4M if=ubuntu-12.04.2-server-i386.iso of=/dev/sdb The pen drive is now bootable, and no further action is needed if this is all you want to do.
Or, to create a blank pen drive for storage purposes, you could put the drive into a Windows machine and format there, which might be easier/quicker, but to partition the pen drive in Linux, continue below as below
This goes into the fdisk program. You need to now input specific commands in the following order.
- Option d — this delete partitions (this is not needed if you have used the dd command above on the device). Repeat for each partition if present.
- Option n — create a new partition, just accept all the defaults (unless you need multiple partitions of specific sizes, most people won’t)
- Option w (write changes)
To create a vFAT partition (readable on Windows)
Or, to create exFAT partition, use the following command instead:-
sudo apt-get install exfat-utils exfat-fuse #if not already installed sudo mkfs.exfat -n volume_name /dev/sdb1 When complete, Linux should auto-mount the device. If not, mount the device as below :-
mkdir /media/usbdrive mount /dev/sdb1 /media/usbdrive Disks ( gnome-disks ) and KDE Partition Manager are two GUI tools that can achieve this. (Gparted cannot do it.)
For USB sticks, there is the USB Stick Formatter, part of the mintstick tool .
In the latest Ubuntu version ( 22.10 ) the package you are looking for is named exfatprogs instead of exfat-utils .
To make exFat formatting available for ubuntu.
(Maybe works fort other distros as well? will modify this claim if its been confirmed false or true.)
After these steps exFat formatting will work in ubuntu.
Ubuntu 20.04 and lower versions:
sudo apt install exfat-fuse exfat-utils Ubuntu 22.04 and higher versions:
sudo apt install exfat-fuse exfatprogs - Article is about how to format into exfat, for example needed when making bootable windows media.
Currently, the best filesystem to share content between Windows and Linux is exFAT, specially on USB pendrives and SD cards. exFAT is, roughly speaking, a revision of FAT32 without the 4GB max file size limitation. Since kernel version 5.4, exFAT is a native filesystem for Linux and does not rely on FUSE anymore.
If not installed, you will have to install exFAT support, as follows.
Note: On systems with older kernels, use exfat-utils instead of exfatprogs .
$ sudo apt install exfatprogs # Debian/Ubuntu $ sudo dnf install exfatprogs # Red Hat/Fedora/CentOS $ sudo pacman -S exfatprogs # Arch Linux/Manjaro From here, you have two options. Use a graphical tool like gparted or the command line (which is more fun). Find below steps for the latter.
- Plug-in the USB pendrive/SD card.
- Identify the device. It should be one of /dev/sd? . In a terminal, run the below command which will show connected devices and partition mount points. In this example, /dev/sdb is the device, with two partitions, the first of which is mounted.
$ lsblk NAME MAJ:MIN RM SIZE RO TYPE MOUNTPOINT sdb 8:16 1 15G 0 disk ├─sdb1 8:17 1 256M 0 part /media/myuser/mydevice └─sdb2 8:18 1 14,7G 0 part nvme0n1 259:0 0 931,5G 0 disk ├─nvme0n1p1 259:1 0 512M 0 part /boot/efi ├─nvme0n1p2 259:2 0 64G 0 part / ├─nvme0n1p3 259:3 0 256G 0 part /home ├─nvme0n1p4 259:4 0 38G 0 part [SWAP] ├─nvme0n1p5 259:5 0 448G 0 part /data ├─nvme0n1p6 259:6 0 16M 0 part └─nvme0n1p7 259:7 0 125G 0 part $ sudo fdisk /dev/sdb # Pay attention! No final digit is used. Welcome to fdisk (util-linux 2.34). Changes will remain in memory only, until you decide to write them. Be careful before using the write command. Command (m for help): - Create a new (dos) partition table: press o and enter .
- Create a new partition: press n , enter and accept default options.
- Change the partition type to HPFS/NTFS/exFAT: press t , enter , 7 , enter .
- Quit saving changes: press w and enter .
- You can quit without saving changes: press q and enter .
$ sudo mkfs.exfat -n "my label" /dev/sdb1 # Pay attention! Final digit is used. mkexfatfs 1.3.0 Creating. done. Flushing. done. File system created successfully. How to Format a USB Disk as exFAT on Linux [Graphically and Command Line]
For a long time FAT has been the default choice of filesystem for formatting disks. It is compatible with pretty much all the major operating systems.
The one major problem with FAT filesystem is that you cannot transfer a file larger than 4 GB. This means even if your USB disk has 32 GB of free space, if you try to transfer a ISO image or some other file greater than 4 GB in size, the transfer will fail.
This creates a problem in situation like when you are creating a bootable USB of Windows in Linux. You cannot use NTFS and FAT filesystem has that 4 GB size restrictions.
To overcome the limitations of FAT filesystem, Microsoft came up with exFAT filesystem. And in this tutorial, I’ll show you how to format a USB disk in exFAT filesystem.
Prerequisites
Starting Linux kernel 5.4, exFAT filesystem support is enabled in the Linux kernel itself. Check which Linux kernel version you are running. If it is kernel 5.4 or higher, you should be fine (mostly).
Otherwise, you can enable exFAT support explicitly.
In Ubuntu 20.04 and lower versions, you can use the following command:
sudo apt install exfat-fuse exfat-utilsFor Ubuntu 22.04 and higher, you should use this command instead:
sudo apt install exfat-fuse exfatprogsMethod 1: Format disk as exFAT using GNOME Disks tool
Formatting a drive using GNOME Disks is a straightforward job. It comes preinstalled in a number of Linux distributions.
Plug in your external USB disk. Now, look for Disks in menu and open the GNOME Disks application. As a first step choose the drive that you want to format and follow the steps with me.
Warning: Pay attention to the disk you are selecting to format. Don’t format your main disk accidentally.
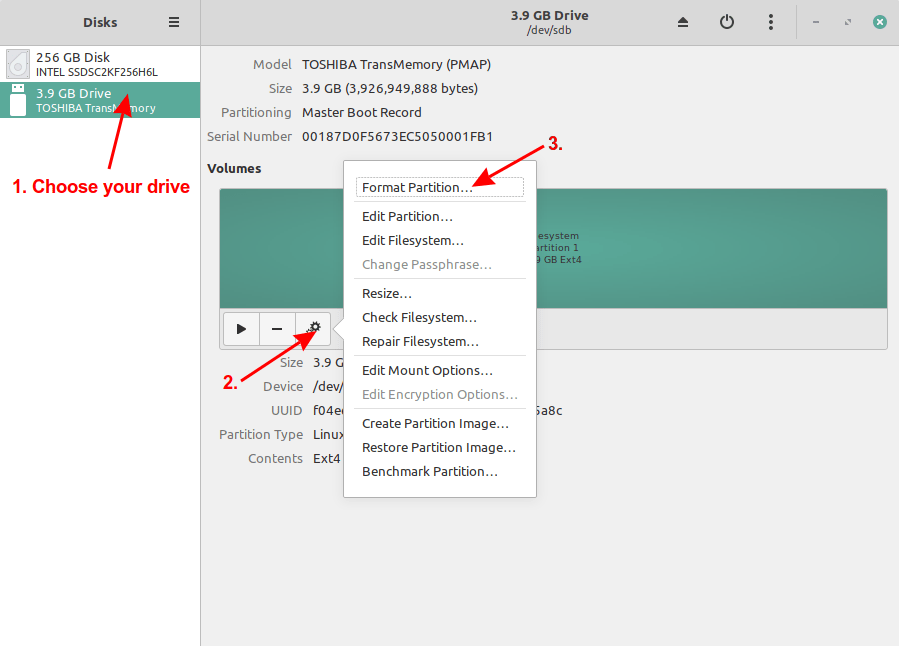
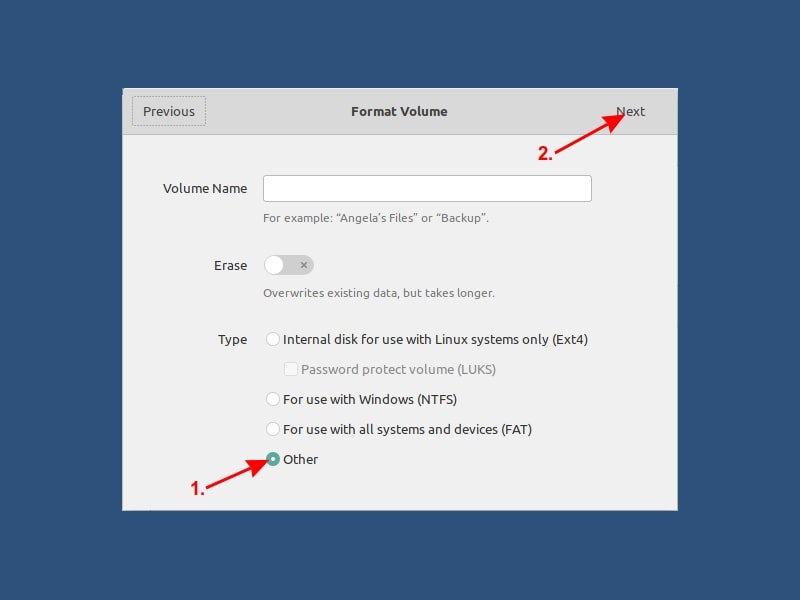
The commonly used file systems like Ext4, NTFS, FAT will appear first. To use exFAT, choose “Other” and then click on “Next“.
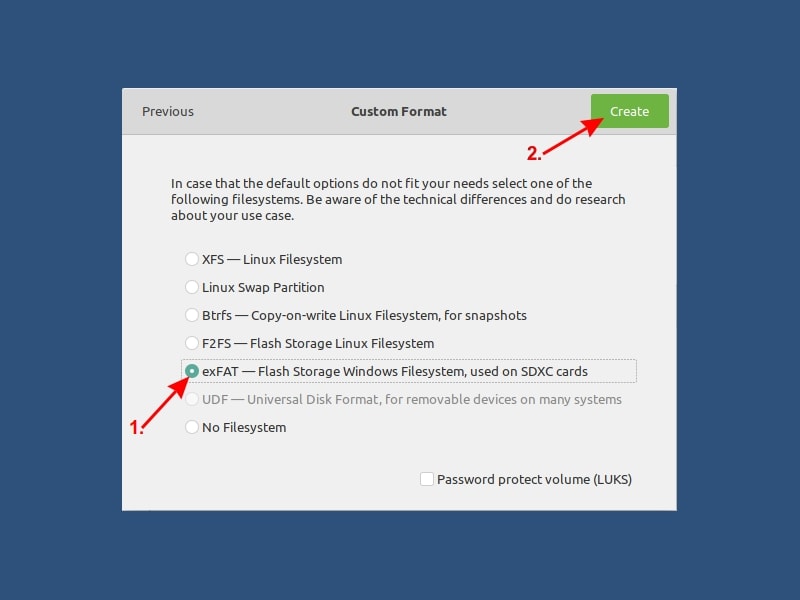
Final step: choose exFAT file system on this screen and then click Create. Job done!
See how easy it was to create a exFAT disk in Linux graphically? Now, let me show you the terminal method as well.
Method 2: Format disk as exFAT in Linux command line (for advanced users)
fdisk is a dialogue-driven command-line utility that creates and manipulates partition tables and partitions on a hard disk. In fact, it is considered one of the best partitioning tools for Linux.
Plug in your external hard disk then type the following command in the terminal:
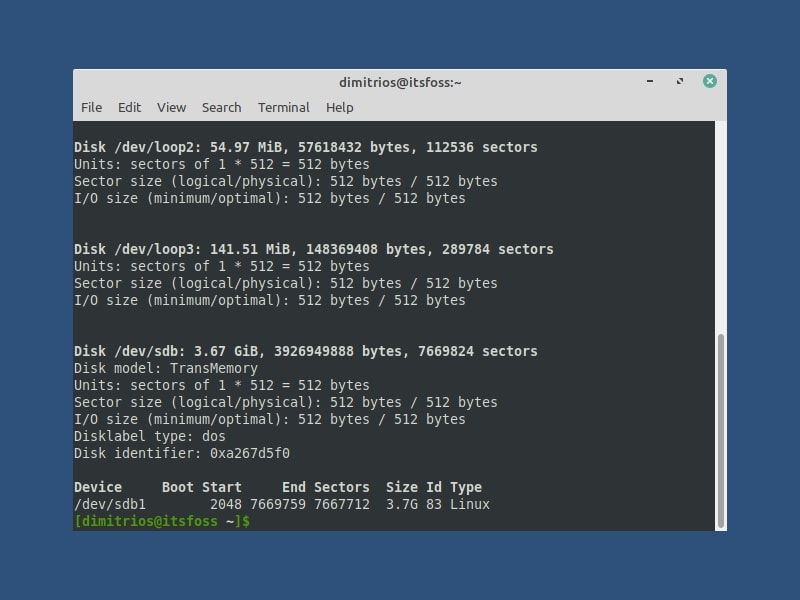
This will list down all the hard disks and partitions in your computer. Identify the partition that you want to format in your external hard disk. Size of the disks should give you a hint. For me, the USB disk was labelled as /dev/sdb1.
Once you have identified your USB disk, format it as exfat using the command below. Replace /dev/sdXn with your disk’s device ID. LABEL is basically the name you want to give to your disk like Data, MyUSB etc.
sudo mkfs.exfat -n LABEL /dev/sdXn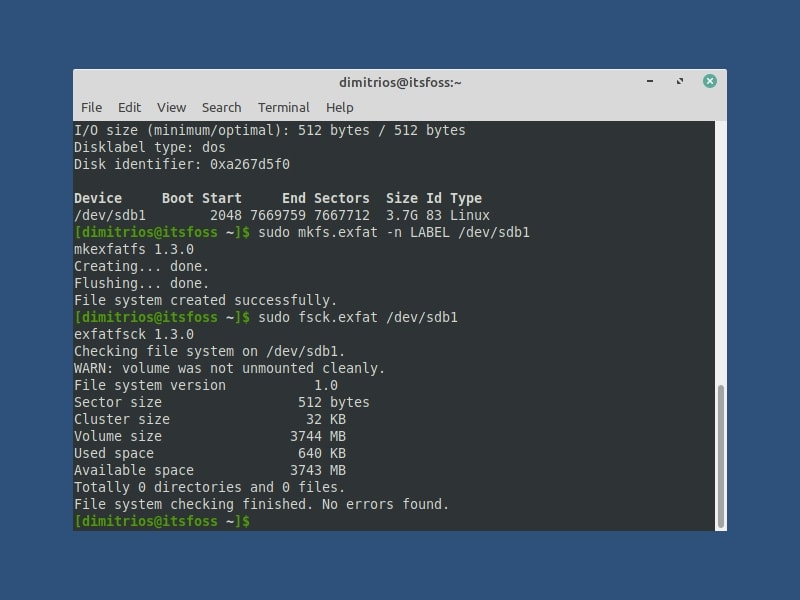
Optionally, run fsck check to make sure the formatting has been done properly.
That’s it. Enjoy the exFAT disk.
Did you succeed in creating exFAT disk?
I hope you find this tutorial simple enough and a step forward to build a solid partitioning knowledge foundation.
Sometimes easy and simple tips and tricks will make you a better Linux in the long term. Our frequent readers know that first hand but if you discovered It’s FOSS recently, you may take the opportunity to explore our handy tutorials.
Don’t forget to subscribe and let me know your questions and suggestions in the comments below.