- Set Screen Resolution using Kernel Boot Parameter on Linux
- Changing Screen Resolution Using vga Kernel Parameter:
- Changing Screen Resolution Using gfxpayload:
- About the author
- Shahriar Shovon
- How to Change Screen Resolution of Grub Boot Menu in Ubuntu
- Установите разрешение экрана с помощью параметра загрузки ядра в Linux
- Изменение разрешения экрана с помощью параметра ядра vga:
- Изменение разрешения экрана с помощью gfxpayload:
Set Screen Resolution using Kernel Boot Parameter on Linux
![]()
There are times when you boot into your favorite Linux distribution and the display resolution is set incorrectly. You might be having a hard time changing the display resolution to the correct one once it has booted (especially in the Linux headless server operating systems). If this is the case for you, then there is a solution. You can actually set the display resolution with Linux kernel boot parameters.In this article, I am going to show you how to set screen resolution using the kernel boot parameters on Linux. So, let’s get started.
Changing Screen Resolution Using vga Kernel Parameter:
This is the traditional method of changing screen resolution using the Linux kernel boot parameter. It will work on CentOS 7 and older Linux distributions very well.
The vga kernel boot parameter accepts a code which represents the screen resolution. Each of the supported screen resolution on your monitor has a unique decimal number.
The easy way to find the codes is to use vga=ask boot parameter when you boot into your operating system.
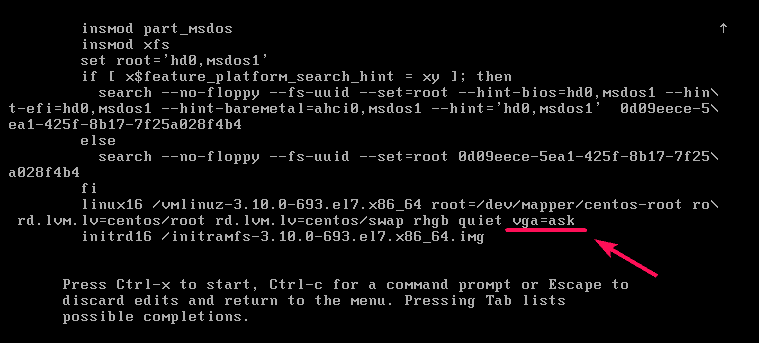
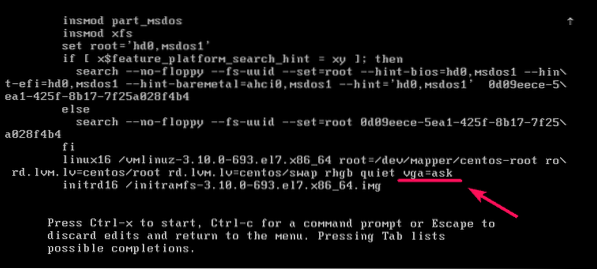
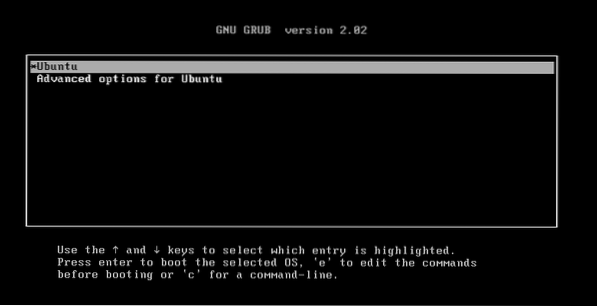
To do that, go to the GRUB menu, select an entry and press e.
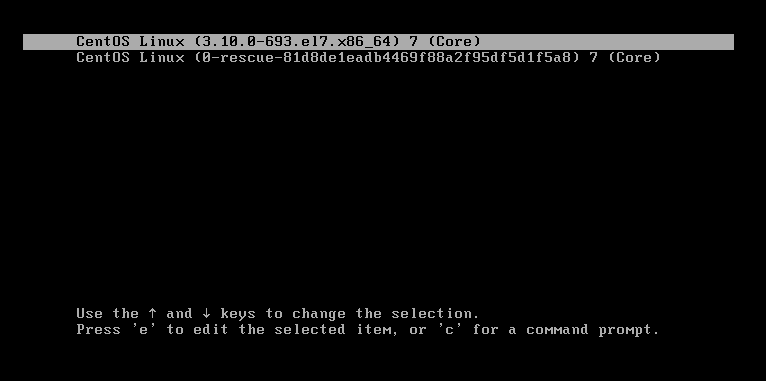
Now, add vga=ask at the end of the line that loads the kernel as shown in the screenshot below. Note that, the line that loads the kernel starts with linux. Once you’re done, press F10 to boot.
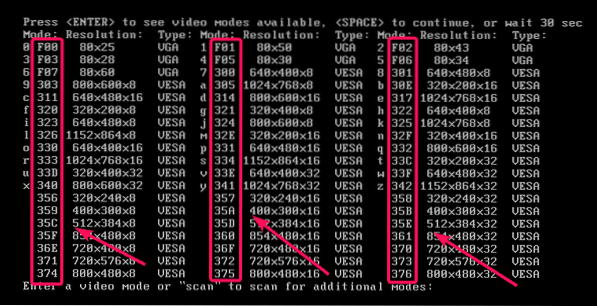
Now, press to see all the supported screen resolutions.

As you can see, all the supported screen resolutions and a hexadecimal code for each screen resolution is listed. If you want to test a screen resolution to see how it works on your computer, just type in the hexadecimal code and press .

Let’s say, the screen resolution you picked works and you would like to set it as the default screen resolution. To do that, you have to modify the GRUB configuration files on your computer.
Let’s say, the screen resolution you would like to set is 1024x768x32, which has the hexadecimal code 341. When you set it as the default on the GRUB configuration file, you have to change the hexadecimal code to an equivalent decimal code.
So, you have to add vga=833 kernel boot parameter on the GRUB configuration file.
First, open the GRUB configuration file with the following command:

Now, add vga=833 to the end of the GRUB_CMDLINE_LINUX as shown in the screenshot below. Once you’re done, save the file.

Now, update the GRUB configuration files with the following command:

GRUB configuration files should be updated. Now, the next time you boot, the new screen resolution should be applied.

Now, reboot your computer with the following command for the changes to take effect:
Changing Screen Resolution Using gfxpayload:
On newer version of GRUB, the screen resolution is set using gfxpayload. So, the vga parameter may not work correctly. If it is the case for you, then this section is for you. It’s also easy to set screen resolution using this method than the traditional method.
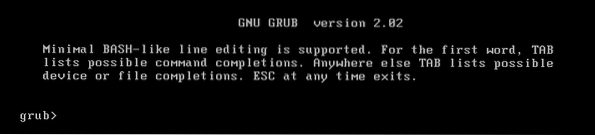
First, press c from the GRUB menu to go to the GRUB command prompt.
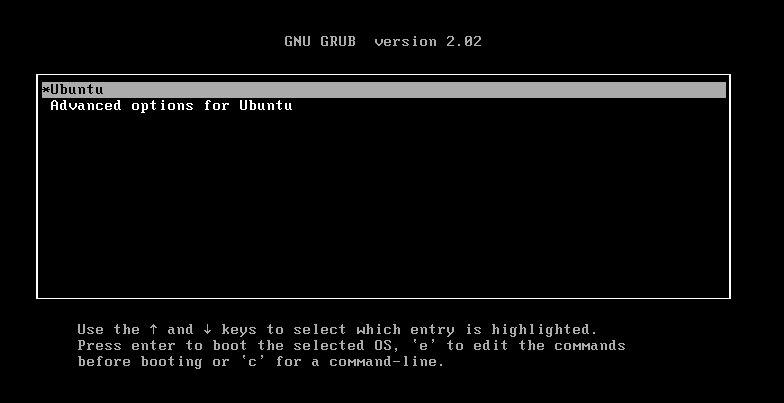
You should be in the GRUB command prompt.
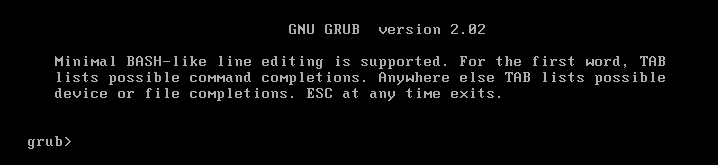
Now, run the following command to enable the pager module.

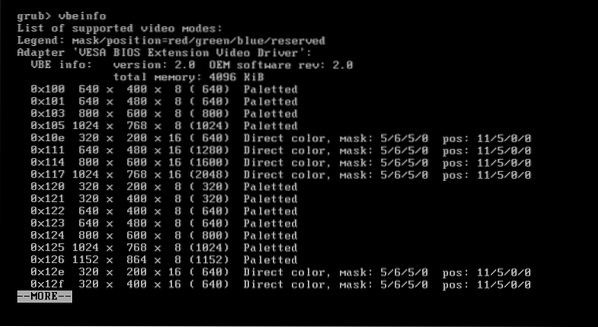
Now, to find the supported screen resolution on your computer, run the following command:

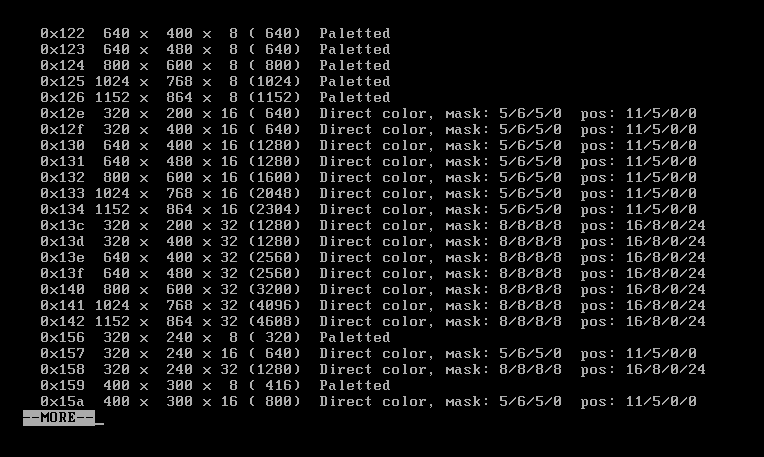
As you can see, all the supported screen resolutions are displayed. The output is very long, so, it uses the pager. You can press to navigate forward and see whether the screen resolution you’re looking for is supported.

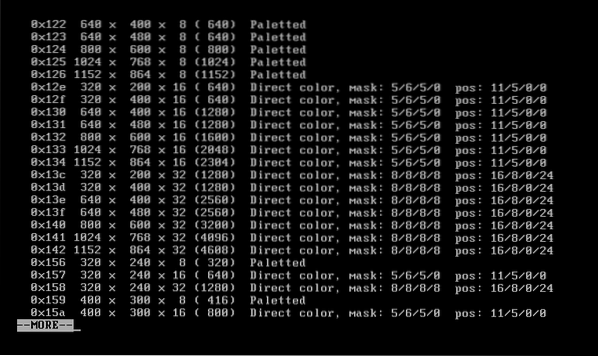
As you can see, more screen resolutions are displayed. Here, you don’t have to remember any codes. Just remember the screen resolution. For example, if you want to set the screen resolution 1024x768x32, then this is what you have to put in the GRUB configuration file. Very simple.
In order to set the screen resolution, open the GRUB configuration file with the following command:

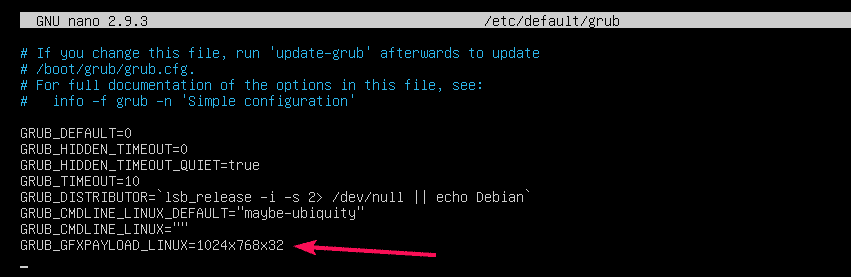
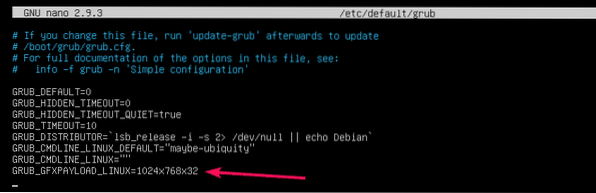
The configuration file should be opened. Now, add the line GRUB_GFXPAYLOAD_LINUX=1024x768x32 as shown in the screenshot below. Once you’re done, save the file by pressing + x followed by y and .
Now, update the GRUB configuration files with the following command:

The GRUB configuration files should be updated. The next time you start your computer, the new screen resolution should be applied.

Finally, reboot your computer with the following command for the changes to take effect:
So, that’s how you set screen resolution using the kernel boot parameters on Linux. Thanks for reading this article.
About the author
Shahriar Shovon
Freelancer & Linux System Administrator. Also loves Web API development with Node.js and JavaScript. I was born in Bangladesh. I am currently studying Electronics and Communication Engineering at Khulna University of Engineering & Technology (KUET), one of the demanding public engineering universities of Bangladesh.
How to Change Screen Resolution of Grub Boot Menu in Ubuntu
The font size of startup boot menu is too small or too large? It’s easy to fix by setting an appropriate screen resolution for the Grub boot-menu in Ubuntu.
1.) Tell which video modes your graphics card support.
Before starting to configure the Grub bootloader, you firstly need to know which video modes are supported.
a.) The hwinfo command has an option to display the information. It however show me nothing. You can try it by opening terminal (Ctrl+Alt+T) and run command:
sudo apt install hwinfo && hwinfo --framebuffer
b.) If howinfo does not work, use videoinfo instead which however runs in Grub command console.
Firstly restart your machine. When you’re at Grub boot-menu, press c to get into command console.
Next run command videoinfo to list supported video modes.
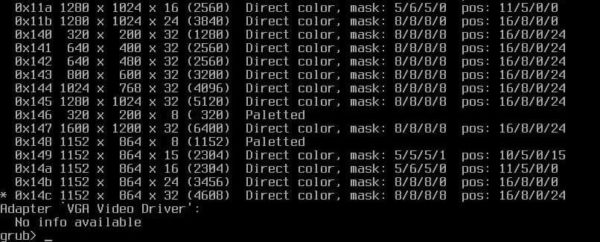
Take a picture of the output, or write down your desired resolution, e.g., 1024x768x32 and 1280x1024x32.
Finally run exit to get back boot menu.
2.) Set a custom screen resolution for Grub boot menu:
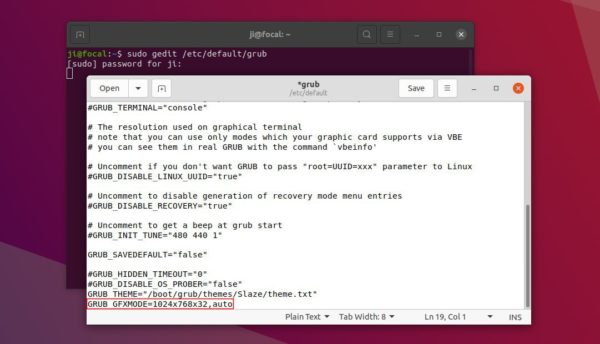
Now boot into Ubuntu, open terminal from system app launcher, and run command to edit the Grub configuration file:
sudo gedit /etc/default/grub
Next set a screen resolution by changing value of “GRUB_GFXMODE”. For instance, set 1024x768x32 (32 means 32-bit color) via:
GRUB_GFXMODE=1024x768x32,auto
Multiple resolutions can be specified, the default is auto .
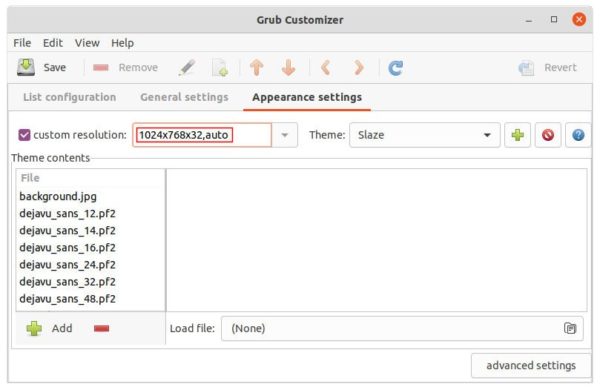
Without running command, you can also set it via Grub Customizer under its ‘Appearance settings’ page.
3.) Update grub to apply change:
If changed the solution via Grub Customizer, simply click on “Save” button. Or, open terminal and run command to update grub:
Установите разрешение экрана с помощью параметра загрузки ядра в Linux
Бывают случаи, когда вы загружаетесь в свой любимый дистрибутив Linux, и разрешение экрана выставлено неправильно. Возможно, вам трудно изменить разрешение дисплея на правильное после загрузки (особенно в операционных системах безголовых серверов Linux). Если это ваш случай, то решение есть. Фактически вы можете установить разрешение дисплея с помощью параметров загрузки ядра Linux.В этой статье я покажу вам, как установить разрешение экрана с помощью параметров загрузки ядра в Linux. Итак, приступим.
Изменение разрешения экрана с помощью параметра ядра vga:
Это традиционный метод изменения разрешения экрана с помощью параметра загрузки ядра Linux. Он будет очень хорошо работать на CentOS 7 и более старых дистрибутивах Linux.
В vga Параметр загрузки ядра принимает код, который представляет разрешение экрана. Каждое из поддерживаемых разрешений экрана на вашем мониторе имеет уникальное десятичное число.
Самый простой способ найти коды — использовать vga = спросить параметр загрузки при загрузке в вашу операционную систему.
Для этого перейдите в меню GRUB, выберите запись и нажмите е.

Теперь добавьте vga = спросить в конце строки, загружающей ядро, как показано на скриншоте ниже. Обратите внимание, что строка, загружающая ядро, начинается с linux. Когда вы закончите, нажмите F10 Загружать.
Теперь нажмите чтобы увидеть все поддерживаемые разрешения экрана.

Как видите, перечислены все поддерживаемые разрешения экрана и шестнадцатеричный код для каждого разрешения экрана. Если вы хотите проверить разрешение экрана, чтобы увидеть, как оно работает на вашем компьютере, просто введите шестнадцатеричный код и нажмите .
Допустим, выбранное вами разрешение экрана работает, и вы хотите установить его в качестве разрешения экрана по умолчанию. Для этого вам необходимо изменить файлы конфигурации GRUB на вашем компьютере.
Допустим, вы хотите установить разрешение экрана 1024x768x32, который имеет шестнадцатеричный код 341. Когда вы устанавливаете его по умолчанию в файле конфигурации GRUB, вы должны изменить шестнадцатеричный код на эквивалентный десятичный код.
341 шестнадцатеричный = 3 * 16 ^ 2 + 4 * 16 ^ 1 + 1 = 833
Итак, вам нужно добавить vga = 833 параметр загрузки ядра в файле конфигурации GRUB.
Сначала откройте файл конфигурации GRUB с помощью следующей команды:
$ sudo vi / и т. д. / по умолчанию / grub

Теперь добавьте vga = 833 до конца GRUB_CMDLINE_LINUX как показано на скриншоте ниже. Как только вы закончите, сохраните файл.

Теперь обновите файлы конфигурации GRUB с помощью следующей команды:
$ sudo grub2-mkconfig -o $ (sudo readlink -f / etc / grub2.cfg)

Необходимо обновить файлы конфигурации GRUB. Теперь при следующей загрузке должно быть применено новое разрешение экрана.

Теперь перезагрузите компьютер с помощью следующей команды, чтобы изменения вступили в силу:
Изменение разрешения экрана с помощью gfxpayload:
В более новой версии GRUB разрешение экрана устанавливается с помощью gfxpayload. Итак vga параметр может работать некорректно. Если это ваш случай, то этот раздел для вас. С помощью этого метода также легко установить разрешение экрана, чем традиционный метод.
Сначала нажмите c из меню GRUB, чтобы перейти в командную строку GRUB.
Вы должны быть в командной строке GRUB.
Теперь выполните следующую команду, чтобы включить модуль пейджера.
grub> установить пейджер = 1

Теперь, чтобы найти поддерживаемое разрешение экрана на вашем компьютере, выполните следующую команду:

Как видите, отображаются все поддерживаемые разрешения экрана. Вывод очень длинный, поэтому используется пейджер. Вы можете нажать чтобы перейти вперед и посмотреть, поддерживается ли требуемое разрешение экрана.
Как видите, отображается больше разрешений экрана. Здесь не нужно запоминать коды. Просто запомните разрешение экрана. Например, если вы хотите установить разрешение экрана 1024x768x32, то это то, что вы должны поместить в файл конфигурации GRUB. Очень простой.
Чтобы установить разрешение экрана, откройте файл конфигурации GRUB с помощью следующей команды:
$ sudo nano / и т. д. / по умолчанию / grub

Файл конфигурации должен быть открыт. Теперь добавьте строку GRUB_GFXPAYLOAD_LINUX = 1024x768x32 как показано на скриншоте ниже. Когда вы закончите, сохраните файл, нажав + Икс с последующим у а также .
Теперь обновите файлы конфигурации GRUB с помощью следующей команды:

Необходимо обновить файлы конфигурации GRUB. При следующем запуске компьютера должно быть применено новое разрешение экрана.

Наконец, перезагрузите компьютер с помощью следующей команды, чтобы изменения вступили в силу:
Итак, вот как вы устанавливаете разрешение экрана с помощью параметров загрузки ядра в Linux. Спасибо, что прочитали эту статью.

Игры
Десять лет назад не многие пользователи Linux могли бы предсказать, что их любимая операционная система однажды станет популярной игровой платформой д.

Игры
Бесплатные игры с открытым исходным кодом и кроссплатформенные версии игрового движка можно использовать для игры как в старые, так и в некоторые из с.

Игры
Командная строка — не только ваш главный союзник при использовании Linux — она также может быть источником развлечений, потому что вы можете использ.
Свежие статьи об операционных системах. Множество интересных гайдов и полезных советов. Почувствуйте себя своим в мире современных технологий