- How to enable ssh on Ubuntu 20.04 LTS Linux
- Install and Enable Open SSH Server on Ubuntu 20.04
- How to Connect remote Ubuntu system via SSH
- Key authentication for more security
- Generate Public and Private Keys for SSH
- Copy Public key to Server
- Leave a Comment Cancel reply
- How to Enable SSH on Ubuntu
- Enable SSH on Ubuntu
- Log Into Remote Server With SSH
- SSH Configuration Options
- Edit Configuration File
- Disable Root
- Configure Firewall
- How to Disable SSH on Ubuntu
How to enable ssh on Ubuntu 20.04 LTS Linux
SSH, or Secure Shell, means both a network protocol and the software required for its usage. It works on a dedicated port number that is 22. Hence, to use SSH on Ubuntu or any other system port 22 must be allowed in the system firewall.
The idea behind using SSH is to establish a secure connection with another computer in the network. However, the remote computer must have a running SSH server, otherwise, we won’t be able to connect it using command or SSH client from our local computer.
As soon as we have established a connection, a prompt will happen to enter the password of the remote PC user to get logged in and access the same in completely encrypted form. The result of a connection is always identical. You end up in a command line on the computer, logged in as one of the users there.
Furthermore, we don’t need a PC to connect, even a smartphone can be used. SSH also allows controlling computers without Display such as NAS boxes, routers, and more…
This network tool is not just limited to Ubuntu only, we can use it on macOS, Windows, Rasberry Pi, and others even on smartphones…
Install and Enable Open SSH Server on Ubuntu 20.04
Most of the time Ubuntu comes by default with SSH as an OpenSSH server & the client is already installed in it. However, if you don’t have then follow the below-given steps. This tutorial is applicable for all active Ubuntu systems such as Ubuntu 18.04/19.04/21.04,
- Run system update command- sudo apt-get update
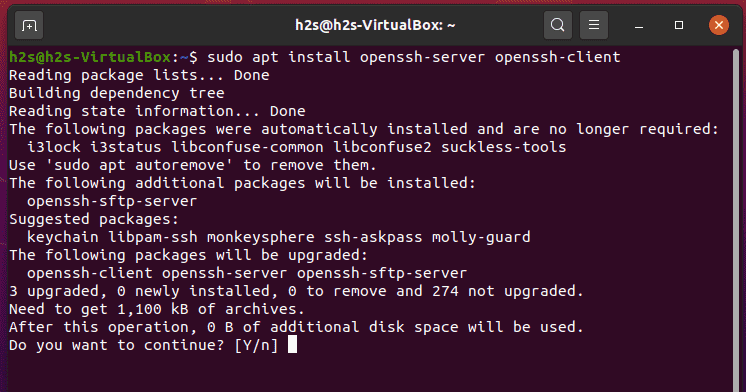
- Install OpenSSH server on Ubuntu 20.04 LTS-
sudo apt-get install openssh-server openssh-client - Enable and StartSSH server services on Ubuntu: sudo systemctl enable —now ssh
- To check the status run- systemctl status ssh

Once the installation is completed, we can test it by connecting our Ubuntu 20.04 LTS system remotely via SSH using the local computer which can be a virtual machine. Of course, one thing you have to make sure your local system should be able to reach the remote system that you want to connect via the network.
How to Connect remote Ubuntu system via SSH
Let’s see how to use your local system’s command prompt or terminal to connect the remote Ubuntu system using SSH.
Here we are assuming that a remote Ubuntu system has an Ip-address- 192.168.45.23 and the username is h2s; now to establish the connection via ssh follow the below steps:
- Open a terminal in your Linux or Command prompt in the Windows system.
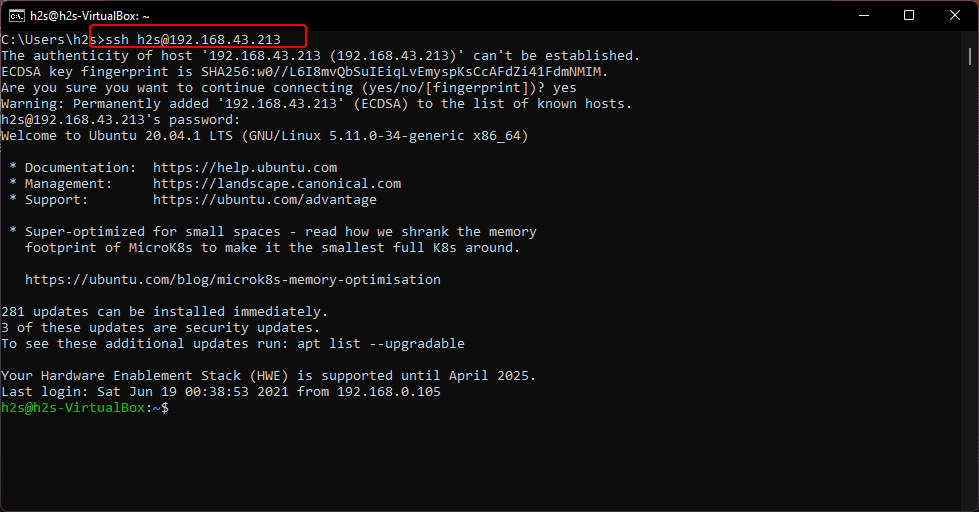
- Use the command syntax “ ssh [email protected]“. For example- ssh [email protected].
- Since we have not connected our Ubuntu server before where we have installed the SSH server, hence, the computers do not “know” each other, of course.
- Therefore, when we connect the server for the first time, it will ask whether you really want to connect to the computer and whether you trust the displayed signature. Simply confirm by typing ” yes “.
- After that you the process will ask for the password of the remote user, defined in the command while connecting the server. Enter the password and with that, you will get the command line of the remote server to issue commands remotely. To leave this again, type ” exit “.
Key authentication for more security
Well, instead of entering the password of the remote Ubuntu server, we can use a more secure way that is Key. In which we don’t need to enter a plain password, hence prevent our password from getting leaked or copied, in case we are using some unknown computer to connect the remote server.
The principle of using a key is actually very simple. We just need to create a key pair on the client machine based on the concept of the public and private keys. So, basically, we will create two keys one is the Public key that is used to encrypting the plain text to convert it into ciphertext whereas the Private key is used by the receiver to decrypt the ciphertext to read the message.
In simple words, the private key is like a Door key that must remain secret as you can use it to unlock the door to the remote computer. The public key is basically the keyhole that you build into the door of the server. Hence, the concept is similar to real doors present in our houses, everyone can see the Door’s keyhole but the Key to open is only with the Owner of the house.
Generate Public and Private Keys for SSH
- Open command line- Terminal or Prompt on your local system.
- Enter SSH key generator command that will generate the key ssh-keygen
- Hit the Enter key.
- (optional) Then you can enter a password in order to add an additional barrier when establishing the connection. Otherwise, simply press the Enter key two times, if you don’t want the system to ask for an additional password query.
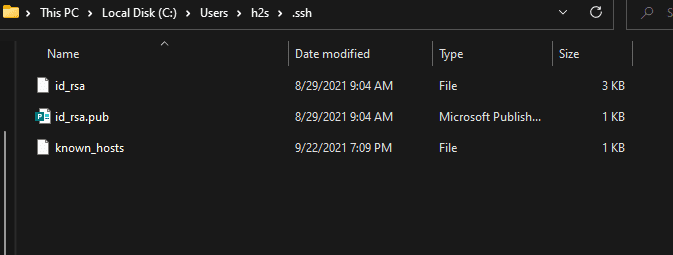
- Ultimately, two files are created in the hidden directory “.ssh” under your user directory: “id_rsa” and “id_rsa.pub”. The “rsa” in the file name stands for the cryptography used, but you don’t have to worry about it. The file extension “pub” stands for “Public”, so it is the public key. Whereas the file without any extension is your private key.
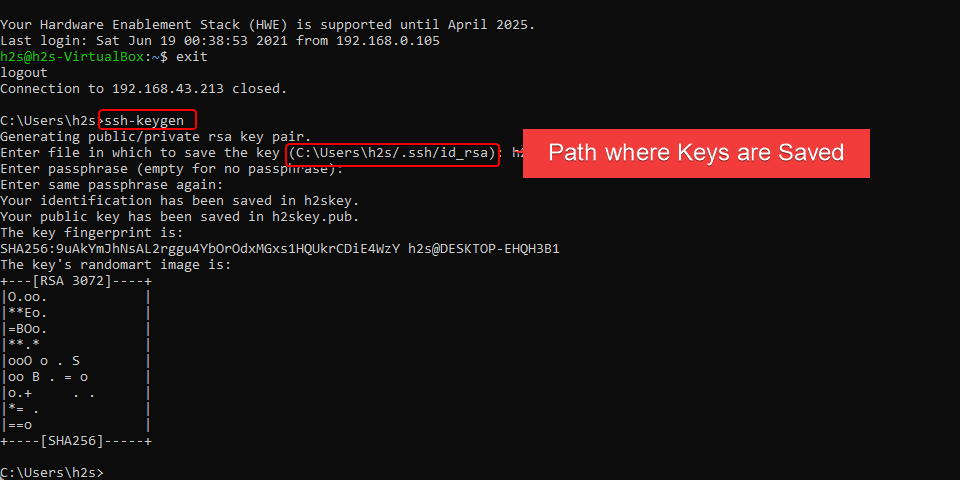
Go to the folder displayed on the command terminal to access the keys:
Copy Public key to Server
Now, to establish a connection using the Key pairs, copy your generated Public key to the server which is Ubuntu here.
We don’t need to visit the server manually, we can use SSH for copying the key as well.
Use the following command top copy SSH Public key to Server:
ssh-copy-id -i ~/.ssh/id_rsa.pub username@ip-address
Note: Change the username and Ip-address with the actual values of your remote server.
Note: Replace windows-username with your current user under which the public key has been saved, whereas the [email protected] needs the remote Linux user and IP-address.
brew install ssh-copy-id ssh-copy-id -i ~/.ssh/id_rsa.pub username@ip-address
The ” -i ” indicates that the identity is to be copied, which means the specified public key. Copying is of course done via SSH, hence we need the password remote machine once, here.
Once the Key has been copied, you can use your private key to connect remote see a system without entering any kind of password. However, make sure your Private key is in a safe location where it can be accessed by you only.
To use private, here is the command syntax:
path-to-private-key: Replace it with the path where you have saved the private key generated by you.
Whereas, the username and IP address are for the remote server system details.
In this way, we can use authentication keys to get a passwordless connection, keep one thing in mind, it is only possible if you have your private key file with you. Know more about SSH at official website.
Leave a Comment Cancel reply
This site uses Akismet to reduce spam. Learn how your comment data is processed.
How to Enable SSH on Ubuntu
When establishing a remote connection between a client and a server, the primary concern is ensuring security. For Linux users, the best practice of accessing and managing a server remotely is through the cryptographic protocol known as Secure Shell (SSH).
SSH encrypts all data transferred from one machine to another, making sure that no sensitive information is compromised during the process. As a desktop client, you can safely run a command line, transfer files, secure network services, and much more.
By following the steps below, you will learn how to enable SSH on Ubuntu.
- A user with sudo privileges.
- Permissions to access the remote computer.
- Access to a terminal/command line.
- The apt-get tool, pre-loaded in Ubuntu.
Note: The guide is tested on Ubuntu 18.04, 20.04 and 22.04.
Enable SSH on Ubuntu
The SSH server is not installed by default on all Ubuntu versions. To install and enable SSH on Ubuntu follow the steps below:
1. Open the terminal either by using the CTRL+ALT+T keyboard shortcut or by running a search in Ubuntu Dash and selecting the Terminal Icon.
2. Before starting the installation process, check if an SSH server has already been installed on your computer with the following ssh command:

If you see the SSH «Connection Refused» message, you will have to go through the SSH installation process.
3. To install SSH, first update the package repository cache with:
4. Now install the OpenSSH software package by entering:
sudo apt-get install openssh-server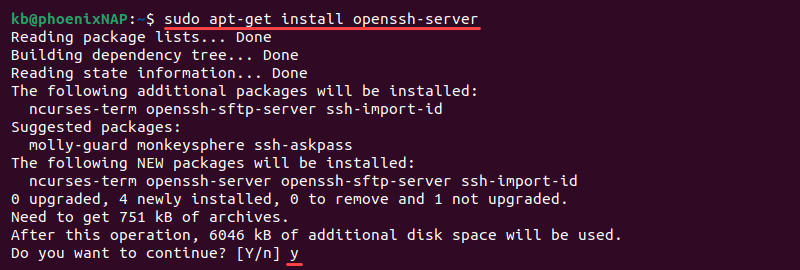
If prompted, type in your password and press y (yes) to permit the installation.
5. To verify the installation was successful and SSH is running use the command:
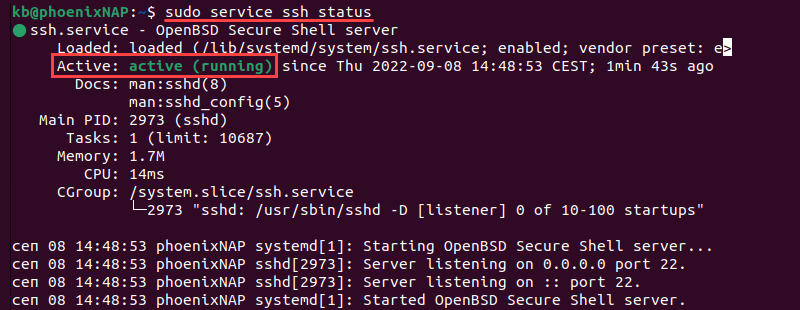
The confirmation message that you are looking for is: Active: active (running) .
This means you have installed and enabled SSH on your remote machine, which can now accept commands from your SSH client.
6. To return to the command line prompt enter q .
Log Into Remote Server With SSH
Once you have gone through the process of enabling SSH on Ubuntu, you are ready to log into your remote machine.
1. Open the terminal (CTRL+ALT+T) and type the following command:
ssh username@public_IP -p22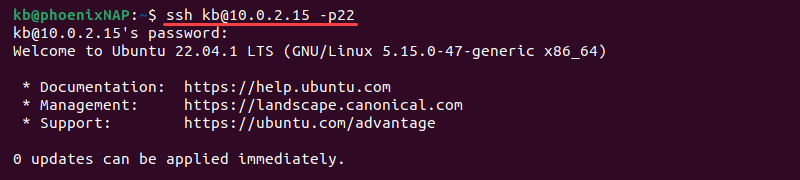
Change the username and IP address to the username and IP address of the Ubuntu computer on which you have installed SSH.
2. If you do not know the IP address, you can quickly identify it through the terminal by typing the command:
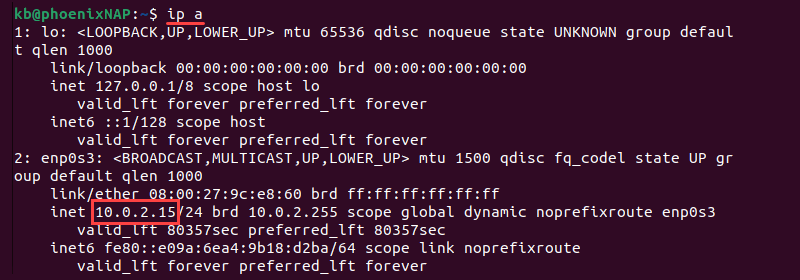
This displays the public IP address of the machine where SSH was installed.
Once you have identified and typed in all the information, you are officially logged into the server. You are free to manage it from the comfort of your workstation safely.
Note: Read more about secure remote access to implement and enforce the best practices for employees.
SSH Configuration Options
The default SSH configuration options can be adjusted. You can change the default port (generally a good idea, as a precautionary security measure), disable the root user, or make other configuration adjustments.
Edit Configuration File
After successfully installing OpenSSH on Ubuntu, you can edit its configuration file.
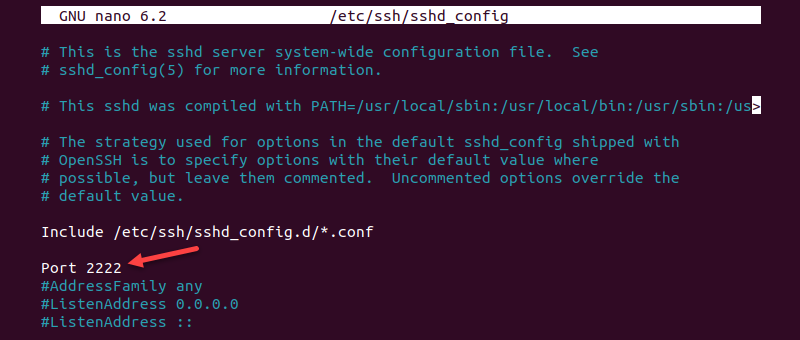
1. Open the SSH configuration file with the command:
sudo nano /etc/ssh/sshd_config2. Now that you have opened the file using nano (or with any Linux text editor) find and make any necessary changes.
For example, to change the port number to listen on TCP port 2222 instead of the default TCP port 22 , find the line in which Port 22 is specified by default, uncomment the line, and change it to Port 2222 .
Note: Changing the default port number is an SSH security best practice. Everyone is aware of the default port number so changing it is a recommended security precaution.
Disable Root
Another critical security precaution is to disable remote root access. That way, the root user cannot be invoked remotely, and security will be significantly improved.
1. In the configuration file, find the line that reads PermitRootLogin_yes and change it to PermitRootLogin_no .
2. For the changes to take effect, restart the SSH service with the following command:
sudo systemctl restart sshd.serviceConfigure Firewall
If you have decided to change the default port number, you must configure your firewall to allow traffic via the specified port.
Let’s use the example of Port 2222 .
The default firewall configurations tool in Ubuntu is UFW, configure it with the command:
sudo ufw allow from any to any port 2222 proto tcpSome firewalls may require allowing traffic to the public IP address of the machine running SSH.

Note: The port 2222 is the port number we have defined in the Configure SSH section. If you used the default port 22, then it is not necessary to put the port number.
How to Disable SSH on Ubuntu
To temporarily disable SSH on Ubuntu, run:
Start the SSH service with:
To completely disable SSH after reboot:
sudo systemctl disable sshEnable SSH on Ubuntu after reboot with:
sudo systemctl enable sshNote: Learn more about how to change SSH port.
By following the simple steps above, you now know how to enable SSH on Ubuntu. Now you can establish a reliable and secure protocol between you and a remote device.
Get started by logging to your machine to perform sysadmin tasks with the command prompt.
Next, we suggest learning about SSH config files that can help you easily configure the default values for these connections and enables efficient streamlining of SSH connections.
Sofija Simic is an experienced Technical Writer. Alongside her educational background in teaching and writing, she has had a lifelong passion for information technology. She is committed to unscrambling confusing IT concepts and streamlining intricate software installations.
This article provides all the information you need in order to set up SSH encryption on your remote device.
If you are using Debian 9 or Debian 10 to manage servers, you must ensure that the transfer of data is as.
Establishing a connection with a remote server without taking the proper security measures can lead to severe.
In this tutorial, Find out How To Use SSH to Connect to a Remote Server in Linux or Windows. Get started with.