- Introduction
- Prerequisites
- Dummy headlines
- 3 Ways to Create Bootable Ubuntu USB Startup Disk
- Requirements
- Creating Ubuntu USB Startup Disk Using Graphic Tool
- Creating Ubuntu USB Startup Disk Using DDrescue Command
- Creating Ubuntu USB Startup Disk Using dd Command
- Create a bootable USB stick on Ubuntu
- 2. Requirements
- 3. Launch Startup Disk Creator
- 4. ISO and USB selection
- 5. Confirm USB device
- 6. Installation complete
- Finding help
Introduction
Ubuntu can be installed from a USB flash drive. This may be necessary for most new portable computers without DVD drives and is handy for others because a USB flash drive is so convenient. Also, you can configure Ubuntu on the USB flash drive to save changes you make, unlike a read-only CD/DVD disk.
Booting from a USB flash drive created with usb-creator alias Startup Disk Creator and mkusb will behave just as if you had booted from the install CD. It will show the language selection and then the install menu, from which you can install Ubuntu onto the computer’s hard drive or launch the LiveCD environment. Other utilities, e.g. UNetbootin, may create slightly different boot drives or if on UEFI might not work at all with Debian iso files due to a bug
Note: This article uses the term «USB flash drive» alongside USB stick, USB drive, USB device, USB pendrive and thumb drive.
Prerequisites
- a 4 GB USB flash device/drive/stick. If the iso file is smaller than 2 GB, it is possible to use a 2 GB USB device, at least with some of the methods. Files on this USB device will be erased, so backup the files you want to keep before making the device bootable. Some of the tools require that this USB device is properly formatted and mounted while other tools will overwrite whatever is on the target device. Please follow the instructions for each tool.
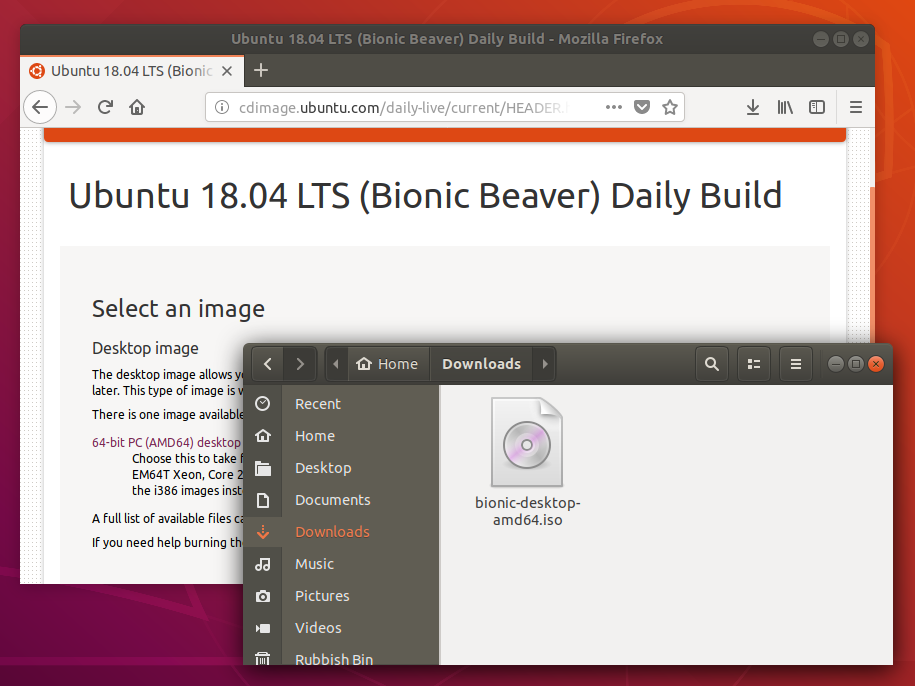
- an Ubuntu flavour ISO file downloaded from an official web page, ubuntu.com/download or http://releases.ubuntu.com, stored in your running computer (for example in the directory Downloads in the internal drive, not in the USB flash drive that you want to make into a USB boot drive).
- Check with md5sum (or another checksum tool) that the download was good. In Linux there is the tool ‘md5sum’. In Windows you can do it with Rufus: click on the circle with a tick mark (more about Rufus here.)
Dummy headlines
After a major remake of this help page the following headlines are kept here because they may be linked to from other web sites. Several other headlines further down in the page are also kept for this reason.
3 Ways to Create Bootable Ubuntu USB Startup Disk
Creating a bootable USB drive is one of the most preferred ways of testing and installing a Linux operating system on a PC. This is so because most modern PCs don’t come with a DVD drive anymore. Further, USB drives are easily portable and less delicate than a CD / DVD.
Many graphical tools abound that can help you create a bootable USB drive. One of the most widely used tools is Rufus, a simple yet very effective tool. Sadly, it’s only available for Windows systems.
Thankfully, Ubuntu ships with its own tool called Startup Disk Creator. The tool is easy to use and allows you to create a bootable Ubuntu USB disk in no time.
With a bootable Ubuntu USB drive you can perform the following operations:
- Install Ubuntu on your PC.
- Try out Ubuntu desktop without installing it on your hard drive.
- Boot into Ubuntu on another PC and run it.
- Perform diagnostic operations such as repairing or fixing a broken configuration.
With that in mind, let’s see how you can create a bootable Ubuntu USB startup disk.
Requirements
For this exercise, ensure that you have the following prerequisites before you get started:
- A USB drive – Minimum 4GB.
- Ubuntu ISO image ( We will use Ubuntu 20.04 ISO ).
- A stable internet connection for downloading the Ubuntu ISO image – If you don’t have one.
In this guide, we will explore three methods that you can use to create a bootable Ubuntu USB startup disk.
On this page:
Let’s shift gears and see how you can create a startup Ubuntu.
Creating Ubuntu USB Startup Disk Using Graphic Tool
The Startup disk creator is Ubuntu’s native tool that comes preinstalled in every modern Ubuntu release. It allows a user to create a Live USB drive from an ISO image is a simple yet fast and effective way.
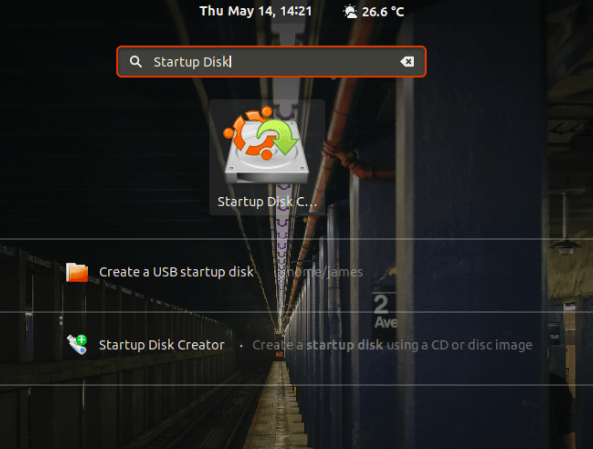
To launch Startup Disk creator, click on ‘Activities’ at the top left corner of your desktop and search for the tool in the application manager as shown. Next, click on the ‘Startup Disk Creator’ option to launch it.
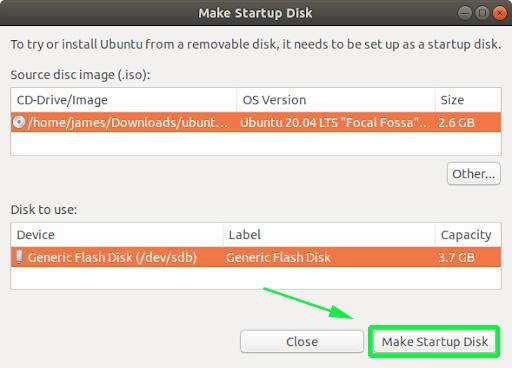
Once launched, you will get a window as shown. The upper section displays the path of the ISO image, the version of the ISO file and its size. If all options are okay, proceed and hit the ‘Make Startup Disk’ option to commence the process of creating the bootable USB drive.
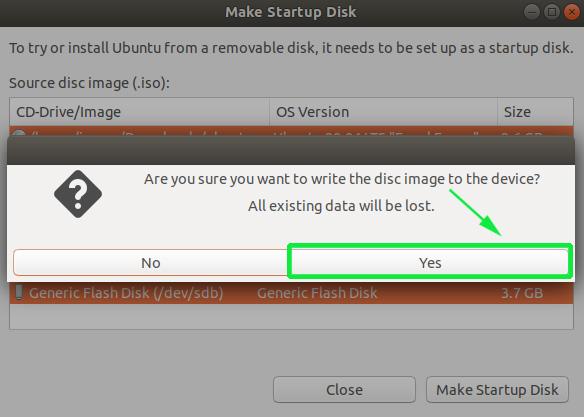
Thereafter, you will get a pop-up notification asking you whether to proceed with the creation or abort. Click on the ‘Yes’ option to initialize the creation of the bootable drive. Provide your password to authenticate and start the process.
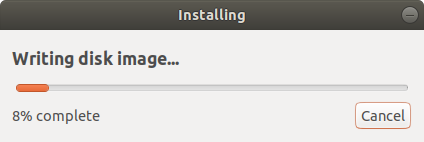
The Startup Disk Creator tool will begin writing the disk image onto the USB drive. This should only a few minutes to be completed.
Once complete, you will get the notification pop-up below indicating that all went well. To try out Ubuntu, click on the ‘Test Disk’ button. If you want to go ahead and start using the bootable drive, simply click ‘Quit’.

Creating Ubuntu USB Startup Disk Using DDrescue Command
The ddrescue tool is a popular data recovery tool that you can use to recover data from failed storage devices such as hard drives, pen drives, etc. Additionally, you can use the ddrescue tool to convert an ISO image to a startup USB drive.
To install ddrescue on Ubuntu / Debian systems execute the command.
$ sudo apt install gddrescue
NOTE: Repositories refer to it as gddrescue. However when invoking it on the terminal use ddrescue.
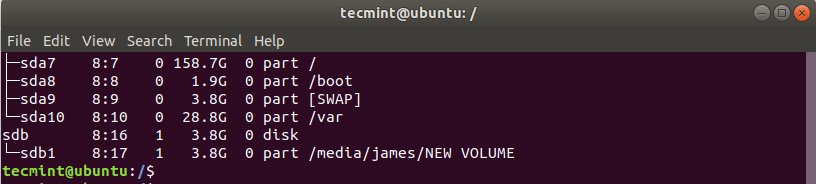
Next, we need to verify the block device volume of the USB drive. To achieve this, use the lsblk command as shown below:
The output below confirms that our USB drive is denoted by /dev/sdb .
Now use the syntax below to create a bootable USB stick.
$ sudo ddrescue path/to/.iso /dev/sdx --force -D
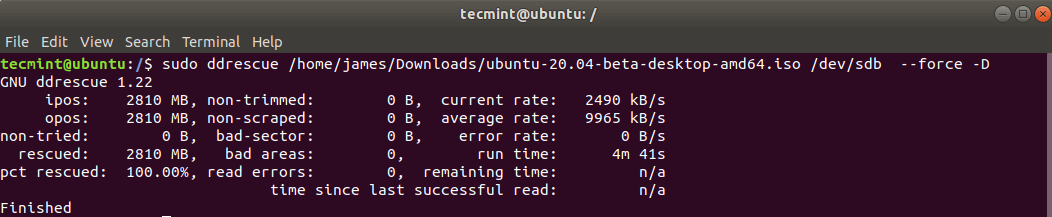
For example to create a Ubuntu 20.04 startup disk we executed the command below.
$ sudo ddrescue ubuntu-20.04-beta-desktop-amd64.iso /dev/sdb --force -D
The process takes a few minutes and your bootable USB drive will be ready in no time.
Creating Ubuntu USB Startup Disk Using dd Command
Another simple and easy to use command-line tool you can use to create a startup disk is the dd command. To use the tool, plug in your USB drive and identify the device volume using the lsblk command.
Next, unmount the USB drive using the command below:
Once the USB drive is unmounted, run the following command:
$ sudo dd if=ubuntu-20.04-beta-desktop-amd64.iso of=/dev/sdb bs=4M
Where Ubuntu-20.04-beta-desktop-amd64.iso is the ISO file and bs=4M is an optional argument to help accelerate the process of creating the bootable drive.

You can now eject your Live USB drive and plug it to any PC and either try out or install Ubuntu.
This brings us to the end of this topic. We hope you found this guide useful and that you can now comfortably create a bootable USB startup disk using all the methods explained herein.
Create a bootable USB stick on Ubuntu
Creating a bootable Ubuntu USB stick is very simple, especially from Ubuntu itself, and we’re going to cover the process in the next few steps.
Alternatively, we also have tutorials to help you create a bootable USB stick from both Microsoft Windows and Apple macOS.
2. Requirements
- A 4GB or larger USB stick/flash drive
- Ubuntu Desktop 14.04 or later installed
- An Ubuntu ISO file. See Get Ubuntu for download links
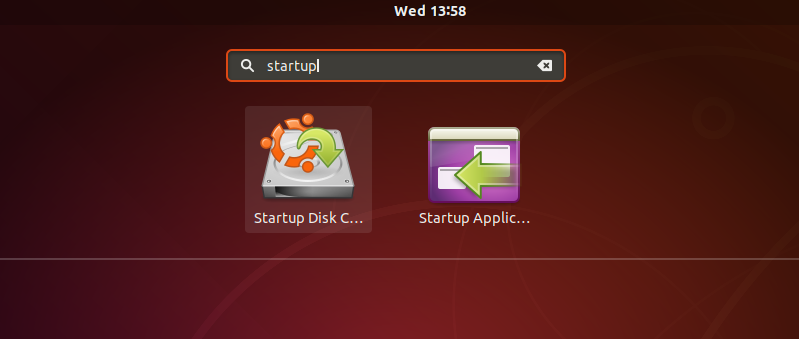
3. Launch Startup Disk Creator
We’re going to use an application called ‘Startup Disk Creator’ to write the ISO image to your USB stick. This is installed by default on Ubuntu, and can be launched as follows:
- Insert your USB stick (select ‘Do nothing’ if prompted by Ubuntu)
- On Ubuntu 18.04 and later, use the bottom left icon to open ‘Show Applications’
- In older versions of Ubuntu, use the top left icon to open the dash
- Use the search field to look for Startup Disk Creator
- Select Startup Disk Creator from the results to launch the application
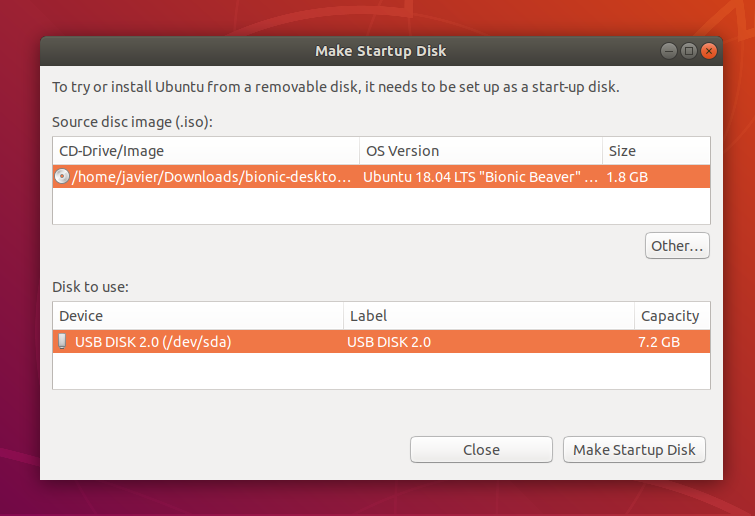
4. ISO and USB selection
When launched, Startup Disk Creator will look for the ISO files in your Downloads folder, as well as any attached USB storage it can write to.
It’s likely that both your Ubuntu ISO and the correct USB device will have been detected and set as ‘Source disc image’ and ‘Disk to use’ in the application window. If not, use the ‘Other’ button to locate your ISO file and select the exact USB device you want to use from the list of devices.
Click Make Startup Disk to start the process.
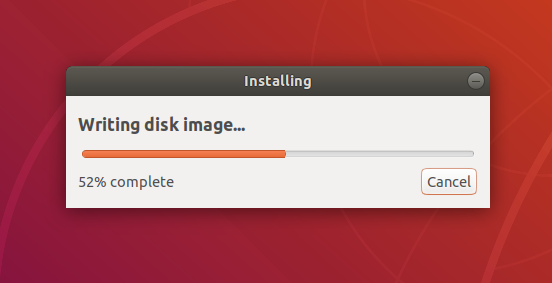
5. Confirm USB device
Before making any permanent changes, you will be asked to confirm the USB device you’ve chosen is correct. This is important because any data currently stored on this device will be destroyed.
After confirming, the write process will start and a progress bar appears.
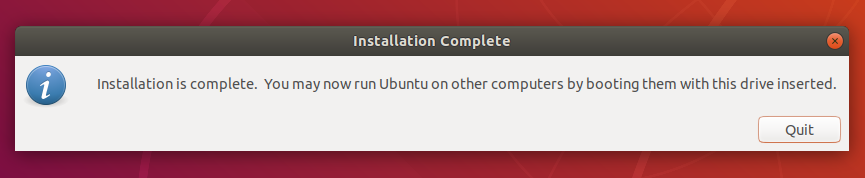
6. Installation complete
That’s it! You now have Ubuntu on a USB stick, bootable and ready to go.
If you want to install Ubuntu, take a look at our install Ubuntu desktop tutorial.
Finding help
If you get stuck, help is always at hand: