- Switch to Console in Ubuntu 18.04 — How to Leave GUI?
- 8 Answers 8
- How to Boot Ubuntu 20.04 into Text / Command Console
- How to Restore:
- Ji m
- 7 responses to How to Boot Ubuntu 20.04 into Text / Command Console
- How to boot to console (text) mode with Debian/Ubuntu, Fedora, Arch Linux/Manjaro, etc.
- Situation A. Temporarily boot into console mode (text mode)
- Case B. Permanently boot into text mode (console mode)
Switch to Console in Ubuntu 18.04 — How to Leave GUI?
To install the graphics driver I need to exit GUI / Gnome and go to the terminal. How can I do this in Ubuntu 18.04? Ctrl (STRG)+ Alt + F1 . F7 does not work, neither on the desktop, nor on the login screen.
Hm. But the keyboard otherwise works? If need be, you can boot from grub in ‘recovery mode’ which will give you a console. From the menu start networking and install the necessary driver packages.
Yes, try recovery mode. You will need to enable networking to be able to download the driver. If you run into any issues connecting, don’t worry there are solutions for that
8 Answers 8
In Ubuntu 18.04, they have changed things around and you cannot get to tty1, it is always showing the display manager / login screen. If you log in, you then cannot get to tty2 because it becomes the GUI for the first logged in user. The tradition of both GUIs showing on tty7 has ended.
You can get to tty3 by pressing Ctrl + Alt + F3 , tty4 by pressing Ctrl + Alt + F4 , tty5 by pressing Ctrl + Alt + F5 and tty6 by pressing Ctrl + Alt + F6 .
You can then switch between tty3-6 by pressing Alt with the appropriate F-key.
Finally, you can get back to the GUI with Alt + F1 for the login chooser or Alt + F2 for the logged-in user’s desktop.
Nothing helps me I have tried ALT+F1 ALT+F2 CTRL+ALT+F1 CTRL+ALT+F2 CTRL+ALT+F7 . still in terminal. The ‘who’ output that there tty2 and tty5 but not inform which of them I currently logged in
Thank you for the explanation. For me, this worked exactly as described with a fresh install of 18.04 (desktop).
I have to press Fn as well as Ctrl + Alt + F3 .
Assuming you’re on a Desktop or Laptop, just use:
Or, you can boot into single-user mode, although you probably don’t want this as getting internet in this mode can be tricky.
My preferred way of entering recovery mode is to set
after you get a shell. Then, you can try using
for ethernet. If you use WiFi, try this question.
i lost my gui and my ubuntu suddenly got locked into command mode. after logging in i was still in command mode.. ctrl+alt+f2 helped.. although not the same issue has the op has, but my problem got solved! thanks.
The «official» way to this under Ubuntu is to pass systemd.unit=multi-user.target as a kernel parameter. So in my /boot/grub/grub.cfg I have the following entry:
menuentry 'Ubuntu Console Linux 4.15.0-23-generic' < linux /boot/vmlinuz-4.15.0-23-generic root=/dev/sdb1 ro rootfstype=ext4 apparmor=0 quiet systemd.unit=multi-user.target initrd /boot/initrd.img-4.15.0-23-generic >Unfortunately, the grub.cfg file is populated with all kinds of unnecessary information. I usually delete all that and have the above chunk plus a similar one without the systemd.unit=multi-user.target which starts up gdm ( The X11 GNOME display manager).
Here is how it worked for me, thanks for all the help that brought me there:
choose advanced options in Grub choose recovery mode in the options that show up, one can load the network driver and mount r/w (mount r/w is part of the load network driver and dpkg options) choose "root. " to get to the console (use "mount -o remount,rw /" to get read and write access if not done with the options above already) Note1: Loading the network driver didn’t work for me, the pc always freezes. However I had the nvidia driver installation file locally, so could install it. After that I could not enter gnome any more, so had to reinstall Ubuntu 18.04 completely.
Note2: After installing the Nvidia driver for my graphics card different: via «sudo apt-get install nvidia-390», I always get the error in python «ModuleNotFoundError: No module named ‘tkinter'», but of course tkinter is installed. So currently I can not use python. it was the same error in ubuntu 16.04 and the reason why I updated. Hoped it would work in 18.04. I opened a new post for this: After installing Nvidia driver I get «ModuleNotFoundError: No module named ‘tkinter'» error in Python3
My original question here how to get to the console is answered and aside from freezing instead of loading the network driver is solved.
How to Boot Ubuntu 20.04 into Text / Command Console
Need to do some work in the black & white command line console? You can press Ctrl+Alt+F3 on keyboard to switch from the current session to tty3 text console, and switch back via Ctrl+Alt+F2.
From the startup grub boot-loader menu entry, you may select the Advanced Options > recovery mode > Drop to root shell prompt to get into text mode. However you need to run command mount -o rw,remount / to get file system write permission.
If you want to make Ubuntu automatically boot into the text mode, configure grub settings by doing following steps one by one:
1. Open terminal and run command to backup the configuration file:
sudo cp -n /etc/default/grub /etc/default/grub.backup
2. Edit the configuration file via command:
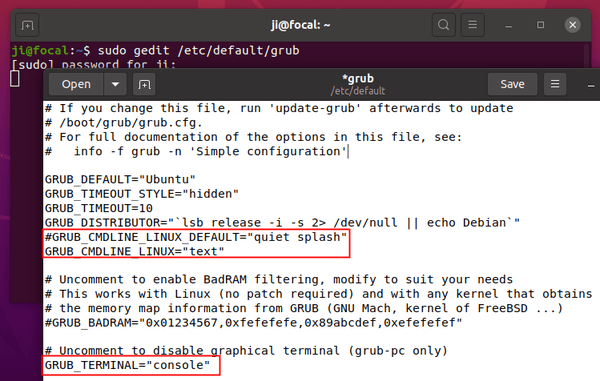
sudo gedit /etc/default/grub
- disable GRUB_CMDLINE_LINUX_DEFAULT=»quiet splash» by adding # at the beginning.
- set GRUB_CMDLINE_LINUX=»» to GRUB_CMDLINE_LINUX=»text»
- remove # from the line GRUB_TERMINAL=»console» to disable graphical terminal.
3. Save the file and apply changes by running command:
4. One more command is required as Ubuntu now uses systemd:
sudo systemctl set-default multi-user.target
How to Restore:
To restore changes, simply move back the backup file via command:
sudo mv /etc/default/grub.backup /etc/default/grub
And run sudo update-grub to apply change.
Also change the setting back in systemd via command:
sudo systemctl set-default graphical.target

Ji m
I’m a freelance blogger who started using Ubuntu in 2007 and wishes to share my experiences and some useful tips with Ubuntu beginners and lovers. Please comment to remind me outdated tutorial! And, notify me if you find any typo/grammar/language mistakes. English is not my native language. Contact me via [email protected] Buy me a coffee: https://ko-fi.com/ubuntuhandbook1
7 responses to How to Boot Ubuntu 20.04 into Text / Command Console
hi ji m
do you how to prevent network loading into my my computer memory. when i start ubuntu in my computer some people manage to connect to my computer through a network (not internet) and load their version of ubuntu into my computer. i believe they start their dirty work from my bios. i cannot change setting. because they copy every password i type. any method to stop them
What makes you think this is happening? It could just be an ubuntu update. Single-user mode disables most things loading and then you can inspect your services as root, if you are sure your computer is hacked.
ctrl+alt+f3 dn’t works for me. If I do ctrl+alt+fn+f3 it open a blank screen with cursor on the top left corner.
I nee to open ubuntu in console mode in order to update nvidia driver. Right now its getting stuck at loading screen before the login screen. Please help.
How to boot to console (text) mode with Debian/Ubuntu, Fedora, Arch Linux/Manjaro, etc.
This article describes how to temporarily or permanently boot Linux distributions such as Debian, Ubuntu, Fedora, Arch Linux / Manjaro, etc. in the console mode. The instructions in this article should apply to any Linux distribution using the following versionssystematic(For the permanent mode below) andGNU GRUB(For temporary mode), but I personally only tried it on Debian, Ubuntu, Manjaro and Fedora.
Booting in console mode (text mode/tty) allows you to log in to the system from the command line (as a regular user or root user (if enabled)) without using a graphical user interface. This is useful if the system fails to boot when using graphical mode, or if the Linux running on your computer uses GUI and plugged in via ssh from time to time, so you can save some system resources by starting in text mode. But for whatever reason, this article will show you how to boot to the console/text/tty on Linux.
Situation A. Temporarily boot into console mode (text mode)
Following these instructions, your computer will boot to the console only when it is currently booted. After restarting the computer, it will start normally, so these changes are temporary1. To temporarily boot into console mode (tty), start the computer, and then press and hold immediately after the BIOS/UEFI startup screen Shift (BIOS), or press Esc Press the (UEFI) key repeatedly to access the GRUB menu. 2. After seeing the GNU GRUB screen, select the first item from the menu and press e key. This allows you to edit the kernel parameters before booting.
Find the line starting with linux (Use Up / Down / Left / Right Arrow keys for navigation); vmlinuz It should also be on the same line. At the end of this line (you can use the arrow keys to place the cursor at the beginning of the line and press End To move the cursor to the end of the line), and then add a space after the number 3 . Don’t change anything else.
This one 3 Representative multi-user.target System goalIt maps to the now obsolete old runlevels 2, 3, and 4 (used to start and stop service groups). For example, the old runlevel 5 Map to systemd graphical.target And start using it… You have guessed the graphical (GUI) goal. For more information about system goals, seeThis pageExample 1 This is what the line starting with “linux” for Ubuntu 18.04 LTS looks like (not necessarily the same as you, but you have a good idea):
linux /boot/vmlinuz-4.18.0-15-generic root=UUID=1438eb20-da3d-4880-bb3a-414e+++0a929 ro quiet splash $vt_handoffThis is to add ” 3 at the end:
linux /boot/vmlinuz-4.18.0-15-generic root=UUID=1438eb20-da3d-4880-bb3a-414e+++0a929 ro quiet splash $vt_handoff 3Example #2. This is how to find Fedora 31 from the line starting with “linux” (this is not the same for you, but you have a good idea):
linux ($root)/vmlinuz-5.3.13-300.fc31.x86_64 root=/dev/mapper/fedora_localhost--live-root ro resume=/dev/mapper/fedora_localhost--live-swap rd.lvm.lv=fedora_localhost-live/root rd.lvm.lv=fedora_localhost-live/swap rhgb quietThis is how it looks after adding 3 At the end of the line:
linux ($root)/vmlinuz-5.3.13-300.fc31.x86_64 root=/dev/mapper/fedora_localhost--live-root ro resume=/dev/mapper/fedora_localhost--live-swap rd.lvm.lv=fedora_localhost-live/root rd.lvm.lv=fedora_localhost-live/swap rhgb quiet 33. When finished, press Ctrl + x Either F10 Boot into console (text) mode.
To reboot the system in console mode, use reboot command( sudo reboot ).
It is worth noting that Linux distributions based on Debian and Ubuntu (including Linux Mint, Elementary OS, Pop!_OS, Zorin OS, etc.) have a built-in recovery mode in the GNU GRUB menu. Therefore, if you use Debian/Ubuntu or some Linux distributions based on it, follow the instructions above to enter the GNU GRUB menu, and then select Advanced options , And select the first entry ending in the new list that appears (recovery mode) . Select this entry and click Enter Key, you will enter a menu that, among other things, allows you to enter the root shell prompt-after selecting this menu, the system will continue to boot to the command line instead of the graphical user interface, allowing you to use the root login password. This allows access to the file system in read-only mode. For reading and writing mount -o remount,rw / . For example, use this command to reset a lost user/administrator password on Ubuntu, Linux Mint, Elementary OS, etc.
Case B. Permanently boot into text mode (console mode)
Making your Linux system always boot into the console (text/tty) mode is as simple as running a single command:
sudo systemctl set-default multi-user.targetThis command sets the text mode as the default systemd target (the run level that was called before systemd). After running this command, reboot the system and it will automatically boot into console/text mode every time.
Don’t know the current systemd target used on your system? Using this command, it will display the currently set target:
Extra tip: Using this technique, your Linux computer will boot to tty1 (plain text virtual console). You can switch to other virtual consoles with the following command Ctrl + Alt + F2 For tty2, Ctrl + Alt + F3 For tty3, and so on, until tty7. If you want to undo this change and make the Linux system boot into the default graphics mode, use:
sudo systemctl set-default graphical.targetAfter using this command, restart ( sudo reboot ), and the system should start in graphical mode in the default mode. You might like: How to use Grub Customizer to change the GRUB boot order or default boot entry in Ubuntu, Linux Mint, Debian or Fedora