- Install ZFS Filesystem on Ubuntu 22.04
- How to install the ZFS Filesystem on Ubuntu?
- How to Create the ZFS storage Pools on Ubuntu?
- How to delete the ZFS pools
- Conclusion
- Installing XFS & Creating XFS File System on Ubuntu
- Steps to Install XFS Package in Ubuntu
- Steps to Create XFS File System in Ubuntu
- Install ZFS File System on Ubuntu 18.04 LTS
- Installing ZFS Filesystem
- Setting Up ZFS RAID 0 Pool
- Changing the Mount Point of Existing ZFS Pool
- Removing a ZFS Pool
- About the author
- Shahriar Shovon
Install ZFS Filesystem on Ubuntu 22.04
ZFS is an advanced-level file system to create storage pools that can store and manage the data. The management of data indicates that ZFS is not a filesystem but a volume manager as well. ZFS(Zettabyte File System) was initially launched with Sun Microsystems, and later it was a part of the Linux distributions and the macOS. But now, it is only being used with some of the Linux distributions and some Unix operating systems.
In this blog, we will explain how to install the ZFS filesystem on Ubuntu 22.04. Before that, we want to shed some light on the distinctive features of the ZFS filesystem:
- It is designed to store a huge amount of data without any loss.
- It can store multiple copies of data and metadata, which will help recover the data.
- Allows the automatic rollback of the data.
- Most internal parameters can be customized according to the user’s ease.
Let’s start the installation method:
How to install the ZFS Filesystem on Ubuntu?
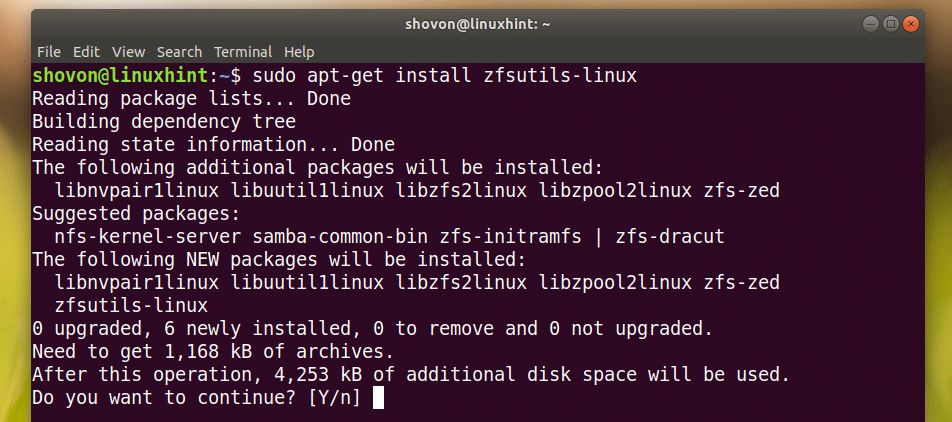
ZFS utilities are supported by the default repository of Ubuntu 22.04. To get it, we will be using the command line interface. Firstly, open the terminal using the shortcut key “CTRL+ALT+T” and use the below-mentioned command to get ZFS and all its supportive packages:
$ sudo apt install zfsutils-linux -y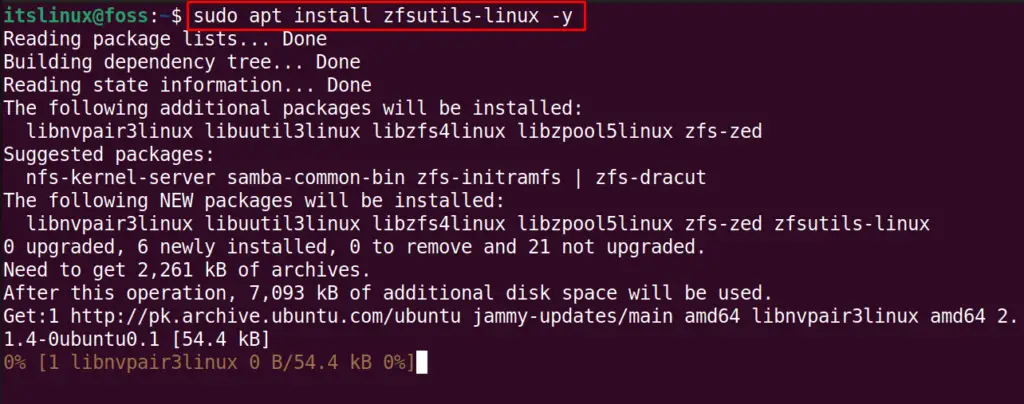
When the installation is completed, verify it by checking the version as follows:
How to Create the ZFS storage Pools on Ubuntu?
To deal with the huge amount of data, it creates the storage pool in which data is stored and managed. Moreover, these pools are known as zpools and the ZFS storage pools. We will first display all the attached storage devices so that we can choose the drive to make a ZFS storage pool. To display the list of storage devices, use the command:
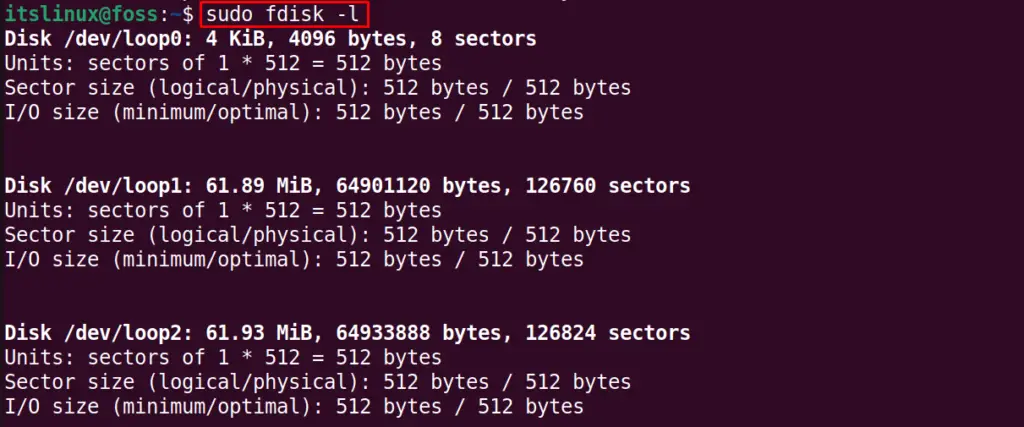
Note down the name of the drive to which you want to make a zpool. Before making them zpool, let’s look at the types of zpools:
- Stripped: All the data is stored in the form of strips in a storage device.
- Mirror: The copy of replicas of the stored data in the specified storage device.
If you want to create a stripped zpool then you have to follow the syntax:
Just replace the “” with any good name and type the name of the drive(s) which you want to make the zpool.
Similarly, use the following syntax to create a mirror zpool:
Now, use the command mentioned below to find the location of the “itsfoss_device”:
To list down the zpool devices, we will use the command:

Similarly, to find out the status of the zpools, run the command:
How to delete the ZFS pools
If you want to delete the storage device of the zpool, use the command whose general syntax will be:
$ sudo zpool destroy pool_nameReplace the “pool_name” with the actual name of the zpool to delete that specific pool.
That’s all from this guide!
Conclusion
The ZFS Filesystem is used in the Linux and Unix-based operating systems and is used to combine a file system with a volume manager. The ZFS filesystem and all its utilities can be installed on Ubuntu 22.04 using the command “sudo apt install zfsutils-linux -y”. This post has demonstrated the method to install the ZFS filesystem on Ubuntu. Alongside this, you have learned to create or delete the ZFS pools.
TUTORIALS ON LINUX, PROGRAMMING & TECHNOLOGY
Installing XFS & Creating XFS File System on Ubuntu
XFS file system gives its user many advantages and is becoming one of the preferred file systems. It is now also the default file system in RHEL 7. We have got many requests to make a tutorial on creating XFS filesystem on Ubuntu as by default XFS package is not present in Ubuntu.
In this tutorial, we will learn how to install the XFS package in Ubuntu, create xfs filesystem and then mount it.
Ubuntu versions, though its package is not installed by default and we will have to install the package first. Read about advantage and disadvantage of XFS filesystem at Ubuntu wiki page.
Steps to Install XFS Package in Ubuntu
1. Verify if the “xfsprogs package” is installed or not on your server. Also, if the package is not installed on the server, you will not find “mkfs.xfs” command.
apt list --installed | grep -i xfs
2. Now, install the xfsprogs package if not present. Below is the command to do that and output from our Ubuntu terminal.
[email protected]:~# apt-get install xfsprogs Reading package lists. Done Building dependency tree Reading state information. Done The following additional packages will be installed: libreadline5 Suggested packages: xfsdump attr quota The following NEW packages will be installed: libreadline5 xfsprogs 0 upgraded, 2 newly installed, 0 to remove and 288 not upgraded. Need to get 696 kB of archives. After this operation, 3,744 kB of additional disk space will be used. Do you want to continue? [Y/n] y Get:1 http://us.archive.ubuntu.com/ubuntu xenial/main amd64 libreadline5 amd64 5.2+dfsg-3build1 [99.5 kB] Get:2 http://us.archive.ubuntu.com/ubuntu xenial-updates/main amd64 xfsprogs amd64 4.3.0+nmu1ubuntu1.1 [597 kB] Fetched 696 kB in 1s (443 kB/s) Selecting previously unselected package libreadline5:amd64. (Reading database . 177984 files and directories currently installed.) Preparing to unpack . /libreadline5_5.2+dfsg-3build1_amd64.deb . Unpacking libreadline5:amd64 (5.2+dfsg-3build1) . Selecting previously unselected package xfsprogs. Preparing to unpack . /xfsprogs_4.3.0+nmu1ubuntu1.1_amd64.deb . Unpacking xfsprogs (4.3.0+nmu1ubuntu1.1) . Processing triggers for libc-bin (2.23-0ubuntu9) . Processing triggers for man-db (2.7.5-1) . Setting up libreadline5:amd64 (5.2+dfsg-3build1) . Setting up xfsprogs (4.3.0+nmu1ubuntu1.1) . update-initramfs: deferring update (trigger activated) Processing triggers for libc-bin (2.23-0ubuntu9) . Processing triggers for initramfs-tools (0.122ubuntu8.8) . update-initramfs: Generating /boot/initrd.img-4.10.0-28-generic [email protected]:~#
[email protected]:~ # apt list --installed | grep -i xfs WARNING: apt does not have a stable CLI interface. Use with caution in scripts. xfsprogs/xenial-updates,now 4.3.0+nmu1ubuntu1.1 amd64 [installed]
Steps to Create XFS File System in Ubuntu
3. Now, once you have installed the XFS package following the above steps, now it is time to create your XFS file system. Take the block device and format it using “mkfs.xfs” command as given below.
[email protected]:~# mkfs.xfs /dev/sdb meta-data=/dev/sdb isize=512 agcount=4, agsize=32768 blks = sectsz=512 attr=2, projid32bit=1 = crc=1 finobt=1, sparse=0 data = bsize=4096 blocks=131072, imaxpct=25 = sunit=0 swidth=0 blks naming =version 2 bsize=4096 ascii-ci=0 ftype=1 log =internal log bsize=4096 blocks=855, version=2 = sectsz=512 sunit=0 blks, lazy-count=1 realtime =none extsz=4096 blocks=0, rtextents=0 [email protected]:~#
4. Now, once your block device is formatted as XFS, you can mount it using “mount” command.
[email protected]:~# mount /dev/sdb /mnt [email protected]:~# df -hP /mnt Filesystem Size Used Avail Use% Mounted on /dev/sdb 509M 27M 483M 6% /mnt
In the above example, we have mounted the file system temporarily, to mount it permanently put its entry in /etc/fstab file.
This is how simply you can install the XFS package and create your XFS filesystem.
We hope you enjoyed reading this tutorial and parallelly you have installed XFS and created your XFS file system. In case of any problem or doubt, please let us know through your comments and email. Do not forget to subscribe to Storage Tutorials and follow us on social networking websites like Twitter, Facebook, etc.
Install ZFS File System on Ubuntu 18.04 LTS
![]()
In this article, I will show you how to install and setup ZFS Filesystem on Ubuntu 18.04 LTS. Let’s get started.
Installing ZFS Filesystem
First you have to make sure that main, restricted, universe and multiverse software sources of the official Ubuntu package repository are enabled.
To do that, run the following command:

Press to continue.
As you can see from the marked section of the screenshot below, I have all of these software sources enabled.

If you don’t have these enabled, run the following commands to add them one by one:
$ sudo apt-add-repository main
$ sudo apt-add-repository restricted
$ sudo apt-add-repository universe
$ sudo apt-add-repository multiverse
Now run the following command to update the apt package repository cache:

The package repository cache should be updated.
Now you can run the following command to install ZFS Filesystem on Ubuntu 18.04 LTS:

Now press y and then press to continue.
ZFS Filesystem should be installed.
Setting Up ZFS RAID 0 Pool
In this section I will show you how to set up a ZFS RAID 0 Pool.
In RAID 0, you add some hard drives, and they are added together to make a single large virtual drive.
For example, if you setup 3 units of 1 TB hard drives in RAID 0 pool, it will be a single 3 TB virtual hard drive. All the data you write to it will be divided into the 3 drives equally. It will make the write speed 3 times faster than it is for 1 drive. The same goes for the read speed. That’s the advantages of RAID 0 setup.
But there is a disadvantage of RAID 0. If one of these 3 drives fail, all your data will be lost.
You can check the status of the ZFS pools you have configured with the following command:
As you can see, I have no pools available yet.

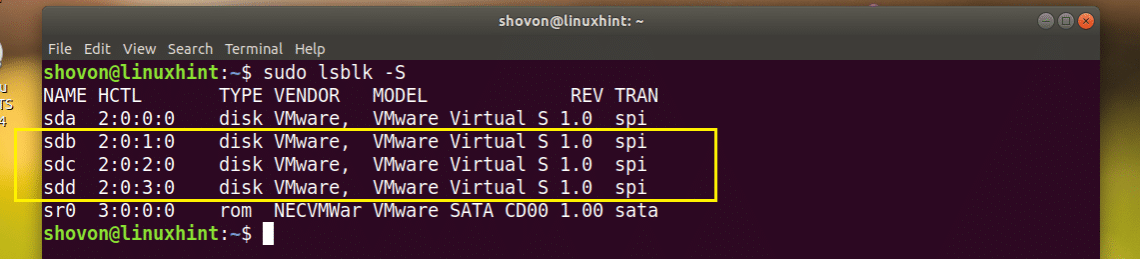
I will show you how to configure your first ZFS pool now. But before that, make sure you have at least 2 hard drives installed on your computer. It is required for RAID 0.
I installed 3 virtual hard drives (8 GB of size) on my Ubuntu 18.04 LTS VMware virtual machine as you can see in the screenshot below. I can access them as /dev/sdb, /dev/sdc, /dev/sdd
Now let’s create our first ZFS pool. I am going to call it files. Of course you can call it something else if you want.
Run the following command to create a ZFS pool files in RAID 0 setup:

ZFS pool files should be created.
Now you can run the following command to list your ZFS pool:

As you can see from the marked section of the screenshot below, the NAME of the pool is files and the SIZE is 23.8 GB (8 GB x 3 = 24 GB)

Your newly created files ZFS pool should be mounted on /files automatically as you can see from the output of the df command.

By default, /files mount point is only writeable by the user root. If you want to make /files writable by your own user and group, you can do so by running the following command:
NOTE: Here USERNAME and GROUPNAME are your login USERNAME and GROUPNAME. Usually they are the same.

As you can see from the screenshot below, the ownership of /files directory changed.

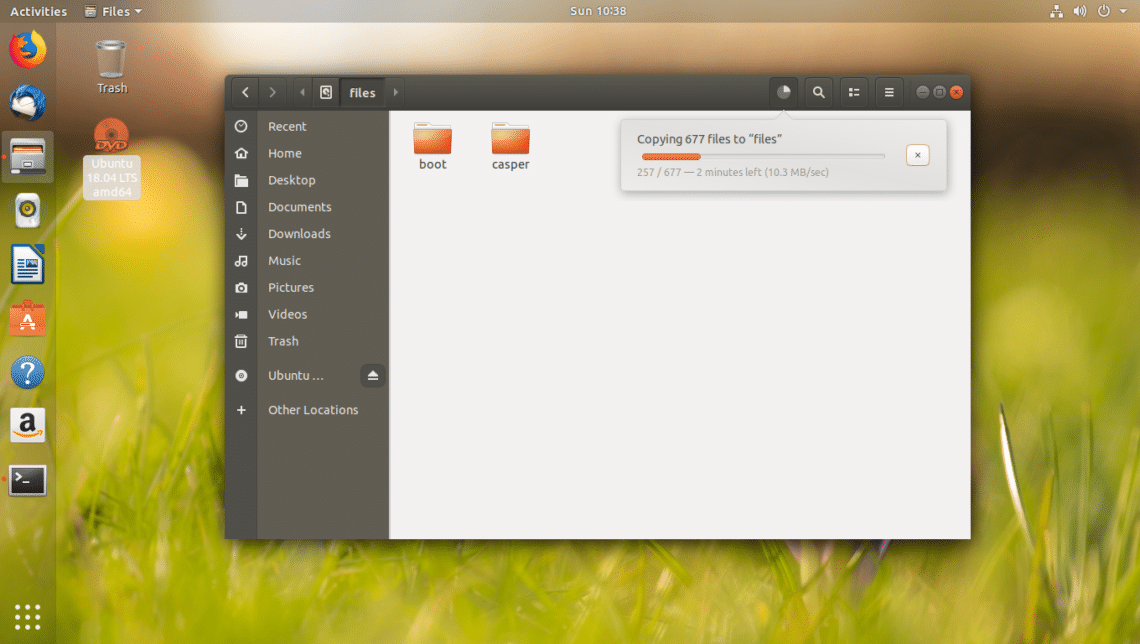
As you can see from the screenshot below, I can now copy and paste files into the /files directory as an ordinary user.
Changing the Mount Point of Existing ZFS Pool
By default, a ZFS pool is mounted on /ZFSPoolName.
For example, if the pool name is files, then it will be mounted on /files.
If you want, you can mount it somewhere else on your filesystem.
For example, if you want to mount files ZFS pool to /var/www, you can do so with the following command:

NOTE: Make sure the directory where you want to mount the ZFS pool exists before you run this command.
As you can see from the output of the df command, the mount point is changed to /var/www

Removing a ZFS Pool
In this section I will show you how to remove the files ZFS pool you just created.
You can run the following command to remove the files ZFS pool:

As you can see from the screenshot below, the files ZFS pool was removed.

That’s how you install and setup ZFS Filesystem on Ubuntu 18.04 LTS. Thanks for reading this article.
About the author
Shahriar Shovon
Freelancer & Linux System Administrator. Also loves Web API development with Node.js and JavaScript. I was born in Bangladesh. I am currently studying Electronics and Communication Engineering at Khulna University of Engineering & Technology (KUET), one of the demanding public engineering universities of Bangladesh.