- Install Ubuntu on WSL2 on Windows 10
- 2. Install WSL
- 3. Download Ubuntu
- The one line install!
- 4. Configure Ubuntu
- 5. Install your first package
- 6. Customising your Terminal with Windows Terminal Preview
- 7. Enjoy Ubuntu on WSL!
- Further Reading
- How To Install Ubuntu Along With Windows
- Install Ubuntu in dual boot with Windows 10 & Windows 8
- Step 1: Create a live USB or disk
- Step 2: Boot in to live USB
- Step 3: Start the installation
- Step 4: Prepare the partition
- Step 5: Create root, swap and home
- Step 6: Follow the trivial instructions
Install Ubuntu on WSL2 on Windows 10
NOTE: As of November 2022, the Windows 10 version of WSL has migrated to support the Windows Store application, bringing feature parity across Windows 10 and Windows 11. Please check out our updated Install Ubuntu on Windows 10 and Windows 11 tutorial for the latest information. This tutorial is now deprecated.
Windows Subsystem for Linux (WSL) allows you to install a complete Ubuntu terminal environment in minutes on your Windows machine, allowing you to develop cross-platform applications without leaving Windows.
In this tutorial, we’ll show you how to get up and running with Ubuntu on WSL. These instructions will work on both Windows 10 or Windows 11.
Whilst WSL is a powerful tool for all users, some features, such as the ability to run graphical Linux applications, are only available on Windows 11. Please check out our Windows 11 tutorial for more information.
2. Install WSL
Installing WSL is now easier than ever. Search for Windows PowerShell in your Windows search bar, then select Run as administrator.
At the command prompt type:
And wait for the process to complete.
For WSL to be properly activated, you will now need to restart your computer.
3. Download Ubuntu
WSL supports a variety of Linux distributions, including the latest Ubuntu release, Ubuntu 20.04 LTS and Ubuntu 18.04 LTS. You can find them by opening the Microsoft store app and searching for Ubuntu.
Choose the distribution you prefer and then click on Get as shown in the following screenshot:
Ubuntu will then install on your machine.
The one line install!
There is a single command that will install both WSL and Ubuntu at the same time.
When opening PowerShell for the first time, simply modify the initial instruction to:
This will install both WSL and Ubuntu! Don’t forget to restart your machine before continuing.
Once installed, you can either launch the application directly from the store or search for Ubuntu in your Windows search bar.
4. Configure Ubuntu
Congratulations, you now have an Ubuntu terminal running on your Windows machine!
If Ubuntu returns an error during this initial installation, then the most common issue is that virtualisation is disabled in your device’s BIOS menu. You will need to turn this on during your device’s boot sequence. The location of this option varies by manufacturer, so you will need to refer to their documentation to find it.
Once Ubuntu has finished its initial setup you will need to create a username and password (this does not need to match your Windows user credentials).
Finally, it’s always good practice to install the latest updates with the following commands, entering your password when prompted.
Press Y when prompted.
5. Install your first package
Installing packages on Ubuntu is as easy as using a single command. Below, you will see how to install bpython, a simple python interpreter for trying out ideas, featuring some nice usability features like expected parameters and autocompletion.
To check that you have the latest package lists, type:
To run the application type:
6. Customising your Terminal with Windows Terminal Preview
Since you’re likely to be using your Ubuntu terminal a fair bit, it’s always nice to do some customisation. We recommend installing Windows Terminal Preview to get the most user-friendly setup. You can find it in the Microsoft Store.
Windows Terminal allows you to open multiple Terminal instances as tabs, so you can have PowerShell running alongside Ubuntu. It also includes a number of customisation options. In the below screenshot, we’ve changed the tab name and colour, and configured the terminal appearance to use the Tango Dark theme and the Ubuntu font!
These customisations can be applied universally using the Appearance menu in Settings or to individual profiles which each have their own Appearance menu. Try it yourself to find something you feel comfortable with!
7. Enjoy Ubuntu on WSL!
That’s it! In this tutorial, you’ve seen how to install WSL and Ubuntu, set up your profile, and install your first package. You also got some tips on how to customise your experience.
We hope you enjoy working with Ubuntu inside WSL. Don’t forget to check out our blog for the latest news on all things Ubuntu.
Further Reading
How To Install Ubuntu Along With Windows
Brief: This detailed guide shows you how to dual boot Ubuntu with Windows legacy BIOS systems. If you are not sure, read this to know if you have BIOS or UEFI system.
Continuing my experimentation with different Linux distribution, I installed Xubuntu last week. Xubuntu is a variant of Ubuntu with Xfce desktop environment instead of the default Unity. Light on resources, Xubuntu can be a good Linux alternative of Windows XP.
I prefer to install Linux in dual boot with Windows. I hardly use Windows but it gives me sort of back up if I mess up with things. Dual booting Linux with Windows is always suggestible for the beginners. In this tutorial, we shall see how to install Ubuntu in dual boot mode with Windows.
This guide covers system with BIOS. You can read this article for dual booting Windows 10 and Ubuntu with UEFI.
Ubuntu, Xubuntu, which one is it? Don’t be confused. The steps given here are equally applicable to Ubuntu, Xubuntu or even Linux Mint.
Before we see how to dual boot Ubuntu with Windows, let me give you some important details.
First, I had Windows 7 installed with 3 partitions on it. Later I installed Linux on it in dual boot mode. I changed the partition and kept around 100 GB of total 320 GB for Linux installation. In the course of time, I upgraded to Windows 8 and subsequently to Windows 8.1. I never had to face the problem of Windows 8′s secure boot thingy. It is just to clarify that this process does not show you how to deal with UEFI .
Install Ubuntu in dual boot with Windows 10 & Windows 8
Follow the steps below to install Ubuntu in dual boot with Windows:
Step 1: Create a live USB or disk
Download and create a live USB or DVD. In Windows, my favorite tool to create a live USB is Universal USB Installer.
Step 2: Boot in to live USB
Plug the live USB or disk in to the computer and restart the computer. While booting the computer press F10 or F12 function key (defers from computer to computer) to go to the boot menu. Now, choose the option to boot from USB or Removable Media.
Step 3: Start the installation
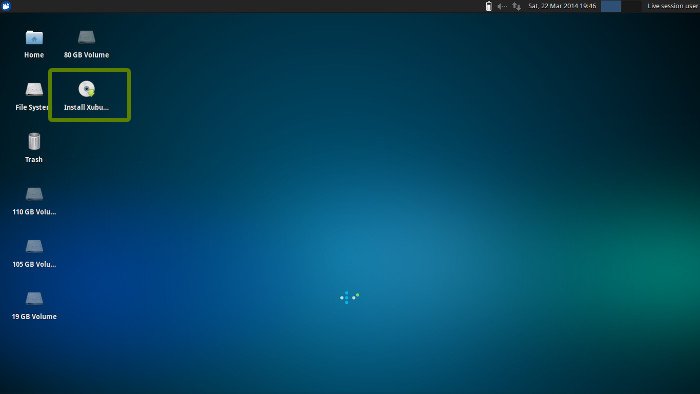
It will take some time to boot in to the live USB or disk. Once booted, you will be immediately provided with option to either try Ubuntu or install Ubuntu. Even if you choose to try, you can find the option to install on the desktop:
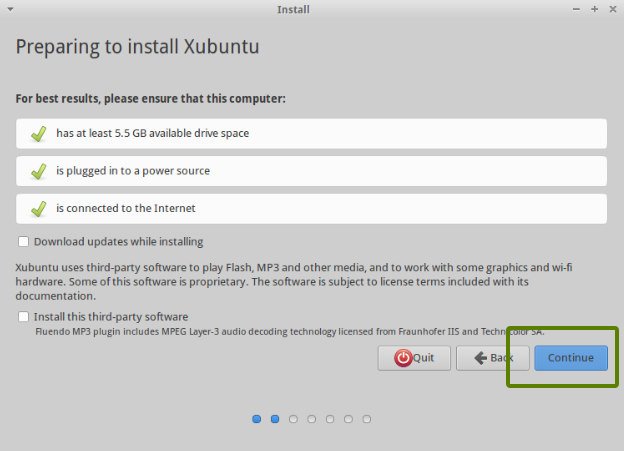
First few screens are pretty straight forward. Just choose press continue:
Step 4: Prepare the partition
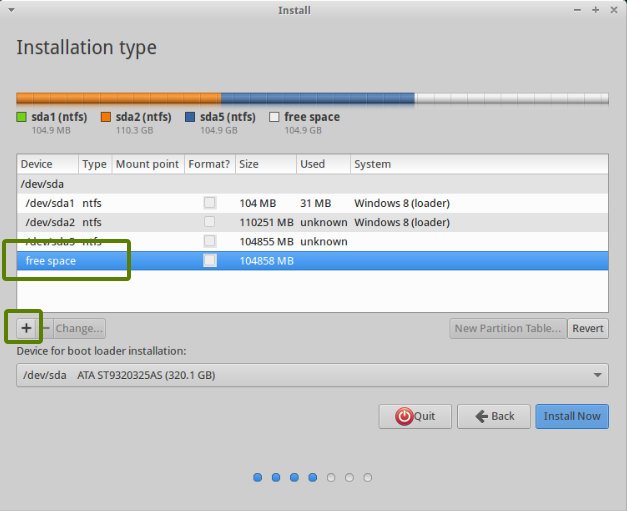
This is the most important part of the whole dual boot installation. Where to install Ubuntu? Windows is already installed here, so, we’ll prepare a new partition for Ubuntu. In the Installation Type window, choose Something Else:
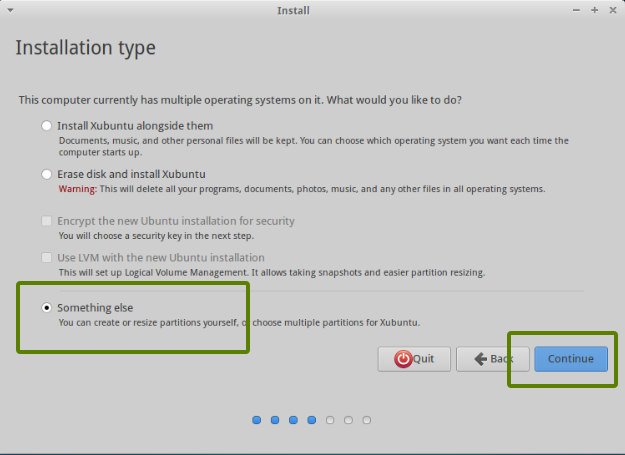
As you can see, I have 3 NTFS and some ext4 partitions. If you don’t have ext4 partition, don’t worry, we don’t need that. As you can see in the picture below, one of the NTFS partition consists of Windows installation. This should be untouched if you want to keep your Windows installation safe.
I presume that you have more than one NTFS (or FAT 32) partitions (i.e. Drives in Windows term) on your hard disk, with one of them consisting of Windows installation (usually C drive). What you need to do here is to delete a NTFS or existing ext4 partition and create some free space. This will delete all the data in that partition and this is why I asked you to verify if you have Windows installed in a different partition.
Click on the desired partition and press the – to delete the partition.

Step 5: Create root, swap and home
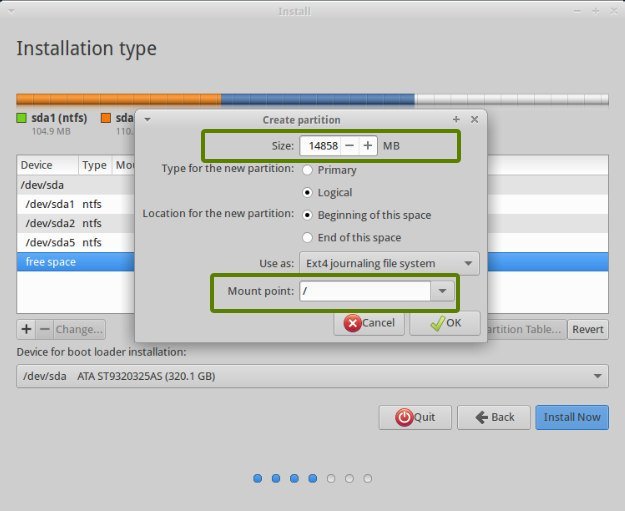
Once you have some free space on your hard drive, its time to install Ubuntu on it. Now, there are several ways to do it. But I prefer to have a Root, a Swap and a Home.
The root should be at least 15 GB for a comfortable use. If you have more disk space, increase the root size. Suppose you have 100 GB of disk space. You can easily devote 30 GB of space to root.
Create a root partition first. Choose the free space available and click on +.
Here, choose the size of root directory (keep it 20 GB or more), choose ext4file system, and mount point as / (i.e. root):
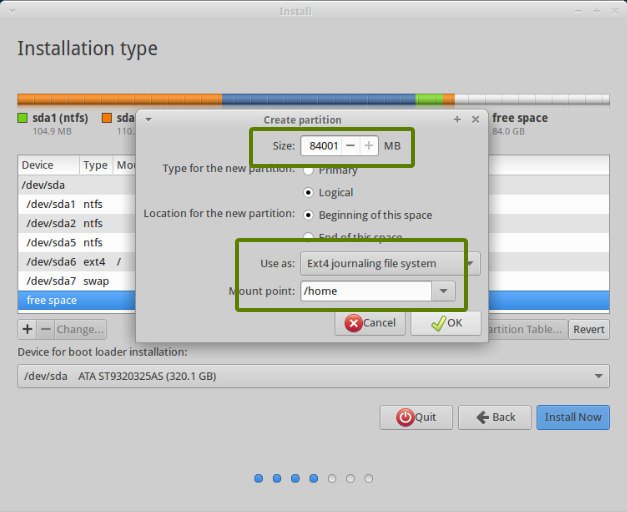
Next step is to create swap partition. It is advised by many that Swap should be double of your system’s RAM size. You can choose the swap size accordingly.

The next step is to create Home. Try to allocate the maximum size to Home because this is where you’ll be downloading and keeping the files.
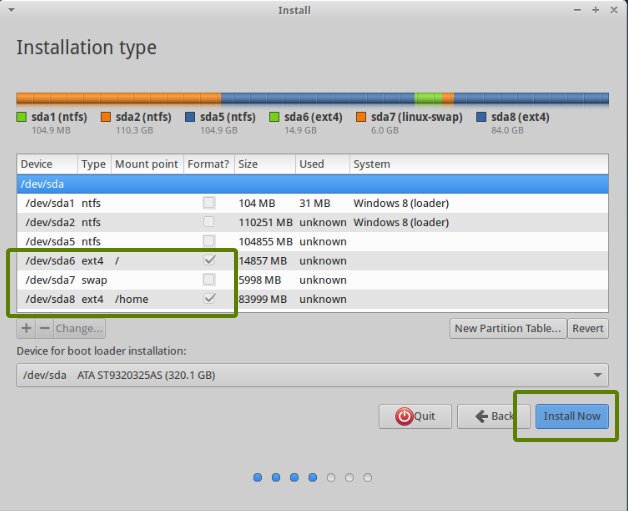
Once you have created Root, Swap and Home partitions, click on Install Now button.
Step 6: Follow the trivial instructions
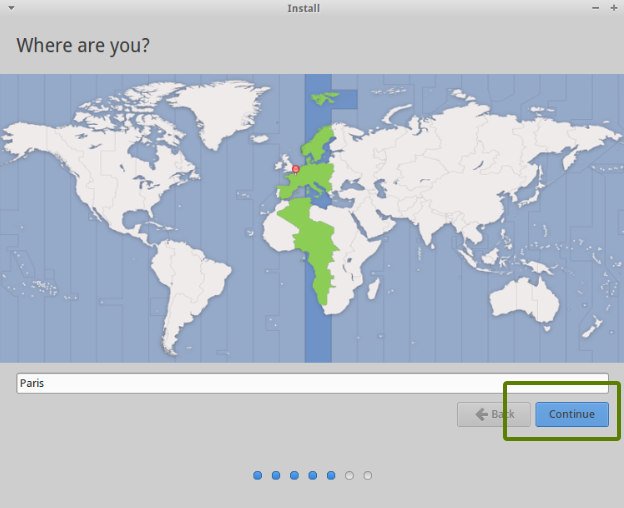
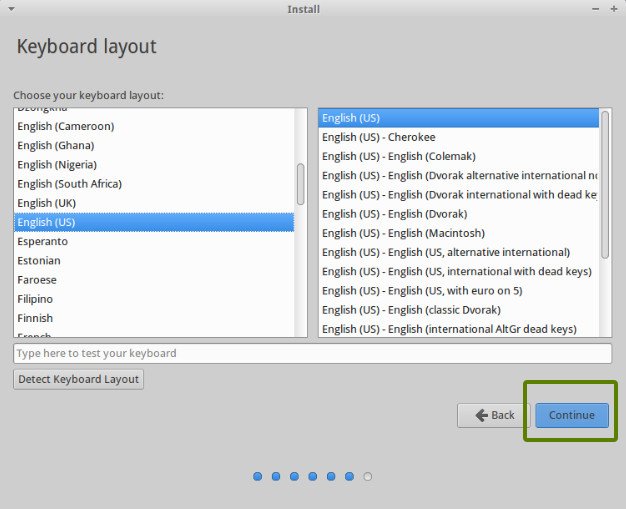
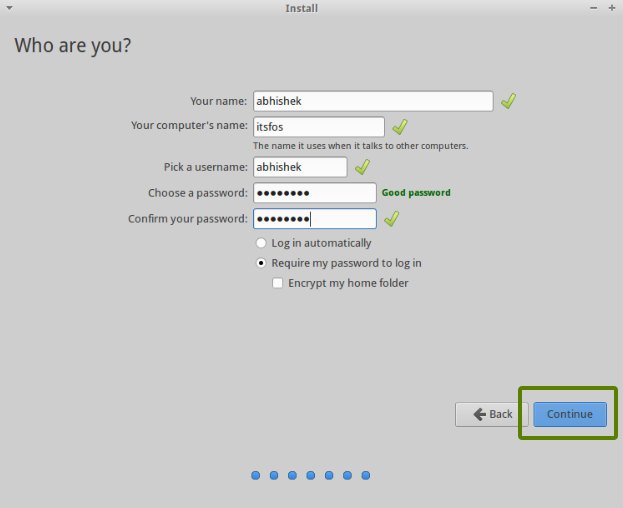
If you successfully created the partitions as mentioned above, you have almost won the battle. Rest is just some trivial steps to follow. You will be taken through a number of screens to select options like keyboard layout, login credentials etc. You don’t have to be a genius to figure out what to do here afterwards. I have attached screenshots for reference purpose here.

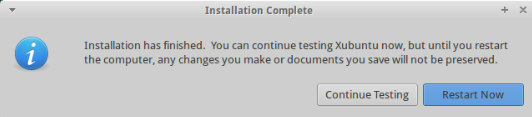
Once the installation is over, you will be presented with the option to keep trying live version or to restart the system.
And that’s it. On next boot, you will see the option of Ubuntu in the grub screen. And thus you can enjoy the beautiful, beginner friendly and world’s most popular Linux distribution. I hope you found this guide to dual boot Ubuntu with Windows helpful. If you need, you can change the boot order easily to make Windows your default OS. Since you have just installed Ubuntu 14.04, you can check out things to do after installing Ubuntu.
If you have questions, suggestions or a word of thanks, feel free to drop a comment.