- Как сделать загрузочную флешку linux через rufus?
- Установка
- Rufus
- Download
- System Requirements:
- Supported Languages:
- Usage
- Notes on DOS support:
- Notes on ISO Support:
- Frequently Asked Questions (FAQ)
- License
- Changelog
- Source Code
- Donations
- (1) Non exhaustive list of ISOs Rufus is known to work with
- Create a bootable USB stick with Rufus on Windows
- 2. Requirements
- 3. USB selection
- 4. Select the Ubuntu ISO file
- 5. Write the ISO
- 6. Additional downloads
- 7. Write warnings
- 8. Writing the ISO
- 9. Installation complete
- Finding help
Как сделать загрузочную флешку linux через rufus?
Rufus — небольшая программа для создания переносных установочных и загрузочных дисков. Он завоевал популярность благодаря тому, что работает быстрее своих конкурентов и не требует установки. Это делает его идеальным инструментом для восстановления компьютеров после сбоя и для создания загрузочных флешек.
Теперь доступна версия Rufus 3.8, которая представляет интересную новинку с точки зрения пользователей Windows. Программа может самостоятельно загружать ISO-образы систем Windows 10, а затем автоматически готовить Flash-диски, с которых систему можно будет установить на компьютер. Руфус использует сценарий Fido, который также доступен отдельно.
Весь процесс очень прост. После запуска Rufus вы можете решить, выбрать ли ISO для записи с диска, или он должен загрузить образ из самой сети. В последнем случае у нас есть выбор из двух версий Windows в разных редакциях (Home, Pro, Education) и компиляциях. Для Widnows 10 это будут 1809, 1803, 1707 и несколько более старых.
Следующим шагом будет выбор системного языка. Вам все еще нужно подключить флешку к компьютеру и указать Rufus в качестве целевого диска. После этого шага Rufus выполнит всю работу автоматически, и пользователь сможет продолжить установку системы.
Установка
Создание установочных дисков Linux происходит так же, как и раньше. Для начала вам необходимо самостоятельно скачать образ выбранного дистрибутива, а затем пройти все шаги по старинке. Кто знает, может быть со временем Rufus также будет автоматически загружать образы различных дистрибутивов Linux.
Более продвинутые возможности Руфуса также остались неизменными. При создании загрузочного диска вы можете выбрать схему таблицы разделов (GPT, MBR), файловую систему и ее параметры. Рекомендуемый нами сайт для загрузки дистрибутивов: comss.ru. На этом сайте вы всегда сможете найти любые версии Linux и Windows.
Теперь приступим к созданию загрузочной флешки с помощью этой программы. Для более комфортного использования установки дистрибутивов Linux желательно иметь под рукой флеш-накопитель объемом не менее 4 ГБ. Пошаговая инструкция:
1) Запускаем программу Rufus.
2) Если ваша флешка была подсоединена к вашему устройству, Rufus сам определит ее автоматически. Или в противном случае в верхней строке программы выбираем самостоятельно флеш-накопитель.
3) Вторая строка — «Метод загрузки». Здесь вам будет предложено выбрать файл ISO Linux, который вы должны предварительно скачать.
4)Следующие строки — «Схема раздела», «Целевая система» рекомендуется оставить по умолчанию. Эти изменения нужно использовать лишь в том случае, если вы продвинутый пользователь.
![[rufus icon]](data:image/svg+xml,%3Csvg%20xmlns='http://www.w3.org/2000/svg'%20viewBox='0%200%200%200'%3E%3C/svg%3E) Rufus
Rufus
![[rufus icon]](https://rufus.ie/pics/rufus-128.png) Rufus
Rufus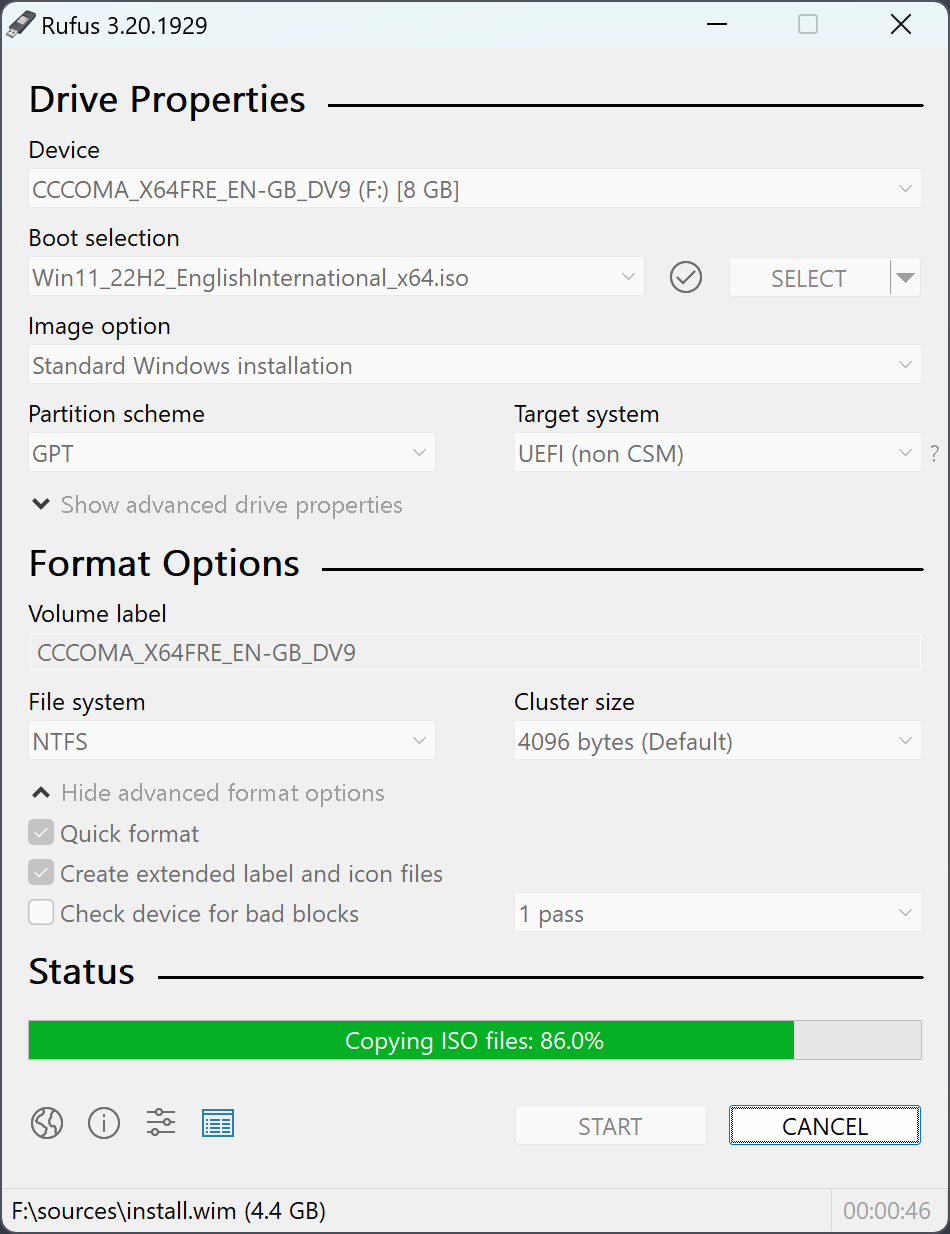
Rufus is a utility that helps format and create bootable USB flash drives, such as USB keys/pendrives, memory sticks, etc.
It can be especially useful for cases where:
- you need to create USB installation media from bootable ISOs (Windows, Linux, UEFI, etc.)
- you need to work on a system that doesn’t have an OS installed
- you need to flash a BIOS or other firmware from DOS
- you want to run a low-level utility
Despite its small size, Rufus provides everything you need!
A non exhaustive list of Rufus supported ISOs is also provided at the bottom of this page. (1)
Download
| Link | Type | Platform | Size | Date |
|---|---|---|---|---|
| rufus-4.1.exe | Standard | Windows x64 | 1.3 MB | 2023.05.31 |
| rufus-4.1p.exe | Portable | Windows x64 | 1.3 MB | 2023.05.31 |
| rufus-4.1_x86.exe | Standard | Windows x86 | 1.4 MB | 2023.05.31 |
| rufus-4.1_arm64.exe | Standard | Windows ARM64 | 4.5 MB | 2023.05.31 |
| rufus-4.2_BETA.exe | BETA | Windows x64 | 1.4 MB | 2023.07.10 |
System Requirements:
Windows 8 or later. Once downloaded, the application is ready to use.
Supported Languages:
| Bahasa Indonesia | , | Bahasa Malaysia | , | Български | , | Čeština | , | Dansk | , | Deutsch | , | Ελληνικά | , |
| English | , | Español | , | Français | , | Hrvatski | , | Italiano | , | Latviešu | , | Lietuvių | , | Magyar | , | Nederlands | , | Norsk | , |
| Polski | , | Português | , | Português do Brasil | , | Русский | , | Română | , | Slovensky | , | Slovenščina | , | Srpski | , |
| Suomi | , | Svenska | , | Tiếng Việt | , | Türkçe | , | Українська | , | 简体中文 | , | 正體中文 | , | 日本語 | , | 한국어 | , | ไทย | , |
| עברית | , | العربية | , | پارسی | . |
I will take this opportunity to express my gratitude to the translators who made it possible for Rufus, as well as this webpage, to be translated in various languages. If you find that you can use Rufus in your own language, you should really thank them!
Usage
Download the executable and run it – no installation is necessary.
The executable is digitally signed and the signature should state:
- «Akeo Consulting» (v1.3.0 or later)
- «Pete Batard — Open Source Developer» (v1.2.0 or earlier)
Notes on DOS support:
If you create a DOS bootable drive and use a non-US keyboard, Rufus will attempt to select a keyboard layout according to the locale of your system.
Notes on ISO Support:
All versions of Rufus since v1.1.0 allow the creation of a bootable USB from an ISO image (.iso).
Creating an ISO image from a physical disc or from a set of files is very easy to do however, through the use of a CD burning application, such as the freely available InfraRecorder or CDBurnerXP.
Frequently Asked Questions (FAQ)
A Rufus FAQ is available HERE.
To provide feedback, report a bug or request an enhancement, please use the GitHub issue tracker. Or you can send an e-mail.
License
GNU General Public License (GPL) version 3 or later.
You are free to distribute, modify or even sell the software, insofar as you respect the GPLv3 license.
Rufus is produced in a 100% transparent manner, from its public source, using a MinGW32 environment.
Changelog
- Version 4.1 (2023.05.31)
- Add timeouts on enumeration queries that may stall on some systems
- Restore MS-DOS drive creation through the download of binaries from Microsoft
- Update the log button icon
- Fix UEFI:NTFS incompatibility with Windows Dev Kit 2023 platform
- Fix more GRUB out of range pointer errors with Ubuntu/Fedora when booting in BIOS mode
Source Code
$ git clone https://github.com/pbatard/rufus
If you are a developer, you are very much encouraged to tinker with Rufus and submit patches.
Donations
Since I’m getting asked about this on regular basis, there is no donation button on this page.
The main reason is that I feel that the donation system doesn’t actually help software development and worse, can be guilt-inducing for users who choose not to donate.
Instead, I think that «mécénat» ; or developer patronage, from companies which benefit most from a healthy FLOSS ecosystem, is what we should be aiming for. This is because, unless they are backed by a company, developers who want to provide quality Open Source software cannot realistically sustain full time development, no matter how generous their software users are.
Also, unless you are blocking them (hint, hint), you’ll notice that there are ads on this page, which I consider sufficient revenue enough.
Finally the fact that I have the freedom to develop Free Software in my spare time should indicate that I’m well-off enough, and therefore that you should direct your generosity towards people who need it a lot more than I do. If you really insist, you can always make a donation to the Free Software Foundation, as they are the main reason software like Rufus is possible.
At any rate, I’ll take this opportunity to say thank you for your continuing support and enthusiasm about this little program: it is much appreciated!
But please continue to feel free to use Rufus without any guilt about not contributing for it financially – you should never have to!
(1) Non exhaustive list of ISOs Rufus is known to work with
Create a bootable USB stick with Rufus on Windows
This tutorial will show you how to create a bootable USB stick on Microsoft Windows using Rufus.
For most users we recommend balenaEtcher instead of Rufus which is simpler to use and also available on MacOS and Ubuntu. Instructions are now included in the primary Install Ubuntu Desktop tutorial.
Creating a bootable Ubuntu USB stick from Microsoft Windows is very simple and we’re going to cover the process in the next few steps.
Alternatively, we also have tutorials to help you create a bootable USB stick from both Ubuntu and Apple macOS.

2. Requirements
- A 4GB or larger USB stick/flash drive
- Microsoft Windows XP or later
- Rufus, a free and open source USB stick writing tool
- An Ubuntu ISO file. See Get Ubuntu for download links

Take note of where your browser saves downloads: this is normally a directory called ‘Downloads’ on your Windows PC. Don’t download the ISO image directly to the USB stick! If using Windows XP or Vista, download version 2.18 of Rufus.
3. USB selection
Perform the following to configure your USB device in Rufus:
- Launch Rufus
- Insert your USB stick
- Rufus will update to set the device within the Device field
- If the Device selected is incorrect (perhaps you have multiple USB storage devices), select the correct one from the device field’s drop-down menu

You can avoid the hassle of selecting from a list of USB devices by ensuring no other devices are connected.
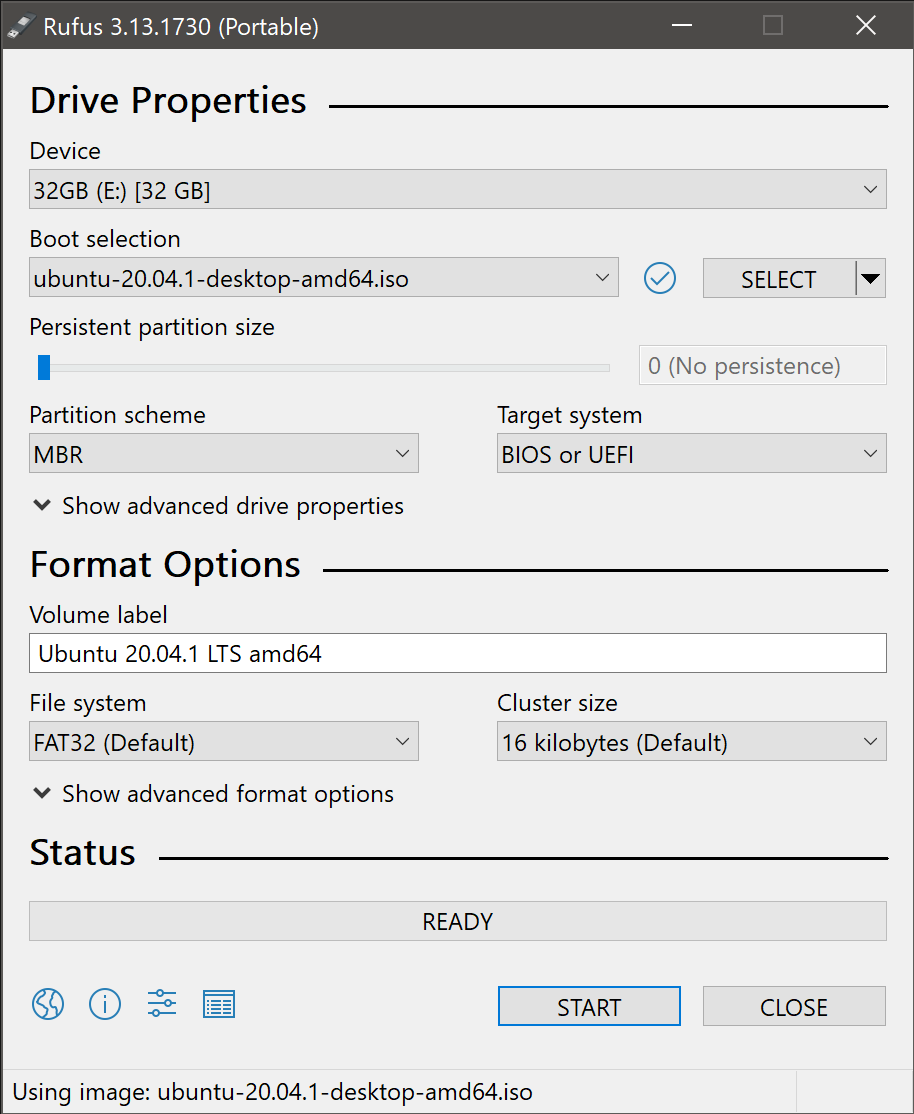
4. Select the Ubuntu ISO file
To select the Ubuntu ISO file you downloaded previously, click the SELECT to the right of “Boot selection”. If this is the only ISO file present in the Downloads folder you will only see one file listed.
Select the appropriate ISO file and click on Open.

5. Write the ISO
The Volume label will be updated to reflect the ISO selected.
Leave all other parameters with their default values and click START to initiate the write process.

6. Additional downloads
You may be alerted that Rufus requires additional files to complete writing the ISO. If this dialog box appears, select Yes to continue.

7. Write warnings
You will then be alerted that Rufus has detected that the Ubuntu ISO is an ISOHybrid image. This means the same image file can be used as the source for both a DVD and a USB stick without requiring conversion.
Keep Write in ISO Image mode selected and click on OK to continue.

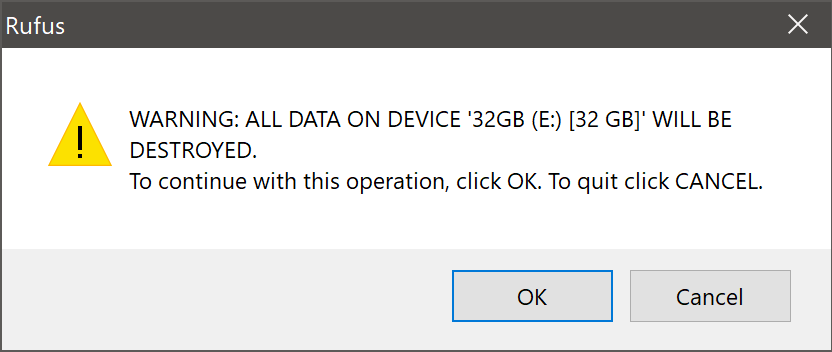
Rufus will also warn you that all data on your selected USB device is about to be destroyed. This is a good moment to double check you’ve selected the correct device before clicking OK when you’re confident you have.

If your USB stick contains multiple partitions Rufus will warn you in a separate pane that these will also be destroyed.
8. Writing the ISO
The ISO will now be written to your USB stick, and the progress bar in Rufus will give you some indication of where you are in the process. With a reasonably modern machine, this should take around 10 minutes. Total elapsed time is shown in the lower right corner of the Rufus window.
9. Installation complete
When Rufus has finished writing the USB device, the Status bar will be filled green and the word READY will appear in the center. Select CLOSE to complete the write process.
Congratulations! You now have Ubuntu on a USB stick, bootable and ready to go.
To use it you need to insert the stick into your target PC or laptop and reboot the device. It should recognise the installation media automatically during startup but you may need to hold down a specific key (usually F12) to bring up the boot menu and choose to boot from USB.
For a full walkthrough of installing Ubuntu, take a look at our install Ubuntu desktop tutorial.
Finding help
If you get stuck, help is always at hand: